NETGEAR XE102 - Wall-Plugged EN Bridge User Manual Download Page 4

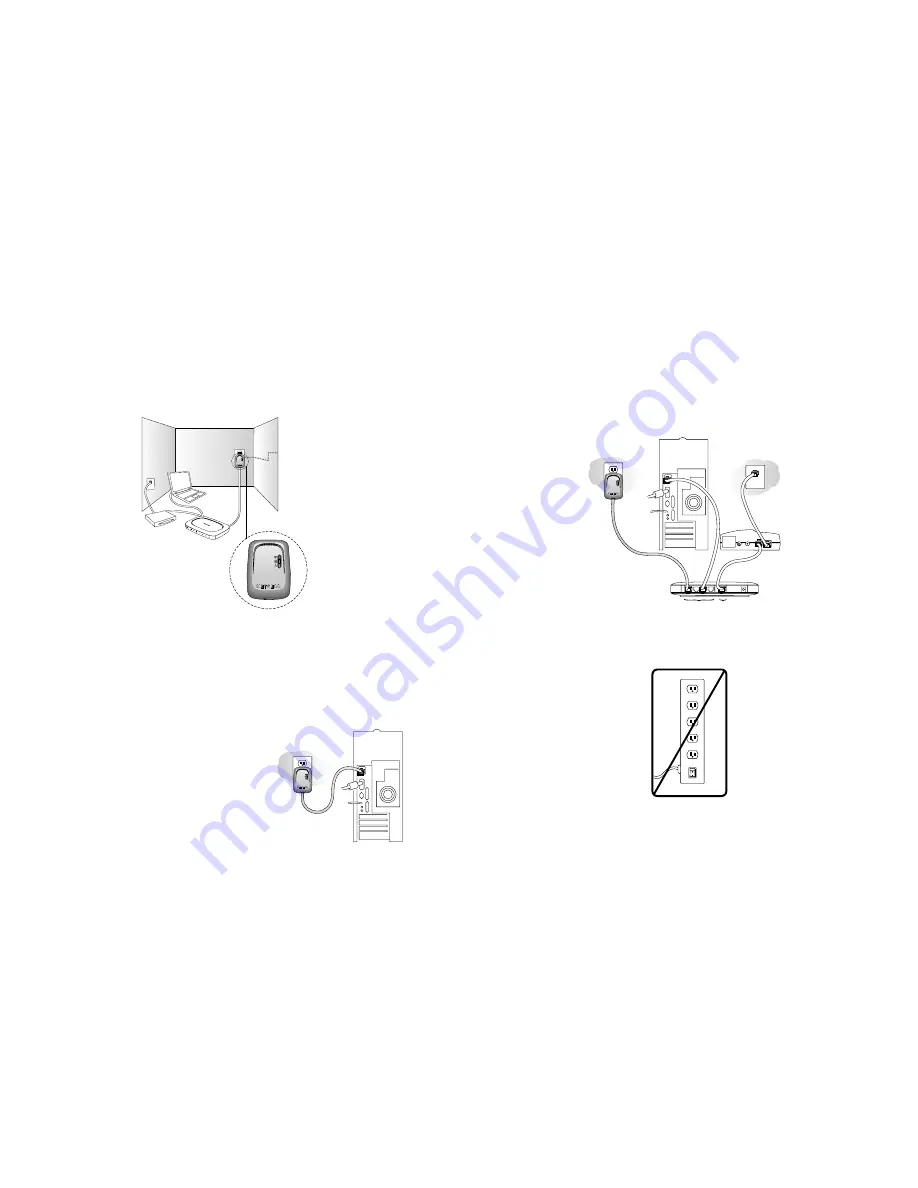
Connecting the Ethernet Bridge to a Cable/DSL router

1.  Connect the XE102 Ethernet Bridge into a wall socket that is within a reasonable distance to

your computer when using the Ethernet Cable.

2.  Connect the enclosed standard Ethernet Cable to the Ethernet port of the XE102 Ethernet

Bridge.

3.  Connect the other end of the cable to an available Ethernet LAN port of the Cable/

DSL/Wireless Router.

Note: Do not connect the XE102 Ethernet Bridge into a power strip or surge protector as
this may prevent the bridge from working properly or degrade the network performance. 

In order to share a Broadband or Dial-up Networking connection between computers using an
Ethernet Bridge you will need:

One (1) Wall-Plugged Ethernet Bridge device attached to each computer

Standard Cable/DSL Modem

Standard Cable/DSL Ethernet or Wireless Router 

Installing the XE102 

Connecting the Ethernet Bridge to a PC

1.  Connect the XE102 Ethernet Bridge into a wall socket that is within a reasonable distance to

your computer when using the Ethernet Cable.

2.  Connect the enclosed standard Ethernet Cable

to the Ethernet port of the XE102 Ethernet
Bridge.

3.  Connect the other end of the cable to the

Ethernet port of the PC.

5

4

2

2

Home Office

XE102

Router

Cable/DSL 
Modem

Wall-Plugged Ethernet Bridge XE102

Notebook
PC

Wall-Plugged 
Ethernet Bridge 
XE102

Router

LAN

Ports

WAN

Port

Cable/DSL
Modem

Wall-Plugged 
Ethernet 
Bridge XE102

WARNING!

OFF

ON

Summary of Contents for XE102 - Wall-Plugged EN Bridge

Page 1: ...User s Guide Wall Plugged Ethernet Bridge XE102...

Page 2: ...rate at its highest data rate capability It s an excellent choice for web surfing playing games or telecommuting over the Internet It is safe and reliable It s also a great way to compliment you exist...

Page 3: ...e device attached to each computer Important Safety Instructions for the XE102 Wall Plugged Ethernet Bridge The following precautions should be taken when using this product Read all instructions befo...

Page 4: ...Networking connection between computers using an Ethernet Bridge you will need One 1 Wall Plugged Ethernet Bridge device attached to each computer Standard Cable DSL Modem Standard Cable DSL Ethernet...

Page 5: ...and 15 Setting Up Your Encryption Software Highly Suggested The XE102 Wall Plugged Ethernet Bridge provides the option to set your own unique encryption network password Important features The encrypt...

Page 6: ...Netgear Powerline device that you are installing on your network write this number down EXAMPLE Device Location Bedroom PWD MX96 DHEE U9Y3 BXJB 4 Choose the default location select Next or select Cha...

Page 7: ...e passwords on these products you must use the Advanced tab and have them located remote from this computer Go to the Security Tab in the Powerline Encryption Utility dialog box To change the password...

Page 8: ...ble method of changing the password for devices attached to your network Go to the Advanced Tab in the Powerline Encryption Utility dialog box There are two general steps 1 Add devices to the Remote P...

Page 9: ...Socket Check to see if a wall switch is in the Off position thereby disabling power to that outlet Make sure that the Wall Plugged Ethernet Bridge is firmly installed into a 110 Vac Wall Socket Power...

Page 10: ...el XE102 Wall Plugged Ethernet Bridge does not exceed the Class B limits for radionoise emissions from digital apparatus as set out in the Radio Interference Regulations of the Canadian Department of...

Page 11: ...other countries E mail support NETGEAR com www NETGEAR com January 2003 U 10008 01 U 1 0 0 0 8 0 1 2003 NETGEAR Inc NETGEAR the Netgear logo The Gear Guy and Everybody s Connecting are trademarks or r...

Reviews: