background image

genie Basic Settings

25

 N150 4-Port Wireless Router JNR1010

6. 

Select a filtering level radio button and click 

Next

.

7. 

Click the T

ake me to the status screen

 button.

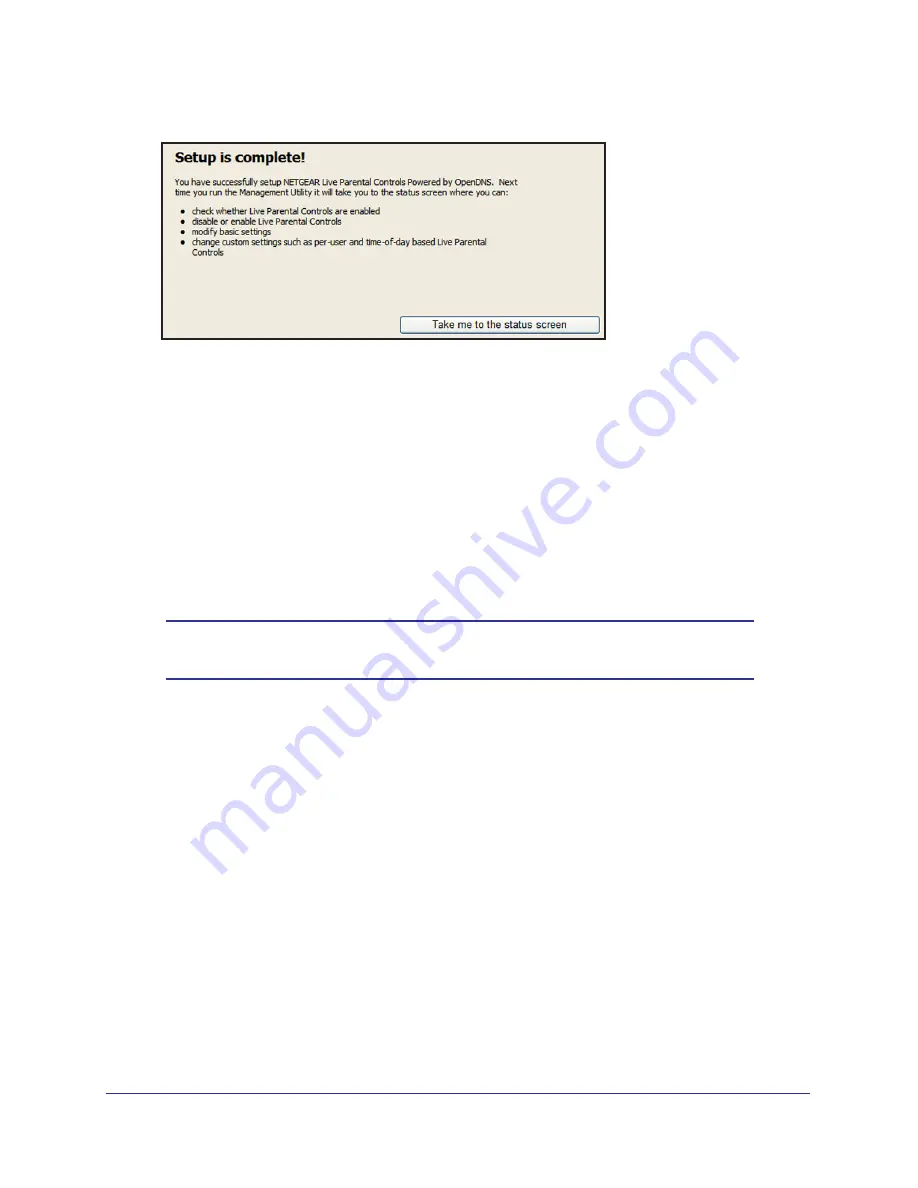
Parental controls are now set up for the router. The Dashboard shows Parental Controls 
as enabled.

Basic Wireless Settings

The Wireless Settings screen lets you view or configure the wireless network setup.

The N150 4-Port Wireless Router comes with preset security. This means that the Wi-Fi 
network name (SSID), network key (password), and security option (encryption protocol) are 
preset in the factory. You can find the preset SSID and password on the bottom of the unit. 

Note:  

The preset SSID and password are uniquely generated for every 

device to protect and maximize your wireless security.

If you change your preset security settings, make a note of the new settings and store it in a 
safe place where you can easily find it.

If you use a wireless computer to change the wireless network name (SSID) or other wireless 
security settings, you are disconnected when you click Apply. To avoid this problem, use a 
computer with a wired connection to access the router.

Summary of Contents for JNR1010

Page 1: ...350 East Plumeria Drive San Jose CA 95134 USA August 2012 202 11017 01 v1 0 N150 4 Port Wireless Router JNR1010 User Manual ...
Page 2: ...formation card Trademarks NETGEAR the NETGEAR logo and Connect with Innovation are trademarks and or registered trademarks of NETGEAR Inc and or its subsidiaries in the United States and or other countries Information is subject to change without notice Other brand and product names are registered trademarks or trademarks of their respective holders 2012 NETGEAR Inc All rights reserved Statement o...

Page 3: ... 13 NETGEAR genie Setup 13 Use NETGEAR genie After Installation 14 Upgrade Router Firmware 15 Router Dashboard Basic Home Screen 15 Join Your Wireless Network 16 WPS Method 16 Manual Method 17 NETGEAR genie App and Mobile genie App 17 Chapter 3 genie Basic Settings Internet Setup 20 Internet Setup Screen Fields 21 Attached Devices 22 Parental Controls 23 Basic Wireless Settings 25 Wireless Setting...

Page 4: ...55 Wireless AP 57 View Logs of Web Access or Attempted Web Access 58 Manage the Configuration File 59 Back Up Settings 59 Restore Configuration Settings 59 Erase 60 Set Password 60 Chapter 7 Advanced Settings Advanced Wireless Settings 62 Restrict Wireless Access by MAC Address 63 Wireless Repeating Function WDS 64 Wireless Repeating Function 66 Set Up the Base Station 67 Set Up a Repeater Unit 68...

Page 5: ...the Router 87 Cannot Access the Internet 88 Your Router Cannot Obtain an IP Address from the ISP 88 Your Router Can Obtain an IP Address from the ISP But Cannot Access the Inter net 89 Troubleshooting PPPoE 89 Troubleshooting Internet Browsing 90 Changes Not Saved 90 Wireless Connectivity 91 Wireless Signal Strength 91 Restore the Factory Settings and Password 91 Troubleshoot Your Network Using th...

Page 6: ... contains the following sections Unpack Your Router Position Your Router Hardware Features The NETGEAR genie app provides easy installation from an iPad tablet computer or smartphone It includes a personal dashboard allowing you to manage monitor and repair your home network NETGEAR customers can download the app at www netgear com genie or from the Google Play or App Store For more information ab...

Page 7: ...case you need to return the product for repair Position Your Router The router lets you access your network from virtually anywhere within the operating range of your wireless network However the operating distance or range of your wireless connection can vary significantly depending on the physical placement of your router For example the thickness and number of walls the wireless signal passes t...

Page 8: ... other materials such as glass insulated walls fish tanks mirrors brick and concrete can also affect your wireless signal When you use multiple access points it is better if adjacent access points use different radio frequency channels to reduce interference The recommended channel spacing between adjacent access points is 5 channels for example use Channels 1 and 6 or 6 and 11 Hardware Features B...

Page 9: ...adio is turned off Internet Solid green The Internet connection has been established Blinking green There is traffic on the Internet port Off No Internet connection Ethernet 1 2 3 4 Solid green The LAN port has detected an Ethernet link with a device such as a computer Blinking green Data is being transmitted or received Off No link is detected on this port Hardware Setup 9 N150 4 Port Wireless Ro...

Page 10: ...following figure Ethernet Internet Power On Off Power connector port LAN ports 4 Reset button See Factory Settings on page 94 for information about restoring factory settings Label The label on the bottom of the router shows the preset WiFi network name and password login information MAC address and serial number ...

Page 11: ...mplete cabling as described in the installation guide and in the previous chapter This chapter contains the following sections Router Setup Preparation Types of Logins NETGEAR genie Setup Use NETGEAR genie After Installation Upgrade Router Firmware Router Dashboard Basic Home Screen Join Your Wireless Network NETGEAR genie App and Mobile genie App ...

Page 12: ...n to set up your router and to check that your Internet configuration is correct The ISP configuration information for your DSL account ISP login name and password Fixed or static IP address settings special deployment by ISP this situation is rare When your Internet service starts your Internet service provider ISP typically gives you all the information needed to connect to the Internet If you c...

Page 13: ...e been successfully completed It takes about 15 minutes to complete To use NETGEAR genie to set up your router 1 Turn the router on by pressing the On Off button if not done yet 2 Make sure that your device is connected with an Ethernet cable wired or wirelessly with the preset security settings listed on the bottom label to your router 3 Launch your Internet browser The first time that you set up...

Page 14: ... persist register your NETGEAR product and contact NETGEAR technical support Use NETGEAR genie After Installation When you first set up your router NETGEAR genie automatically starts when you launch an Internet browser on a computer that is connected to the router You can use NETGEAR genie again if you want to view or change settings for the router 1 Launch your browser from a computer or wireless...

Page 15: ... finishes restarting and the Power LED has stopped blinking for several seconds Router Dashboard Basic Home Screen The router Basic Home screen has a dashboard that lets you see the status of your Internet connection and network at a glance You can click any of the five sections of the dashboard to view more detailed information The left column has the menus and an Advanced tab is at the top Use t...

Page 16: ...nd product documentation These links work once you have an Internet connection Join Your Wireless Network Choose either the manual or the WPS method to join your wireless network See Guest Networks on page 28 for instructions for how to set up a guest network WPS Method Wi Fi Protected Setup WPS lets you connect to a secure WiFi network without typing its password Instead you press a button or ent...

Page 17: ...password is on the router label If you changed these settings look for the network name that you used 3 Enter the router password and click Connect NETGEAR genie App and Mobile genie App The genie app is the easy dashboard for managing monitoring and repairing your home network It allows you to automatically repair common wireless network problems It also provides easy access to router features li...

Page 18: ...TGEAR genie 18 N150 4 Port Wireless Router JNR1010 You can use the genie mobile app on your iPhone iPad or Android phone Log in to the router Information about genie mobile app Search NETGEAR support and the connected router ...

Page 19: ...network This chapter explains the features available from the genie Basic Home screen shown in the following figure This chapter contains the following sections Internet Setup Attached Devices Parental Controls Basic Wireless Settings Guest Networks FastLane ...

Page 20: ...r Internet connection require a login section as follows Yes Select the encapsulation method and enter the login name If you want to change the login time out enter a new value in minutes No Enter the account and domain names only if needed 3 Enter the settings for the IP address and DNS server The default settings usually work fine If you have problems with your connection check the ISP settings ...

Page 21: ... Your ISP uses DHCP to assign your IP address Your ISP automatically assigns these addresses Use Static IP Address Enter the IP address IP subnet mask and the gateway IP address that your ISP assigned The gateway is the ISP s router to which your router will connect Domain Name Server DNS Address The DNS server is used to look up site addresses based on their names Get Automatically from ISP Your ...

Page 22: ...network NETGEAR genie displays the following information about devices that are currently connected to your network number The order in which the device joined the network IP Address The IP address that the router assigned to this device when it joined the network This number can change if a device is disconnected and rejoins the network MAC Address The unique MAC address for each device does not ...

Page 23: ...t Live Parental Controls or download the application To set up Live Parental Controls 1 Select Parental Controls on the Dashboard screen 2 Click either the Windows Users or Mac Users button 3 Follow the onscreen instructions to download and install the NETGEAR Live Parental Controls Management Utility After installation Live Parental Controls automatically starts 4 Click Next read the note and cli...

Page 24: ...ct the radio button that applies to you as follows and click Next If you already have an OpenDNS account leave the Yes radio button selected If you do not have an OpenDNS account select the No radio button If you are creating an account the following screen displays Complete the fields and click Next After you log on or create your account the filtering level screen displays ...

Page 25: ...work name SSID network key password and security option encryption protocol are preset in the factory You can find the preset SSID and password on the bottom of the unit Note The preset SSID and password are uniquely generated for every device to protect and maximize your wireless security If you change your preset security settings make a note of the new settings and store it in a safe place wher...

Page 26: ...how up on the Attached Devices screen If it does then it is connected to the network If you are not sure what the network name SSID or password is look on the label on the bottom of your router Wireless Settings Screen Fields You can configure the following wireless settings Region The location where the router is used Select from the countries in the list In the United States the region is fixed ...

Page 27: ...ers If you experience interference experiment with different channels to see which is the best Mode Up to 54 Mbps This legacy mode uses a maximum speed of Mbps for b g networks Up to 65 Mbps Default This neighbor friendly mode does not interfere with neighboring wireless networks Up to 150 Mbps Performance mode uses the maximum wireless N speed of up to 150 Mbps Security Options Settings The Secur...

Page 28: ...rk can use the Internet but cannot access each other or access Ethernet devices on the network Enable SSID Broadcast If this check box is selected the wireless access point broadcasts its name SSID to all wireless stations Stations with no SSID can adopt the correct SSID for connections to this access point Allow guest to access My Local Network If this check box is selected any user who connects ...

Page 29: ...poral Key Integrity Protocol TKIP data encryption implements most of the IEEE 802 11i standard and is designed to work with all wireless network interface cards but not all wireless access points It is superseded by WPA2 PSK WPA2 PSK is stronger than WPA PSK It is advertised to be theoretically indecipherable due to the greater degree of randomness in encryption keys that it generates WPA2 PSK get...

Page 30: ...e 1 On the Basic Home tab select FastLane 2 Select the Turn On FastLane check box 3 Select the amount of bandwidth to be reserved from the drop down list You can choose to reserve 50 60 70 or 80 of the bandwidth 4 Enter the trusted IP address 5 Select the FastLane radio button 6 Click Apply ...

Page 31: ...s also displayed through the Administration menu This chapter contains the following sections Setup Wizard WPS Wizard Setup Menu WAN Setup LAN Setup Quality of Service QoS Setup Some selections on the Advanced Home screen are described in separate chapters Security See Chapter 5 Security Administration See Chapter 6 Administration Advanced Setup See Chapter 7 Advanced Settings ...

Page 32: ...the setup wizard again 1 Log in to the router and select the Advanced tab 2 Select Setup Wizard The following screen displays 3 Select the Yes radio button and click the Next button If you select No you are taken to the Internet Setup screen see Internet Setup on page 20 The following screen displays The Setup Wizard searches your Internet connection for servers and protocols to determine your ISP...

Page 33: ...WPS button on this screen or press the WPS button on the side of the router Within 2 minutes go to the wireless client and press its WPS button to join the network without entering a password To use the PIN method select the PIN Number radio button enter the client security PIN and click Next Within 2 minutes go to the client device and use its WPS software to join the network without entering a p...

Page 34: ...LAN Setup on page 37 QoS Setup Quality of Service QoS setup See Quality of Service QoS Setup on page 41 WAN Setup The WAN Setup screen lets you configure a DMZ demilitarized zone server change the Maximum Transmit Unit MTU size and enable the router to respond to a ping on the WAN Internet port Select Advanced Setup WAN Setup to view the following screen You can configure the following settings Di...

Page 35: ... prevent some Internet games point to point applications or multimedia applications from functioning Open NAT provides a much less secured firewall but it allows almost all Internet applications to function Default DMZ Server The default DMZ server feature is helpful when you are using some online games and videoconferencing applications that are incompatible with Network Address Translation NAT T...

Page 36: ... the default value In some situations changing the value fixes one problem but causes another Leave the MTU unchanged unless one of these situations occurs You have problems connecting to your ISP or other Internet service and the technical support of either the ISP or NETGEAR recommends changing the MTU setting These web based applications might require an MTU change A secure website that does no...

Page 37: ... not have large email attachments for example 1436 Used in PPTP environments or with VPN 1400 Maximum size for AOL DSL 576 Typical value to connect to dial up ISPs To change the MTU size 1 Select Advanced Setup WAN Setup 2 In the MTU Size field enter a value from 64 to 1500 3 Click Apply to save the settings LAN Setup The LAN Setup screen allows configuration of LAN IP services such as Dynamic Hos...

Page 38: ...llowing screen 2 Enter the settings that you want to customize These settings are described in the following section LAN Setup Screen Settings 3 Click Apply to save your changes LAN Setup Screen Settings You can configure the following LAN settings LAN TCP IP Setup IP Address The LAN IP address of the router IP Subnet Mask The LAN subnet mask of the router Combined with the IP address the IP subne...

Page 39: ...or the pool of IP addresses in the same subnet as the router Address Reservation When you specify a reserved IP address for a computer on the LAN that computer receives the same IP address each time it accesses the router s DHCP server Assign reserved IP addresses to servers that require permanent IP settings Use the Router as a DHCP Server By default the router acts as a DHCP server The router as...

Page 40: ...he same IP address each time it accesses the router s DHCP server Assign reserved IP addresses to computers or servers that require permanent IP settings To reserve an IP address 1 In the Address Reservation section of the screen click the Add button 2 In the IP Address field type the IP address to assign to the computer or server Choose an IP address from the router s LAN subnet such as 192 168 1...

Page 41: ...st effort and background For an application to receive the benefits of WMM QoS both it and the client running that application must have WMM enabled Legacy applications that do not support WMM and applications that do not require QoS are assigned to the best effort category which receives a lower priority than voice and video WMM QoS is enabled by default You can disable it in the QoS Setup screen...

Page 42: ...t Access QoS On check box 2 Click the Setup QoS Rule button to see the existing priority rules You can edit or delete a rule by selecting its radio button and clicking either the Edit or Delete button You can also delete all of the rules by simply clicking the Delete All button 3 To add a priority rule scroll down to the bottom of the QoS Setup screen and click Add Priority Rule to display the fol...

Page 43: ...Type list select either TCP UDP or both TCP UDP Specify the port number or range of port numbers that the application or game uses 7 From the Priority list select the priority for Internet access for this traffic relative to other applications and traffic The options are Low Normal High and Highest 8 Click Apply to save this rule to the QoS Policy list and return to the QoS Setup screen Set up QoS...

Page 44: ...Rule button The QoS Setup screen displays 2 Click Add Priority Rule 3 From the Priority Category list select MAC Address 4 If the device is the MAC Device List select its radio button The information from the MAC Device List populates the policy name MAC Address and Device Name fields If the device is not in the list click Refresh If it still does not appear fill in these fields manually 5 From th...

Page 45: ...up to display the QoS Setup screen 2 Select the radio button next to the QoS policy that you want to edit or delete and do one of the following Click Delete to remove the QoS policy Click Edit to edit the QoS policy Follow the instructions in the preceding sections to change the policy settings 3 Click Apply in the QoS Setup screen to save your changes ...

Page 46: ...e the basic firewall features of the router to prevent objectionable content from reaching the computers and devices on your network This chapter includes the following sections Keyword Blocking of HTTP Traffic Block Services Port Filtering Schedule Blocking Security Event Email Notifications ...

Page 47: ...e Keyword field enter a keyword or domain click Add Keyword and click Apply The Keyword list supports up to 32 entries Following are sample entries Specify XXX to block http www badstuff com xxx html Specify com if you want to allow only sites with domain suffixes such as edu or gov Enter a period to block all Internet browsing access To delete a keyword or domain 1 Select the keyword you want to ...

Page 48: ... in RFC1700 Assigned Numbers Service numbers for other applications are typically chosen from the range 1024 to 65535 by the authors of the application Although the router already holds a list of many service port numbers you are not limited to these choices You can often determine port number information by contacting the publisher of the application by asking user groups or newsgroups or by sear...

Page 49: ...lect User Defined 5 If you know that the application uses either TCP or UDP select the appropriate protocol If you are not sure select Both 6 Enter the starting and ending port numbers If the application uses a single port number enter that number in both fields 7 Select the radio button for the IP address configuration you want to block and enter the IP addresses You can block the specified servi...

Page 50: ...eywords and services Days to Block Select days on which you want to apply blocking by selecting the appropriate check boxes or select Every Day to select the check boxes for all days Time of Day to Block Select a start and end time in 24 hour format or select All Day for 24 hour blocking 3 Select your time zone from the list 4 If you use daylight savings time select the Automatically adjust for da...

Page 51: ... logs and alerts are sent in the Send to This Email Address field This email address is also used for the From address If you leave this field blank log and alert messages are not sent by email 5 If your outgoing email server requires authentication select the My Mail Server requires authentication check box and complete the User Name and Password fields for the outgoing email server 6 To have ema...

Page 52: ... page 80 for information about checking the status of your router over the Internet and Traffic Meter on page 83 for information about monitoring Internet traffic on your router s Internet port This chapter includes the following sections Upgrade the Router Firmware View Router Status View Logs of Web Access or Attempted Web Access Manage the Configuration File Set Password ...

Page 53: ...w firmware and update your router 1 Select Advanced Administration Firmware Update to display the following screen Click Check 2 Click the Check button If new firmware is available the router finds it 3 Click Yes to update and locate the firmware you downloaded the file ends in img WARNING When uploading firmware to the router do not interrupt the web browser by closing the window clicking a link ...

Page 54: ...ion The router model Firmware Version The version of the router firmware It changes if you upgrade the router firmware GUI Language Version The localized language of the user interface MAC Address The Media Access Control address is the unique physical address used by the Ethernet LAN port of the router IP Address The IP address used by the Ethernet LAN port of the router The default is 192 168 1 ...

Page 55: ...tton Click the Show Statistics button to display the following screen The Show Statistics screen provides the following information System Up Time The time elapsed since the router was last restarted Port The statistics for the WAN Internet and LAN Ethernet ports For each port the screen displays the following information Status The link status of the port TxPkts The number of packets transmitted ...

Page 56: ...at the router communicates with DHCP Server The IP address for the Dynamic Host Configuration Protocol server that provides the TCP IP configuration for all the computers that are connected to the router DNS Server The IP address of the Domain Name Service server that provides translation of network names to IP addresses Lease Obtained The date and time when the lease was obtained Lease Expires Th...

Page 57: ... finds the best operating channel available If you notice interference from nearby devices you can select a different channel Channels 1 6 and 11 do not interfere with each other Mode Indicates the wireless communication mode Up to 54 Mbps Up to 65 Mbps default and Up to 150 Mbps Wireless Radio Indicates whether the radio feature of the router is enabled If this feature is not enabled the Wireless...

Page 58: ... 1 Select Advanced Administration Logs The Logs screen displays The log screen shows the following information Date and time The date and time the log entry was recorded Source IP The IP address of the initiating device for this log entry Target address The name or IP address of the website or news group visited or to which access was attempted Action Whether the access was blocked or allowed 2 To...

Page 59: ...gs 1 Select Advanced Administration Backup Settings to display the following screen 2 Click Back Up to save a copy of the current settings 3 Choose a location to store the cfg file that is on a computer on your network Restore Configuration Settings To restore configuration settings that you backed up 1 Enter the full path to the file on your network or click the Browse button to find the file 2 A...

Page 60: ...word and the LAN IP address to 192 168 1 1 and enables the router s DHCP Set Password This feature allows you to change the default password that is used to log in to the router with the user name admin This procedure is not the same as changing the password for wireless access The label on the bottom of your router shows your unique wireless network name SSID and password for wireless access see ...

Page 61: ...ter for unique situations such as when remote access from the Internet by IP or domain name is needed This chapter includes the following sections Advanced Wireless Settings Wireless Repeating Function WDS Port Forwarding and Triggering Set Up Port Forwarding to Local Servers Set Up Port Triggering Dynamic DNS Static Routes Remote Management Universal Plug and Play Traffic Meter ...

Page 62: ... your household can use the router by connecting their computers to the router with an Ethernet cable Enable 20 40 MHZ Coexistence By default this check box is selected so that your wireless network does not interfere with other wireless networks in your area This setting might reduce the maximum speed of your 2 4 GHz wireless network to half when another wireless network is detected in your envir...

Page 63: ...that are allowed to join the wireless network This list is based on the unique MAC address of each computer and device Each network device has a MAC address which is a unique 12 character physical address containing the hexadecimal characters 0 V9 a Vf or A VF only and separated by colons for example 00 09 AB CD EF 01 Typically the MAC address is on the label of the wireless card or network interf...

Page 64: ...ce to the Wireless Card Access List The screen changes back to the list screen 5 Add each computer or device that you want to allow to connect wirelessly 6 Select the Turn Access Control On check box 7 Click the Apply button Wireless Repeating Function WDS You can configure the N150 4 Port Wireless Router to be used as a wireless access point AP which enables it to act as a wireless repeater A wir...

Page 65: ... a remote access point To configure this mode you must know the MAC address of the remote parent access point The JNR1010 router is always in dual band concurrent mode unless you turn off one radio If you enable the wireless repeater in either radio band the wireless base station or wireless repeater cannot be enabled in the other radio band However if you enable the wireless base station in eithe...

Page 66: ... Repeater If your router is the repeater select this check box Repeater IP Address If your router is the repeater enter the IP address of the other access point Disable Wireless Client Association If your router is the repeater selecting this check box means that wireless clients cannot associate with it Only LAN client associations are allowed If you are setting up a point to point bridge select ...

Page 67: ...poke mode The units cannot be daisy chained You must know the wireless settings for both units You must know the MAC address of the remote unit Set up the base station first and then set up the repeater To set up the base station 1 Set up both units with the same wireless settings SSID mode channel and security The wireless security option must be set to None or WEP 2 Select Advanced Advanced Setu...

Page 68: ... IP address must be in the same subnet as the base station but different from the LAN IP address of the base station 5 Click Apply to save your changes 6 Verify connectivity across the LANs A computer on any wireless or wired LAN segment of the router should be able to connect to the Internet or share files and printers with any other wireless or wired computer or server connected to the other acc...

Page 69: ...g this communication session between your computer and the web server at www example com Before sending the web page request message to www example com your router stores the original information and then modifies the source information in the request message performing Network Address Translation NAT The source address is replaced with your router s public IP address This step is necessary becaus...

Page 70: ...ort originates a session An example is Internet Relay Chat IRC Your computer connects to an IRC server at destination port 6667 The IRC server not only responds to your originating source port but also sends an identify message to your computer on port 113 Using port triggering you can tell the router When you initiate a session with destination port 6667 you must also allow incoming traffic on po...

Page 71: ...ort Forwarding to Permit External Host Communications In both of the preceding examples your computer initiates an application session with a server computer on the Internet However you might need to allow a client computer on the Internet to initiate a connection to a server computer on your network Normally your router ignores any inbound traffic that is not a response to your own outbound traff...

Page 72: ...h displays the web page from www example com To configure port forwarding you need to know which inbound ports the application needs You can usually determine this information by contacting the publisher of the application or the relevant user groups and newsgroups How Port Forwarding Differs from Port Triggering The following points summarize the differences between port forwarding and port trigg...

Page 73: ...vice application or game you want to provide Find out the local IP address of the computer that will provide the service The server computer has to always have the same IP address To set up port forwarding Tip To ensure that your server computer always has the same IP address use the reserved IP address feature of your N150 4 Port Wireless Router 1 Select Advanced Setup Port Forwarding Port Trigge...

Page 74: ...vice type 3 Click the Add Custom Service button to display the following screen 4 In the Service Name field enter a descriptive name 5 In the Protocol list select the protocol If you are unsure select TCP UDP 6 In the Starting Port field enter the beginning port number as follows If the application uses a single port enter the same port number in the Ending Port field If the application uses a ran...

Page 75: ...tional Register a host name with a Dynamic DNS service and configure your router to use the name as described in Dynamic DNS on page 77 To access your web server from the Internet a remote user must know the IP address that your ISP assigned However if you use a Dynamic DNS service the remote user can reach your server by a user friendly Internet name such as mynetgear dyndns org Set Up Port Trigg...

Page 76: ...e opening of the inbound ports You can usually get this information by contacting the publisher of the application or user groups or newsgroups To set up port triggering 1 Select Advanced Advanced Setup Port Forwarding Port Triggering 2 Select the Port Triggering radio button to display the port triggering information 3 Clear the Disable Port Triggering check box if it is selected Note If the Disa...

Page 77: ...ISP gave you a permanently assigned IP address you can register a domain name and have that name linked with your IP address by public Domain Name Servers DNS However if your Internet account uses a dynamically assigned IP address you do not know in advance what your IP address will be and the address can change frequently In this case you can use a commercial Dynamic DNS service This type of serv...

Page 78: ...t the Use a Dynamic DNS Service check box 3 Select the name of your Dynamic DNS service provider 4 Type the host name or domain name that your Dynamic DNS service provider gave you 5 Type the user name for your Dynamic DNS account Enter the name that you use to log in to your account not your host name 6 Type the password or key for your Dynamic DNS account 7 If your Dynamic DNS provider allows th...

Page 79: ...f you attempt to access a device on the 134 177 0 0 network your router forwards your request to the ISP The ISP forwards your request to the company where you are employed and the request is likely to be denied by the company s firewall In this case you must define a static route telling your router that 134 177 0 0 should be accessed through the ISDN router at 192 168 1 100 In this example The D...

Page 80: ... metric value This value represents the number of routers between your network and the destination Usually a setting of 2 or 3 works but if this is a direct connection set it to 1 9 Click Apply to add the static route Remote Management The remote management feature lets you upgrade or check the status of your N150 4 Port Wireless Router over the Internet To set up remote management 1 Select Advanc...

Page 81: ... number for the remote web management interface Choose a number from 1024 to 65535 but do not use the number of any common service port The default is 8080 which is a common alternate for HTTP 5 Click Apply to have your changes take effect 6 When accessing your router from the Internet type your router s WAN IP address into your browser s address or location field followed by a colon and the custo...

Page 82: ... durations can compromise the freshness of the device status but can significantly reduce network traffic Advertisement Time to Live The time to live for the advertisement is measured in hops steps for each UPnP packet sent The time to live hop count is the number of steps a broadcast packet is allowed to propagate for each UPnP advertisement before it disappears The number of hops can range from ...

Page 83: ... No restriction is applied when the traffic limit is reached Download only The restriction is applied to incoming traffic only Both Directions The restriction is applied to both incoming and outgoing traffic 4 To limit the amount of data traffic allowed per month specify how many Mbytes per month are allowed or specify how many hours of traffic are allowed 5 Set the Traffic Counter to begin at a s...

Page 84: ... check the NETGEAR support site at http support netgear com for product and contact information This chapter contains the following sections Quick Tips Troubleshooting with the LEDs Cannot Log In to the Router Cannot Access the Internet Changes Not Saved Wireless Connectivity Restore the Factory Settings and Password Troubleshoot Your Network Using the Ping Utility ...

Page 85: ...le the corresponding numbered router LAN port LED is on Wireless Settings Make sure that the wireless settings in the computer and router match exactly For a wirelessly connected computer the wireless network name SSID and wireless security settings of the router and wireless computer must match exactly If you set up an access list in the Advanced Wireless Settings screen you must add each wireles...

Page 86: ...C 1A power adapter that NETGEAR supplied for this product If the Power Test LED blinks slowly and continuously the router firmware is corrupted This condition can happen if a firmware upgrade is interrupted or if the router detects a problem with the firmware If the error persists you have a hardware problem For recovery instructions or help with a hardware problem contact technical support at www...

Page 87: ...ge check the connection from the computer to the router and reboot your computer If your router s IP address was changed and you do not know the current IP address clear the router s configuration to factory defaults Restoring the factory default configuration sets the router s IP address to 192 168 1 1 This procedure is explained in Factory Settings on page 94 Make sure that your browser has Java...

Page 88: ...btain an IP address from the ISP you might need to force your cable or DSL modem to recognize your new router by restarting your network as described in Sequence to Restart Your Network on page 85 If your router is still unable to obtain an IP address from the ISP the problem might be one of the following Your Internet service provider ISP might require a login program Ask your ISP whether they re...

Page 89: ...oot the computer and verify the gateway address You might be running login software that is no longer needed If your ISP provided a program to log you in to the Internet such as WinPoET you no longer need to run that software after installing your router You might need to go to Internet Explorer and select Tools Internet Options click the Connections tab and select Never dial a connection Troubles...

Page 90: ...ave the router configured as its default gateway Reboot the computer and verify that the router address www routerlogin net is listed by your computer as the default gateway address You might be running log in software that is no longer needed If your ISP provided a program to log you in to the Internet such as WinPoET you no longer need to run that software after installing your router You might ...

Page 91: ...see Basic Wireless Settings on page 25 Note Be sure to click Apply if you make changes Wireless Signal Strength If your wireless device finds your network but the signal strength is weak check these conditions Is your router too far from your computer or too close Place your computer near the router but at least 6 feet 1 8 meters away and see whether the signal strength improves Is your wireless s...

Page 92: ... a message like this one Pinging IP address with 32 bytes of data If the path is working you see this message Reply from IP address bytes 32 time NN ms TTL xxx If the path is not working you see this message Request timed out If the path is not functioning correctly you could have one of the following problems Wrong physical connections For a wired connection make sure that the numbered LAN port L...

Page 93: ...computer is assigned by DHCP this information is not visible in your computer s Network Control Panel Verify that the IP address of the router is listed as the default gateway Check to see that the network address of your computer the portion of the IP address specified by the subnet mask is different from the network address of the remote device Check that your cable or DSL modem is connected and...

Page 94: ...y configuration settings shown in the following table Table 3 Factory default settings Feature Default behavior Router login User login URL www routerlogin com or www routerlogin net User name case sensitive admin Login password case sensitive password Internet connection WAN MAC address Use default hardware address WAN MTU size 1500 Port speed AutoSensing Local network LAN LAN IP 192 168 1 1 Subn...

Page 95: ...cluding volume of network traffic building materials and construction and network overhead lower actual data throughput rate Table 4 JNR1010 Router specifications Feature Description Data and routing protocols TCP IP RIP 1 RIP 2 DHCP PPPoE PPTP Dynamic DNS and UPnP Power adapter AC plug is localized 110V 240V 50 60 Hz input All regions output 5V DC 1A output Dimensions 197 x 137 x 30 mm 7 8 x 5 4 ...

Page 96: ...imum computers per wireless network Limited by the amount of wireless network traffic generated by each node typically 50 70 nodes Operating frequency range 2 412 2 462 GHz US 2 412 2 472 GHz Europe ETSI 802 11 security WPA PSK WPA2 PSK and WPA WPA2 Table 4 JNR1010 Router specifications Continued Feature Description ...

Page 97: ... standards EN300 328 2 4Ghz EN301 489 17 EN60950 1 For complete DoC visit the NETGEAR EU Declarations of Conformity website at http support netgear com app answers detail a_id 11621 EDOC in Languages of the European Community Language Statement Cesky Czech NETGEAR Inc tímto prohlašuje že tento Radiolan je ve shode se základními požadavky a dalšími príslušnými ustanoveními smernice 1999 5 ES Dansk ...

Page 98: ...ming is met de essentiële eisen en de andere relevante bepalingen van richtlijn 1999 5 EG Malti Maltese Hawnhekk NETGEAR Inc jiddikjara li dan Radiolan jikkonforma mal htigijiet essenzjali u ma provvedimenti ohrajn relevanti li hemm fid Dirrettiva 1999 5 EC Magyar Hungarian Alulírott NETGEAR Inc nyilatkozom hogy a Radiolan megfelel a vonatkozó alapvetõ követelményeknek és az 1999 5 EC irányelv egy...

Page 99: ...n the USA market only channel 1 11 can be operated Selection of other channels is not possible This device and its antenna s must not be co located or operation in conjunction with any other antenna or transmitter Interference Reduction Table The table below shows the Recommended Minimum Distance between NETGEAR equipment and household appliances to reduce interference in feet and meters Household...

Page 100: ...mic DNS 78 NAT 35 port forwarding 73 port triggering 75 QoS 41 repeater unit 68 user defined services 48 connecting wirelessly 7 country setting 32 crossover cable 86 CTS RTS Threshold 62 custom service port forwarding 74 D dashboard 15 data packets fragmented 36 default DMZ server 35 default factory settings list of 94 default factory settings restoring 60 91 default gateway 56 deleting keywords ...

Page 101: ...creen 21 interval poll 55 IP addresses current 55 DHCP 12 dynamic 77 reserved 40 IP subnet mask 55 K keywords 47 L label product 10 LAN port QoS for 43 LAN setup 37 language setting 32 lease DHCP 56 LEDs described 9 troubleshooting and 86 local servers port forwarding to 73 logging in 12 14 logs emailing 51 viewing 58 M MAC addresses current 55 product label 10 QoS for 44 mail server outgoing 51 m...

Page 102: ...il 51 serial number product label 10 services blocking 48 settings default See default factory settings Setup Wizard 32 sites blocking 47 SMTP server 51 specifications technical 94 SSID described 27 static routes 79 status router viewing 54 subnet mask 55 system up time 55 T technical specifications 94 technical support 2 Temporal Key Integrity Protocol TKIP 29 time to live advertisement 82 time o...

Page 103: ... 66 base station 67 repeater unit 68 wireless security options 29 wireless settings 25 checking for correct 85 SSID broadcast 26 WMM Wi Fi Multimedia 41 WPA encryption 29 WPA2 encryption 29 WPA2 PSK encryption 29 WPA PSK WPA2 PSK mixed mode 29 WPS button 16 WPS PSK encryption 29 WPS PSK WPA2 PSK encryption 29 ...

Reviews: