background image

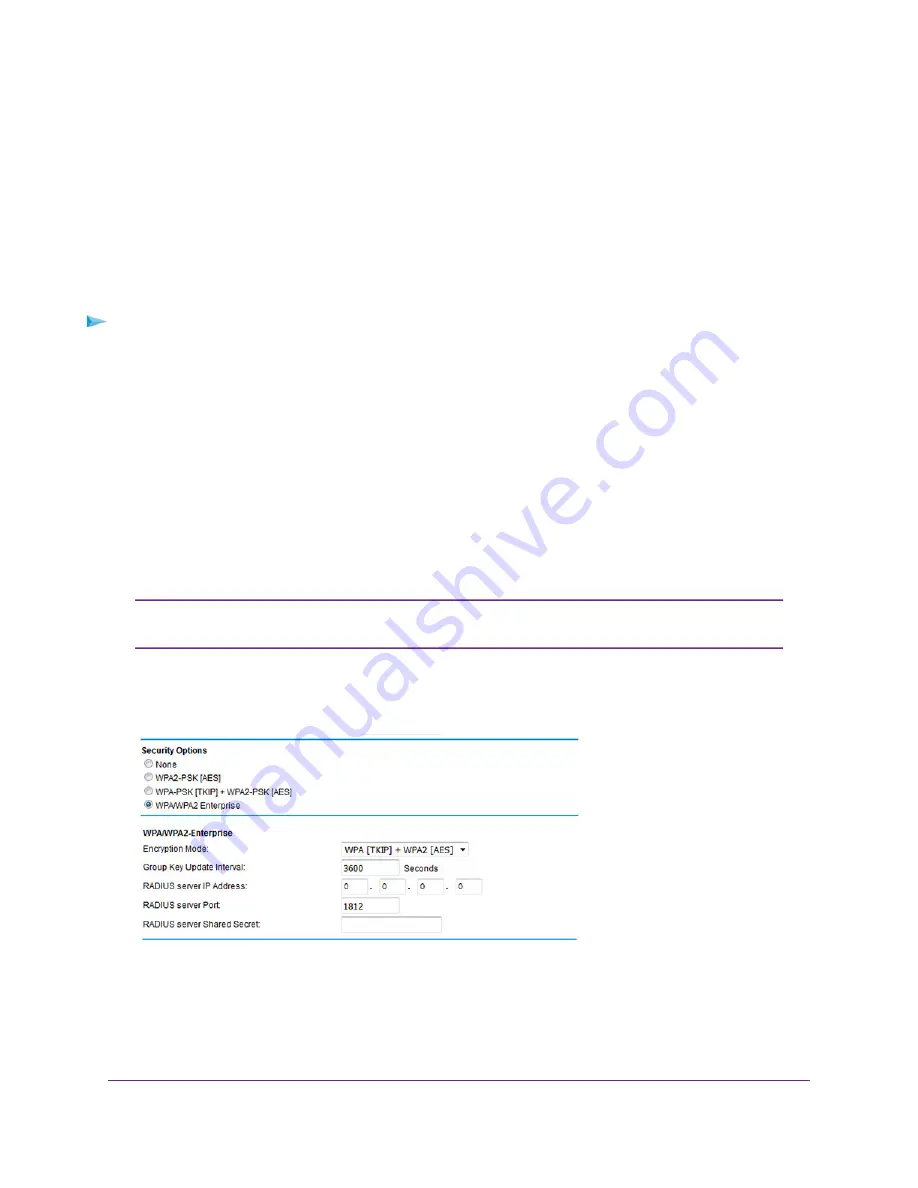
Configure WPA/WPA2 Enterprise WiFi Security

Remote Authentication Dial In User Service (RADIUS) is an enterprise-level method for centralized
Authentication, Authorization, and Accounting (AAA) management. To enable the modem router to provide
WPA/WPA2 enterprise WiFi security, the WiFi network that the modem router provides must be able to
access a RADIUS server.

If you want to change the WiFi settings of the modem router’s main network, use a wired
connection to avoid being disconnected when the new WiFi settings take effect.

Tip

To configure WPA/WPA2 enterprise security:

1.

Launch a web browser from a WiFi-enabled computer or mobile device that is connected to the network.

2.

Enter http://www.routerlogin.net.

A login window opens.

3.

Enter the modem router user name and password.

The user name is admin. The default password is password. The user name and password are
case-sensitive.

The BASIC Home page displays.

4.

Select Wireless.

The Wireless Setup page displays.

If you are configuring a guest network, select Guest Network instead. The Guest
Network Settings page displays.

Note

5.

In the Security Options section below either the Wireless Network (2.4GHz b/g/n) section or the Wireless
Network (5GHz a/n/ac) section, select the WPA/WPA2 Enterprise radio button.

6.

In the WPA/WPA2 Enterprise section, enter the settings as described in the following table.

Manage the Basic WiFi Network Settings

91

AC1200 WiFi VDSL/ADSL Modem Router Model D6220

Summary of Contents for D6220

Page 1: ...AC1200 WiFi VDSL ADSL Modem Router User Manual Model D6220 June 2016 202 11615 01 350 E Plumeria Drive San Jose CA 95134 USA ...

Page 2: ...mity For the current EU Declaration of Conformity visit http kb netgear com app answers detail a_id 11621 Compliance For regulatory compliance information visit http www netgear com about regulatory See the regulatory compliance document before connecting the power supply Trademarks NETGEAR Inc NETGEAR and the NETGEAR Logo are trademarks of NETGEAR Inc Any non NETGEAR trademarks are used for refer...

Page 3: ...r Automatically Update Its Firmware 33 Access the Modem Router With the NETGEAR genie App 34 Chapter 3 Manage the Internet Settings Manually Use the Internet Setup Wizard After Initial Setup 36 Manually Set Up an ADSL Internet Connection 41 Specify an ADSL Connection Without a Login 41 Specify an ADSL Connection With a Login and PPPoA or PPPoE Service 46 Manually Set Up a VDSL Internet Connection ...

Page 4: ...s Control 104 Manage Network Access Control Lists 106 Add Devices to or Remove Them From the Allowed List 106 Add Devices to or Remove Them From the Blocked List 108 Use Keywords to Block Internet Sites 109 Set Up Blocking 109 Remove a Keyword or Domain From the Blocked List 111 Remove All Keywords and Domains From the Blocked List 111 Specify a Trusted Computer 112 Manage Simple Outbound Firewall...

Page 5: ...49 Chapter 8 Manage Dynamic DNS and Access Storage Devices Through the Internet Set Up and Manage Dynamic DNS 152 Your Personal FTP Server 152 Set Up a New Dynamic DNS Account 153 Specify a DNS Account That You Already Created 154 Access Storage Devices Through the Internet 155 Access Storage Devices From a Remote Computer 156 Set Up FTP Access Through the Internet 156 Use FTP to Access Storage De...

Page 6: ...ange a Reserved IP Address 185 Remove a Reserved IP Address Entry 186 Manage the DHCP Server Address Pool 186 Disable the Built In DHCP Server 187 Change the Modem Router s Device Name 188 Set Up and Manage Custom Static Routes 189 Set Up a Static Route 189 Change a Static Route 190 Remove a Static Route 191 Chapter 12 Manage the Modem Router and Monitor the Traffic Update the Firmware of the Mode...

Page 7: ...et Up a VPN Connection 228 Specify VPN Service in the Modem Router 228 Install OpenVPN Software on a Windows Computer 229 Install OpenVPN Software on a Mac Computer 231 Use a VPN Tunnel on a Windows Computer 232 Use VPN to Access the Modem Router s USB Device and Media From a Windows Computer 234 Use VPN to Access Your Internet Service at Home 234 Set Up VPN Client Internet Access in the Modem Rou...

Page 8: ...ED Is Solid Green 254 DSL LED Is Blinking Green 254 DSL LED Is Off or Internet LED Is Off 254 Internet LED Is Off 255 Obtain an Internet IP Address 255 Verify the PPPoE or PPPoA Connection 256 Reestablish the PPPoE or PPPoA Connection 257 Troubleshoot Internet Browsing 258 Changes Are Not Saved 258 Troubleshoot the WiFi Connectivity 258 Troubleshoot Your Network Using the Ping Utility 259 Test the...

Page 9: ... With Ports Buttons and a DC Connector on page 12 Bottom Panel Product Label on page 13 For more information about the topics that are covered in this manual visit the support website at netgear com support Note Firmware updates with new features and bug fixes are made available from time to time at downloadcenter netgear com You can check for and download new firmware manually If the features or ...

Page 10: ...age might contain more items The filter or phone cable provided depends on the region In some regions a CD is included in the package Note Top Panel With LEDs The status LEDs and buttons are located on the top panel of the modem router Figure 1 LEDs and buttons of the modem router Hardware Overview of the Modem Router 10 AC1200 WiFi VDSL ADSL Modem Router Model D6220 ...

Page 11: ... modem router detected an Internet connection Solid amber The modem router is not connected to a DSL or cable modem or the modem router did not detect an Internet connection For more information see Troubleshoot the Internet Connection on page 254 Blinking green Data is being transmitted over the Internet connection Alternating green and amber The traffic meter is enabled and the traffic limit was...

Page 12: ... or Turn Off LEDs on page 200 If you turn off the LEDs the Power LED remains on Back Panel With Ports Buttons and a DC Connector The back panel of the modem router provides ports buttons and a DC power connector Figure 2 Modem router back panel Viewed from left to right the back panel contains the following components DSL port One RJ 11 DSL port for connecting the modem router to an ADSL or VDSL l...

Page 13: ...connector Connect the power adapter that came in the product package to the DC power connector Bottom Panel Product Label The product label on the bottom panel of the modem router lists the login information WiFi network name SSID and password network key serial number and MAC address of the modem router Figure 3 Modem router product label Hardware Overview of the Modem Router 13 AC1200 WiFi VDSL ...

Page 14: ...em Router on page 15 Connect to the Modem Router on page 16 Set Up Your Modem Router for DSL Service on page 18 Set Up the Modem Router for Cable Service on page 25 Log In to the Modem Router After Setup to View or Change Settings on page 31 Change the Language on page 32 Let the Modem Router Automatically Update Its Firmware on page 33 Access the Modem Router With the NETGEAR genie App on page 34...

Page 15: ...where your computers and other devices operate and within line of sight to your WiFi devices Make sure that the modem router is within reach of an AC power outlet and near Ethernet cables for wired computers Place the modem router in an elevated location minimizing the number walls and ceilings between the modem router and your other devices Place the modem router away from electrical devices such...

Page 16: ...m Router Choose either the manual or the WPS method to add a WiFi device such as a WiFi enabled computer an iPhone an iPad another mobile device or a gaming device to the WiFi network of the modem router Manual Method On the WiFi enabled computer or mobile device that you want to connect to the modem router you can use the software application that manages your WiFi connections To connect a WiFi e...

Page 17: ... password and connects the computer or device to the WiFi network of the modem router For more information see Use WPS to Add a Device to the WiFi Network on page 94 Types of Logins Separate types of logins serve different purposes This section describes the differences so that you know which login to use when Types of logins ISP login The login that your Internet service provider ISP gave you log...

Page 18: ...modem router The ISP configuration information for your DSL account ISP login name and password Fixed or static IP address settings special deployment by ISP this setting is rare If you cannot locate this information ask your ISP to provide it When your Internet connection is working you no longer need to launch the ISP login program on your computer to access the Internet When you start an Intern...

Page 19: ... DHCP Option 61 that are required only for some ISPs are not included in the following procedure The following figure shows the cabling of your modem router for DSL service Figure 4 Modem router cabling for DSL service To connect your modem router to a DSL service 1 Install a DSL microfilter between the phone line and the phone The product package contains either a DSL microfilter 2 Use a phone ca...

Page 20: ...ey is on the product label Your WiFi enabled computer or mobile device connects to the modem router s WiFi network If the computer is set to a static fixed IP address this setting is uncommon either change the computer to obtain an IP address automatically from the modem router through DHCP or change the IP address of the computer to a static IP address in the 192 168 0 2 192 168 0 254 range Note ...

Page 21: ...en c Make sure that your browser does not cache the previous page by closing and reopening the browser d Clear the browser cache e If the computer is set to a static fixed IP address this setting is uncommon either change the computer to obtain an IP address automatically from the modem router through DHCP or change the IP address of the computer to a static IP address in the 192 168 0 2 192 168 0...

Page 22: ... If you are connected to the Internet you can ignore Step 16 through Step 19 We recommend that you change the default password that you use to log in to the modem router to a more secure password see Change the admin Password on page 196 We also recommend that you enable password recovery see Set Up Password Recovery on page 197 Note 16 Only if the page in the following figure displays Specify a f...

Page 23: ...now a Unplug your modem router s power leaving the modem router connected to the wall jack for your Internet service b Wait 10 seconds c Plug in your modem router s power and turn on your modem router d Wait two minutes e Select the I just power cycled the modem and waited for 2 minutes radio button f Click the Next button If you do not need to power cycle the modem router do the following a Selec...

Page 24: ...th Step 19 Take one of the following actions If your ISP assigned you a fixed static IP address do the following a Select the Yes radio button b Click the Next button c Enter the address information that your ISP gave you for your fixed IP address configuration d Click the Next button If your ISP did not assign you a fixed IP address or you do not know if your ISP assigned you a fixed IP address d...

Page 25: ...ETGEAR product and contact NETGEAR technical support Set Up the Modem Router for Cable Service You can install your modem router for cable service or for DSL service If you use a cable modem follow the procedure that is described in this section If you use a DSL modem follow the procedure that is described in Cable the Modem Router for DSL Service and Access the Modem Router on page 19 The NETGEAR...

Page 26: ...e of the following methods Ethernet cable Use an Ethernet cable to connect your computer to a yellow Ethernet LAN port on the modem router The product package contains a yellow Ethernet cable Your computer connects to the modem router s LAN WiFi Connect to the default WiFi network of the modem router a On your WiFi enabled computer or mobile device find and select the WiFi network The WiFi network...

Page 27: ...ssword for the password If the Configuring the Internet Connection page displays skip to Step 13 If the page still does not display see Step 12 12 If the browser cannot display the web page do the following a Make sure that the computer is connected to one of the four Ethernet LAN ports or over WiFi to the modem router b Make sure that the Power LED of the modem router is lit solid green c Make su...

Page 28: ... connected to the Internet the Congratulations page displays and you successfully completed the setup process The Congratulations page that displays is similar to the one that is shown in the following figure If the Congratulations page does not yet display other pages might display and you might need to provide more information in which case you must continue with Step 18 The pages that display d...

Page 29: ... the modem router connected to the cable modem b Wait 10 seconds c Plug in your modem router s power and turn on your modem router d Wait two minutes e Select the I just power cycled the modem and waited for 2 minutes radio button f Click the Next button See if the Ethernet cable is not fully inserted or is inserted at the wrong place If necessary do the following a Fully insert the Ethernet cable...

Page 30: ...tep 20 Take one of the following actions If your ISP assigned you a fixed static IP address do the following a Select the Yes radio button b Click the Next button c Enter the address information that your ISP gave you for your fixed IP address configuration d Click the Next button If your ISP did not assign you a fixed IP address or you do not know if your ISP assigned you a fixed IP address do th...

Page 31: ...on assistant one more time c Contact your ISP to verify that you are using the correct configuration information d Read Troubleshoot the Internet Connection on page 254 e If problems persist register your NETGEAR product and contact NETGEAR technical support Log In to the Modem Router After Setup toView or Change Settings After you set up the modem router for DSL service or cable service you can v...

Page 32: ... glance You can click any of the sections of the dashboard to view more detailed information The left column displays the menus and at the top is an ADVANCED tab that you can use to access more menus and pages Change the Language By default the language is set as Auto You can change the language To change the language 1 Launch a web browser from a WiFi enabled computer or mobile device that is con...

Page 33: ...om a WiFi enabled computer or mobile device that is connected to the network 2 Enter http www routerlogin net A login window opens 3 Enter the modem router user name and password The user name is admin The default password is password The user name and password are case sensitive The BASIC Home page displays 4 Wait for the modem router to determine if newer firmware is available This process might...

Page 34: ...access Internet traffic meter speed test and more Share and stream music or videos To use the genie app to access the modem router 1 Visit the NETGEAR genie web page at netgear com genie 2 Click the appropriate Download button 3 Follow the onscreen instructions to install the app on your smartphone tablet or WiFi enabled computer 4 Launch the genie app The genie app dashboard displays The followin...

Page 35: ...browser These options are described in Install and Access the Modem Router and Its Network on page 14 You can also customize or specify your Internet settings manually The chapter contains the following sections Use the Internet Setup Wizard After Initial Setup on page 36 Manually Set Up an ADSL Internet Connection on page 41 Manually Set Up a VDSL Internet Connection on page 51 Manually Set Up a ...

Page 36: ...figuring IPTV options and configuring DHCP Option 61 that are required only for some ISPs are not included in the following procedure To use the Setup Wizard 1 Launch a web browser from a WiFi enabled computer or mobile device that is connected to the network 2 Enter http www routerlogin net A login window opens 3 Enter the modem router user name and password The user name is admin The default pas...

Page 37: ...ed the setup process 9 Click the Next button You are prompted to download and install the free NETGEAR Desktop genie app and the free ReadySHARE Vault app This step concludes a successful setup process If you are connected to the Internet you can ignore Step 10 through Step 13 We recommend that you change the default password that you use to log in to the modem router to a more secure password see...

Page 38: ...ith the detection of the Internet connection The page that might display states that a problem occurred while the wizard was detecting the Internet connection If this page does not display continue with Step 12 Take one of the following actions If you did not yet power cycle the modem router do so now a Unplug your modem router s power leaving the modem router connected to either the wall jack for...

Page 39: ...Next button If you do not need to power cycle the modem router or the Ethernet cable is already fully inserted in the correct ports do the following a Select the None of the above radio button b Click the Next button 12 Only if the page in the following figure displays Specify how to manage problems with the detection of the IP address for the Internet connection The page that might display states...

Page 40: ...ter or router with which you previously were able to connect to the Internet You might find the MAC address on the product label of your device Enter the MAC address in the AABBCCDDEEFF format not in the AA BB CC DD EE FF format d Click the Next button 13 If the Congratulations page still does not display and the modem router still does not connect to the Internet do the following a Review all you...

Page 41: ...ISP Entering incorrect information might prevent the modem router from connecting to the Internet If your ISP supports two virtual interfaces one Internet virtual interface and one IPTV virtual interface before you specify the settings for the IPTV interface first use the following procedure to specify the settings for the Internet interface Then repeat the procedure to specify the settings for th...

Page 42: ...e is the one that you must configure first The IPTV virtual interface applies only to a few ISPs In most situations you can ignore the IPTV virtual interface IPTV For some ISPs you must configure the IPTV virtual interface in addition to the Internet virtual interface However first specify the settings for the Internet virtual interface which is the default interface before you repeat the procedur...

Page 43: ...he settings that display when you configure an ADSL connection without a login 12 Enter the ADSL settings as described in the following table Manage the Internet Settings Manually 43 AC1200 WiFi VDSL ADSL Modem Router Model D6220 ...

Page 44: ...r they could be different for each virtual interface Use VLANID If your ISP provided you with a VLAN ID and a priority value enter the priority value which is a number from 0 to 7 You can enter a priority value only in combination with a VLAN ID If your ISP did not provide you with a priority value leave the default setting which depends on the selected ISP If you are configuring both an Internet ...

Page 45: ...domain names Your ISP uses DHCP to assign your DNS servers Your ISP automatically assigns this address Get Automatically from ISP If you know that your ISP does not automatically transmit DNS addresses to the modem router during login select this option and enter the IP address of your ISP primary DNS server If secondary and tertiary DNS server addresses are available enter them also Use These DNS...

Page 46: ...nect to your Internet service If you cannot find this information contact your ISP Entering incorrect information might prevent the modem router from connecting to the Internet If your ISP supports two virtual interfaces one Internet virtual interface and one IPTV virtual interface before you specify the settings for the IPTV interface first use the following procedure to specify the settings for ...

Page 47: ...lect the virtual interface that you are configuring Internet In all situations the Internet virtual interface is the one that you must configure first The IPTV virtual interface applies only to a few ISPs In most situations you can ignore the IPTV virtual interface IPTV For some ISPs you must configure the IPTV virtual interface in addition to the Internet virtual interface However first specify t...

Page 48: ...ual circuit VC based or logical link control LLC based Multiplexing Method Enter a number between 0 and 255 for the virtual circuit number for the virtual path identifier VPI as indicated by your ISP If your ISP did not provide you with a VPI setting leave the default setting which depends on the selected ISP The VPI might be required not only for a VC based connection but also for an LLC based co...

Page 49: ...nterfaces separately Depending on the requirements of your ISP the priorities could be the same for both virtual interfaces or they could be different for each virtual interface Priority 0 7 If your ISP does not support bridge mode for an IPTV virtual interface the check box does not display onscreen If you are specifying the settings for the IPTV virtual interface and your ISP informed you that y...

Page 50: ...omatically Idle Timeout In Minutes Internet IP Address Your ISP uses DHCP to assign your IP address Your ISP automatically assigns these addresses Get Dynamically from ISP Enter the IP address IP subnet mask and gateway IP address that your ISP assigned you for static IP address service The gateway is the ISP router to which your modem router connects Use Static IP Address Domain Name Server DNS A...

Page 51: ...nnection If the NETGEAR website does not display within one minute see Troubleshoot the Internet Connection on page 254 Manually Set Up a VDSL Internet Connection You can view or change the modem router s VDSL Internet connection settings manually The following sections describe the options that are available to you to manually set up the VDSL Internet connection Specify a VDSL Connection Without ...

Page 52: ... select the Internet service provider ISP that you are using If your ISP is not in the menu select Other 7 From the Transfer Mode menu select PTM When you select PTM from the Transfer Mode menu the only option in the DSL Mode menu is VDSL2 8 From the menu above the Enable This Interface check box select the virtual interface that you are configuring Internet In all situations the Internet virtual ...

Page 53: ...the settings that display when you configure a VDSL connection without a login 11 Enter the VDSL settings as described in the following table Manage the Internet Settings Manually 53 AC1200 WiFi VDSL ADSL Modem Router Model D6220 ...

Page 54: ...rtual interface Priority 0 7 If your ISP does not support bridge mode for an IPTV virtual interface the check box does not display onscreen If you are specifying the settings for the IPTV virtual interface and your ISP informed you that you must use bridge mode select the Bridge Mode bind LAN4 to WAN2 check box If your ISP does not support bridge mode the check box might not display onscreen Some ...

Page 55: ...our account is first opened They accept traffic only from the MAC address of that computer This feature allows your modem router to use your computer s MAC address also called cloning Use the default MAC address Use Default Address The modem router captures and uses the MAC address of the computer that you are now using You must use the one computer that is registered by the ISP Use Computer MAC A...

Page 56: ...ternet Setup page displays 5 From the Select Country menu select the country in which you use the modem router The Select Country menu is not available in all countries and might be masked out 6 From the Select Internet Service Provider menu select the Internet service provider ISP that you are using If your ISP is not in the menu select Other 7 From the Transfer Mode menu select PTM When you sele...

Page 57: ...e Yes radio button The following figure shows the settings that display when you configure a VDSL connection with a login and PPPoE service 11 Enter the VDSL settings as described in the following table Manage the Internet Settings Manually 57 AC1200 WiFi VDSL ADSL Modem Router Model D6220 ...

Page 58: ...ur ISP does not support bridge mode for an IPTV virtual interface the check box does not display onscreen If you are specifying the settings for the IPTV virtual interface and your ISP informed you that you must use bridge mode select the Bridge Mode bind LAN4 to WAN2 check box If your ISP does not support bridge mode the check box might not display onscreen Some devices such as an IPTV cannot fun...

Page 59: ...our IP address Your ISP automatically assigns these addresses Get Dynamically from ISP Enter the IP address IP subnet mask and gateway IP address that your ISP assigned you for static IP address service The gateway is the ISP router to which your modem router connects Use Static IP Address Domain Name Server DNS Address The DNS server is used to look up site addresses based on their domain names Y...

Page 60: ... If the NETGEAR website does not display within one minute see Troubleshoot the Internet Connection on page 254 Manually Set Up a Cable Internet Connection You can view or change the modem router s cable Internet connection settings manually The following sections describe the options that are available to you to manually set up the cable Internet connection Specify a Cable Connection Without a Lo...

Page 61: ...nd the modem router restarts If you use a WiFi enabled computer or mobile device to connect to the modem router you might need to log in again Note 7 Select BASIC Internet The Internet Setup page displays 8 From the Select Country menu select the country in which you use the modem router The Select Country menu is not available in all countries and might be masked out 9 From the Select Internet Se...

Page 62: ...interface but not enable it 12 Scroll down to the Does your Internet connection require a login section and select the No radio button The following figure shows the settings that display when you configure a cable connection without a login 13 Enter the cable settings as described in the following table Manage the Internet Settings Manually 62 AC1200 WiFi VDSL ADSL Modem Router Model D6220 ...

Page 63: ...TV virtual interface the check box does not display onscreen If you are specifying the settings for the IPTV virtual interface and your ISP informed you that you must use bridge mode select the Bridge Mode bind LAN4 to WAN2 check box If your ISP does not support bridge mode the check box might not display onscreen Some devices such as an IPTV cannot function behind the modem router s Network Addre...

Page 64: ...e allows your modem router to use your computer s MAC address also called cloning Use the default MAC address Use Default Address The modem router captures and uses the MAC address of the computer that you are now using You must use the one computer that is registered by the ISP Use Computer MAC Address Enter the MAC address that you want to use By default the field displays the MAC address of the...

Page 65: ...ile device that is connected to the network 2 Enter http www routerlogin net A login window opens 3 Enter the modem router user name and password The user name is admin The default password is password The user name and password are case sensitive The BASIC Home page displays 4 Select ADVANCED Setup WAN Setup The WAN Setup page displays 5 From the WAN Preference menu select Must use Ethernet WAN B...

Page 66: ...Internet virtual interface which is the default interface before you repeat the procedure to specify the settings for the IPTV virtual interface 11 Make sure that the EnableThis Interface check box is selected for the interface that you are configuring Clear the Enable This Interface check box only if you want to configure the virtual interface but not enable it 12 Scroll down to the Does your Int...

Page 67: ...be the same for both virtual interfaces or they could be different for each virtual interface Priority 0 7 If your ISP does not support bridge mode for an IPTV virtual interface the check box does not display onscreen If you are specifying the settings for the IPTV virtual interface and your ISP informed you that you must use bridge mode select the Bridge Mode bind LAN4 to WAN2 check box If your I...

Page 68: ...omatically Idle Timeout In Minutes Internet IP Address Your ISP uses DHCP to assign your IP address Your ISP automatically assigns these addresses Get Dynamically from ISP Enter the IP address IP subnet mask and gateway IP address that your ISP assigned you for static IP address service The gateway is the ISP router to which your modem router connects Use Static IP Address Domain Name Server DNS A...

Page 69: ...the Internet Connection on page 254 Specify an IPv6 Internet Connection The modem router supports many different types of IPv6 Internet connections for which you can specify the settings manually IPv6 Internet Connections and IPv6 Addresses The modem router can support an IPv6 Internet connection through the following connection types Auto Detect For more information see Use Auto Detect for an IPv...

Page 70: ...and the modem router does not expect to receive such a packet or the packet is not in the connection record the modem router blocks this packet This function works in two modes In secured mode the modem router inspects both TCP and UDP packets In open mode the modem router inspects UDP packets only IPv6 addresses are denoted by eight groups of hexadecimal quartets that are separated by colons You ...

Page 71: ... the length of the prefix which is also indicated by the underline _ under the IPv6 address If no address is acquired the field displays Not Available 6 Select an IP Address Assignment radio button Use DHCP Server This method passes more information to LAN devices but some IPv6 systems might not support the DHCv6 client function Auto Config This is the default setting This setting specifies how th...

Page 72: ...ANCED Advanced Setup IPv6 The Basic Settings page displays 5 From the Internet Connection Type menu select 6to4 Tunnel The modem router automatically detects the information in the Router s IPv6 Address on LAN field This field shows the IPv6 address that is acquired for the modem router s LAN interface The number after the slash is the length of the prefix which is also indicated by the underline ...

Page 73: ...not specify an ID here the modem router generates one automatically from its MAC address 10 Click the Apply button Your settings are saved Set Up an IPv6 Pass Through Internet Connection In pass through mode the modem router works as a Layer 2 Ethernet switch with two ports LAN and WAN Ethernet ports for IPv6 packets The modem router does not process any IPv6 header packets To set up a pass throug...

Page 74: ...up IPv6 The Basic Settings page displays 5 From the Internet Connection Type menu select Fixed 6 Configure the fixed IPv6 addresses for the WAN connection IPv6 Address Prefix Length The IPv6 address and prefix length of the modem router s WAN interface Default IPv6 Gateway The IPv6 address of the default IPv6 gateway for the modem router s WAN interface Primary DNS Server The primary DNS server th...

Page 75: ... In the IPv6 Address Prefix Length fields specify the static IPv6 address and prefix length of the modem router s LAN interface If you do not specify an ID here the modem router generates one automatically from its MAC address 9 Click the Apply button Your settings are saved Set Up an IPv6 DHCP Internet Connection To set up an IPv6 Internet connection with a DHCP server 1 Launch a web browser from...

Page 76: ...omain Name If Required field enter a domain name You can type the domain name of your IPv6 ISP Do not enter the domain name for the IPv4 ISP here For example if your ISP s mail server is mail xxx yyy zzz type xxx yyy zzz as the domain name If your ISP provided a domain name type it in this field For example Earthlink Cable might require a host name of home and Comcast sometimes supplies a domain n...

Page 77: ... number after the slash is the length of the prefix which is also indicated by the underline _ under the IPv6 address If no address is acquired the field displays Not Available Router s IPv6 Address on LAN This field shows the IPv6 address that is acquired for the modem router s LAN interface The number after the slash is the length of the prefix which is also indicated by the underline _ under th...

Page 78: ...Server This method passes more information to LAN devices but some IPv6 systems might not support the DHCv6 client function Auto Config This is the default setting This setting specifies how the modem router assigns IPv6 addresses to the devices on your home network the LAN 11 Optional Select the Use This Interface ID check box and specify the interface ID to be used for the IPv6 address of the mo...

Page 79: ...he DHCP Domain Name If Required field enter a domain name You can type the domain name of your IPv6 ISP Do not enter the domain name for the IPv4 ISP here For example if your ISP s mail server is mail xxx yyy zzz type xxx yyy zzz as the domain name If your ISP provided a domain name type it in this field For example Earthlink Cable might require a host name of home and Comcast sometimes supplies a...

Page 80: ...n 1 Launch a web browser from a WiFi enabled computer or mobile device that is connected to the network 2 Enter http www routerlogin net A login window opens 3 Enter the router user name and password The user name is admin The default password is password The user name and password are case sensitive The BASIC Home page displays 4 Select ADVANCED Advanced Setup IPv6 The Basic Settings page display...

Page 81: ...on Auto Config This is the default setting This setting specifies how the router assigns IPv6 addresses to the devices on your home network the LAN 9 Optional Select the Use This Interface ID check box and specify the interface ID to be used for the IPv6 address of the router s LAN interface If you do not specify an ID here the router generates one automatically from its MAC address 10 Click the A...

Page 82: ...cations Table 2 Common MTU sizes Application MTU The largest Ethernet packet size This setting is typical for connections that do not use PPPoE or VPN and is the default value for NETGEAR modem routers adapters and switches 1500 Used in PPPoE environments 1492 Maximum size to use for pinging Larger packets are fragmented 1472 Used in some DHCP environments 1468 Used in PPPoA environments 1458 Used...

Page 83: ...ays 4 Select ADVANCED Setup WAN Setup The WAN Setup page displays 5 In the MTU Size field enter a value from 616 to 1500 The normal MTU maximum transmit unit value for most Ethernet networks is 1500 bytes or 1492 bytes for PPPoE connections 6 Click the Apply button Your settings are saved Manage the Internet Settings Manually 83 AC1200 WiFi VDSL ADSL Modem Router Model D6220 ...

Page 84: ...includes the following sections Manage the Basic WiFi Settings and WiFi Security of the Main Network on page 85 Use WPS to Add a Device to the WiFi Network on page 94 Manage the Basic WiFi Settings and WiFi Security of the Guest Network on page 96 Control the WiFi Radios on page 100 For information about setting up an access control list ACL and managing WiFi access for enhanced security see Allow...

Page 85: ...ic WiFi Settings You can view or change the basic WiFi settings and WiFi security The modem router simultaneously supports the 2 4 GHz band for 802 11b g n devices and the 5 GHz band for 802 11a n ac devices If you change the WiFi settings of the modem router s main network use a wired connection to avoid being disconnected when the new WiFi settings take effect Tip To view or change the basic WiF...

Page 86: ... or region is not listed check with your local government agency Note Region Wireless Network 2 4GHz b g n By default the modem router broadcasts its SSID so that WiFi stations can detect the WiFi name SSID in their scanned network lists To turn off the SSID broadcast clear the Enable SSID Broadcast check box Turning off the SSID broadcast provides additional WiFi security but users must know the ...

Page 87: ... We recommend a channel spacing of four channels between adjacent APs for example use Channels 1 and 5 or 6 and 10 Note Channel From the Mode menu select one of the following modes Up to 54 Mbps Legacy mode This mode allows 802 11n 802 11g and 802 11b devices to join the network but limits 802 11n devices to functioning at up to 54 Mbps Up to 145 Mbps Neighbor friendly mode for reduced interferenc...

Page 88: ...support either WPA or WPA2 to join the modem router s 2 4 GHz WiFi network However WPA PSK TKIP is less secure than WPA2 PSK AES and limits the speed of WiFi devices to 54 Mbps To use this type of security in the Passphrase field enter a phrase of 8 to 63 characters To join the modem router s WiFi network a user must enter this passphrase WPA WPA2 Enterprise This type of security requires that you...

Page 89: ...acent APs Note Channel From the Mode menu select one of the following modes Up to 173 Mbps Legacy mode This mode allows 802 11ac 802 11n and 802 11a devices to join the network but limits 802 11ac and 802 11n devices to functioning at up to 173 Mbps Up to 400 Mbps Neighbor friendly mode for reduced interference with neighboring WiFi networks This mode allows 802 11ac 802 11n and 802 11a devices to...

Page 90: ...ity in the Passphrase field enter a phrase of 8 to 63 characters To join the modem router s WiFi network a user must enter this passphrase WPA WPA2 Enterprise This type of security requires that your WiFi network can access a RADIUS server For information about configuring WPA WPA2 Enterprise see Configure WPA WPA2 Enterprise WiFi Security on page 91 6 Click the Apply button Your settings are save...

Page 91: ...computer or mobile device that is connected to the network 2 Enter http www routerlogin net A login window opens 3 Enter the modem router user name and password The user name is admin The default password is password The user name and password are case sensitive The BASIC Home page displays 4 Select Wireless The Wireless Setup page displays If you are configuring a guest network select Guest Netwo...

Page 92: ...ct over WiFi check the following If your WiFi enabled computer or mobile device is already connected to another WiFi network in your area disconnect it from that WiFi network and connect it to the WiFi network that the modem router provides Some WiFi devices automatically connect to the first open network without WiFi security that they discover If your WiFi enabled computer or mobile device is tr...

Page 93: ...hentication Type menu select one of the following types Automatic Clients can use either Open System or Shared Key authentication Shared Key Clients can use only Shared Key authentication 8 From the Encryption Strength menu select the encryption key size 64 bit Standard WEP encryption using 40 64 bit encryption 128 bit Standard WEP encryption using 104 128 bit encryption This selection provides hi...

Page 94: ...ork WPS Wi Fi Protected Setup lets you connect a WiFi enabled computer or mobile device to the modem router s network without entering the WiFi network passphrase or key Instead you use a WPS button or enter a PIN to connect If you use the push button method the computer or device that you are trying to connect must provide either a physical button or a software button If you use the PIN method yo...

Page 95: ...n to join the modem router s main WiFi network without entering a password After the modem router establishes a WPS connection the WPS LED on the WPS button lights solid white and the Add WPS Client page displays a confirmation message 8 To verify that the WiFi device is connected to the modem router s main WiFi network select BASIC Attached Devices The WiFi device displays onscreen Use WPS With t...

Page 96: ...PS Client page displays a confirmation message 10 To verify that the WiFi device is connected to the modem router s main WiFi network select BASIC Attached Devices The WiFi device displays onscreen Manage the Basic WiFi Settings and WiFi Security of the Guest Network A guest network allows visitors to use the Internet without using your WiFi security key By default the guest WiFi network is disabl...

Page 97: ... 1 Launch a web browser from a WiFi enabled computer or mobile device that is connected to the network 2 Enter http www routerlogin net A login window opens 3 Enter the modem router user name and password The user name is admin The default password is password The user name and password are case sensitive The BASIC Home page displays 4 Select Guest Network 5 Enable the guest network and configure ...

Page 98: ...y authentication and data encryption mode that is superseded by WPA PSK and WPA2 PSK The WEP option displays only if you configure the WiFi mode for the main WiFi network as Up to 54 Mbps in the 2 4 GHz band see View or Change the Basic WiFi Settings on page 85 For information about configuring WEP see Configure WEP Legacy WiFi Security on page 92 WPA2 PSK AES WPA2 provides a secure and fast conne...

Page 99: ...t WiFi network This is the default setting for the guest WiFi network WPA2 PSK AES WPA2 provides a secure and fast connection but some older WiFi devices do not detect WPA2 and support only WPA Select WPA2 PSK AES security to allow 802 11ac and 802 11n devices to connect to the 5 GHz band of the guest WiFi network at the fastest speed If your network includes older devices that do not support WPA2...

Page 100: ...chedule on page 221 Use the WiFi On Off Button To turn the WiFi radios off and on with the WiFi On Off button Press the WiFi On Off button on the top panel of the modem router for two seconds If you turned off the WiFi radios the WiFi LED the WiFi LED on the WiFi On Off button and the WPS LED on the WPS button turn off If you turned on the WiFi radios the WiFi LED lights solid green and the WiFi L...

Page 101: ...er Radio check box The WiFi LED the WiFi LED on the WiFi On Off button and the WPS LED on the WPS button turn off Turn on the radio Select the Enable Wireless Router Radio check box The WiFi LED lights solid green and the WiFi LED on the WiFi On Off button and the WPS LED on the WPS button light solid white 6 Click the Apply button Your settings are saved Manage the Basic WiFi Network Settings 101...

Page 102: ...llow or Block Access to Your Network on page 104 Use Keywords to Block Internet Sites on page 109 Manage Simple Outbound Firewall Rules for Services and Applications on page 113 Set Up a Schedule for Keyword Blocking and Outbound Firewall Rules on page 118 Set Up Security Event Email Notifications on page 120 For information about more advanced ways to configure Internet security see Manage Port F...

Page 103: ...rk 2 Enter http www routerlogin net A login window opens 3 Enter the modem router user name and password The user name is admin The default password is password The user name and password are case sensitive The BASIC Home page displays 4 Select Parental Controls The Parental Controls website opens 5 Click the button for the app or version that you want to download and use 6 Follow the onscreen ins...

Page 104: ... or Block Access to Your Network You can use access control to block or allow access of devices to your network You define access by selecting or specifying the MAC addresses of the wired and WiFi devices that either can access your entire network or are blocked from accessing your entire network Enable and Manage Network Access Control When you enable access control you must select whether new de...

Page 105: ...s radio button selected Block all new devices from connecting With this setting if you add a new device before it can access your network you must enter its MAC address for an Ethernet connection and its MAC address for a WiFi connection in the allowed list For more information see Manage Network Access Control Lists on page 106 The access rule does not affect previously blocked or allowed devices...

Page 106: ...ontaining the hexadecimal characters 0 9 a f or A F uppercase or lowercase only and separated by colons for example 00 09 AB CD EF 01 Typically the MAC address is on the label of the WiFi card or network interface device If you cannot see the label you can display the MAC address using the network configuration utilities of the computer You might also find the MAC addresses through the web pages o...

Page 107: ...s the network 6 To add a device to the allowed list do the following a Click the Add button The Add Allowed Device page displays b Enter the MAC address and device name for the device that you want to allow c On the Add Allowed Device page click the Apply button The device is added to the allowed list on the Access Control page 7 To remove a device from allowed list do the following a Select the c...

Page 108: ...rd is password The user name and password are case sensitive The BASIC Home page displays 4 Select ADVANCED Security Access Control The Access Control page displays 5 Click the View list of blocked devices not currently connected to the network link A table displays the detected device name MAC address and connection type of the devices that are not connected and are blocked from accessing the net...

Page 109: ...ault keyword blocking is disabled and no domains are blocked Set Up Blocking You can set up blocking of specific keywords and domains to occur continuously or according to a schedule To set up keyword and domain blocking 1 Launch a web browser from a WiFi enabled computer or mobile device that is connected to the network 2 Enter http www routerlogin net A login window opens 3 Enter the modem route...

Page 110: ...Specify XXX to block http www badstuff com xxx html Specify com if you want to allow only sites with domain suffixes such as edu or gov Enter a period to block all Internet browsing access 7 Click the Add Keyword button The keyword or domain is added to the Block sites containing these keywords or domain names field which is also referred to as the blocked list 8 To add more keywords or domains re...

Page 111: ...ord button The keyword or domain is removed from the blocked list 7 Click the Apply button Your settings are saved Remove All Keywords and Domains From the Blocked List You can simultaneously remove all keywords and domains from the blocked list To remove all keywords and domains from the blocked list 1 Launch a web browser from a WiFi enabled computer or mobile device that is connected to the net...

Page 112: ...s admin The default password is password The user name and password are case sensitive The BASIC Home page displays 4 Select ADVANCED Security Block Sites 5 Scroll down and select the Allow trusted IP address to visit blocked sites check box 6 In the Trusted IP Address field enter the IP address of the trusted device The first three octets of the IP address are automatically populated and depend o...

Page 113: ...ds to Block Internet Sites on page 109 This type of blocking is another aspect of the outbound firewall For information about inbound firewall rules see Manage Port Forwarding and Port Triggering on page 237 Service blocking means the same thing as applying outbound firewall rules Note Add an Outbound Firewall Rule You can add an outbound firewall rule to prevent access to a specific service or ap...

Page 114: ...ustom Service or Application on page 115 8 Specify which devices on your LAN are affected by the rule based on their IP addresses Only This IP Address Enter the required address in the fields to apply the rule to a single device on your LAN IP Address Range Enter the required addresses in the start and end fields to apply the rule to a range of devices All IP Addresses All computers and devices on...

Page 115: ...rom a WiFi enabled computer or mobile device that is connected to the network 3 Enter http www routerlogin net A login window opens 4 Enter modem router the user name and password The user name is admin The default password is password The user name and password are case sensitive The BASIC Home page displays 5 Select ADVANCED Security Block Services 6 If this is the first time that you add an out...

Page 116: ... in the Starting Port field Ending Port Enter the name of the custom service or application Service Type User Defined 10 Specify which devices on your LAN are affected by the rule based on their IP addresses Only This IP Address Enter the required address in the fields to apply the rule to a single device on your LAN IP Address Range Enter the required addresses in the start and end fields to appl...

Page 117: ...se sensitive The BASIC Home page displays 4 Select ADVANCED Security Block Services The previous figure shows two rules in the Service Table 5 In the Service Table select the radio button for the rule 6 Click the Edit button The Block Services Setup page displays 7 Change the settings For more information about the settings see Add an Outbound Firewall Rule for a Custom Service or Application on p...

Page 118: ... two rules in the Service Table 5 In the Service Table select the radio button for the rule 6 Click the Delete button The rule is removed from the Service Table Set Up a Schedule for Keyword Blocking and Outbound Firewall Rules You can set up a schedule that you can apply to keyword blocking see Use Keywords to Block Internet Sites on page 109 and outbound firewall rules see Manage Simple Outbound...

Page 119: ...Days to Block Select the check box for each day that you want to block access or specify that blocking occurs on every day by selecting the Every Day check box By default the Every Day check box is selected Time of Day to Block Select a start and end time for blocking in 24 hour format or select the All Day check box for 24 hour blocking By default the All Day check box is selected 6 From the Time...

Page 120: ...ces To set up email notifications 1 Launch a web browser from a WiFi enabled computer or mobile device that is connected to the network 2 Enter http www routerlogin net A login window opens 3 Enter the router user name and password The user name is admin The default password is password The user name and password are case sensitive The BASIC Home page displays 4 Select ADVANCED Security E mail 5 S...

Page 121: ...the outgoing email server b In the Password field type the password for the outgoing email server 10 To send alerts when someone attempts to visit a blocked site select the Send Alerts Immediately check box Email alerts are sent immediately when someone attempts to visit a blocked site 11 To send logs based on a schedule specify these settings a From Send logs according to this schedule menu selec...

Page 122: ...ws through the modem router The chapter contains the following sections Optimize Traffic with QoS on page 123 Manage Custom and Default QoS Priority Rules on page 124 Manage Wi Fi Multimedia Quality of Service on page 131 Manage Beamforming on page 132 Improve Network Connections With Universal Plug and Play on page 133 122 ...

Page 123: ...o check and specify the maximum uplink bandwidth and turn on QoS 1 Launch a web browser from a WiFi enabled computer or mobile device that is connected to the network 2 Enter http www routerlogin net A login window opens 3 Enter the modem router user name and password The user name is admin The default password is password The user name and password are case sensitive The BASIC Home page displays ...

Page 124: ... router s QoS Priority Rule list includes many common applications and online games that can benefit from QoS handling Set Up QoS for an Application or Online Game You can create an upstream QoS policy rule for an application or online game To create a QoS policy rule for an application or online game 1 Launch a web browser from a WiFi enabled computer or mobile device that is connected to the net...

Page 125: ...e button 7 In the QoS Policy for field type the name of the application or game 8 From the Priority Category menu select either Applications or Online Gaming A list of applications or games displays 9 Scroll and select Add a New Application or Add a New Game as applicable Optimize Performance 125 AC1200 WiFi VDSL ADSL Modem Router Model D6220 ...

Page 126: ...r LAN Port You can create a QoS policy rule for a device that is connected to a LAN port of the modem router To create a QoS policy rule for a device connected to one of the modem router s LAN ports 1 Launch a web browser from a WiFi enabled computer or mobile device that is connected to the network 2 Enter http www routerlogin net A login window opens 3 Enter the modem router user name and passwo...

Page 127: ...plays 7 From the Priority Category menu select Ethernet LAN Port 8 From the LAN Port menu select the LAN port The options are 1 2 3 and 4 9 From the Priority menu select the priority for upstream traffic on this port relative to other traffic The options are Low Normal High and Highest 10 Click the Apply button Optimize Performance 127 AC1200 WiFi VDSL ADSL Modem Router Model D6220 ...

Page 128: ...aunch a web browser from a WiFi enabled computer or mobile device that is connected to the network 2 Enter http www routerlogin net A login window opens 3 Enter the modem router user name and password The user name is admin The default password is password The user name and password are case sensitive The BASIC Home page displays 4 Select ADVANCED Setup QoS Setup Optimize Performance 128 AC1200 Wi...

Page 129: ...ty Category menu select MAC Address 8 If the device is in the MAC Device List select its radio button The information from the MAC Device List populates the QoS Policy for MAC Address and Device Name fields If the device is not in the MAC Device List click the Refresh button If it still does not display complete these fields manually Optimize Performance 129 AC1200 WiFi VDSL ADSL Modem Router Mode...

Page 130: ...r name and password are case sensitive The BASIC Home page displays 4 Select ADVANCED Setup QoS Setup The QoS Setup page displays 5 Click the Set Up QoS rule button The QoS Priority Rule list page displays 6 Select the radio button for the QoS policy rule 7 Scroll down and click the Edit button The QoS Priority Rules page displays 8 Change the policy settings 9 Click the Apply button Your settings...

Page 131: ...ected to the network 2 Enter http www routerlogin net A login window opens 3 Enter the modem router user name and password The user name is admin The default password is password The user name and password are case sensitive The BASIC Home page displays 4 Select ADVANCED Setup QoS Setup The QoS Setup page displays 5 Click the Set Up QoS rule button The QoS Priority Rule list page displays 6 Scroll...

Page 132: ...k the modem router actively tracks your device and directs WiFi to your device rather than just blasting it out in all directions The modem router uses explicit and implicit beamforming to improve WiFi performance Explicit beamforming requires the devices to support beamforming Typically 802 11ac devices support beamforming Implicit beamforming means that the modem router supports beamforming even...

Page 133: ...nP devices on the network If you use applications such as multiplayer gaming peer to peer connections or real time communications such as instant messaging or remote assistance keep UPnP enabled which it is by default To manage Universal Plug and Play 1 Launch a web browser from a WiFi enabled computer or mobile device that is connected to the network 2 Enter http www routerlogin net A login windo...

Page 134: ... packet takes between routers The number of hops can range from 1 to 255 The default value for the advertisement time to live is 4 hops which should be fine for most home networks If you notice that some devices are not being updated or reached correctly it might be necessary to increase this value 8 Click the Apply button The UPnP Portmap Table displays the IP address of each UPnP device that is ...

Page 135: ...This chapter contains the following sections USB Device Requirements on page 136 Connect a USB Device to the Modem Router on page 136 Access a Storage Device Connected to the Modem Router on page 137 Map a USB Device to a Windows Network Drive on page 138 Back Up Windows Computers With ReadySHARE Vault on page 138 Manage Access to a Storage Device on page 139 Enable FTP Access Within Your Network ...

Page 136: ...outer The modem router supports the following file system types for full read write access FAT16 FAT32 NTFS NTFS with compression format enabled Ext2 Ext3 Ext4 The modem router supports the following file system types with read only access HFS HFS Connect a USB Device to the Modem Router ReadySHARE lets you access and share a USB device connected to the router USB port If your USB device uses spec...

Page 137: ...he storage device to the modem router s port it might take up to two minutes before the storage device is ready for sharing By default the device is available to all computers on your local area network LAN 3 On a Windows computer that is connected to the network select Start Run 4 Enter readyshare in the dialog box 5 Click the OK button A window displays the files and folders on the device Access...

Page 138: ...e modem router s port it might take up to two minutes before it is ready for sharing By default the device is available to all computers on your local area network LAN 2 Select Start Run 3 Enter readyshare in the dialog box 4 Click the OK button A window automatically opens and displays the USB device 5 Right click the USB device and select Map network drive The Map Network Drive window opens 6 Se...

Page 139: ...p tab to set up and run your backup Manage Access to a Storage Device You can specify the device name workgroups and network folders for a storage device connected to the USB port on the modem router To specify the storage device access settings 1 Launch a web browser from a WiFi enabled computer or mobile device that is connected to the network 2 Enter http www routerlogin net A login window open...

Page 140: ...ices are members of in the Workgroup field enter a name By default the name is Workgroup The name works only in an operating system that supports NetBIOS such as Microsoft Windows If you are using a Windows workgroup rather than a domain the workgroup name is displayed here 8 Enable or disable access methods by selecting or clearing the corresponding check boxes and specifying access to the storag...

Page 141: ...upload files In this URL readyshare is the name that is specified in the Network Device Name field If you change the name in the Network Device Name field from readyshare to another name the link changes accordingly You can also click the link that is shown in the Link column The fixed port is number is 21 FTP Disabled by default If you enable this feature remote users can type ftp public IP addre...

Page 142: ...t password is password The user name and password are case sensitive The BASIC Home page displays 4 Select ReadySHARE The USB Storage Basic Settings page displays By default the Basic radio button is selected 5 Click the Edit button The previous figure shows a USB device attached to the modem router 6 Select the FTP check box 7 Click the Apply button Your settings are saved Share a Storage Device ...

Page 143: ...ser name and password The user name is admin The default password is password The user name and password are case sensitive The BASIC Home page displays 4 Select ReadySHARE The USB Storage Basic Settings page displays By default the Basic radio button is selected 5 Click the Edit button The previous figure shows a USB device attached to the modem router 6 The Available Networks Folder section show...

Page 144: ...Device You can add network folders on a storage device connected to the USB port on the modem router To add a network folder to a storage device 1 Launch a web browser from a WiFi enabled computer or mobile device that is connected to the network 2 Enter http www routerlogin net A login window opens 3 Enter the modem router user name and password The user name is admin The default password is pass...

Page 145: ...If this pop up window does not display your web browser might be blocking pop ups If it is change the browser settings to allow pop ups 8 From the USB Device menu select the USB drive We recommend that you do not attach more than one drive to each USB port for example through a USB hub Note Share a Storage Device Attached to the Modem Router 145 AC1200 WiFi VDSL ADSL Modem Router Model D6220 ...

Page 146: ...ply button The folder is added on the storage device 15 Click the Close Window button The pop up window closes Change a Network Folder Including Read and Write Access on a USB Drive You can change network folders on storage devices connected to the USB port on the modem router To change a network folder on a storage device 1 Launch a web browser from a WiFi enabled computer or mobile device that i...

Page 147: ...ders table select the device 7 Click the Edit button 8 Change the settings in the fields as needed For more information about the settings see Add a Network Folder on a Storage Device on page 144 9 Click the Apply button Share a Storage Device Attached to the Modem Router 147 AC1200 WiFi VDSL ADSL Modem Router Model D6220 ...

Page 148: ...ed computer or mobile device that is connected to the network 3 Enter http www routerlogin net A login window opens 4 Enter the modem router user name and password The user name is admin The default password is password The user name and password are case sensitive The BASIC Home page displays 5 Select ADVANCED Advanced Setup USB Settings 6 Select the No radio button By default the Yes radio butto...

Page 149: ...SB Device on page 149 connect the other USB device and repeat this procedure Safely Remove a USB Device Before you physically disconnect a USB device from the USB port on the modem router log in to the modem router and take the drive offline To remove a USB device safely 1 Launch a web browser from a WiFi enabled computer or mobile device that is connected to the network 2 Enter http www routerlog...

Page 150: ...r 5 In the Available Network Folders table select the device 6 Click the Safely Remove USB Device button The device goes offline and a pop up window opens 7 Click the OK button 8 Physically disconnect the USB device Share a Storage Device Attached to the Modem Router 150 AC1200 WiFi VDSL ADSL Modem Router Model D6220 ...

Page 151: ...e If you know the IP address of the modem router and the IP address did not change you can also access the USB storage device by using the IP address This chapter includes the following sections Set Up and Manage Dynamic DNS on page 152 Access Storage Devices Through the Internet on page 155 For information about how to connect the device and specify its settings see Share a Storage Device Attache...

Page 152: ...t the service finds the current IP address of your home network and automatically connects you If your ISP assigns a private WAN IP address such as 192 168 x x or 10 x x x the Dynamic DNS service does not work because private addresses are not routed on the Internet Your Personal FTP Server With your customized free URL you can use FTP to access your network when you are not home through Dynamic D...

Page 153: ...he modem router For more information see Set Up FTP Access Through the Internet on page 156 6 On a remote computer with Internet access you can use FTP to access your modem router using ftp yourname mynetgear com in which yourname is your specific domain name For more information see Use FTP to Access Storage Devices Through the Internet on page 158 Set Up a New Dynamic DNS Account NETGEAR offers ...

Page 154: ...unt 11 Click the Register button 12 Follow the onscreen instructions to register for your NETGEAR Dynamic DNS service Specify a DNS Account That You Already Created If you already created a Dynamic DNS account with NETGEAR No IP or Dyn you can set up the modem router to use your account To set up Dynamic DNS if you already created an account 1 Launch a web browser from a WiFi enabled computer or m...

Page 155: ...il field enter the email address for your account 10 In the Password 6 32 characters field enter the password for your DDNS account 11 Click the Apply button Your settings are saved 12 To verify that your Dynamic DNS service is enabled in the modem router click the Show Status button A message displays the Dynamic DNS status Access Storage Devices Through the Internet If you connect a USB storage ...

Page 156: ...e device to the modem router you can access the storage device from your network see Enable FTP Access Within Your Network on page 141 You can also set up FTP access through the Internet so that you can access the storage device from outside your local network for example when you are not at home To set up FTP access through the Internet 1 Launch a web browser from a WiFi enabled computer or mobil...

Page 157: ...the modem router 6 Select the FTP via internet check box 7 Click the Apply button Your settings are saved 8 To limit access to the admin user do the following Manage Dynamic DNS and Access Storage Devices Through the Internet 157 AC1200 WiFi VDSL ADSL Modem Router Model D6220 ...

Page 158: ...age device through the Internet with FTP you must first set it up see Set Up FTP Access Through the Internet on page 156 To access a USB device with FTP from a remote computer to download or upload a file 1 Take one of the following actions To download a file from a storage device connected to the modem router launch a web browser To upload a file to a storage device connected to the modem router ...

Page 159: ...log in as guest in the user name field enter guest The guest user name does not need a password The files and folders that your account can access on the USB device display For example you might see share partition1 directory1 4 Navigate to a location on the USB device 5 Download or upload the file Manage Dynamic DNS and Access Storage Devices Through the Internet 159 AC1200 WiFi VDSL ADSL Modem R...

Page 160: ...er comes set up to work as a ReadyDLNA media server You can set up the modem router to play media from TiVo This chapter contains the following sections Specify ReadyDLNA Media Server Settings on page 161 Play Media From a USB Device on TiVo on page 161 160 ...

Page 161: ...r Select this check box to enable the modem router to function as a media server Enable TiVo support Select this check box if you want to play USB or ReadyNAS media on your TiVo device See Play Media From a USB Device on TiVo on page 161 7 To change the name of the media server in the Media Server Name field type a new server name By default the server name is D6220 8 Click the Apply button Your s...

Page 162: ...d are case sensitive The BASIC Home page displays 4 Select ADVANCED USB Functions ReadySHARE Storage The USB Storage Advanced Settings page displays 5 Click the Media Server tab The Media Server Settings page displays 6 Make sure that the Enable TiVo support check box is selected 7 If you changed the setting click the Apply button Your settings are saved Play Videos To play videos 1 On the TiVo se...

Page 163: ...Photos Showcases 2 Select an item to play or watch Copy TiVo Files to a Computer To copy TiVo files to a computer Use the TiVo Desktop accessory available at https www3 tivo com store accessories software do Use the Modem Router as a Media Server 163 AC1200 WiFi VDSL ADSL Modem Router Model D6220 ...

Page 164: ... The chapter includes the following sections Install the Printer Driver and Cable the Printer on page 165 Download the ReadySHARE Printer Utility on page 165 Install the ReadySHARE Printer Utility on page 165 Use the Shared Printer on page 167 View or Change the Status of a Printer on page 168 Use the Scan Feature of a Multifunction USB Printer on page 169 Manage the NETGEAR USB Control Center Set...

Page 165: ... and tablets To download the ReadySHARE Printer utility 1 Visit netgear com readyshare 2 Scroll down to the Print From the Comfort of Your Home Network section at the bottom of the page 3 Click one of the following links Download PC installer and get started This is the utility for Windows computers Download Mac installer and get started This is the utility for MAC computers Download the genie App...

Page 166: ...ARE Printer utility setup file that you downloaded 3 Follow the wizard instructions to install NETGEAR USB Control Center After the InstallShield Wizard completes the installation the NETGEAR USB Control Center prompts you to select a language Share a USB Printer 166 AC1200 WiFi VDSL ADSL Modem Router Model D6220 ...

Page 167: ...ns once the utility automatically manages the printing queue By default the utility starts automatically whenever you log on to Windows and runs in the background Manually Connect and Print For each computer after you click the Connect and Disconnect buttons once the utility automatically manages the printing queue By default the utility starts automatically whenever you log on to Windows and runs...

Page 168: ...an use the USB printer from any computer in the network Connected Your computer is connected to the printer and will be released when your print job is done Manually Connected by Only the connected computer can use the printer Waiting to Connect Your computer is not connected to the shared printer yet 2 To print from your computer when the status shows Manually connected by another computer click ...

Page 169: ...axes window is ready for print jobs Figure 8 Printers and Faxes window To use the scan feature of a multifunction USB printer 1 Click the NETGEAR USB Control Center icon 2 Make sure that the printer status shows as Available 3 Click the Network Scanner button The scanner page displays so that you can use the USB printer for scanning Share a USB Printer 169 AC1200 WiFi VDSL ADSL Modem Router Model ...

Page 170: ...tup of the NETGEAR USB Control Center You can stop the NETGEAR USB Control Center from starting automatically when you log in to Windows To turn off the automatic startup of the NETGEAR USB Control Center 1 Click the NETGEAR USB Control Center icon 2 Select Tools Configuration 3 Clear the Automatically execute when logging on Windows check box 4 Click the OK button Your settings are saved Share a ...

Page 171: ...ts the language changes Specify the Time Out To specify the time out 1 Click the NETGEAR USB Control Center icon The main page displays 2 Select Tools Configuration The Control Center Configuration page displays 3 In the Timeout field type the number of minutes The time out is the number of minutes that a computer holds its connection to the printer when the connection is not being used 4 Click th...

Page 172: ...AN Security Settings on page 179 Set Up a Default DMZ Server on page 180 Manage NAT Filtering on page 181 Manage the SIP Application Level Gateway on page 181 Manage IGMP Proxying on page 182 Manage the Modem Routers s LAN IP Address Settings on page 182 Manage the Router Information Protocol Settings on page 183 Manage Reserved LAN IP Addresses on page 184 Manage the DHCP Server Address Pool on p...

Page 173: ...e WAN Preference menu select one of the following options Must use DSL WAN The modem router uses the DSL port for a DSL WAN connection The Internet port is shut down Must use EthernetWAN The modem router uses the Internet port for an Ethernet WAN connection The DSL port is shut down 6 Click the Apply button Your settings are saved Enable and Configure a VLAN A network of computers and devices can ...

Page 174: ...ted to the network 2 Enter http www routerlogin net A login window opens 3 Enter the modem router user name and password The user name is admin The default password is password The user name and password are case sensitive The BASIC Home page displays 4 Select Internet 5 Configure a VLAN for the Internet virtual interface a Make sure that Internet is selected from the menu above the EnableThis Int...

Page 175: ... check box is selected b Select the Use VLANID check box c Enter a VLAN ID that applies to the IPTV virtual interface The VLAN ID can be in a range from 0 to 4094 The default VLAN ID is 0 d To specify a priority for the VLAN in the Priority 0 7 field enter a value from 0 to 7 e Click the Apply button Your settings are saved for the IPTV virtual interface For information about enabling bridge mode ...

Page 176: ...up a bridge for a port group for the modem router s Internet interface A bridge with a port group prevents packets that are sent between the IPTV device and the modem router s Internet port from being processed through the modem router s network address translation NAT service To configure a port group and enable the bridge 1 Launch a web browser from a WiFi enabled computer or mobile device that ...

Page 177: ...WiFi network include an IPTV device your ISP might require you to set up a bridge for a VLAN tag group for the modem router s Internet interface If you are subscribed to IPTV service the modem router might require VLAN tags to distinguish between the Internet traffic and the IPTV traffic A bridge with a VLAN tag group prevents packets that are sent between the IPTV device and the modem router s In...

Page 178: ... page displays 5 Select the Enable VLAN Bridge Group check box 6 Select the By VLAN tag group radio button 7 Click the Add button 8 Specify the settings as described in the following table Description Field Enter a name for the VLAN tag group The name can be up to 10 characters Name Enter a value from 1 to 4094 VLAN ID Manage the WAN and LAN Network Settings 178 AC1200 WiFi VDSL ADSL Modem Router ...

Page 179: ...ect your LAN against attacks such as Syn flood Smurf Attack Ping of Death and many others By default DoS protection is enabled and a port scan is rejected You can also enable the modem router to respond to a ping to its WAN Internet port This feature allows your modem router to be discovered Enable this feature only as a diagnostic tool or if a specific reason exists To change the default WAN secu...

Page 180: ...ck other computers on your network The modem router usually detects and discards incoming traffic from the Internet that is not a response to one of your local computers or a service or application for which you set up a port forwarding or port triggering rule Instead of discarding this traffic you can direct the modem router to forward the traffic to one computer on your network This computer is ...

Page 181: ...ers on the LAN from attacks from the Internet but might prevent some Internet games point to point applications or multimedia applications from functioning By default the Secured radio button is selected Open Provides a much less secured firewall but allows almost all Internet applications to function 6 Click the Apply button Your settings are saved Manage the SIP Application Level Gateway The app...

Page 182: ...age displays 4 Select ADVANCED Setup WAN Setup The WAN Setup page displays 5 Clear the Disable IGMP Proxying check box By default the Disable IGMP Proxying check box is selected and IGMP proxying is disabled 6 Click the Apply button Your settings are saved Manage the Modem Routers s LAN IP Address Settings The modem router is preconfigured to use private IP addresses on the LAN side and to act as ...

Page 183: ... LAN Setup 5 In the IP Address field enter the LAN IP address for the modem router 6 In the IP Subnet Mask enter the LAN subnet mask for the modem router 7 Click the Apply button Your settings are saved If you changed the LAN IP address of the modem router you are disconnected when the changes take effect To reconnect close your browser relaunch it and log in to the modem router at its new LAN IP ...

Page 184: ...ting table 6 From the RIP Version menu select the RIP version Disabled The RIP version is disabled This is the default setting RIP 1 This format is universally supported It is adequate for most networks unless you are using an unusual network setup RIP 2 This format carries more information Both RIP 2B and RIP 2M send the routing data in RIP 2 format RIP 2B uses subnet broadcasting RIP 2M uses mul...

Page 185: ... reserved address is not assigned until the next time the computer or device contacts the modem router s DHCP server Reboot the computer or device or access its IP configuration and force a DHCP release and renew Change a Reserved IP Address You can change a reserved IP address entry To change a reserved IP address entry 1 Launch a web browser from a WiFi enabled computer or mobile device that is ...

Page 186: ...HCP server The modem router assigns IP DNS server and default gateway addresses to all computers that are connected to its LAN and WiFi networks The assigned default gateway address is the LAN address of the modem router These addresses must be part of the same IP address subnet as the modem router s LAN IP address The default DHCP address pool is 192 168 0 2 192 168 0 254 The modem router deliver...

Page 187: ...n the Ending IP Address field enter the number at the end of the range of IP addresses This IP address must be in the same subnet as the modem router By default the ending IP address is 192 168 0 254 7 Click the Apply button Your settings are saved Disable the Built In DHCP Server By default the modem router functions as a DHCP server The modem router assigns IP DNS server and default gateway addr...

Page 188: ...s DHCP Server check box 6 Click the Apply button Your settings are saved Change the Modem Router s Device Name The router s device name is D6220 This device name displays in a file manager when you browse your network To change the modem router s device name 1 Launch a web browser from a WiFi enabled computer or mobile device that is connected to the network 2 Enter http www routerlogin net A logi...

Page 189: ...you are employed and the request is likely to be denied by the company s firewall In this case you must define a static route instructing your modem router that 134 177 0 0 is accessed through the ISDN modem router at 192 168 0 100 Here is an example Through the destination IP address and IP subnet mask specify that this static route applies to all 134 177 x x addresses Through the gateway IP addr...

Page 190: ...Destination IP Address Enter the IP subnet mask for the final destination of the route If the destination is a single host enter 255 255 255 255 IP Subnet Mask Enter the IP address of the gateway The IP address of the gateway must be on the same LAN segment as the modem router Gateway IP Address Enter a number from 1 through 15 This value represents the number of routers between your network and t...

Page 191: ...189 8 Click the Apply button The route is updated in the table on the Static Routes page Remove a Static Route You can remove an existing static route that you no longer need To remove a static route 1 Launch a web browser from a WiFi enabled computer or mobile device that is connected to the network 2 Enter http www routerlogin net A login window opens 3 Enter the modem router user name and passw...

Page 192: ...e 195 Change the admin Password on page 196 Set Up Password Recovery on page 197 Recover the admin Password on page 198 Return the Modem Router to Its Factory Default Settings on page 198 Disable LED Blinking or Turn Off LEDs on page 200 View the Status and Statistics of the Modem Router on page 201 View Devices Currently on the Network on page 210 Manage the Activity Log on page 210 Monitor and M...

Page 193: ...tion Router Update The Router Update page displays 5 Click the Check button The modem router detects new firmware if any is available and displays a message asking if you want to download and install it 6 To download and install the new firmware click the Yes button The modem router locates the firmware downloads it and begins the update WARNING To avoid the risk of corrupting the firmware do not ...

Page 194: ... download the new firmware 2 Read the new firmware release notes to determine whether you must reconfigure the modem router after updating 3 Launch a web browser from a WiFi enabled computer or mobile device that is connected to the network 4 Enter http www routerlogin net A login window opens 5 Enter the modem router user name and password The user name is admin The default password is password T...

Page 195: ...splays The version firmware is stated in the top right under the Logout button Manage the Configuration File of the Modem Router The configuration settings of the modem router are stored within the modem router in a configuration file You can back up save this file to your computer or restore it Back Up the Settings You can save a copy of the current configuration settings To back up the modem rou...

Page 196: ...on The configuration is uploaded to the modem router When the restoration is complete the modem router reboots This process takes about two minutes WARNING To avoid the risk of corrupting the firmware do not interrupt the restoration For example do not close the browser click a link or load a new page Do not turn off the modem router Wait until the modem router finishes restarting and the Power LE...

Page 197: ...u change the password for the modem router user name admin Then you can recover the password if it is forgotten This recovery process is supported in Internet Explorer Firefox and Chrome browsers but not in the Safari browser To set up password recovery 1 Launch a web browser from a WiFi enabled computer or mobile device that is connected to the network 2 Enter http www routerlogin net A login win...

Page 198: ...ter 4 Enter the serial number of the modem router 5 Click the Continue button A page displays requesting the answers to your security questions 6 Enter the saved answers to your security questions 7 Click the Continue button A page displays your recovered password 8 Click the Login again button A login window opens 9 With your recovered password log in to the modem router Return the Modem Router t...

Page 199: ...bout two minutes WARNING To avoid the risk of corrupting the firmware do not interrupt the reset For example if you are connected to the modem router s web page do not close the browser click a link or load a new page Do not turn off the modem router Wait until the modem router finishes restarting and the Power LED turns solid green Erase the Settings CAUTION This process erases all settings that ...

Page 200: ...r Turn Off LEDs The LEDs on the top panel of the modem router indicate activities and behavior You can disable LED blinking for network communications or turn off all LEDs except the Power LED To disable LED blinking or turn off the LEDs 1 Launch a web browser from a WiFi enabled computer or mobile device that is connected to the network 2 Enter http www routerlogin net A login window opens 3 Ente...

Page 201: ...tion you can view traffic statistics for the various ports View Information About the Modem Router and the Internet and WiFi Settings You can view modem router information the Internet port status and WiFi settings To view information about the modem router and the Internet and WiFi settings 1 Launch a web browser from a WiFi enabled computer or mobile device that is connected to the network 2 Ent...

Page 202: ...r exclamation mark indicates that the cable port or Internet port is configured but cannot get an Internet connection for example because the cable is disconnected that a WiFi network is enabled but unprotected or that another situation that requires your attention occurred The following table describes the fields of the six panes on the ADVANCED Home page Description Field Router Information The ...

Page 203: ...g sections Set Up Your Modem Router for DSL Service on page 18 Set Up the Modem Router for Cable Service on page 25 Manually Set Up an ADSL Internet Connection on page 41 Manually Set Up a VDSL Internet Connection on page 51 Manually Set Up a Cable Internet Connection on page 60 The Media Access Control MAC address This address is the unique physical address that is assigned to the Internet port M...

Page 204: ...en you use WPS to connect a device to the 2 4 GHz band of the main network Configured The modem router keeps its existing WiFi settings This is the default setting Not configured The modem router generates a random SSID and passphrase and changes the security mode to WPA WPA2 PSK mixed mode For more information see Manage the WPS Settings on page 222 Wi Fi Protected Setup Wireless Settings 5 0GHz ...

Page 205: ... is enabled The WiFi LED on the front of the modem router is not affected by the status of the guest network Wireless AP Displays whether the 2 4 GHz band of the guest network broadcasts its SSID Broadcast Name Displays whether users of the 2 4 GHz band of the guest network are allowed to access the main network Allow guest to see each other and access my local network Guest Network 5 0GHz The set...

Page 206: ...port and WLAN a n ac port For each port the page displays the information that is described in this table Port The link status of the port Status The number of packets that were transmitted on this port since reset or manual clear TxPkts The number of packets that were received on this port since reset or manual clear RxPkts The number of packets that collided on this port since reset or manual cl...

Page 207: ...ssword The user name and password are case sensitive The BASIC Home page displays 4 Select ADVANCED ADVANCED Home The ADVANCED Home page displays 5 In the Internet Port pane click the Show Statistics button A pop up window displays 6 Change the polling frequency or stop polling To change the polling frequency do the following a In the Poll Interval field enter a time in seconds b Click the Set Int...

Page 208: ...ss The subnet mask that is assigned by the ISP to the modem router Subnet Mask The IP address of the default gateway of the ISP that the modem router communicates with Default Gateway The IP address of the DHCP server of the ISP that issues the IP address to the modem router DHCP Server The IP address of the Domain Name System DNS server of the ISP that provides translation of network names to IP ...

Page 209: ...e displays 5 In the Internet Port pane click the Connection Status button The Connection Status pop up window opens The fields that display depend on the type of Internet connection The following table describes the fields for a PPPoE connection Description Field The time elapsed since the connection was established Connection Time The status can be Connected or Disconnected Connection Status The ...

Page 210: ... GHz band The following table describes the fields on the Attached Devices page Description Field For a WiFi device the WiFi network name SSID that the device is using SSID If access control is enabled the access control status of the device in the network Allowed or Blocked Status The IP address that the modem router assigned to the device when it joined the network This address can change when a...

Page 211: ...tration Logs The Logs page shows the following information Action The action that occurred such as whether Internet access was blocked or allowed Source The name IP address or MAC address of the target device application or website for this log entry Target The name IP address or MAC address of the target device application or website for this log entry Date and Time The date and time at which the...

Page 212: ...tivities that you want to be logged By default all check boxes are selected 6 Clear the check boxes that correspond to the activities that you do not want to be logged 7 Click the Apply button Your settings are saved Monitor and Meter Internet Traffic Traffic metering allows you to monitor the volume of Internet traffic that passes through the modem router Internet port With the traffic meter util...

Page 213: ...rts The Internet Traffic Statistics section helps you to monitor the data traffic For more information see View the Internet Traffic Volume and Statistics on page 213 View the Internet Traffic Volume and Statistics If you enabled the traffic meter see Start the Traffic Meter Without Traffic Volume Restrictions on page 212 you can view the Internet traffic volume and statistics To view the Internet...

Page 214: ...rmation about the data traffic and to change the polling interval click the Traffic Status button The Traffic Status pop up window displays Restrict Internet Traffic by Volume You can record and restrict the traffic by volume in MB This is useful when your ISP measures your traffic in volume To record and restrict the Internet traffic by volume 1 Launch a web browser from a WiFi enabled computer o...

Page 215: ...rning message before the monthly limit in hours is reached This setting is optional The modem router issues a warning when the balance falls under the number of minutes that you enter By default the value is 0 and no warning message is issued 12 Select one or more of the following actions to occur when the limit is reached Turn the Internet LED to flashing green amber This setting is optional When...

Page 216: ...password is password The user name and password are case sensitive The BASIC Home page displays 4 Select ADVANCED Advanced Setup Traffic Meter 5 Select the Enable Traffic Meter check box 6 Select the Connection time control radio button The modem router must be connected to the Internet for you to be able to select the Connection time control radio button Note 7 In the Monthly Limit field enter ho...

Page 217: ... monitor the data traffic For more information see View the Internet Traffic Volume and Statistics on page 213 Unblock the Traffic Meter After the Traffic Limit Is Reached If you configured the traffic meter to disconnect and disable the Internet connection after the traffic limit is reached you cannot access the Internet until you unblock the traffic meter CAUTION If your ISP set a traffic limit ...

Page 218: ...nge the admin Password on page 196 Note To set up remote management 1 Launch a web browser from a WiFi enabled computer or mobile device that is connected to the network 2 Enter http www routerlogin net A login window opens 3 Enter the modem router user name and password The user name is admin The default password is password The user name and password are case sensitive The BASIC Home page displa...

Page 219: ... By default the modem router functions as both a modem and a router You can change the operation mode to a mode in which the modem router functions as a DSL modem only with the routing firewall WiFi and traffic meter features disabled A typical use of such a mode is when the modem router is used only for DSL connectivity behind a router firewall or security device manager that provides routing fir...

Page 220: ...ork Settings on page 84 The chapter includes the following sections Set Up a WiFi Schedule on page 221 Manage the WPS Settings on page 222 Manage Advanced WiFi Settings on page 224 Use the Modem Router as a WiFi Access Point Only on page 225 For information about setting up an access control list ACL and managing WiFi access for enhanced security see Manage Network Access Control Lists on page 106...

Page 221: ...out whether the modem router synchronizes its clock see Set Up a Schedule for Keyword Blocking and Outbound Firewall Rules on page 118 Note To set up the WiFi schedule for a WiFi band 1 Launch a web browser from a WiFi enabled computer or mobile device that is connected to the network 2 Enter http www routerlogin net A login window opens 3 Enter the modem router user name and password The user nam...

Page 222: ...anage the WPS Settings Wi Fi Protected Setup WPS lets you join the WiFi network without typing the WiFi password You can change the WPS default settings To manage WPS settings 1 Launch a web browser from a WiFi enabled computer or mobile device that is connected to the network 2 Enter http www routerlogin net A login window opens 3 Enter the router user name and password The user name is admin The...

Page 223: ...ings check boxes By default both Keep Existing Wireless Settings check boxes are selected We recommend that you leave these check boxes selected If you clear a check box the next time a new WiFi client uses WPS to connect to the router the router s associated WiFi settings change to an automatically generated random SSID and passphrase For information about viewing this SSID and passphrase see Vie...

Page 224: ...nected to the network 2 Enter http www routerlogin net A login window opens 3 Enter the modem router user name and password The user name is admin The default password is password The user name and password are case sensitive The BASIC Home page displays 4 Select ADVANCED Advanced Setup Wireless Settings 5 Enter the settings as described in the following table Except where indicated the descriptio...

Page 225: ...e modem router unexpectedly Fragmentation Length 256 2346 CTS RTS Threshold 1 2347 Preamble Mode 6 Click the Apply button Your settings are saved Use the Modem Router as a WiFi Access Point Only You can set up the modem router to function as a WiFi access point AP on the same local network as another router When the modem router functions as a WiFi AP many router related features are disabled If y...

Page 226: ...able fixed IP settings on this device not recommended Use this setting if you want to manually assign a specific IP address to the modem router while it functions in access point mode Using this option effectively requires advanced network experience To avoid interference with other routers or gateways on your network we recommend that you use different WiFi settings on each router You can also tu...

Page 227: ...is chapter explains how to set up and use VPN access The chapter includes the following sections Set Up a VPN Connection on page 228 Use a VPN Tunnel on a Windows Computer on page 232 Use VPN to Access the Modem Router s USB Device and Media From a Windows Computer on page 234 Use VPN to Access Your Internet Service at Home on page 234 227 ...

Page 228: ...ce register for an account with a host name sometimes called a domain name You use the host name to access your network The modem router supports these accounts NETGEAR No IP and Dyn See Set Up and Manage Dynamic DNS on page 152 If your Internet service provider ISP assigned a static WAN IP address such as 50 196 x x or 10 x x x that never changes to your Internet account the VPN can use that IP a...

Page 229: ...enVPN software on your computer before you can use a VPN connection see Install OpenVPN Software on a Windows Computer on page 229 and Install OpenVPN Software on a Mac Computer on page 231 Install OpenVPN Software on a Windows Computer You must install OpenVPN software on each computer that you plan to use for VPN connections to your modem router To install VPN client software on a Windows comput...

Page 230: ...e file 10 To install the OpenVPN client utility on your computer click the openVPN install xxx exe file 11 Click the Next button 12 Read the License Agreement and click the I Agree button 13 Leave the check boxes selected as shown in the previous figure and click the Next button 14 To specify the destination folder click the Browse button select a destination folder and click the Next button 15 Cl...

Page 231: ...e local area connection with the device name TAP Windows Adapter c Select the local area connection and change its name not its device name to NETGEAR VPN If you do not change the VPN interface name the VPN tunnel connection will fail For more information about using OpenVPN on a Windows computer visit openvpn net index php open source documentation howto html quick Install OpenVPN Software on a M...

Page 232: ...visit openvpn net index php access server docs admin guides 183 how to connect to access server from a mac html Use a VPN Tunnel on a Windows Computer After you set up the modem router to use VPN and install the OpenVPN application on your computer you can open a VPN tunnel from your computer to your modem router over the Internet For the VPN tunnel to work the local LAN IP address of the remote r...

Page 233: ...dministrator check box Then every time you use this shortcut OpenVPN automatically runs with administrator privileges Tip 2 Right click the OpenVPN icon 3 Select Connect The VPN connection is established You can do the following Launch a web browser and log in to your modem router Use Windows file manager to access the modem router s USB device and download files Use VPN to Access Your Network 233...

Page 234: ...to Access Your Internet Service at Home When you are away from home and you access the Internet you usually use a local Internet service provider For example at a coffee shop you might be given a code that lets you use the coffee shop s Internet service account to surf the web The modem router lets you use a VPN connection to access your own Internet service when you are away from home You might w...

Page 235: ...hat enables VPN access only for necessary services and sites and might not include full Internet access Note 7 Click the Apply button Your settings are saved 8 Click the For Windows or For non Windows button and download the configuration files for your VPN clients 9 Unzip the configuration files and copy them to the folder where the VPN client is installed on your device For a client device with ...

Page 236: ...7 Click the Apply button Your settings are saved Use a VPN Tunnel to Access Your Internet Service at Home To access your Internet service 1 Set up the modem router to allow VPN access to your Internet service See Set Up VPN Client Internet Access in the Modem Router on page 234 2 On your computer launch the OpenVPN application The OpenVPN icon displays in the Windows taskbar 3 Right click the icon...

Page 237: ...ules for Internet traffic for services and applications You need networking knowledge to set up these features This chapter includes the following sections Manage Port Forwarding to a Local Server for Services and Applications on page 238 Manage Port Triggering for Services and Applications on page 243 237 ...

Page 238: ...forward incoming traffic for a default service or application 1 Decide which type of service application or game you want to provide 2 Find the local IP address of the computer on your network that will provide the service The server computer must always receive the same IP address To specify this setting use the reserved IP address feature See Manage Reserved LAN IP Addresses on page 184 3 Launch...

Page 239: ...ule with a custom service or application To add a port forwarding rule with a custom service or application 1 Find out which port number or range of numbers the service or application uses You can usually find this information by contacting the publisher of the service or application or through user groups or news groups 2 Launch a web browser from a WiFi enabled computer or mobile device device t...

Page 240: ...External Ending Port Specify the internal ports by one of these methods If the external and internal ports are the same leave the Use the same port range for Internal port check box selected If the external and internal ports are different in the Internal Starting Port field enter the starting port number for the service or application The Internal Ending Port field is populated automatically Inte...

Page 241: ...ed Setup Port Forwarding Port Triggering The previous figure shows two custom port forwarding rules 5 Make sure that the Port Forwarding radio button is selected 6 In the table select the radio button for the service or application name 7 Click the Edit Service button The Ports Custom Services page displays 8 Change the settings For information about the settings see Add a Port Forwarding Rule Wit...

Page 242: ... page displays 4 Select ADVANCED Advanced Setup Port Forwarding Port Triggering The previous figure shows two custom port forwarding rules 5 Make sure that the Port Forwarding radio button is selected 6 In the table select the radio button for the service or application name 7 Click the Delete Service button The rule is removed from the table Application Example Make a Local Web Server Public If y...

Page 243: ...dard port number for a web server process 2 The modem router receives the message and finds your port forwarding rule for incoming port 80 traffic 3 The modem router changes the destination IP address in the message to 192 168 0 123 and sends the message to that computer 4 Your web server at IP address 192 168 0 123 receives the request and sends a reply message to your modem router 5 Your modem r...

Page 244: ...lt services and applications for port triggering rules You must define a custom service or application for each port triggering rule To add a port triggering rule 1 Launch a web browser from a WiFi enabled computer or mobile device device that is connected to the network 2 Enter http www routerlogin net A login window opens 3 Enter the modem router user name and password The user name is admin The...

Page 245: ...t the protocol TCP or UDP that is associated with the service or application Service Type Enter the number of the outbound traffic port that must open the inbound ports Triggering Port Inbound Connection Select the protocol TCP or UDP that is associated with the inbound connection If you are unsure select TCP UDP Connection Type Enter the start port number for the inbound connection Starting Port ...

Page 246: ...arding Port Triggering The Port Forwarding Port Triggering page displays 5 Select the Port Triggering radio button The previous figure shows two port triggering rules 6 In the Port Triggering Portmap Table select the radio button for the service or application name 7 Click the Edit Service button The Port Triggering Services page displays 8 Change the settings For information about the settings se...

Page 247: ...ring The Port Forwarding Port Triggering page displays 5 Select the Port Triggering radio button The previous figure shows two port triggering rules 6 In the Port Triggering Portmap Table select the radio button for the service or application name 7 Click the Delete Service button The rule is removed from the Port Triggering Portmap Table Specify the Time Out for Port Triggering The time out perio...

Page 248: ...k the Apply button Your settings are saved Disable Port Triggering By default port triggering is enabled You can disable port triggering temporarily without removing any port triggering rules To disable port triggering 1 Launch a web browser from a WiFi enabled computer or mobile device device that is connected to the network 2 Enter http www routerlogin net A login window opens 3 Enter the modem ...

Page 249: ...dem router stores the original information performs Network Address Translation NAT on the source address and port and sends this request message through the Internet to the IRC server 4 Noting your port triggering rule and observing the destination port number of 6667 your modem router creates another session entry to send any incoming port 113 traffic to your computer 5 The IRC server sends a re...

Page 250: ...com support for product and contact information The chapter contains the following sections Quick Tips for Troubleshooting on page 251 Troubleshoot With the LEDs on page 252 You Cannot Log In to the Modem Router on page 253 Troubleshoot the Internet Connection on page 254 Changes Are Not Saved on page 258 Troubleshoot the WiFi Connectivity on page 258 Troubleshoot Your Network Using the Ping Utili...

Page 251: ...uter try the following Make sure that the WiFi settings in your WiFi device and modem router match exactly For a device that is connected over WiFi the WiFi network name SSID and WiFi security settings of the modem router and WiFi computer must match exactly The default SSID and password are on the product label see Bottom Panel Product Label on page 13 Make sure that your WiFi device supports the...

Page 252: ... is solid white unless the WiFi radios are turned off The WPS LED on the WPS button is solid white unless the WiFi radios are turned off You can use the LEDs for troubleshooting For more information see the following sections Power LED Is Off on page 252 Power LED Remains Solid Amber on page 253 WiFi LED Is Off on page 253 Troubleshoot the Internet Connection on page 254 Power LED Is Off If the Po...

Page 253: ...nnected computer check the Ethernet connection between the computer and the modem router Make sure that the IP address of your computer is on the same subnet as the modem router If you are using the recommended addressing scheme your computer s address is in the range of 192 168 0 2 to 192 168 0 254 Make sure that your computer can reach the modem router s DHCP server Recent versions of Windows an...

Page 254: ...f the DSL LED does not turn solid green disconnect all telephones on the line If this solves the problem reconnect the telephones one at a time being sure to use a microfilter on each telephone If the microfilters are connected correctly you can connect all your telephones If disconnecting telephones does not result in a solid green DSL LED a problem with your wiring might exist If the telephone c...

Page 255: ...dem router s web pages To check the Internet IP address 1 Launch a web browser from a WiFi enabled computer or mobile device device that is connected to the network 2 Enter http www routerlogin net A login window opens 3 Enter the modem router user name and password The user name is admin The default password is password The user name and password are case sensitive The BASIC Home page displays 4 ...

Page 256: ...ection on page 60 Verify the PPPoE or PPPoA Connection If you use a PPPoE or PPPoA connection to your ISP make sure that the connection works To verify that your PPPoE or PPPoA connection is working 1 Launch a web browser from a WiFi enabled computer or mobile device device that is connected to the network 2 Enter http www routerlogin net A login window opens 3 Enter the modem router user name and...

Page 257: ... is connected to the network 2 Enter http www routerlogin net A login window opens 3 Enter the modem router user name and password The user name is admin The default password is password The user name and password are case sensitive The BASIC Home page displays 4 Select ADVANCED ADVANCED Home The ADVANCED Home page displays 5 In the Internet Port pane click the Connection Status button The Connect...

Page 258: ...ing the Ping Utility on page 259 If your computer obtains its information from the modem router by DHCP reboot the computer and verify the modem router address Changes Are Not Saved If the modem router does not save the changes that you make on a modem router web page do the following When entering configuration settings always click the Apply button before moving to another page or tab or your ch...

Page 259: ...locking the WiFi signal Troubleshoot Your Network Using the Ping Utility Most network devices and routers contain a ping utility that sends an echo request packet to the designated device The device then responds with an echo reply You can easily troubleshoot a network using the ping utility in your computer or workstation Test the LAN Path to Your Modem Router You can ping the modem router from y...

Page 260: ...of your modem router is listed as the default router in your computer If the IP configuration of your computer is assigned by DHCP this information is not visible in your computer s Network Control Panel Verify that the IP address of the modem router is listed as the default router Check to see that the network address of your computer the portion of the IP address specified by the netmask is diff...

Page 261: ...A Supplemental Information This appendix covers the following topics Factory Settings on page 262 Technical Specifications on page 264 261 ...

Page 262: ...ssword Login password case sensitive Internet connection Use default hardware address WAN MAC address Determined by the protocol that is used for the Internet connection see MTU Concepts on page 81 WAN MTU size Autosensing Port speed Local network LAN 192 168 0 1 LAN IP address 255 255 255 0 Subnet mask Enabled DHCP server 192 168 0 2 to 192 168 0 254 DHCP range 192 168 0 2 DHCP starting IP addres...

Page 263: ...ions and environmental factors including volume of network traffic building materials and construction and network overhead affect the data throughput rate Note Transmission speed Up to 300 Mbps at 2 4 GHz Up to 867 Mbps at 5 GHz WiFi operating mode Guest WiFi network Disabled WiFi communication 2 4 GHz band NETGEAR Guest 5 GHz band NETGEAR 5G Guest SSID name None open network Security Disabled Al...

Page 264: ...P 2 DHCP PPPoE PPPoA Dynamic DNS UPnP and SMB Data and routing protocols North America 120V 60 Hz input UK Australia 240V 50 Hz input Europe 230V 50 Hz input All regions 12V 2 5A output Power adapter 240 x 182 x 41 mm 9 44 x 7 16 x 1 61 in Dimensions 341 g 0 75 lb Weight 0 to 40 C 32º to 104ºF Operating temperature 90 maximum relative humidity noncondensing Operating humidity EN 55022 2010 AC 2011...

Page 265: ...EEE 802 11 a n ac 5 0 GHz Data encoding standards The modem router can support a maximum of 256 clients Maximum number of wired clients 128 Maximum number of 2 4 GHz WiFi clients 64 Maximum number of 5 GHz WiFi clients 64 In a WiFi network the number of clients is limited by the amount of WiFi traffic that is generated by each client Note Maximum number of supported clients 2 4 GHz band US 2 412 2...

Page 266: ... A L and M Supports all VDSL2 profiles 8a 8b 8c 8d 12a 12b and 17a VDSL2 interface compliance with ITU T993 2 G 992 1 G dmt Annex A compliant G 992 2 G lite Annex A compliant ANSI T1 413 compliant G 992 3 ADSL2 compliant Annex A L and M G 992 5 ADSL2 compliant supporting Annex A and M G 993 2 compliant Annex A G 993 5 Vectoring ATM and PTM dual priority xDSL data rate Supplemental Information 266 ...

Reviews: