Quick Start Guide
APconnections, Inc. // 303.997.1300 //
www.netequalizer.com
Page 3 of 14
All rights reserved
Copyright © 2010 to 2015 APconnections, Inc.
rev. 20141125
Step #1: Cabling the NetEqualizer into your Network
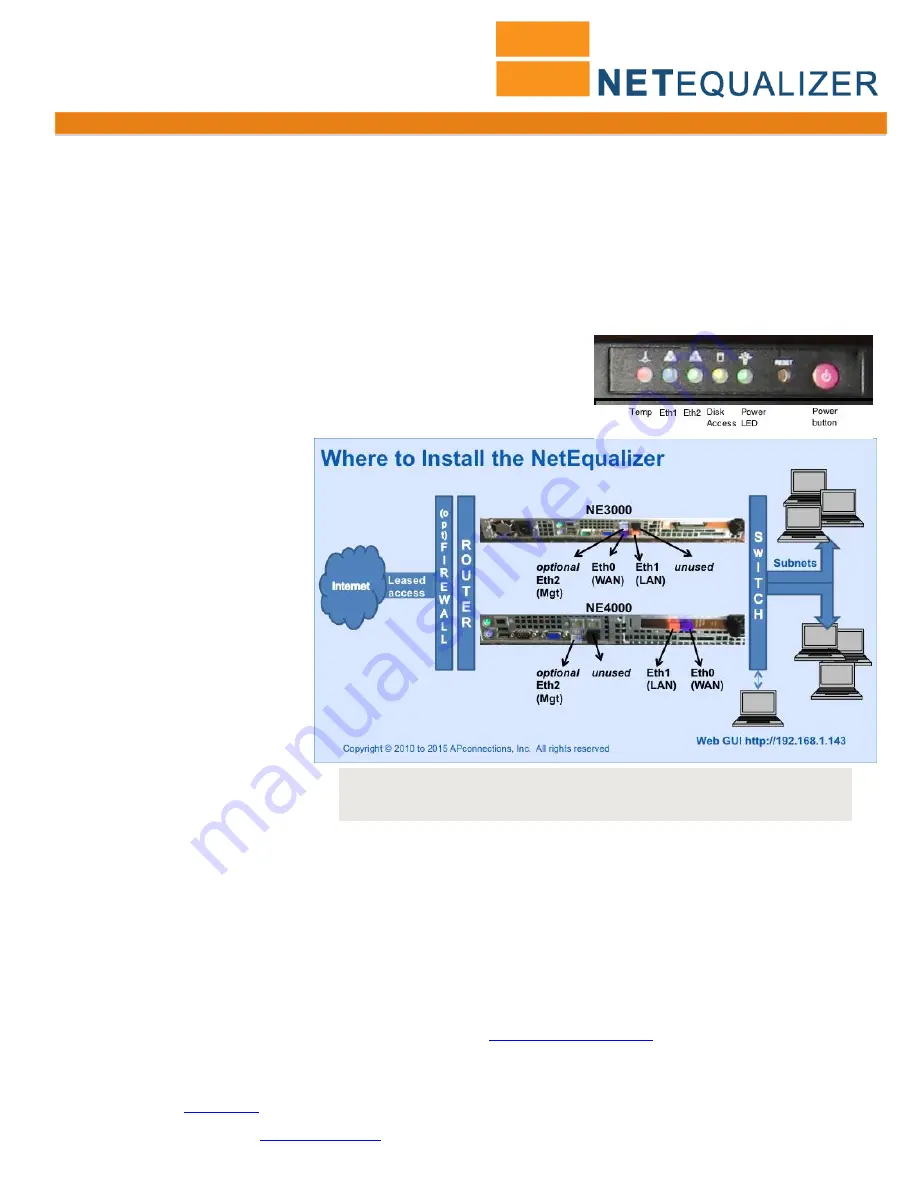
All of the NetEqualizer models (series 3000/4000) have two Ethernet interfaces. We are now using port plugs to help
distinguish the various interface ports on the NetEqualizer. We use four colors: 1) blue (WAN), 2) orange (LAN),
3) translucent (Management Port
–
optional, not activated
) and 4) black (unused).
The easiest way to figure out the
ports is to look at the port plug color. The LAN port is orange and the WAN port is blue
. For further clarification,
please see the "Where to Install the NetEqualizer" diagram below.
The
optional
Management Port (translucent port plug) is not activated at this time, and is not needed in many
configurations. However, if you are on a VLAN, you may need to use the Management Port. See Step #2 for details.
First, make sure that you
power on the NetEqualizer
.
Do this by pressing the red power button to the right of the LED panel.
WAN Connection (blue)
Remove the blue port plug and then
plug a
crossover cable
into Eth0
(WAN) port and connect it to the
Firewall/Router. As you face the back
of the machine, Eth0 is on your
bottom row LEFT (NE3000), or top
row RIGHT (NE4000). If you have
an auto-sensing Firewall/Router, you
can use a straight cable or a
crossover cable.
LAN Connection (orange)
Remove the orange port plug and
then plug a
straight cable
into the
Eth1 (LAN) port and connect it to
your Network Switch. As you face
the back of the machine, Eth1 is on
your bottom row RIGHT (NE3000), or
top row LEFT (NE4000). If whatever
you are plugging into does not have
a built-in switch, then use a crossover
cable.
Once your machine is on & connected, you should see green lights in the Power LED, Eth0, and Eth1 LEDs.
Step #1A (optional): Access Point Configuration in a Wireless Network
Put your radios in bridging mode and set your Firewall/Router at your headend to do DHCP and NAT, instead of doing
DHCP and NAT at your Access Points.
Step #1B (optional): Setting LAN Port Speed and Duplex
Occasionally, customers need to manually set LAN Port Speed and Duplex, as some Firewall/Routers do not auto-
negotiate correctly with the NetEqualizer. If this is happening in your environment, you will see a large number of
collisions and dropped packets as well as reduced network throughput. Although dropped packets are not a good thing,
if you are seeing less than 1/10 of a percent (< 0.1%) of the total packets transmitted it will have no adverse effect on your
network. If it starts to approach 1 percent (1%), you should follow
User Guide Appendix #2
to set this in your environment.
Step #1C (optional): Firewalling off the NetEqualizer
If you do not install the NetEqualizer behind a firewall, you should use
Manage Firewall Settings
to firewall off the
NetEqualizer. See
User Guide
for detailed instructions.
Notes:
Once you have the NetEqualizer configured, you can change the Default Web GUI IP address. See Appendix #2C.
To secure the management port, you can also make it accessible via https (SSH). See Appendix #2D.
If you are on a VLAN, you will need to set-up a Management Port.
Note:
We recommend that you install your NetEqualizer on a UPS, to protect
from power surges and outages.


