background image


www.netcomm.com.au 

11 

NetComm NB304N – ADSL2+ Wireless N300 Modem 


YML304X 

Hardware installation  

1.


Connect the power adapter to the Power socket on the back of the NB304N.  

2.


Plug the power adapter into the wall socket and switch on the power.  

3.


Wait approximately 60 seconds for the NB304N to power up.  

Connecting via a cable  

1.


Connect the yellow Ethernet cable provided to one of the ports marked ‘LAN’ at the back of the NB304N.  

2.


Connect the other end of the yellow Ethernet cable to your computer.  

3.


Wait approximately 30 seconds for the connection to establish.  

4.


Open your Web browser, and enter http://192.168.1.1 into the address bar and press enter.  

5.


Follow the steps to set up your NB304N.  

Connecting wirelessly  

1.


Ensure Wi-Fi is enabled on your device (computer/laptop/Smartphone).  

2.


Scan for wireless networks in your area and connect to the network name that matches the Wireless network name 
configured on the NB304N.  


Please note: The default Wireless network name is “NetComm Wireless”


3.


When prompted for your wireless security settings, enter the Wireless security key configured on the NB304N.  


Please note: The default Wireless Security key is “a1b2c3d4e5”


4.


Wait approximately 30 seconds for the connection to establish.  

5.


Open your Web browser, and enter http://192.168.1.1 into the address bar and press enter.  

6.


Follow the steps to set up your NB304N.  


Summary of Contents for NB304N

Page 1: ...NETCOMM GATEWAY SERIES ADSL2 Wireless N300 Modem Router NB304N USER GUIDE...

Page 2: ...nt When this equipment has reached the end of its useful life it must be taken to a recycling centre and processed separately from domestic waste The cardboard box the plastic contained in the packagi...

Page 3: ...ndicators 6 Physical Dimensions 7 NB304N Default Settings 7 Integrated Interfaces 8 Safety and Product Care 9 Transport and Handling 9 Installation and Configuration of the NB304N 10 Management Consol...

Page 4: ...your NB304N please confirm that you comply with the minimum system requirements below An activated ADSL ADSL2 ADSL2 broadband service Computer with Windows Macintosh or Linux based operating systems w...

Page 5: ...iting the NetComm Support website at http www netcomm com au contact us technical support Product Features The NetComm NB304N ADSL2 Wireless N300 Modem Router allows you to connect to a broadband Inte...

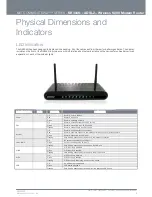
Page 6: ...connected to an xDSL service Flashing Router is connecting to an xDSL service Internet Off Router is not connected to the Internet Red Router is unable to connect to the internet with the current con...

Page 7: ...1 mm Height 135 mm Width 26 mm Weight 245 grams NB304N Default Settings The following tables list the default settings for the NB304N LAN MANAGEMENT Static IP Address 192 168 1 1 Subnet Mask 255 255 2...

Page 8: ...ve xDSL service here WLAN Press this button to enable or disable the Wi Fi function of the NB304N RESET Hold this button down for 10 seconds or more to reset the NB304N to factory defaults WPS Press t...

Page 9: ...elevated surfaces Allow it to lie freely There should be no obstructions in its path and no heavy items should be placed on the cord In addition do not walk on step on or mistreat the cord To safeguar...

Page 10: ...ovens Dense objects that can inhibit wireless communication include Refrigerators Washers and or dryers Metal cabinets Large aquariums Metallic based UV tinted windows If your wireless signal seems we...

Page 11: ...browser and enter http 192 168 1 1 into the address bar and press enter 5 Follow the steps to set up your NB304N Connecting wirelessly 1 Ensure Wi Fi is enabled on your device computer laptop Smartph...

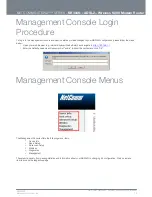
Page 12: ...below 1 Open your web browser e g Internet Explorer Firefox Safari and navigate to http 192 168 1 1 2 Enter the default username and password of admin without the quotes and click OK Management Consol...

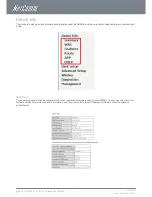
Page 13: ...bout the NB304N and the currently configured network connections and hosts Summary The summary page provides an overview of the current operating parameters used by your NB304N You can use this check...

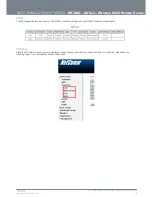
Page 14: ...X www netcomm com au WAN The WAN page displays a summary of the WAN connection settings and your WAN IP address if applicable Statistics Statistical information is provided and displayed broken down b...

Page 15: ...The LAN page displays information about computers or devices connected to the NB304N either by an Ethernet cable or via wireless WAN Service The WAN page displays information about the WAN connection...

Page 16: ...B304N ADSL2 Wireless N300 Modem YML304X www netcomm com au xTM The Asynchronous Transfer Mode ATM page shows information about the currently configured ATM interface xDSL The xDSL page shows informati...

Page 17: ...2 Wireless N300 Modem YML304X Route The Route page lists the current routing table entries ARP The Address Resolution Protocol ARP page shows the current ARP table entries DHCP The DHCP page lists the...

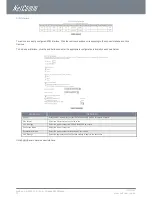
Page 18: ...password provided by your ISP in the PPP Password field 3 Click Apply Save 4 Click Next and view your connection information The NB304N will then automatically attempt to connect using the details yo...

Page 19: ...hown below PARAMETER DEFINITION VPI VCI Enter the PVC identifier for your service This will usually be 8 35 for users in Australia DSL Latency Select the DSL latency path you wish to use DSL Link Type...

Page 20: ...move checkbox corresponding to the chosen interface and click Remove To Add a new Interface click the add button and select the appropriate configuration options as shown below PARAMETER DEFINITION ET...

Page 21: ...will be summarized here You can also add or remove WAN Services To remove a currently configured WAN Service Click the remove checkbox corresponding to the chosen service and click Remove To create a...

Page 22: ...al on demand mode Enter the idle time to wait before disconnecting the service PPP IP Extension Select to enable PPP IP Extension on the connection Static IPv4 Address Enter a static IP Address to uti...

Page 23: ...nter the subnet mask to use for the connection WAN gateway IP Address Enter the gateway IP address to use for the connection Primary DNS Server Enter the Primary DNS server to use for the connection S...

Page 24: ...firewall to restrict traffic between LAN hosts Enable DHCP Server Select to enable or disable the DHCP server and enter the start and end address for the DHCP IP Address pool Configure the second IP A...

Page 25: ...ress Set the IPv6 Address of the NB304N Enable DHCPv6 Server Select to enable the stateless DHCPv6 Server Enable RADVD Select to enable the Router Advertisement Daemon Site Prefix Configuration Select...

Page 26: ...al Server allows you to direct incoming traffic from the Internet to a specific computer in your local network A maximum 32 entries can be configured Click Add to create a Virtual Server As an example...

Page 27: ...32 entries can be configured Click Add to setup Port Triggering 1 Enter the External Port range for the incoming connections 2 Select the appropriate protocol 3 Enter the Internal Port Range Click Sav...

Page 28: ...ns to enable and click Save Apply Multi NAT Multi NAT enables the NB304N to support a number of different NAT types such as One to One One to Many Many to One Many to Many 1 Select the type of NAT to...

Page 29: ...and click Remove To create a new outgoing IP filter click Add The Add IP Filter Outgoing page will be displayed Enter the following parameters PARAMETER DEFINITION Filter Name Enter a name to identif...

Page 30: ...Remote Server from which to allow connections Source Port Enter the port number used by the application to allow Destination IP Address Subnet Mask Enter the IP Address of the PC on the LAN to which c...

Page 31: ...he Parental Control rule Browser s MAC Address or Other MAC Address Enter the MAC Address of the device restrict Days of the Week Click to select the days of the week on which to apply the restriction...

Page 32: ...rovided for specific applications By default QoS is not enabled After enabling QoS select the appropriate default DSCP mark from the dropdown menu to apply to network traffic Queue Configuration The Q...

Page 33: ...ffic to apply the entered QoS classification to Source MAC Address Enter the source MAC address to apply the entered QoS classification to Destination MAC Address Enter the destination MAC address to...

Page 34: ...nt to manually define the path to transmit data on To delete a static route click the Remove checkbox next to the selected static route and click Remove To create a new Static Route click Add The Rout...

Page 35: ...physical port to apply the routing policy to Source IP Enter the source address of traffic to apply the routing policy to Use Interface Enter the interface to apply the routing policy to Default Gatew...

Page 36: ...05 232 4 The DNS system consists of a network of DNS servers If one DNS server does not know how to translate a particular domain name it asks another one and so on until the correct IP address is ret...

Page 37: ...popular Dynamic DNS service providers www dyndns org www tzo com To delete a Dynamic DNS entry click the Remove checkbox next to the selected Dynamic DNS entry and click Remove Click Add to create a D...

Page 38: ...can also configure the DSL test mode which can improve your DSL connection speeds or throughput Select the DSL test mode applicable to your DSL service Click Apply Save to save the new DSL test mode c...

Page 39: ...omain name for the DNS Proxy function and click Apply Save to save the new DNS Proxy configuration settings Packet Acceleration Packet acceleration uses a number of methods to try and reduce the laten...

Page 40: ...username to use when accessing the USB Storage device Password Enter the password to use when accessing the USB Storage device Re enter the password in the Confirm Password field VolumeName Enter the...

Page 41: ...Tunnel access from Local Select which remote addresses local IPSec connections are able to access IP Address from VPN Enter the IP Address to be used locally for the IPSec tunnel Subnet mask for VPN E...

Page 42: ...YML304X www netcomm com au Power Management The power management page enables you to control the green aspects of the NB304N You can enable or disable the power management features by selecting or uns...

Page 43: ...lect to prevent clients on the wireless network being able to access each other Disable WMM Advertise Select to prevent the NB304N advertising its WMM function Enable Multicast Forwarding WMF Select t...

Page 44: ...ter the security key to use with the wireless network WPA Group Rekey Interval Enter the group rekey interval This should not need to changed WPA WAPI Encryption Select the type of encryption to use o...

Page 45: ...using the Bridge Restrict option and then entering the applicable MAC Addresses of the other wireless access points Click Apply Save to save the new wireless bridge configuration settings Advanced Adv...

Page 46: ...tion You can use the diagnostic menu to perform the following test functions from the router Testing the connection to your local network Testing the connection to your DSL service provider Testing th...

Page 47: ...file saved on your PC click Backup Settings Select the folder where you want to save the file and key in the file name under which you want to save the settings Update To import a previously saved co...

Page 48: ...her or not a remote syslog server should be used If a remote system log server is to be used enter the IP address and port the remote syslog server is running on Click Apply Save to save the new syste...

Page 49: ...ystem requires you to enter your user name and password to validate your access permission By default the Username is set to admin and the Password to admin You can change both the user and password i...

Page 50: ...N300 Modem YML304X www netcomm com au To delete an IP restriction entry click the Remove checkbox next to the IP restriction entry and click Remove Click Add to add a new IP restriction Enter the Star...

Page 51: ...re is stored in the FLASH memory and can be upgraded as new software is released Click Browse to locate the software file and then click Update Software Reboot This feature allows the router to enable...

Page 52: ...G 992 5 ADSL2 Annex L reach extended ADSL2 LED Indicators Power DSL Internet LAN1 LAN4 WLAN WPS USB Operating Temperature 0 40 degrees Celsius operating temperature Power input 12VDC 1 5A Dimensions...

Page 53: ...service is active and that the telephone line has been connected securely 3 I cannot connect wirelessly Verify the Wireless network function is enabled and that you are entering the correct Wireless S...

Page 54: ...s no guarantee that interference will not occur with the installation of this product in your home or office If this equipment does cause some degree of interference to radio or television reception w...

Page 55: ...icable Consumer Protection Laws which cannot be excluded see Section 3 above the Product Warranty is automatically voided if 1 you or someone else use the product or attempt to use it other than as sp...

Page 56: ...Modem Router 56 NetComm NB304N ADSL2 Wireless N300 Modem YML304X www netcomm com au Contact Address NETCOMM LIMITED Head Office PO Box 1200 Lane Cove NSW 2066 Australia P 61 0 2 9424 2070 F 61 0 2 942...

Reviews: