


SETTING UP ON THE STAND
Tools required
Accessories provided
•
Torx, cross-headed screwdriver or screw gun
• Bearing bolt
•
19mm diameter latch key • M12 self-locking nut
•
Size 8 Allen key (BTR)
Number of people: 3 - 4
Procedure
•
Place the stand in the prepared position
•
Place the stove on the stand using a lift or sharing the weight between several people.
•
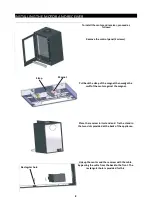
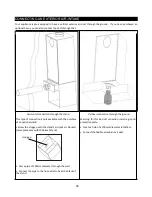
Turn the stove so that the fi xing screw of the plinth cover is accessible.
•
Unscrew the fi xing screw of the plinth cover (2 screws for the low base and 4 for the log-storing base) and
remove it. (See photo 1)
•
Unscrew the 2 fi xing screws (Torx screws) from the control panel and remove it (photo 2).
Photo 1 Photo 2
•
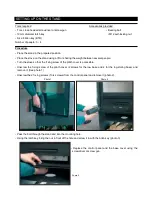
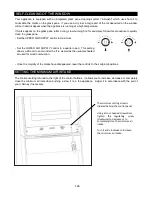
Pass the bolt through the stand and into the mounting hole.
•
Using the latch key, bring the nut in front of the hole and screw it in with the Allen key (photo 3).
•
Replace the control panel and the base cover using the
screwdriver or screw gun.
Photo 3
Summary of Contents for TQ33
Page 2: ...2 C07100DB805 ...
Page 24: ...24 C07100DB805 ...
Page 44: ...44 C07100DB805 ...
Page 66: ...66 ...
Page 88: ...88 ...
Page 110: ...110 C07100DB805 ...
Page 112: ...112 C07100DB805 ...
Page 113: ...113 C07100DB805 ...
Page 114: ...114 C07100DB805 ...
Page 115: ...115 C07100DB805 ...
Page 116: ...116 C07100DB805 ...
Page 117: ...117 C07100DB805 ...
Page 118: ...118 C07100DB805 ...
Page 119: ...119 C07100DB805 ...


