R8
I N S T A L L AT I O N & P R O G R A M M I N G M A N U A L
A$15.00
INC GST
Ness R8 Radio Control Panel Installer’s Manual
Revision
2
Page 1: ...R8 INSTALLATION PROGRAMMING MANUAL A 15 00 INC GST Ness R8 Radio Control Panel Installer s Manual Revision 2 ...
Page 2: ...stralia s largest designer and manufacturer of high quality security products WWW NESS COM AU Ness Security Products Pty Ltd Quality Endorsed Company ISO9001 LIC No QEC2074 NSW Head Office only NESS R8 INSTALLER MANUAL Revision 2 October 2002 Document Part Number 890 273 For product 100 690 Ness R8 Control Panel 2002 Ness Security Products Pty Ltd ABN 28 069 984 372 R8 installer rev2 pmo091002 Spe...
Page 3: ...larm Type Descriptions 14 System Alarm Descriptions 15 Quick Start Panel Programming 16 Quick Start RADIO Programming 17 PROGRAMMING 19 How to enter Program Mode 19 PANEL PROGRAMMING OPTIONS 20 35 DIALLER PROGRAMMING OPTIONS 37 43 FACTORY DEFAULT OPTIONS 45 CENTRAL STATION MONITORING 48 Contact ID reporting codes 48 Ness Accessories 50 Ness Radio Products 51 PROGRAM OPTIONS SUMMARY 52 55 CONTENTS ...
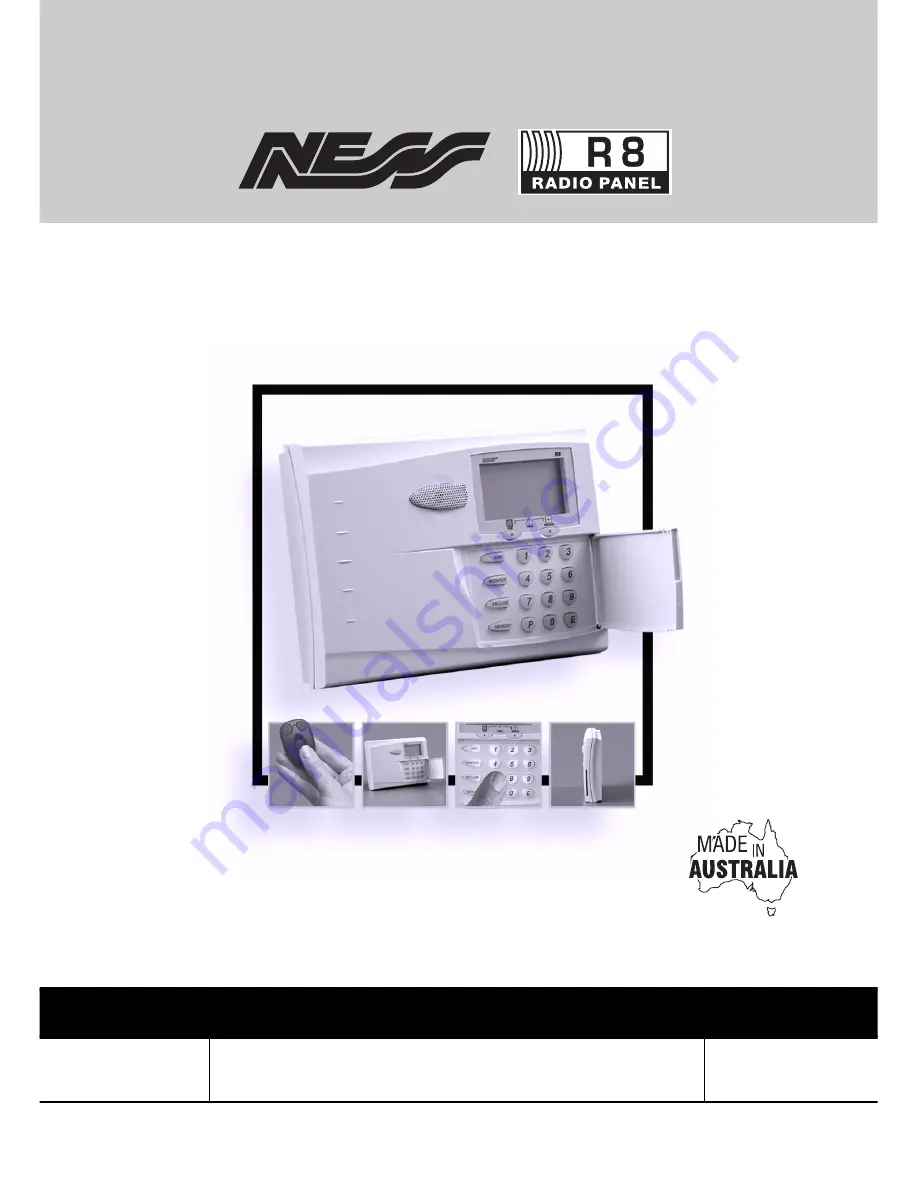
Page 4: ...designed to provide at least 48 hours service running on the backup battery alone This includes one full alarm condition with sirens strobe and dialler The built in dialler uses Contact ID format for central station monitoring as well as audible monitoring to any telephone The user can also dial into the system for remote arming and disarming over the telephone line INTRODUCTION SPECIFICATIONS Rad...
Page 5: ...ess R8 supports all Ness radio devices as shown below All late model Ness transmitters send encrypted transmissions to prevent eavesdropping and substitution Ness fixed transmitters can send a regular supervision signal which the R8 monitors to ensure system security ...
Page 6: ...ay wire loom to the main board 5 Connect the plug pack wiring to the Terminal Board making sure that mains power is not turned on at this stage Connect siren wires and external tamper inputs as required 6 Replace the battery POWER UP PROCEDURE The power up procedure assumes that installation of the R8 is completed and the plug pack is wired 7 Connect the battery lead to the BATTERY socket on the m...
Page 7: ...NG CABLE ENTRY VIA CONDUIT EXTERNAL ANTENNA The external antenna supplied can be fitted if required The sensitivity of the R8 radio receiver with or without the external antenna is subject to RF conditions specific to the site Tests have shown that most sites will perform well using the standard internal antenna The external antenna can be fitted at the installer s discretion in cases where its re...
Page 8: ...TAMPER SWITCH EARTH AC TAMP STR PIEZ 0V ZONE PIEZ STR SIREN SIREN PIEZ STR EARTH PIEZ STR 0V TAMP 0V Z1 AC17V TERMINAL BOARD EARTH AC TAMP STR PIEZ 0V ZONE PIEZ STR SIREN 17V AC Earth EXTERNAL HORN SPEAKER NOI 110 Max Qty 1 STROBE LIGHT NOI 300 Max Qty 1 HARDWIRED ZONE 2K2 END OF LINE EXTERNAL SCREAMER 100 172 Max Qty 1 PLUG PACK 17VAC 300mA Supplied 2K2 N O TAMPER SWITCH 761 002 Colour BLACK Supp...
Page 9: ...0mA plug pack OUTPUTS SIREN Timed siren output for connection of maximum one 1 8 Ohm horn speaker STR Output for connection of 1 x NOI 300 Ness strobe light As a power saving feature the strobe output times out after 11 hours If mains power is off the output will time out after 1 hour PIEZ Timed output for connection of maximum 1 x 12V screamer Ness Part No NOI240 NOI 230 100 238 or 100 172 ONBOAR...
Page 10: ...CD DISPLAY ENTER OUTPUT TYPE OUTPUT DESCRIPTION Keypad Acknowledge key press Keypad Valid entry end of Exit Time Keypad Invalid entry Low battery AC Fail Medical Alarm Alarm Entry Delay etc Arm Disarm The Doorbell has been pressed Alarm condition Panel Armed or Disarmed Alarm condition Keypad beeper Onboard Siren External Siren output Onboard Siren Piezo output External Siren output Strobe output ...
Page 11: ...d kiss off tones This test automatically turns off after 2 minutes E Display Test Press and hold keypad button E for 1 5 seconds Turns on all LCD icons while the button is pressed Zone is sealed Not ready to arm unsealed zones or system faults Disarmed Disarmed Normal Normal Normal Normal Normal Normal Normal Normal Zone is unsealed Ready to Arm Armed Monitor Mode Memory Mode selected Receiving ra...
Page 12: ...eady to detect intrusion DISARMED The system is Off This is the normal mode when the premises are occupied Day Zones and 24 Hour Zones if configured are active DAY MODE The system is Disarmed and a zone or zones have been setup to create an alarm when activated Often used as a doorway alert in a shop See P53E Day Zones MONITOR MODE Allows the system to be partially Armed For example in a house to ...
Page 13: ...IO KEY To Disarm and report a Duress Alarm add the digit 9 before the User Code when Disarming P75E 1E must be enabled to report the alarm Zones can be Excluded when the panel is disarmed x 1 x 1 x 2 Hold Hold Press repeatedly to display the last 20 events Both keys together Keypad Panic must be enabled P62E 6E Zone No Zone No Arming Shortcut must be ON P62E 5E User Code User Code Monitor Shortcut...
Page 14: ... the device PANIC button for the required length of time No sirens or strobe are active MEDICAL Keypad Press and hold Right Hand keypad Star key for 2 seconds The keypad beeper will sound 8 warning beeps The dialler reports a Medical alarm if enabled by P75E 2E MEDICAL Key With a radio key programmed as Medical press and hold the device PANIC button for the required length of time FIRE Keypad Pres...
Page 15: ...m occurs when the detector operates Flash the LCD BATTERY RADIO and zone number icons LOW BATTERY The control panel backup battery is periodically load tested A low battery condition is cleared when the battery passes load test Battery is tested once every 1 hour and on every disarm Flash the LCD BATTERY icon RADIO SUPERVISION FAIL A radio supervisory message or other message has not been received...
Page 16: ... then press 1 0 0 2 0 0 3 0 0 To program the Master Code Example to program the Master Code to be 1234 P11E is the option for the Master Code Press Enter the new Master Code followed by E Enter the new Master Code again followed by E To program the dialler Client Account Number Example Client Code is 9876 P72E is the option for the Client Code Press Enter the new Client Account Number followed by ...
Page 17: ...ep 3 beeps will be heard if the RADIO PIR was successfully learned Zone icon 1 will then be on steady To program a Radio Key Example to program a Radio Key to user slot 2 P10E is the option for programming Radio Keys Learn mode for User 2 Press then press The RADIO icon will be on and the number 2 will be flashing Numbers 2 15 show the status of the user slots ON Radio Keys programmed OFF blank fl...
Page 18: ...Ness R8 Installation and Programming Manual 18 This page is intentionally blank ...
Page 19: ...Program Mode PROGRAM light is ON 2 Then press INSTALLER CODE The keypad will respond with 3 beeps This is Installer Program Mode PROGRAM light is FLASHING HOW TO EXIT PROGRAM MODE 1 Press then This is Operating Mode PROGRAM light is OFF USER PROGRAM MODE User Program Mode allows the owner to program All User Codes Entry and Exit times Note The panel will automatically drop out of User Program Mode...
Page 20: ...to be 03 1234 1234 Press P00E 0312341234E TO CLEAR A TELEPHONE NUMBER To clear a telephone number enter the MEMORY key in place of the telephone number E g to clear Voice Dialling Phone No 2 press P01E MEMORY E PROGRAM MODE LEVEL User Installer Remote by PC FACTORY DEFAULT Both Telephone Numbers blank NOTES These program options can also be accessed by pressing P0E and P1E The leading zero is not ...
Page 21: ...ine built in doorbell tunes to choose from The doorbell is activated by the optional 100 056 Radio Doorbell transmitter Most Ness transmitters can be programmed to operate the Doorbell function see page 25 Extra Option for Radio Keys PROGRAMMING SEQUENCE 1 Press P06E Existing value is displayed 2 ENTER NEW VALUE E New value is displayed EXAMPLE To program Doorbell Tune to be Tune 1 Westminster Pre...
Page 22: ...MPLE TO TEST THE SIGNAL STRENGTH OF A RADIO PIR ON ZONE 2 1 Press P08E 2E Radio icon and numeric icon 2 is flashing waiting for radio data 2 Trigger the radio device on zone 2 3 The display will alternate flashing signal strength value and radio key detector slot number E g The signal strength will be flashed on the display and the panel will beep signal strength value Then the radio icon and dete...
Page 23: ...dicates that the radio device may already be programmed on another zone 3 Connect the battery in the radio device Three beeps indicates device has been successfully programmed EXAMPLE 1 To program radio zone 1 with a Ness Radio PIR 1 Press P09E 1E Zone 1 will start flashing 2 Connect the 9V battery to the Radio PIR TO DELETE A RADIO DEVICE To delete an existing Radio Device press P09E select the z...
Page 24: ...s indicates the radio key has been successfully programmed EXAMPLE To program a Radio Key to user slot 2 Press P10E 2E then press and hold the PANIC button on the Radio Key TO DELETE A RADIO KEY To delete an existing Radio Key press P10E select the user number to delete 2E 15E then press P10E again EXAMPLE To delete the Radio Key on user slot 2 Press P10E 2E P10E PROGRAM MODE LEVEL User Installer ...
Page 25: ...E FOR EXTRA OPTIONS 1 Press P user number option 12 25 E If a Radio Key is programmed to the user slot the RADIO icon will be on Icons 1 5 show which Extra Option is currently selected 2 Press 1 5 E This selects a new Extra Option EXAMPLE A Radio Key is programmed to User Code slot 2 To change the Extra Option to Ignore Panic press P12E 4E USER CODE SLOT KEYPAD CODES RADIO CODES OPTION NOs DESCRIP...
Page 26: ...ber when the control panel is central station monitored Shortcut arming ARM E if enabled is sent as User 25 RELATED OPTIONS P10E Program Radio Keys P11E P25E PROGRAM KEYPAD CODES Options P11E P25E allow the programming or deletion of the 15 keypad codes and also setup the Extra Options for user code slots programmed with a Radio Key PROGRAMMING SEQUENCE 1 Press P user number option 11 25 E The exi...
Page 27: ... Exit Delay time PROGRAMMING SEQUENCE 1 Press P28E The digits of the existing value will be displayed 2 Press new time E The digits of the new value will be displayed EXAMPLE To program the exit delay time to be 50 seconds P28E 50E PROGRAM MODE LEVEL User Installer Remote by PC FACTORY DEFAULT 60 60 seconds NOTES Programmable range is 1 99 seconds To view the programmed value without making change...
Page 28: ...d PROGRAMMING SEQUENCE 1 Press P42E 2 Press 1 8 E to enable each zone for this option To deselect a zone from this option program it to be Instant or Handover Zone light s on indicates which option is enabled PROGRAM MODE LEVEL Installer Remote by PC FACTORY DEFAULT 1 ON Zone 1 is Delayed NOTES When a zone is selected as Entry Delay it is automatically deselected from Instant or Handover P41E ENTR...
Page 29: ... home Example Upstairs zones are Disarmed while downstairs zones are Armed in Monitor mode PROGRAMMING SEQUENCE 1 Press P51E 2 Press 1 8 E to toggle each zone on or off Zone light s on indicates which option s are enabled PROGRAM MODE LEVEL Installer Remote by PC FACTORY DEFAULT 1 8 OFF No Monitor zones RELATED OPTIONS P64E 1E Brief Monitor alarm P51E MONITOR ZONES 24hr Zones operate at all times ...
Page 30: ...OGRAMMING SEQUENCE 1 Press P53E 2 Press 1 8 E to enable each zone for this option To deselect a zone from this option program it to be Delayed Instant or Handover Zone light s on indicates which option s are enabled PROGRAM MODE LEVEL Installer Remote by PC FACTORY DEFAULT 1 8 OFF No Day zones NOTES Typical uses Instant alert when a delivery door is opened Doorway alert for a shop RELATED OPTIONS ...
Page 31: ...armed with a zone s Auto Excluded The 2 sec Siren burst can be disabled by option P62E 7E Default ON P60E 7E KEYPAD BACKLIGHT BLANKING OFF Keypad Backlighting is always on ON Keypad Backlighting blanking enabled The backlighting on the keypad can be programmed to blank after 4 minutes of no keypad use Any action that causes a beep will restore the back lighting or press E to manually restore backl...
Page 32: ...SHORTCUT To enable or disable the Arming shortcut OFF Shortcut disabled ARM USER CODE E ON Shortcut enabled ARM E Default ON PROGRAMMING SEQUENCE 1 Press P62E 2 Press 1 5 E to toggle each option on or off Zone light s on indicates which option s are enabled PROGRAM MODE LEVEL Installer Remote by PC FACTORY DEFAULT 1E ON 2E ON 3E ON 4E not used 5E ON P62E 1E 5E OPERATION SHORTCUTS This option enabl...
Page 33: ...rming 3 chirps disarming OFF Siren chirps disabled ON Siren chirps enabled Default OFF P64E 5E Not used P64E 6E KEYPAD PANIC ALARM Keypad Panic can be triggered by pressing both star keys together The dialler reports a Panic alarm if enabled by P75E 3E OFF NO KEYPAD PANIC ON KEYPAD PANIC IS ENABLED Default ON P64E 7E FIRE ALARM The Fire Alarm can be triggered by pressing the FIRE key for at least ...
Page 34: ... to defeat the system If 2 consecutive identical valid encrypted messages are received a minimum time apart the alarm is raised 2 Encryption Hacking In this case an attempt is made to crack the encrypted changing part of a message using multiple transmissions If 20 messages are received with a valid ID but fail decryption the alarm is raised Arming and disarming resets this count OFF Radio Substit...
Page 35: ...urs P67E 6E PROGRAM MODE LEVEL Installer Remote by PC FACTORY DEFAULT 24 24 hours NOTES RELATED OPTIONS P88E 6E Report Supervision Alarms P67E RADIO SUPERVISION TIME PROGRAMMING Setting this option on allows an external siren chirp warning if there is an unsealed zone when the panel is armed by a Radio Key otherwise only internal beeper warning is given OFF Radio Key Arming Warning disabled ON Rad...
Page 36: ... to be 03 1234 1234 Press P70E 0312341234E TO CLEAR A TELEPHONE NUMBER To clear a telephone number enter the MEMORY key in place of the telephone number E g to clear Central Station Telephone Number 1 press P70E MEMORY E PROGRAM MODE LEVEL Installer Remote by PC FACTORY DEFAULT Both Telephone Numbers blank NOTES If P70E or P71E is programmed non blank then Ness Voice Dialling format is disabled P0...
Page 37: ...ht s on indicates which option s are enabled PROGRAM MODE LEVEL Installer Remote by PC FACTORY DEFAULT 1 8 ON All zones report Alarms RELATED OPTIONS P76E Report Zone Restorals P74E REPORT ZONE ALARMS See page 38 P75E REPORT MISCELLANEOUS ALARMS This option selects the zones which will report Restorals by dialler PROGRAMMING SEQUENCE 1 Press P76E 2 Press 1 8 E to toggle each zone on or off Zone li...
Page 38: ...R ALARM This option applies to panel tamper and external tamper OFF Tamper Alarm reporting is disabled ON Tamper Alarm reporting is enabled Default ON P75E 6E Not used P75E 7E REPORT KEYPAD TAMPER ALARM Reports entry of consecutive invalid codes in Armed mode alarm on 4th failed attempt OFF Keypad Tamper Alarm reporting is disabled ON Keypad Tamper Alarm reporting is enabled Default ON P75E 8E REP...
Page 39: ...NG SEQUENCE 1 Press P78E 2 Press 1 8 E to toggle each zone on or off Zone light s on indicates which option s is enabled PROGRAM MODE LEVEL Installer Remote by PC FACTORY DEFAULT 1 8 ON All zones report Multiple Zone Alarms RELATED OPTIONS P74E Report Zone Alarms P78E REPORT MULTIPLE ZONE ALARMS This option selects when the dialler sends Zone Restoral Reports Only one of the following options may ...
Page 40: ...rs Enter a value between 0 and 255 A value of 0 zero triggers the next test call immediately on exit from Installer program Mode PROGRAMMING SEQUENCE 1 Press P84E The digits of the existing value will be displayed 2 Press new time before next test call E The digits of the current value will be displayed PROGRAMMING EXAMPLE To set the time before the first test call E g If you are programming the p...
Page 41: ...e access remain enabled This option is useful for temporary disabling of the dialler without affecting other dialler options OFF The dialler is enabled The dialler will still remain disabled if no telephone numbers are programmed ON The dialler is disabled PROGRAMMING SEQUENCE 1 Press P86E 2 Press 1E to turn the option on or off Zone light s on indicates the option is enabled PROGRAM MODE LEVEL In...
Page 42: ... ON Cancel Report enabled PROGRAMMING SEQUENCE 1 Press P88E 2 Press 5E to turn the option on or off Zone light s on indicates the option is enabled PROGRAM MODE LEVEL Installer Remote by PC FACTORY DEFAULT ON Cancel Report enabled NOTES This option is used to indicate to the Central Station that an alarm has been reset by a valid user Usually used in cases where Open Close reports are normally sel...
Page 43: ...nloaded by a remote computer OFF Remote Access is disabled ON Remote Access is enabled Default OFF P90E 2E Not used P90E 3E REMOTE ARMING Allows the remote Arming of the control panel using a standard DTMF telephone or mobile phone OFF Remote Arming is disabled ON Remote Arming is enabled Default OFF P90E 4E REMOTE DISARMING Allows the remote Disarming of the control panel using a standard DTMF te...
Page 44: ...ed for Remote Access Programmable from 1 to 16 rings Enter a value between 1 and 16 PROGRAMMING SEQUENCE 1 Press P91E The digits of the existing value will be displayed 2 Press required rings E The digits of the new value will be displayed PROGRAM MODE LEVEL Installer Remote by PC FACTORY DEFAULT 1 1 double ring NOTES P91E REQUIRED RINGS ...
Page 45: ... P97E3E PROGRAMMING SEQUENCE 1 Press P97E 2 Press 1E Factory defaults are restored PROGRAM MODE LEVEL Installer Remote by PC FACTORY DEFAULT not applicable P97E 1E FACTORY DEFAULT PANEL OPTIONS This option erases all Radio Zones programmed by option P09E PROGRAMMING SEQUENCE 1 Press P97E 2 Press 2E Factory defaults are restored PROGRAM MODE LEVEL Installer Remote by PC FACTORY DEFAULT not applicab...
Page 46: ...he new installer code will be displayed One beep will sound on the first entry of the new code three beeps will sound on the second entry of the new code if the code was successfully programmed PROGRAM MODE LEVEL Installer Remote by PC FACTORY DEFAULT 000000 NOTES The Installer code cannot begin with the digit 0 zero The Installer code can be changed but it cannot be deleted Any attempt to delete ...
Page 47: ...t 7 A maximum of 15 dial attempts for the same event 8 New events re start the sequence at 1 No more than 20 dial events will be reported between each disarming of the panel MESSAGE QUEUE The panel places event reports in a queue Multiple simultaneous reports or reports previously unsuccessfully dialled will be included in the current call The oldest report on the queue is sent first If the queue ...
Page 48: ...nel low battery 383 Tamper Detector 381 Radio device supervision poll fail Restores are always sent for the following alarms on disarming when a valid code is entered if Restores are enabled 101 Radio Key Medical alarm 120 Panic alarm 121 Duress alarm 130 Burglary alarm 133 24 hour alarm 355 Radio jamming alarm REPORTED IN VOICE FORMAT CONTACT ID CODE REPORT NAME Q XYZ CCC Zone Alarm q 130 0zz Yes...
Page 49: ...ngs and then hang up 2 Call the number again within 60 seconds 3 The R8 will answer the second call immediately sound a beep for 2 seconds then after a pause it will sound a lower frequency tone The R8 is now ready to receive telephone commands 4 Press the button on the telephone This tells the R8 that telephone commands will follow 5 Now enter a valid User Code followed by the button The R8 will ...
Page 50: ... 360 Ceiling mounted 360 passive infra red detector with selectable pulse count and sensitivity Provides 8 metre coverage mounted at standard 2 4 metre ceiling height 100 021 Quantum 100 226 Quantum Plus 100 210 Quantum Dual 100 048 Quantum 360 PET AWARE DETECTORS The Ness Quantum Pet Aware PIR Pet Aware Radio PIR and the Pet Aware DUAL are able to discriminate between household pets and unwanted ...
Page 51: ...en used with the Ness D16 D24 panels The Ness radio Keypad is suitable for use as a portable keypad or for adding an extra keypad in areas where it is not possible to install wires NESS RK1 RADIO KEY PENDANT Fully waterproof pendant style transmitter can be used as a portable wireless Panic button Supplied with a neckchain as well as wristwatch straps Ideal for use as a medical alarm for the elder...
Page 52: ...lay Time Entry Delay Zones not used Program Radio Keys Siren Reset Time Handover Zones not used Reset Lockout Zones Tamper Siren Lockout Monitor Zones not used 24hr Zones Auto Exclude Zones Day Zones Keypad Backlight Blanking Disable onboard siren none 123 none 3 0E Radio Key test 20 sec Zones 3 8 ON ON ON none 3 none 60 sec Zone 1 OFF none 5 min Zone 2 OFF OFF OFF OFF All zones No zones No zones ...
Page 53: ...e next page Report Misc Alarms Report Zone Restorals 1 8 Brief Day Alarm Zone Exclude Shortcut Radio Substitution Alarm Siren chirps Arm Disarm Monitor Mode Shortcut Keypad Panic Alarm not used Fire Alarm Arming Shortcut Medical Alarm none 0000 All zones ON ON ON 24 hrs ON ON ON ON ON none All zones OFF OFF OFF OFF OFF OFF OFF 36 37 37 37 32 34 32 35 35 33 P70E P72E P74E P64E P62E P65E P62E P67E P...
Page 54: ...1E 1E 1E 1E 1E 2E 5E 2E 2E 2E 5E 3E 3E 3E 6E 4E 4E 5E 6E 7E 8E OPTION No DESCRIPTION DEFAULT PAGE Report misc ALARMS RESTORAL REPORTING OPTIONS DIALLING METHOD see previous page Report Zone Restorals Report Misc Restorals see P75E for full list Disable Dialler Report Multiple Zone Alarms 1 8 Check For Dial Tone Telephone Line Monitor P76E P77E P86E P78E P87E P89E Test Call Interval Auto Pulse or D...
Page 55: ...000 43 44 46 45 P90E 1E 1E 2E 2E 3E 3E 4E OPTION No DESCRIPTION DEFAULT PAGE UPLOAD DOWNLOAD OPTIONS Required Rings to answer incoming calls Program Installer Code Clear Event Memory Factory Default Panel Options Factory Default Radio Zones Factory Default User Codes P91E P99E P96E P97E NESS R8 OPTIONS SUMMARY Page of 4 4 ...
Page 56: ...This page is intentionally blank ...