background image

INSTALLATION INSTRUCTIONS


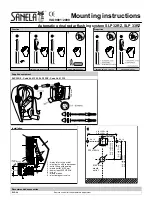
Attaching the hinge anchor

• 

Place integrated anchor into anchor holes provided  

on the toilet pan. 

• 

Place Anchor Plate over the integrated anchor and 

Insert screws. 

• 

Tighten the screw and fasten anchor plate to the  

integrated anchor.  


Installing the seat

• 

Align seat pins with the seat hinge sockets and apply 

downward pressure until you feel and hear a “click”.  

This “click” will signify the seat pin is locking into posi-

tion.  With care - adjust the hinge anchors and position 

the hinge anchors so the seat is aligned with the outer 

edges of the toilet pan.

• 

When the toilet seat has been aligned and is in the 

desired position, carefully unfasten the seat from the 

hinge anchors.  Please refer to step 3 of the process 

to learn how to unfasten the seat.  Be sure to unfas-

ten the seat gently so the integrated anchors and pin 

positions don’t move.

• 

Once toilet seat has been removed, proceed to firmly 

tighten screws and fasten anchor plate to the inte-

grated anchor (please see step 1) so that toilet seat 

remains in its desired final position. 


Removing the toilet seat with quick release 

technology


To remove the seat, place the seat in its open position, 

and locate the release-buttons in the center of each hinge.  

Press the release-buttons and lift the seat upwards.   

This should unlock the seat. 


To re-install the seat. Align seat pins with the seat hinge 

sockets and apply downward pressure until you feel and 

hear a “click”. This “click” will signify the seat pin is locking 

into position.

TOILET SEAT INSTALLATION INSTRUCTIONS

**NOTE

: Do not overtighten - Be sure screws are 

slightly loose to allow for final adjustments later in 

this process.

**

RENI

NBMU-7312

Summary of Contents for RENI NBMU-7312

Page 1: ...IPTION FEATURES Vitreous china Seamless one piece design 2 fully glazed trapway 12 305mm rough In Siphonic Jet Water ConsciousTM Dual Flush Technology Low Flow 1 28 GPF 4 8 L HET INCLUDED COMPONENTS Seat w lid soft close Tank cover Flush actuator Wax ring Floor installation kit CODES AND STANDARDS Meets or exceeds ASME A112 19 2 CSA B45 1 ASME A112 19 14 RENI NBMU 7312 IMPORTANT PRIOR TO INSTALLAT...

Page 2: ...Level Pipe Wrench Channel Locks Scroll Saw Adjustable Wrench Pipe Clamp Pipe Cutter Hacksaw Plumber s Putty or Caulking Putty Knife Drill Philips Screwdriver Flathead Screwdriver USA Canada www nellabath com TOILET INSTALLATION INSTRUCTIONS RENI NBMU 7312 ...

Page 3: ...loor 3 Insert screw through the plastic mounting brackets and install securely to floor in proper location 4 Turn toilet on its side please protect the ground surface with soft material to prevent damage to toilet and press new wax seal firmly around waste flange apply a small bead of silicone sealant around toilet base 5 Position toilet squarely with wall and align toilet with closet flange Slowl...

Page 4: ...g brackets place the finish caps on the heads Apply a small bead of silicone sealant where toilet base meets finish floor Wipe and clean any excess sealant immediately 9 Connect water supply Connect the shut off valve to the supply pipe Gradually open the valve and check for leaks Flush several times to test for leaks and continue to do so periodically for the first few days of usage CONCEALED MOU...

Page 5: ...ect floor position and fasten closet flange EXPOSED MOUNT INSTALLATION INSTRUCTIONS Wax Seal Sealant T Bolt Closet Flange NOTE Installation surface must be clean and level before new toilet is installed NOTE Do not overtighten nuts Porcelain is fragile and could possibly crack if nuts are over tightened 4 Position toilet squarely with wall and align toilet with closet flange Slowly lower toilet do...

Page 6: ...here toilet base meets finish floor Wipe and clean any excess sealant immedi ately 7 Connect water supply Connect the shut off valve to the supply pipe Gradually open the valve and check for leaks Flush several times to test for leaks and continue to do so periodically for the first few days of usage RENI NBMU 7312 ...

Page 7: ... se curely to floor 2 Turn toilet on its side please protect the ground surface with soft material to prevent damage to toilet and press new wax seal firm ly around waste flange Apply a small bead of silicone sealant around toilet base 3 Install T bolts in correct floor position and fasten closet flange 4 Position toilet squarely with wall and align toilet with closet flange Slowly lower toilet do...

Page 8: ...TIONS Sealant Apply Silicone Sealant 8 Apply a small bead of silicone sealant where toilet base meets finish floor Wipe and clean any excess sealant immedi ately 9 Connect water supply Connect the shut off valve to the supply pipe Gradually open the valve and check for leaks Flush several times to test for leaks and continue to do so periodically for the first few days of usage NOTE Do not overtig...

Page 9: ...plate around the screw maximum hinge adjustment is achievable Please refer to the diagram above Adjustment A Additional adjustment and fine tuning of the pin position can accomplished by sliding the within the anchor plate adjustment B INTEGRATED ANCHOR COVER PLATE PIN RUBBER WASHER FIXING SCREW ANCHOR PLATE ADJUSTMENT A B RENI NBMU 7312 ...

Page 10: ...ess to learn how to unfasten the seat Be sure to unfas ten the seat gently so the integrated anchors and pin positions don t move Once toilet seat has been removed proceed to firmly tighten screws and fasten anchor plate to the inte grated anchor please see step 1 so that toilet seat remains in its desired final position Removing the toilet seat with quick release technology To remove the seat pla...

Reviews: