background image

www.nektartech.com                                                     Nektar Panorama T4 & T6 User Guide       19

Your Panorama T4/T6 is equipped with a note repeat/arpeggiator function that helps you create musical parts and beats that might be 
difficult to play manually.

• 

Press the button labeled [Key Repeat] to switch the repeat function on/off for the keyboard.

• 

Press the button labeled [Key Repeat] to switch the repeat function on/off for the pads.

The behavior for the 2 buttons can be set to either ‘toggle’ or ‘latch’, by default it is set to ‘toggle’. To change the current setting, press 
[Shift]+[Key Repeat] or [Shift]+[Pad Repeat]. The setting can also be changed in one of the Repeat settings pages.

To open up the Repeat settings page, in [Internal] mode press either the display button labeled [Keys] or [Pads] depending on which you 
want to work with. Then press the display button labeled [Repeat].

Key/Pad Repeat

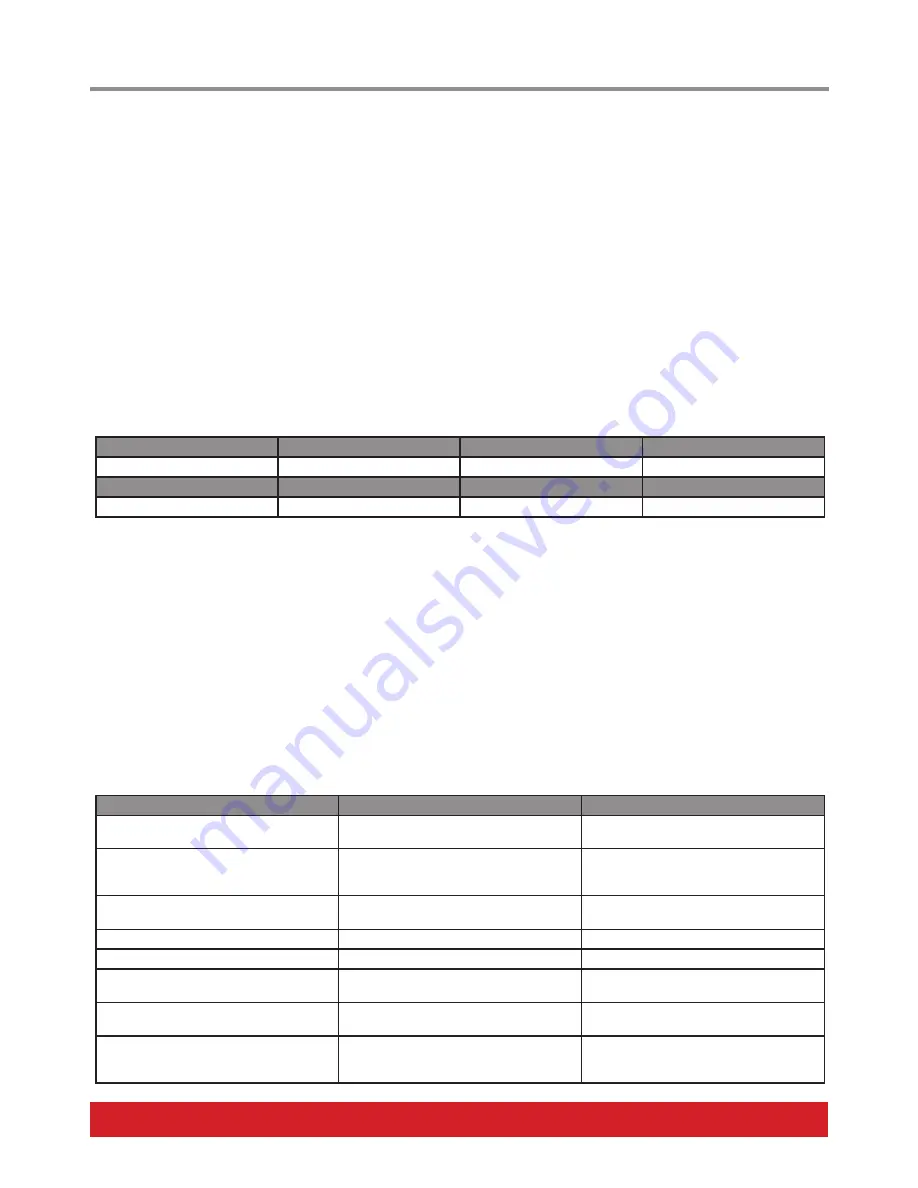
With the Repeat menu active in the Keys or Pads menu, the encoders control the following parameters:

E1

E2

E3

E4

Tempo

Gate/Length

Accent Velocity

Setup

E5

E6

E7

E8

Repeat Rate

Swing

Accent Interval

Setup Select

Tempo:

 Sets the tempo between 30 and 240 BPM if the clock source is set to ‘Internal’. If clock source is set to ‘MIDI Clock’ , current tempo 

will be displayed but the E1 encoder doesn’t control it.

Repeat Rate: 

Choose the rate notes are repeated at. Options are 1/4, 1/6, 1/8, 1/12, 1/16, 1/24, 1/32, 1/48, 1/64, 1/80, 1/96.

Gate: 

Sets the length of the repeated note in a range from 1% to 100%. 100% equals the repeat rate.

Swing:

 By default the swing value is 50% which means that swing is essentially off. Changing to value < 50% will move every second note 

closer to the preceding note and setting the value > 50% will move it further away to the preceding note. Remember to set the value back 
to 50% when you want it off.

Accent Velocity:

 Sets the velocity accent value offset -/+ 50 which means that an accent will play up to 50 velocity values higher than the 

originally played velocity value or 50 values below.

Accent Interval:

 Sets the interval at which an accent should be played (from 2 to 16). Setting the interval to 2 means every second note 

will be played with the accent offset value and a setting of 9 means every 9th note will be played with the accent offset value, etc.

Setup:

 Moving the Setup encoder goes through a selection of menus for each of which a value can be set in Setup Select.

Setup

Setup Select

Description

Vel Src

AfterTouch/Pad Pressure, Exp Pedal, Mod 

Wheel, off

Selected source controls velocity during 

repeat.

Btn Mode

Toggle, Latch

Switches the [Key Repeat] and [Pad Repeat] 

buttons behavior. Can also be done using 

[Shift]+[Key Repeat] or [Shift]+[Pad Repeat].

Trig Sync

Key 1 Sync

Each note plays from point of triggering and 

stays in sync with itself. 

Key 2 Sync

Plays in sync with your original key trigger. 

Beat Sync

Syncs with the next beat rate step.

Clock Src

Internal

Clock source is Panorama T4/T6’s internal 

clock.

MIDI Clock

Clock source is incoming MIDI clock sent via 

USB MIDI port 1.

Vel Src

Auto

Automatically switches to MIDI clock, when 

an external clock is present, and back when 

it is not..

Repeat Functions

Summary of Contents for Panorama T4

Page 1: ...www nektartech com www nektartech com User Guide ...

Page 2: ...ackup 11 Controlling a DAW Plugin Instrument or MIDI Device 12 What is Nektar DAW Integration 12 What is Nektarine 13 Internal Mode Controls Assignments 14 Performance Controls 14 Presets 14 Mode Buttons 15 Internal Mode Display Button Menus 16 Fader Encoder 16 Keys Chord Repeat Vel Fix Hold 16 Pads Learn Repeat Vel Fix Spread 17 Pads 18 Pads Bank Button 18 Pad Learn 18 Change Octave for All Pad A...

Page 3: ...ause harmful interference to radio or television reception which can be determined by turning the equipment off and on the user is encouraged to try to correct the interference by one or more of the following mea sures Reorient or relocate the receiving antenna Increase the separation between the equipment and receiver Connect the equipment into an outlet on a circuit different from that to which ...

Page 4: ...bove are missing please let us know via email stuffmissing nektartech com Panorama T4 T6 Features 49 61 note 2nd generation synth action keyboard with velocity and aftertouch 10 user configurable presets 5 velocity curves plus adjustable fixed velocity 8 pad map presets 8 velocity and pressure sensitive illuminated LED green red orange pads Pad Bank button to switch pad assignments 1 8 and 9 16 No...

Page 5: ...tect the polarity of the foot switch Set the power switch on the back of the unit to On Your computer will now spend a few moments identifying the Panorama T4 T6 and subsequently you will be able to set it up for your DAW Getting Access to Downloads If your DAW is supported with Nektar DAW integration software or you want to run Nektarine you ll need to first create a user account on our website a...

Page 6: ... in presets 1 10 Key Repeat and Pad Repeat Buttons Switch the note repeat function on off LED Buttons Assignable settings stored in presets 1 10 Display Buttons Functionality follows the display labels Navigation Buttons Track Browse and View are assignable to any MIDI message when Nektar DAW Integration is not present Pressing Shift any of the 4 buttons provides another 4 assignable button contro...

Page 7: ...efault to MMC if Nektar DAW Integration is not present Assignments stored as global settings Pads 1 8 Velocity and pressure sensitive Assignable settings stored in Pad Maps 1 8 Pad Banks Switch the pads between two assignment banks giving access to 16 pad settings per Pad Map Focus Button Displays the current parameter line in large font at the center of the display E1 Data Data control when Setup...

Page 8: ...l modulation by default Both the Pitch bend and the Modulation wheel are MIDI assignable with settings stored over power cycling so you don t lose them when you switch the unit off Pitch bend and Modulation assignments are not part of the Panorama T4 T6 presets Control message assign ments are changed in the Control Edit menu as described on page 21 Key Repeat Pad Repeat Buttons Panorama T4 T6 has...

Page 9: ...lly detected on boot up so if you plug in your foot switch after boot up is complete you may experience the foot switch working in reverse To correct that do the following Switch the Panorama T4 T6 off Make sure your foot switch is connected Switch the Panorama T4 T6 on The polarity of the foot switch should now be automatically detected Expression Pedal Socket Panorama T4 T6 works with any standa...

Page 10: ...cription E1 Octave 3 4 T6 3 3 Change the current Octave setting E2 Transpose 12 semitones The selected semitone shift affects the keyboard only E3 Global Channel MIDI Channel 1 16 This is the channel the keyboard sends MIDI notes on Typically pads will also send on the global MIDI channel unless they are assigned to a specific MIDI channel E4 MIDI Output Internal USB Select Internal to send MIDI d...

Page 11: ...and 10 will load Pad Maps 1 and 2 respectively Page 3 Pad Setup The Pad Setup page allows you to use the 8 encoders to adjust the trigger threshold independently for each of the 8 pads default 40 If you hold Shift while adjusting you change the setting for all pads simultaneously The lower the value the easier the pads will trigger Be aware that too low a setting can result in crosstalk and false ...

Page 12: ...at tells you how to set Panorama T4 T6 up with your DAW The PDF guide also tells you in more detail how Nektar DAW Integration works with your DAW however here is a general outline of what you can expect The two mode buttons labeled Mixer and Instrument switch control between your DAW s Mixer and Instrument plugins The Multi mode button is used for Nektarine so it only works if Nektarine is loaded...

Page 13: ...s not able to host one of these plugin formats directly Most popular plugins are already pre mapped for control so you don t have to Mapping can be customized or created from scratch for any plugin Expand the map change parameter names add pages etc Use Learn to quickly reassign controls as you work Nektarine s browser loads plugin patches and enables you to quickly find the sounds you need Naviga...

Page 14: ...end Modulation wheels AfterTouch Foot Switch input Expression Pedal input Navigation buttons Track Track Browse View An additional 4 navigation button assignments can be accessed by pressing Shift one of the navigation buttons 6 transport buttons In total 19 global control assignments are stored over power cycling As Presets or Pad Maps are loaded or adjusted performance controls remain unchanged ...

Page 15: ... channel that these presets transmit on With 16 MIDI channels available it means you can create 16 unique setups and just change the MIDI channel to switch between them Mode Buttons The 4 mode buttons are positioned to the right of the display When you first boot up Panorama T4 T6 Internal is the default mode with preset 1 selected Each of the 4 mode buttons by default load a preset Press Mixer to...

Page 16: ...he chord on the keyboard while continuing to hold the Chord button Continue to hold the root note and release the Chord button Play any other notes you want to be part of the chord interval You only need to continue holding one note not necessarily the root note at this point so additional notes can be played one at a time Release all notes when done and play a key on the keyboard to verify the re...

Page 17: ...if you want to be sure they are not lost in the future Repeat Opens the pads Repeat menu See page 19 for details Vel Fix When Vel Fix is engaged the pads output velocity at a fixed value To set the fixed velocity setting press and hold Vel Fix Move E1 Data to select a value between 0 127 This is the velocity value that will be output by the keys when Vel Fix is engaged Keep moving E1 Data past 127...

Page 18: ...nk to exit Learn mode Change Octave for all Pad Assignments If you want to shift all current pad assignments up or down an octave or two here is how you do that Press Pads Bank and hold Press the Octave down or Octave Up key to change the octave The display s current parameter line updates to show you how many octaves the pads have been shifted Release Pads Bank when done Load and Save Pad Maps Yo...

Page 19: ...0 100 equals the repeat rate Swing By default the swing value is 50 which means that swing is essentially off Changing to value 50 will move every second note closer to the preceding note and setting the value 50 will move it further away to the preceding note Remember to set the value back to 50 when you want it off Accent Velocity Sets the velocity accent value offset 50 which means that an acce...

Page 20: ...ocity State MIDI Machine Control Key Hold Key Chord Encoders MIDI CC Pitch Bend Channel Pressure AT NRPN coarse NRPN fine Fixed Velocity Value Program MIDI CC Relative Pad Pressure MIDI CC Pitch Bend Poly AfterTouch Channel AfterTouch Load Preset Load Pad Map NRPN Toggle coarse NRPN Toggle fine NRPN Step coarse NRPN Step fine Fixed Velocity Value Pad Strike Note Chord Note that the pad strike comp...

Page 21: ... Change the Program number to 11 or whichever program message you want the button to send using E1 Data Press the display button Arrow Down once to select BANK MSB Change the Bank MSB value using E1 Data Press the display button Arrow Down once to select BANK LSB Change the Bank LSB value using E1 Data The Program value allows you to select up to 128 programs between values 0 and 127 within the cu...

Page 22: ... preset the button loads the selected preset at any time If you assign any of the LED buttons B1 B8 the LED button may be assigned to a different Message Type in the loaded preset LED button assignments are not global but stored with a preset Make sure to save any changes you want to retain before loading a preset Programming a Fader to Adjust the Velocity Value for Keyboard Fixed Curve Move Fader...

Page 23: ...n display buttons Press Enter In the display window now choose Mixer Instrument Multi Internal or Pad using the arrow up down display buttons Move Data E1 to change the MIDI port routing Press Save when done You can route any Preset loaded using the Mode buttons page 15 to the assigned USB port thereby sending MIDI messages to completely different destinations at the push of a button Setting up a ...

Page 24: ...www nektartech com Designed by Nektar Technology Inc Made in China ...

Reviews: