www.nektartech.com Using Nektar Panorama P-Series with Bitwig Studio 11
Mixer Mode Home Page
Start by creating a new project in Bitwig Studio and make sure [Mixer] mode is selected on Panorama.
The default Bitwig Studio project contains one audio track and one instrument track. Notice that the
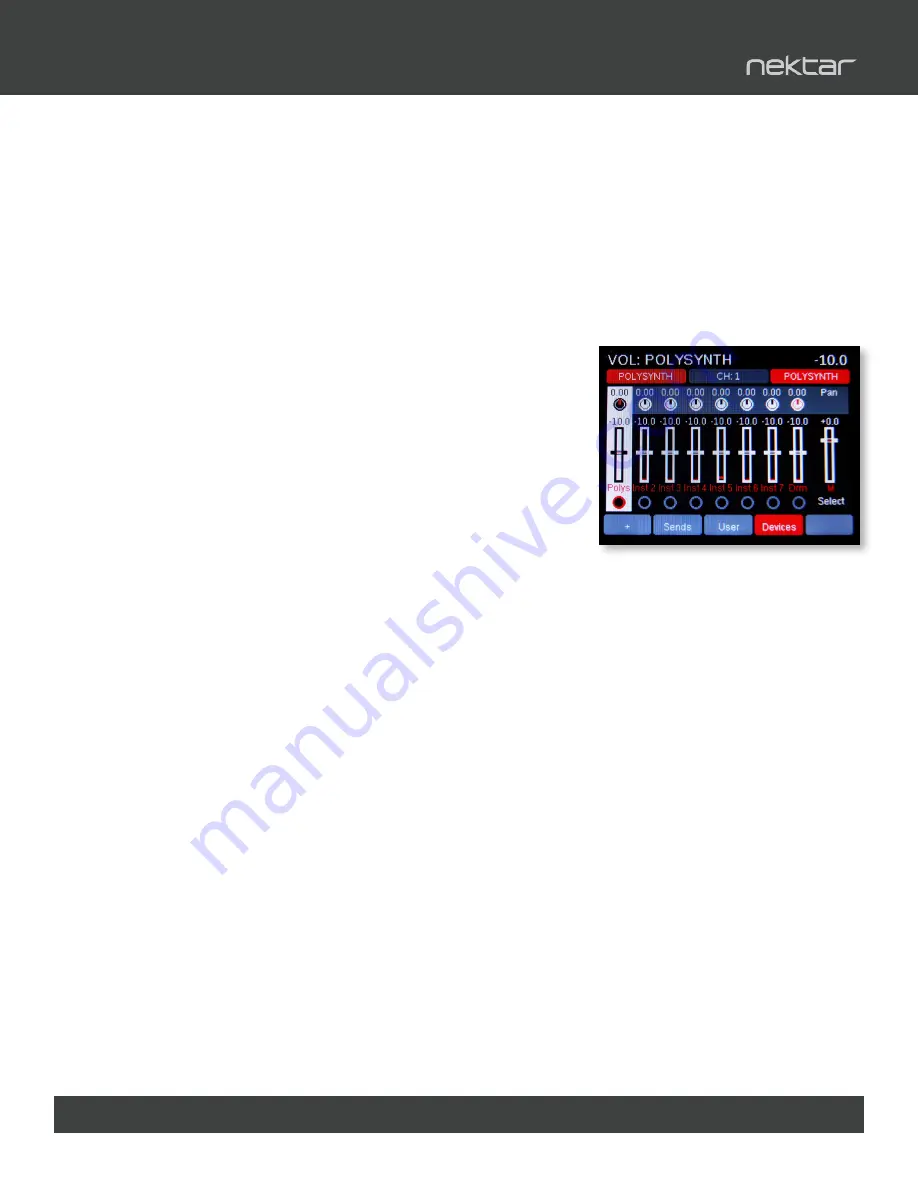
window in Panorama shows 9 faders corresponding to the 9 physical 45mm faders.
The info bar’s first red field shows the track name. Try changing the track name in Bitwig Studio and you
will see it update on Panorama as well.
The first fader (of the group of 9) on Panorama now controls the mixer channel volume of the first track.
Panorama displays the fader channel graphic and a square fader cap graphic shows the current volume
setting in Bitwig Studio. The red line graphic shows the position of the physical fader .
Moving the fader may not change the volume immediately because
the fader position needs to first match the position in Bitwig Studio, to
allow for smooth change to the volume setting. Move the physical fader
towards the position of the virtual fader and notice once the two match,
the fader cap graphic will follow the fader movement and in Bitwig
Studio you are now changing the volume setting for the mixer channel.
Since the instrument track is empty, the right info-bar field is blank. Now
insert a Bitwig Polysynth by dragging it from the Bitwig Studio browser
and on to the track. You can now see clearly in the display info-bar
center field, that the Polysynth device is selected on the current track.
Next press the [Track+] button to navigate to the second track.
Notice now that the background of track 1 has turned black and that the second track is now inverted
with white background plus the track name has changed. The white background clearly shows you which
track is currently selected.
Next create an additional 6 tracks (audio or instrument) so you have a complete bank of 8 channels to
control with the faders.
Encoders & LED Buttons
The encoders above the faders are by default assigned to Pan. Try adjusting the Pan setting for a few of the
tracks in the Panorama Window. To the right of the 8 encoders you’ll find a button labeled [Toggle/View].
Pressing this button will change the assignment of the 8 encoders to Send 1.
Pressing it again will change the assignment to Send 2 etc until after Send 8 they are finally assigned to
Pan again.
A faster option is to press and hold [Toggle/View] and move the Data Control to scroll through Pan and
send options.
So this allows you to control send or pan across multiple channels.
The 8 LED buttons below the faders are by default assigned to Select. Try pressing first LED button 1 and
then LED button 8. Notice this is a quick way to jump from one track to another.
Pressing the [Toggle/Mute] button will change the assignment of the LED buttons to Mute. Additional
presses will assign them to Solo, Record Arm and then back to Select. As with the encoders, press and
hold [Toggle/Mute] and move the Data Control to quickly scroll through the options.
The display image shows you the location of the labels that tell you what the 8 encoders and 8 LED
buttons are assigned to control.
Bitwig Studio Mixer Control


