background image

en

    Cleaning

32

D

Cleaning

Cleaning

:

Warning – Risk of burns! 

The appliance becomes hot during operation. Allow the 

appliance to cool down before cleaning.

:

Warning – Risk of burns! 

The appliance will become hot during operation. If hot 

liquids penetrate the appliance, leave the appliance to 

cool for at least two hours before removing the filter 

cover, the metal grease filter, the container, the overflow 

reservoir or the appliance housing.

:

Warning – Risk of electric shock! 

Do not use any high-pressure cleaners or steam 

cleaners, which can result in an electric shock.

:

Warning – Risk of electric shock! 

Penetrating moisture may result in an electric shock. 

Clean the appliance using a damp cloth only. Before 

cleaning, pull out the mains plug or switch off the circuit 

breaker in the fuse box.

:

Warning – Risk of injury! 

Components inside the appliance may have sharp 

edges. Wear protective gloves.

Note: 

Only use a minimal amount of water when 

cleaning so that no water enters the appliance.

Notes

Before cleaning the appliance, remove any jewellery 

you are wearing on your arms and hands.

Do not use any cleaning agents while the hob is still 

hot. This may mark the surface. Ensure that any 

residue left by cleaning agents is removed.

Cleaning agents

Only use cleaning products that are suitable for this 

type of hob. Follow the manufacturer's instructions on 

the product packaging.
Follow all instructions and warnings included with the 

cleaning products.
Suitable maintenance and cleaning products can be 

purchased from the after-sales service or in our e-Shop.

Caution!
Beware of causing surface damage

Do not use:

Undiluted washing-up liquid

Cleaning products designed for dishwashers

Abrasive cleaning products 

Pressure washers or steam jet cleaners

Oven cleaners

Corrosive or aggressive cleaners, or those 

containing chlorine

Cleaners containing a large percentage of alcohol

Hard, scratchy sponges, brushes or scouring pads

Caution!
Beware of causing surface damage

Always wash new sponge cloths thoroughly before use.

To ensure that the different surfaces are not damaged 

by using the wrong cleaning product, follow the 

instructions in the table. 

Area

Cleaning products

Glass ceramic

Glass cleaner for stains caused by limescale 

and residual water: 

Clean the hob as soon as it has cooled down. 

You can use a cleaning product that is suita-

ble for glass-ceramic hobs or glass cleaner 

(article no. 00311499).
Glass scraper (article no. 00087670) for 

stains caused by sugar, rice starch or plastic: 

Clean immediately.  Caution: Risk of burns.
Then clean with a damp dish cloth and dry 

with a cloth or towel.

Note: 

Do not use cleaning products designed

for dishwashers.

Stainless steel

Hot soapy water: 

Clean with a dish cloth and then dry with a 

soft cloth.
Use a minimal amount of water when cleaning 

to prevent water from penetrating the appli-

ance.
Leave dried-on remnants to soak in a small 

amount of soapy water; do not scour.
Always clean stainless steel surfaces in the 

direction of the grain.
Special stainless steel cleaning products (arti-

cle no. 00311499) are available from our 

after-sales service, through our online shop or 

from specialist retailers. Apply a very thin 

layer of the cleaning product with a soft cloth.

Note: 

Do not use a glass scraper to clean the

hob surround.

Plastic

Hot soapy water: 

Clean with a soft cloth or in the dishwasher.

Controls

Hot soapy water or an appropriate glass 

cleaner (article no. 00311499): 

Clean with a damp dish cloth and then dry 

with a soft cloth.

Cast iron (filter cover) Hot soapy water or an appropriate glass 

cleaner (article no. 00311499): 

Clean with a damp dish cloth and then dry 

with a soft cloth.

Summary of Contents for T58TS6BN0

Page 1: ...en Instruction manual FLEX INDUCTION COOKTOP WITH INTEGRATED VENTILATION SYSTEM T58TS6BN0 T58PS6BX0...

Page 2: ...2 cm...

Page 3: ...re 19 As two independent hotplates 19 As a single hotplate 19 u Move function 20 Activation 20 Deactivating 20 O Time setting options 21 Programming the cooking time 21 The kitchen timer 21 Stopwatch...

Page 4: ...This appliance is intended for use up to a maximum height of 2000 metres above sea level Do not use covers These can cause accidents for example due to overheating catching fire or materials shatterin...

Page 5: ...ood room air is extracted from the kitchen and neighbouring rooms a partial vacuum is produced if not enough fresh air is supplied Toxic gases from the chimney or the extraction shaft are sucked back...

Page 6: ...ation If hot liquids penetrate the appliance leave the appliance to cool for at least two hours before removing the filter cover the metal grease filter the container the overflow reservoir or the app...

Page 7: ...r sharp objects to fall on the hob Heating cookware when empty may cause surface damage Never leave empty cookware on the heat Hot pots or pans may damage the hob Never place hot pots or pans on the c...

Page 8: ...ness of the ventilation system and to prevent the risk of fire Environmentally friendly disposal Dispose of packaging in an environmentally friendly manner fInduction cooking InductioncookingAdvantage...

Page 9: ...ase of the cookware is uneven this may impair the heat supply Absence of pan or unsuitable size If no pan is placed on the selected hotplate or if it is made of unsuitable material or is not the corre...

Page 10: ...mally suited for the frying sensor function They can be purchased from specialist retailers or through our technical after sales service Always quote the relevant reference number No Name 1 Filter cov...

Page 11: ...tely When the hotplate is switched off the residual heat indicator will light up Even after the hob has been switched off the residual heat indicator will stay lit for as long as the hotplate is still...

Page 12: ...brochure Alternatively ask your dealer The required accessories are available from specialist outlets from customer service or from the Online Shop KBefore using for the first time Beforeusingforthef...

Page 13: ...re If during this 35 seconds a metallic object is placed in the twistpad area the hob may continue to heat up Therefore always switch off the hob using the main switch Storing the twist knob A strong...

Page 14: ...n switched off If you switch it back on during this time the hob will operate using the stored settings Setting a hotplate Set the required heat setting using the twist knob Heat setting 1 lowest sett...

Page 15: ...3 To set a different fan setting touch the A symbol and use the twist knob to select the required setting The fan setting that is selected will be shown on the display panel Switching off the ventila...

Page 16: ...function with sensor controlled run on is activated the A symbol the line above the A symbol and the symbol light up during the run on Switching off Touch the A symbol This will deactivate the run on...

Page 17: ...n 3 4 15 25 Goulash frozen 3 4 35 55 Poaching simmering Potato dumplings 4 5 20 30 Fish 4 5 10 15 White sauces e g B chamel sauce 1 2 3 6 Whisked sauces e g sauce b arnaise hollandaise 3 4 8 12 Boilin...

Page 18: ...10 Saut eing fresh vegetables and mushrooms 7 8 10 20 Stir fry vegetables meat cut in Asian style strips 7 8 15 20 Frozen dishes e g roasted dishes 6 7 6 10 Pancakes baked in succession 6 7 Omelette c...

Page 19: ...wn select one of the two hotplates in the flexible cooking zone and then touch the symbol twice The new cookware is detected and the previously selected heat setting remains the same Note If the cookw...

Page 20: ...tting of the area in which the vessel was detected is set You can find information on the size and positioning of the cookware in the section on Flex Zone Activation 1 Select one of the two hotplates...

Page 21: ...ouch the x symbol Change the cooking time using the twist knob or on the control panel or set to delete the programmed cooking time When the time has elapsed The hotplate switches off An audible signa...

Page 22: ...faster than when using heat setting This function can always be activated for a hotplate provided the other hotplate in the same group is not in use see illustration Otherwise and will flash in the d...

Page 23: ...that has not been pre heated Use pots and pans with a flat base Do not use cookware with a thin base Never leave empty cookware oil butter or lard to heat up unattended Do not place a lid on the cook...

Page 24: ...ookware in the section on Flex Zone Activation 1 Move the cookware from the hotplate which is switched on to another hotplate The heat setting of the original hotplate flashes The cookware is detected...

Page 25: ...les service Quote the relevant reference number Z9451X0 15 cm frying pan Z9452X0 19 cm frying pan Z9453X0 21 cm frying pan These frying pans have a non stick coating so that you require only a small a...

Page 26: ...pre boiled or raw 3 8 20 Hamburger meatballs rissoles 3 6 30 Stripes of meat gyros 4 7 12 Minced meat 4 6 10 Bacon 2 5 8 Fish Fish fried whole e g trout 3 10 20 Fish fillet plain or breaded 3 4 10 20...

Page 27: ...late and touch the symbol The function is deactivated Frozen products Escalope 4 15 20 Cordon bleu 4 10 30 Poultry breast 4 10 30 Chicken nuggets 4 10 15 Gyros kebab 4 10 15 Fish fillet plain or bread...

Page 28: ...t The control panel will remain locked for 35 seconds You will now be able to clean the surface of the control panel without altering the settings To deactivate this function The control panel will be...

Page 29: ...ing Switched off Time until automatic switch off Duration of the timer end signal tone 10 seconds 30 seconds 1 minute Power management function limit the hob s total output Switched off 1000 W minimum...

Page 30: ...off the hob with the main switch Set air recirculation mode or air extraction mode Air recirculation mode has been set Air extraction mode has been set Set automatic start Switched off Switched on Aut...

Page 31: ...lays The function is activated After 10 seconds information on the quality and speed of the cooking process appears in the hotplate displays Check the result using the following table To reactivate th...

Page 32: ...hers or steam jet cleaners Oven cleaners Corrosive or aggressive cleaners or those containing chlorine Cleaners containing a large percentage of alcohol Hard scratchy sponges brushes or scouring pads...

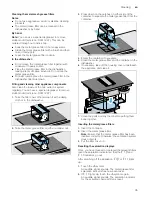
Page 33: ...tration of odours and grease Metal grease filter The metal grease filters should be cleaned every 30 operating hours or at least once a month Warning Risk of fire Grease deposits in the grease filter...

Page 34: ...lation system may be reduced Removing metal grease filter The metal grease filters filter the grease out of kitchen steam To keep them in good working order the filters should be cleaned at least once...

Page 35: ...the filter cover off and clean it with a damp cloth or in the dishwasher 2 Take the metal grease filter and the container out 3 Press down on the catches on either side of the container to separate th...

Page 36: ...e overflow container with both hands Notes Hold the overflow container level to prevent liquid from leaking out If the metal grease filter and the container have been removed and liquid finds its way...

Page 37: ...tplates are used at the highest heat setting at the same time The whistling noises disappear or become quieter when the heat setting is reduced Fan noise The hob is equipped with a fan that switches o...

Page 38: ...ing a special glass ceramic cleaning agent produces the best results We advise against using harsh or abrasive cleaning agents dish water detergent concentrated or scouring pads You can find more info...

Page 39: ...all our after sales service The ventilation system is not working The A symbol is not lit The metal grease filter is not inserted correctly Insert the metal grease filter correctly The electronics hav...

Page 40: ...surface You can check the after sales service index KI and FD number by going to the basic settings Refer to the section entitled Basic settings to find out how to do this Please note that a visit fr...

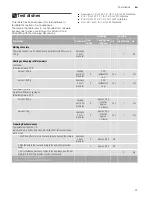
Page 41: ...oking pot 16 cm diameter 9 1 30 without stir ring Yes 1 Yes Amount 800 g Saucepan 22 cm diameter 9 2 30 without stir ring Yes 1 Yes Lentil stew from a tin E g lentils with Erasco sausages Initial temp...

Page 42: ...lk 3 5 fat content and 1 g salt Cooking pot 16 cm diameter 8 Approx 5 30 No 3 No Ingredients 250 g short grain rice 120 g sugar 1 l milk 3 5 fat content and 1 5 g salt Saucepan 22 cm diameter 8 Approx...

Page 43: ...6...

Page 44: ...9001240858 9001240858 970808 en...
Reviews: