

Installation instructions
en
5
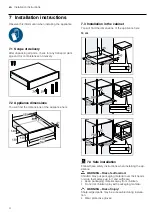
7.5 Installation
Fitted units
This is where you can find information about safe in-
stallation.
ATTENTION!
When the door is opened, the appliance may tip over.
▶
Above the appliance, provide a fixed intermediate
floor in the fitted unit.
▶
When combined with an oven, provide a fixed inter-
mediate floor above the oven.
If no intermediate floor is possible above the appliance
or above the oven, install tilt protection for the appli-
. Suitable tilt protection can be ob-
tained from customer service, on our website or in the
online shop.
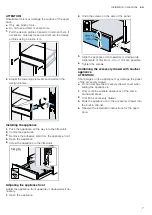
Combining with other appliances
You can combine the accessory drawer with a max-
imum of one more appliance from the same appliance
series.
No intermediate floor is required between the appli-
ances.
When installing appliances under an oven, combi-
steam oven or steam oven, no tilt protection is re-
quired.
When installing under the fully automatic coffee ma-
chine, install the tilt protection for the fully automatic
coffee machine.
For the following combinations, install tilt protection on
the accessory drawer:
¡
Accessory drawer separately, including when in-
stalling below an intermediate floor
¡
Accessory drawer under microwave
¡
Accessory drawer under hob
¡
Accessory drawer with accessory drawer, at least
on the upper appliance
¡
Accessory drawer with warming drawer, at least on
the upper appliance
¡
Accessory drawer with vacuum-sealing drawer, at
least on the upper appliance
Suitable tilt protection can be obtained from customer
service, on our website or in the online shop.
"Fitting tilt protection", Page 5
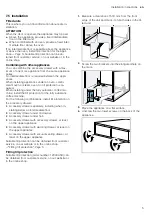
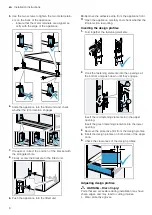
Fitting tilt protection
Suitable tilt protection (order number: 12039458) can
be obtained from customer service, on our website or
in the online shop.
1.
Measure a clearance of 518 mm from the front
edge of the unit and mark it on both sides in the fit-
ted unit.
2.
Screw the two brackets into the elongated hole on
the mark.
3.
Place the appliance on a flat surface.
4.
Unscrew the two lower screws on the back of the
appliance.


