


en
Installation instructions
6
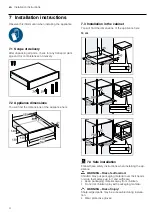
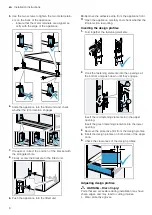
5.
Use the two screws to tighten the two metal retain-
ers on the back of the appliance.
‒
Ensure that the metal retainers are aligned ex-
actly with the edge of the appliance.
6.
Slide the appliance into the fitted unit and check
whether the tilt protection engages.
7.
If required, correct the position of the bracket with
the elongated hole.
8.
Finally, screw the brackets to the fitted unit.
9.
Push the appliance into the fitted unit.
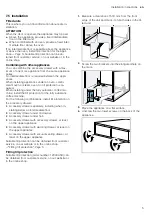
10.
Remove the adhesive strip from the appliance front.
11.
Open the appliance carefully and check whether the
tilt protection is working.
Inserting the design profiles
1.
Fold together the fastening elements.
2.
Hook the fastening elements into the openings at
the bottom and push down until they engage.
Insert the red fastening elements into the upper
opening.
Insert the green fastening elements into the lower
opening.
3.
Remove the protective film from the design profiles.
4.
Insert the design profiles on both sides of the appli-
ance.
5.
Check the clearances of the design profiles.
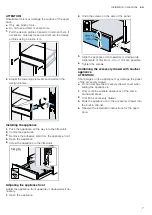
Adjusting design profiles
WARNING ‒ Risk of injury!
Parts that are accessible during installation may have
sharp edges and may lead to cutting injuries.
▶
Wear protective gloves.


