background image

26

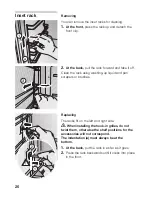
Inset rack

Removing

You can remove the inset racks for cleaning.

1.

At the front, 

press the rack up and detach the

front clip.

2.

At the back,

pull the rack forward and take it off.

Clean the rack using washing-up liquid and pan 
scrapers or brushes.

Replacing

The racks fit on the left and right side. 

When installing the hook-in grilles, do not 

twist them, otherwise the shelf positions for the 
accessories will not correspond.
The indentation (a) must always be at the 
bottom.

1.

At the back,

put the rack in as far as it goes.

2.

Press the rack backwards until it clicks into place 
in the front.

Summary of Contents for B1322

Page 1: ...How to connect up build in set up use and look after your B1322 oven NEFF UK Ltd ...

Page 2: ...ntrol panel 10 Minute timer 10 Automatic timer 11 Special functions 12 Description of Oven Features 13 Switching the oven ON and OFF 14 Inhaltsverzeichnis Baking 15 Cooking Tips and Helpful Hints 16 Roasting 17 Grilling 19 Surface grilling 19 Defrosting and Cooking 20 Cleaning and Care 22 Important cleaning basics 22 Catalytic oven surfaces 24 Removing installing the oven door 25 Inset rack 26 Ser...

Page 3: ...aterials used for this purpose are environmentally friendly and can be recycled Please make a contribution to protecting the environment by disposing of the packaging appropriately Old appliances are not worthless rubbish Environmentally conscious recycling can reclaim valuable raw materials Before disposing of your old appliance please make sure that it is unusable or label it with a sticker stat...

Page 4: ...lements There is a risk of burning Children must be kept at a safe distance from the appliance Never store combustible items in the oven Risk of fire Never place flammable objects onto the hot plates Fire hazard Never place cables of electronic devices onto the hot plates Never clamp leads of electrical appliances in the hot oven door The insulation on the leads could melt There is a risk of short...

Page 5: ...ng from the baking sheet leaves stains that cannot be removed It is recommended that you use the deeper universal pan Cooling with the oven door Only leave the oven to cool with the door closed Do not allow anything to become trapped in the oven door Even if you only leave the oven door open slightly the fronts of adjacent units may become damaged over time Very dirty oven seal If the oven seal is...

Page 6: ...re The heating modes and the accessories included with your oven will be explained here The control panel Function selector Use the function selector to select the type of heating for the oven Settings Circotherm Surface grilling large area grill e Defrosting position Oven light Function selector Function selector Rotary knob Temperature selector ...

Page 7: ... in C Slide in levels Your oven features 4 slide in levels The slide in levels are counted from bottom to top The numbers are marked in the oven When using circotherm baking or roasting do not use slide in level 2 in order not to block air circulation ...

Page 8: ...l These differences may occur if only one part of the utensil was covered or if deep frozen food e g pizza was placed on the utensil The distortion will already subside again during baking roasting or grilling Universal pan non stick Soufflé pan Baking tray aluminium Baking tray enamelled Baking tray non stick Wire shelf high low Wire shelf dose mesh Roasting tray Upgrade set Clou 3 pieces Upgrade...

Page 9: ...ime on the electronic clock Heat the empty oven for approx 30 minutes Select circotherm at a setting of 190 C During the initial burn in phase please open the kitchen windows to dissipate unpleasant odours Subsequent cleaning Clean the oven with a hot detergent solution Install the hook in grilles Time of day After connecting to the mains or after a power Setting the time failure the display 0 00 ...

Page 10: ...ay flashes 4 seconds The control panel Minute timer ON time OFF time Rotary knob To engage and disengage depress gently Time of day Function selector Minute timer 1 Press the button and set the cooking time e g 5 minutes When the timer switches on the remaining time is displayed 2 When the time has elapsed a signal is emitted and the symbol flashes To stop the signal press the button ...

Page 11: ...our and 30 minutes a signal is emitted and the display flashes The oven switches off automatically To stop the signal press the button 4 Switch the oven off 5 To end automatic mode press the button again Automatic switch on and If the food is to be baked or roasted later on both switch off the ON time and OFF time must be set 1 Select the heating system and the oven temperature 2 Press the button ...

Page 12: ...cel your settings turn the set time back to 0 00 and switch the oven off Note The automatic timer is best used with dishes which require little attention The minute timer and OFF time can be pre programmed up to a max 24 hours The settings can be displayed at any time by pressing the button Special functions Masking out the display 1 Press the button for 7 seconds The display then goes blank and t...

Page 13: ...er preheating times low oven temperatures gentle defrosting Large area grill The food being prepared is exposed to heat radiation from the heating element at the top of the oven cavity Particularly effective with flat small cuts of meat i e steaks sausages fish vegetables and toast Defrost A fan in the rear wall of the oven circulates the air in the oven around the frozen food The fan system is ru...

Page 14: ...to the desired temperature The selected temperature will be controlled automatically The oven temperature control lamp illuminates when the oven is first switched on and extinguishes when the required temperature has been reached Switching the oven OFF To switch the oven OFF turn both the temperature selector and functions selector to the 0 position Notes The appliance features a cooling fan which...

Page 15: ...wning of the cake If a cake collapses after removing it from the oven consider using a longer baking time or use a slightly lower temperature setting Using tinplate baking tins Circotherm Shelf position 1 If the cake bottom gets too dark Check the slide in level Shorten the baking time and possibly use a lower baking temperature If the cake bottom stays too light Check the slide in level Increase ...

Page 16: ...lightly longer Add less liquid to the dough When baked with circotherm Avoid blocking the air vents at the rear wall of the circulation cake baked in oven cavity with the cake tins round or square tins gets too dark at the rear Very moist cake dough e g You can let the steam escape from the oven and fruit cake causes a lot of thereby reduce the forming of water droplets by steam to generate in the...

Page 17: ... Place the meat on the shelf season if desired Slide the pan and shelf into the oven on the same shelf position No pre heating is required Save energy by putting the roast into the cold oven Use a Circotherm temperature of 160 C Circotherm Use this method for small cuts of meat steaks grilling chops sausages bacon chicken joints and fish Use the shelf and roasting pan together Season meat as requi...

Page 18: ...able from your dealer Place the roasting sheet into the universal pan The roasting sheet prevents soiling of the oven Grease and juice drippings from the roast are collected in the universal pan The roast is not done on Use a lower roasting temperature the inside Note Higher temperatures do not shorten roasting times done on the outside raw on the inside Choose slightly longer roasting times Very ...

Page 19: ...res are variable Always use the grill and roasting pan together Turn the food after approx two thirds of the grilling time has elapsed Lightly brush the wire shelf with oil and baste the food if desired Surface grilling Always place the food to be grilled in the centre of the wire shelf If the heating element switches off automatically the overheating protection was activated The element will be r...

Page 20: ...required cooking time Always defrost frozen poultry before cooking because the giblets must be removed For cooking frozen fish use the same temperatures as for fresh fish Frozen ready to eat meals in aluminium dishes may be placed into the oven several at a time Frozen vegetables i e when cooking complete meals should be cooked in a covered pot together with the roast Use only approximately half o...

Page 21: ...or 20 30 minutes Defrost moist frozen yeast cakes with fruit topping at 160 170 C for 30 50 minutes after wrapping in aluminium foil to prevent cake from drying out Defrost and toast frozen toast with topping at 160 170 C for about 20 minutes Defrost and bake frozen pizzas at 180 190 C for 15 25 minutes Place on wire grill covered with greaseproof paper Please ensure that the greaseproof paper is ...

Page 22: ...nges Use commercially available detergents applied to a soft moistened cloth or a chamois Enamel and glass Use hot detergent suds for cleaning Remove the oven door before cleaning the enamel surface Oven door pane The temperature of the pane inside the oven door is reduced by a heat reflecting coating The reduced temperature ensures that visibility through the oven door window is not impaired When...

Page 23: ...ee of soiling by frequent cleaning using the hot air cooking system Do not clean the warm oven with any of the cleaning products specifically designed for this purpose When baking very moist cake use the universal baking pan For roasting use the appropriate utensils Dutch oven Clean the oven before soiling becomes too heavy Wash out the oven cavity with hot detergent suds Leave the door open until...

Page 24: ...t its self cleaning properties Cleaning the oven floor Use hot soapy water or a vinegar solution the oven ceiling and the It is best to use oven cleaner if the oven is very dirty side walls Only use oven cleaner in a cold oven Note Enamel is baked on at very high temperatures This can cause some slight colour variation This is normal and does not affect the function Do not use coarse scouring pads...

Page 25: ...door 2 Move the catch levers on the right and left hand sides to the fully open position 3 Placing the door at an upward angle toward you grasp the door with both hands and lift it out of the hinges toward you Hanging the oven door 1 Set both hinges into their respective receptacles on the left and right and swing the oven door downward 2 Close the catch levers on the left and right 3 Close the ov...

Page 26: ...ck using washing up liquid and pan scrapers or brushes Replacing The racks fit on the left and right side When installing the hook in grilles do not twist them otherwise the shelf positions for the accessories will not correspond The indentation a must always be at the bottom 1 At the back put the rack in as far as it goes 2 Press the rack backwards until it clicks into place in the front ...

Page 27: ...the event of a customer service request please have the following information handy E Number FD Replacing the oven light Caution Unplug the appliance or remove the fuse By actuating the miniature circuit breaker or by unscrewing the fuses in the fuse box in your house 1 To prevent damage place a towel into the cold oven 2 Unscrew the lamp cover by turning it counter clockwise 3 Replace the lamp Ty...

Page 28: ...ilure of Defective fuse Check the fuse in the fuse box and all electrical functions i e the replace if required control lamps have suddenly ceased to function if liquids or thin viscous The appliance has not Level the appliance using the leveling dough are distributed at a been placed or installed feet or check the installation visibly uneven thickness plumb and level if the oven suddenly stop The...

Page 29: ...ing temperature 5 minutes at 100 C clouded difference if the oven shows increasing Normal occurrence Briefly open the oven door occasionally condensation water e g in the case of cakes during baking or roasting wipe up the with very moist topping condensation water after operation fruit or roasts After prolonged use the oven This kind of soiling Remove the oven door and put aside window panes are ...

Page 30: ...to the left beneath the side edge of the oven The unit s nameplate is located at on the sidewall of the unit Electrical safety of the appliance can be ensured only if the equipment earth in the building installation has been installed according to regulations On the installation side a separating device shall be provided Any switch with a contact gap The connection diagramm is exceeding 3 mm may b...

Page 31: ...n is positioned securely and in a level position and that the required installation dimensions have been maintained Furniture requirements Oven housings from virtually all lines of kitchen furniture are suitable for installing the built in oven However the veneers or plastic laminates on the conversion cabinets must be applied with heat resistant adhesive 90 C If plastic laminates or cement are no...

Page 32: ...9000 039 318 Printed in Germany 0405 Es NEFF UK Ltd Grand Union House Old Wolverton Road Old Wolverton Milton Keynes MK12 5PT Tel 01908 328300 Fax 01908 328399 ...

Reviews: