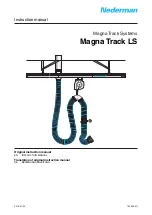
background image

Magna Track LS

EN

10

Preface

Read this manual carefully before installation, use and service of this product. 

Replace the manual immediately if lost. Nederman reserves the right, without 

previous notice, to modify and improve its products including documentation.
This product is designed to meet the requirements of relevant EC directives. 

To maintain this status, all installation, maintenance and repair is to be done 

by qualified personnel using only original spare parts. Contact the nearest 

authorized distributor or Nederman for advice on technical service and 

obtaining spare parts. If there are any damaged or missing parts when the 

product is delivered, notify the carrier and the local Nederman representative 

immediately.

Notices

This document contains important information that is presented either as a 

warning, caution or note. See the following examples:

WARNING! 

Type of injury.

Warnings indicate a potential hazard to the health and safety of personnel, and 

how that hazard may be avoided. 

CAUTION! Type of risk. 

Cautions indicate a potential hazard to the product but not to personnel, and 

how that hazard may be avoided.

NOTE! 

Notes contain other information that is important for personnel.

Safety

WARNING! 

Risk of personal injury.

• 

Magna Track LS must not be used for other purposes than extracting 

exhaust.

• 

Magna Track LS must only be used in combination with the anchor plate, 

which is to be mounted on the vehicle.

• 

 Magna Track LS must not be used when working on the vehicle fuel 

system or when there is a risk for inflammable dust or explosive gases.

• 

Magna Track LS is designed for use only in the exit direction of the length 

of the track.

• 

Check that there is enough suction capacity in the exhaust hose before it 

is connected to the vehicle exhaust pipe. If needed, check the fan impeller 

rotation direction.

• Check that the nozzle is correctly fitted to the exhaust pipe after the vehicle 

has been moved. Check that the hose or nozzle will not snag on any 

protruding parts on the vehicle.

• 

Do not extract hot, burning or ignited material or substances that might react 

with parts or materials from the suction system.

•  Around the earth magnet there is a narrow magnet field close to the magnet 

assembly on the exhaust hose. Magnet fields can in rare cases affect cardiac 

pacemakers and implantable cardioverter defibrillator. Concsult doctor if 

applicable.


Summary of Contents for Magna Track LS

Page 1: ...Magna Track Systems Magna Track LS 144999 01 2016 07 05 Original instruction manual EN INSTRUCTION MANUAL Translation of original instruction manual DE BEDIENUNGSANLEITUNG Instruction manual...

Page 2: ...Magna Track LS 2 Declaration of conformity 3 Figures 4 English 9 Deutsch 17...

Page 3: ...und die technische Dokumentation verantwortlich ist Deutsch DE Declaration of conformity We AB Ph Nederman Co declare under our sole responsibility that the Nederman product Magna Track LS Part No and...

Page 4: ...ack LS 4 0 4 0 6 m 1 ft 4 in 2 ft min 0 3 m 3 3 3 6 m 11 12 ft min 1 ft X Figures 1 2 3 1300 N 292 lbs 1300 N 292 lbs 2 4 m 8 ft 0 5 0 6 m 1 ft 8 in 2 ft 1300 N 292 lbs 1300 N 292 lbs 1300 N 292 lbs C...

Page 5: ...Magna Track LS 5 5 1 2 min 0 8 m 2 ft 8 in Exit 8 exit 6 7...

Page 6: ...Magna Track LS 6 max 20 max 20 min 200 mm 8 in max 50 mm 2 in min 300 mm 1 ft Forward direction of vehicle X 6 0 0 m m X Alt 1 Alt 2 9 10 11 12 5...

Page 7: ...om door Approx 1 5 m 5 ft from door Approx 1 5 m 5 ft from door 12 m 40 ft system 9 m 30 ft system 6 m 20 ft system 6 m 20 ft 9 m 30 ft 12 m 40 ft 1 Duct connector 1 1 1 2 Track segment 2 7 10 3 Suspe...

Page 8: ...Magna Track LS 8...

Page 9: ...10 6 Installation 11 6 1 Installing Magna Track LS 11 6 1 1 The exhaust pipe 11 6 1 2 Anchor plate 11 6 1 3 Nozzle 12 6 1 4 Adjustment of disconnection wires 12 6 1 5 Fans 12 6 1 6 Installation check...

Page 10: ...to personnel and how that hazard may be avoided NOTE Notes contain other information that is important for personnel 3 Safety WARNING Risk of personal injury Magna Track LS must not be used for other...

Page 11: ...aterial track Aluminum 5 Before installation 5 1 Delivery checks Check the unit for any transport damage In case of damage or parts missing notify the carrier and your local Nederman representative im...

Page 12: ...t connector over the track as close to the middle of the track as possible see Figure 8 NOTE The vehicle s parking position must be on the opposite side of the track see Figure 1 5 Slide the trolley w...

Page 13: ...between 3 3 3 6 m 11 12 ft If the mounting height is lower than 3 3 m 11 ft there may be a reason to shorten the vertical hose and adjust the two wires See Figure 5 and the following list 1 Determine...

Page 14: ...d the nozzle do not catch any part of the vehicle or threshold 7 Using Magna Track LS 7 1 Driving in 1 Open the station door and start the exhaust extraction fan An automatic fan start is available as...

Page 15: ...r advice on technical service 8 1 Check these points when necessary and at least twice a year 1 The magnetic operation Check the attachment with the connector Also check the magnet and the anchor plat...

Page 16: ...st be removed from its support device and all its spring tension must be released WARNING Risk of personal injury Never overtighten the spring so the end position can be reached Never remove the sprin...

Page 17: ...zungen 20 6 Installation 21 6 1 Installation von Magna Spursystem LS 21 6 1 1 Abgasrohr 21 6 1 2 Ankerplatte 21 6 1 3 T lle 22 6 1 4 Einstellung der Trenndr hte 22 6 1 5 Ventilatoren 23 6 1 6 Checklis...

Page 18: ...INWEIS Hinweise enthalten Informationen die f r die Mitarbeiter wichtig sind 3 Sicherheit WARNUNG Verletzungsgefahr Magna Track LS darf ausschlie lich f r das Absaugen von aus Maschinen stammenden Abg...

Page 19: ...r Installation 5 1 Kontrolle der angelieferten Ware Auf Transportsch den kontrollieren Bei Besch digungen oder wenn Teile fehlen sind der Spediteur und Ihre Nederman Vertretung unverz glich zu benachr...

Page 20: ...4 Den Kanalanschluss m glichst nah an der Mitte und ber der Spur anbringen siehe Abb 8 HINWEIS Die Parkposition des Fahrzeugs muss sich auf der anderen Seite der Spur befinden siehe Abb 1 5 Den Rollwa...

Page 21: ...n die Spur zwischen 3 3 und 3 6 m liegt Bei einer Einbauh he unter 3 3 m kann es angebracht sein den Vertikalschlauch zu k rzen und die beiden Dr hte anzupassen siehe Abb 5 und folgende Liste 1 Die ri...

Page 22: ...vor der ffnung der Stationst r mit normaler Geschwindigkeit nicht mehr als 5 km h l sen Bei Bedarf ist der Sto d mpfer einzustellen 3 Sicherstellen dass der Schlauch nach der Trennung richtig angehob...

Page 23: ...nach oben m glich HINWEIS Der flexible Schlauch kann Temperaturen bis zu 150 C aushalten Bei h heren Temperaturen verk rzt sich die Haltbarkeitsdauer des Produkts Daher sind Eins tze mit l ngeren Daue...

Page 24: ...t ist 5 Wenn die Federspannung erh ht wurde ist zu berpr fen ob die ben tigte L nge des Drahts gezogen werden kann ohne dass die Feder an ihre Grenze gespannt wird Wartung und Inspektion Der Balancer...

Page 25: ...urde auf die Recyclingf higkeit der einzelnen Komponenten geachtet Die verschiedenen Materialarten sind gem den einschl gigen rtlichen Bestimmungen zu entsorgen Bei Unklarheiten ber die korrekte Entso...

Page 26: ...www nederman com...

Reviews: