background image

75

7

To complete, press the END button.

• Whenever the END button is pressed, the menus will sequence

in this order:

“OPTION” menu 

 “ADJUST” menu 

 Source screen

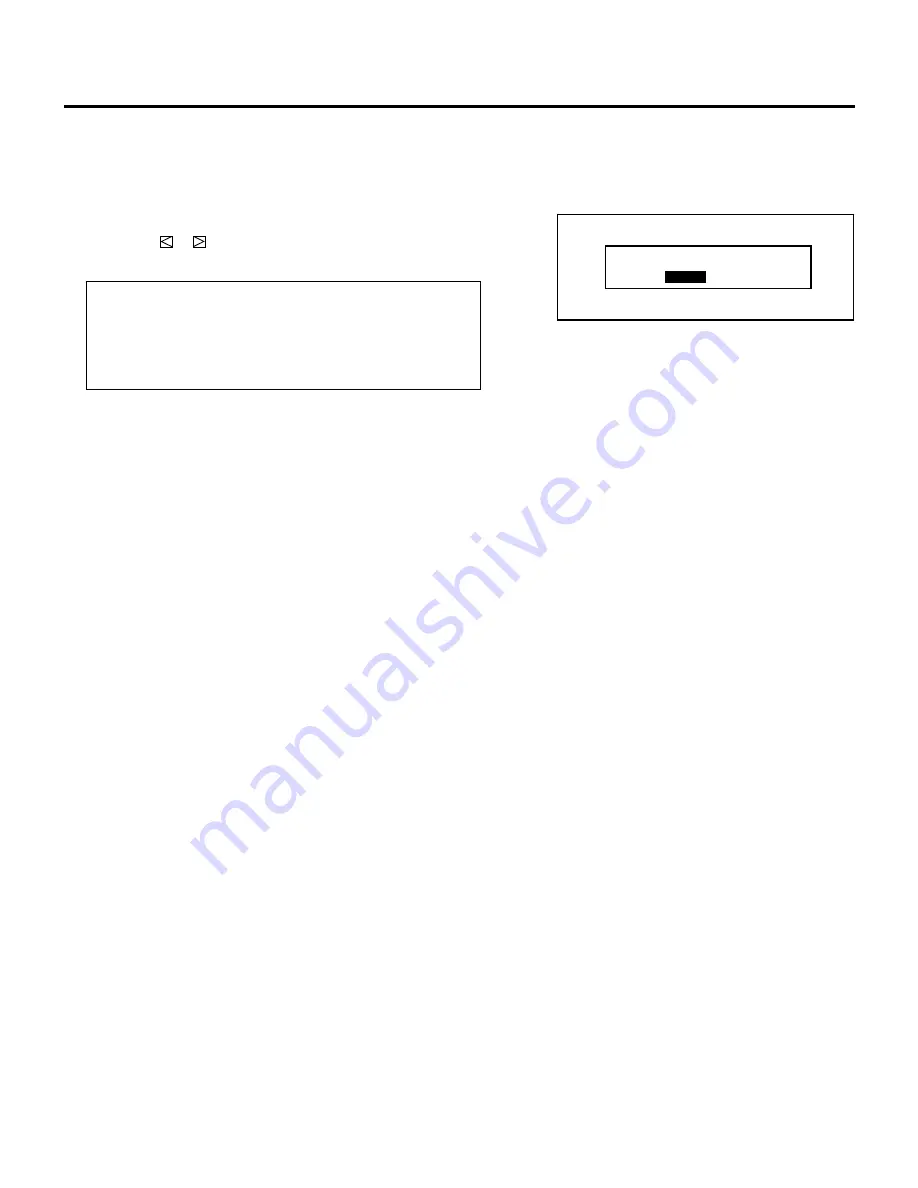
• If the “RETURN USER MODE?” menu appears, use the

CURSOR

or

button to select either “YES” or “NO” and

press ENTER. This will exit the ADJUST mode.

Items to select
• YES ......... When you try to enter the ADJUST mode the next

time, you will need to re-enter your passcode.

• NO ........... When you try to enter the ADJUST mode the next

time, you will not need to re-enter your passcode.

R E T U R N   U S E R   M O D E ?

Y E S

N O

SETTING

Summary of Contents for XG85-XG135LC - 1

Page 1: ...1 MultiSync XG85 MultiSync XG135LC Large Screen MultiSync Projection Monitor Set Up Manual Model Number XG 852 XG 1352 XG 852G XG 1352G...

Page 2: ...2...

Page 3: ...USTMENT 123 REF ADJUST menu 123 ASTIG Adjustment 124 Bright Uniformity Adjustment 126 White Uniformity Adjustment 127 Raster Centering Adjustment 128 Appendix TIMING CHARTS 130 Pre set Signals 130 Inp...

Page 4: ...r G Y B Cb H HV V S VIDEO VIDEO OPTION REMOTE1 REMOTE2 OUT IN INPUT SELECT ENTER ON OFF INDICATOR I INPUT SELECT POWER 1 3 2 4 6 5 7 G F E D C B 8 9 0 I H 123456 123456 123456 123456 123456 123456 PAR...

Page 5: ...PUT C slots J Active Indicator green LED Lights up when the INPUT A slot is selected Front Panel 1 Power Switch Main power To turn on the main power to the projector press the switch to the ON positio...

Page 6: ...odel RGB INPUT Board XG RGBIN A Front view 1 Active Indicator green LED Lights up when this board is selected 2 R Input Terminal Connects an Red output signal 3 G Input Terminal Connects a Green outpu...

Page 7: ...Y Y G B terminal C Pb Cb B Board Identification VIDEO COMPONENT RGB Input Signal Setting of Rotary switch and Jumpers Table for Setting Rotary Switch and Jumpers Setting of Rotary switch indicates fa...

Page 8: ...remote control is designed for setup adjustment Use the user remote control for normal operation POWER ON OFF OPERATE PICTURE MUTE SOUND MUTE 1 ABC 2 DEF 3 GHI 4 JKL 5 MNO 6 PQR 7 STU 8 VWX 9 YZ 10 R...

Page 9: ...ng with CTL will restore display PART NAMES AND FUNCTIONS NOTE Even if the on screen display may be turned off with pressing CTL and DISPLAY any adjustment will still change the projector s memory set...

Page 10: ...ustments Note that the G button is only on the full function remote control R CURSOR Buttons Used for increasing and decreasing control levels cursor movement and convergence adjustments S NORMAL Butt...

Page 11: ...he unit 2 Install the two new batteries making sure that their polarity matches the diagrams inside the battery compartment Incorrect polarity could damage the unit Remote control cautions Use the rem...

Page 12: ...12...

Page 13: ...rious adjustment such as focus alignment conver gence This chapter also explains the passcode It is a convenient way to prevent any tampering of projector set up information by unauthorized individual...

Page 14: ...TUDE 04 LINEARITY 05 KEY STONE 06 PIN CUSHION 07 LINEAR BAL 08 KEY BALANCE 09 PIN BALANCE 10 LINE DIST 11 R G B POINT CONVERGENCE menu CONVERGENCE 1 TILT SKEW 2 BOW 3 AMPLITUDE 4 LINEARITY 5 KEY STONE...

Page 15: ...ce screen One input is switched to another The projector is turned off After every 10 minutes of elapsed time mWhen the Automatic Save Feature mode is set to DISABLE projector settings can be stored i...

Page 16: ...gnal in an unassigned location starting at memory location No 51 NO Does not register settings A registered name is given as follows VIDEO S VIDEO Video standard with a list number e g NTSC51 or PAL52...

Page 17: ...the ADJUST menu See Entering Passcode Registering Passcode Changing Your Passcode and Canceling Your Passcode on pages 61 through 66 When your passcode has already been registered When finishing the...

Page 18: ...ve been turned off by the R G and B buttons on the remote control CROSS HAIR CROSS COARSE CROSS FINE DOT COARSE DOT FINE FOCUS WINDOW WHITE Adjustment test pattern H H H H H H H H H H H H H H H H H H...

Page 19: ...irst whenever inputting video signals for the first time so that you can register the video signals before making any adjustments If the current input signal s has not been registered the UNREGISTERED...

Page 20: ...ton to select NEW ENTRY and press ENTER The INPUT TERMINAL SELECT menu will be displayed When using the projector in stand alone application Use the CURSOR or button to select one of the three slots a...

Page 21: ...matches the selected signal Check if the installed input board matches the slot number When using with two or more ISS 6020 ISS 6020G switchers Use the CURSOR or button to select the input slot numbe...

Page 22: ...INPUT 7 S T U and 7 s t u and INPUT 8 V W X and 8 v w x and INPUT 9 Y Z and 9 y z and INPUT 10 and 0 and If you have made an error in the input of a character use the CURSOR button and enter the corre...

Page 23: ...ect ALL Copies all the settings EXCEPT H POSI PHASE Copies the settings except H position and Phase adjustments data The SOURCE INFORMATION screen will be displayed Pressing END will return to the SIG...

Page 24: ...ted line To do this proceed as follows 1 Use the CURSOR or button to select ENTRY MOVE and then press ENTER The ENTRY MOVE SELECT SOURCE message will be displayed at the bottom of the screen 2 Use the...

Page 25: ...To do this proceed as follows 1 Use the CURSOR or button to select ENTRY DELETE and then press ENTER The DELETE SELECT START LINE message will be displayed at the bottom of the screen 2 Use the CURSO...

Page 26: ...isplayed this completes the DATA COPY mode The SIGNAL ENTRY list will be displayed Go on to Step 5 m When selecting CHANGE DEFAULT All of the adjustment data of the selected signal will be stored in t...

Page 27: ...ot be stored in the DEFAULT AREA If the SIGNAL ENTRY list will be displayed this completes the CHANGE DEFAULT mode To end the SIGNAL ENTRY list go on to Step 5 m When selecting SOURCE EDIT This featur...

Page 28: ...e Switcher and press ENTER The SIGNAL ENTRY screen is displayed When used with two or more Switchers ISS 6020 ISS 6020G Use the CURSOR or button to select the master slot number 1 through 10 0 first f...

Page 29: ...ct the RETURN USER MODE screen will be displayed If this happens use the CURSOR or button to select either YES or NO and press ENTER Items to select YES When you try to enter the ADJUST mode the next...

Page 30: ...SOURCE LOCK AKB G Y MATRIX POSITION FONT APERTURE SYNC TERMINA TION and AFC See the following pages for an explanation of eachsetting Checking and Setting Various Parameters A D J U S T 1 S I G N A L...

Page 31: ...same procedure of the signal entry See page 20 for more details The screen will return to the SOURCE INFORMATION screen m Setting SYNC CONTROL This function is used to select the detection method of t...

Page 32: ...NFORMATION AUTO COMP OFF OFF SYNC CONTROL COUNTER DISPLAY TIME SOURCE LOCK AKB G Y MATRIX COUNTER RESET Y E S N O DISPLAY TIME RESET Y E S N O m Setting DISPLAY TIME This function is used to reset the...

Page 33: ...OURCE INFORMATION AUTO COMP OFF OFF SYNC CONTROL COUNTER DISPLAY TIME SOURCE LOCK AKB G Y MATRIX O F F O N S O U R C E L O C K C O N T R O L P02 03 SOURCE INFORMATION AUTO COMP OFF OFF SYNC CONTROL CO...

Page 34: ...se the CURSOR buttons to select G Y MATRIX and press ENTER The G Y MATRIX menu will be displayed 2 Use the CURSOR or button to select an item and press ENTER The screen will return to the SOURCE INFOR...

Page 35: ...TION FONT APERTURE SYNC TERMINATION AFC W I D E N A R R O W P O S I T I O N m Setting FONT This function is used to specify the appropriate font size to the on screenmessage To do this proceed as foll...

Page 36: ...ng is MANUAL LEVEL 1 m Setting SYNC TERMINATION This function is used to select the impedance of the sync signal 1 Use the CURSOR buttons to select SYNC TERMINA TION then press ENTER The SYNC TERMINAT...

Page 37: ...R MODE Y E S N O SIGNAL ENTRY m Setting AFC This function is used to reduce jitter by changing time constant of AFC of the sync generator circuit 1 Use the CURSOR buttons to select AFC then press ENTE...

Page 38: ...See page 62 Carry out the adjustments after displaying an image for 20 minutes or more 4 Select the input signal If your input signal has not been recorded it is necessary to perform the signal entry...

Page 39: ...lect the FOCUS menu directly by pressing the INPUT 2 button 3 Use the CURSOR or button to highlight your preferred adjustment item Press ENTER to display the selected adjustment screen You can also se...

Page 40: ...Always be aware of what color the on screen CRT display is showing R G B when CENTER EDGE SEPA or COR NER is selected If that color s test pattern is turned off any adjustment to that color will disp...

Page 41: ...the edge focus The gauge mark in the scale moves to the left 3 To switch to the CENTER screen use the CTL and CURSOR buttons as follows To switch to CENTER from Top press and hold CTL then press CURS...

Page 42: ...t either YES or NO and then press ENTER This will exit the ADJUST mode Items to select YES WhenyoutrytoentertheADJUSTmodethenext time youwillneedtore enteryourpasscode N O WhenyoutrytoentertheADJUSTmo...

Page 43: ...and vertical pincushion LINEAR BAL Adjusts the horizontal and vertical linearity balance KEY BALANCE Adjusts the horizontal and vertical keystone tilt balance PIN BALANCE Adjusts the horizontal and v...

Page 44: ...moment If this happens reduce the total amount of the current adjust ment data m Adjusting LINE DISTORTION 1 Select the 10 LINE DIST item then press ENTER The LINE DIST menu is displayed 2 Use the CUR...

Page 45: ...t the same time while the convergence adjustment needs to be performed for each CRT R and B separately 1 Select 11 R G B POINT from the ALIGNMENT menu and press ENTER to display the R G B POINT menu F...

Page 46: ...ect COARSE Coarse adjustment Number of adjust ment zones is 3 x 3 MEDIUM Number of adjustment zones is 7 x 7 FINE Fine adjustment Number of adjustment points is 13 x 16 3 Use the CURSOR or buttons to...

Page 47: ...ence adjustment RETURN USER MODE Y E S N O 6 To end this adjustment press the END button Whenever the END button is pressed the menus will sequence in this order ALIGNMENT menu ADJUST menu Source scre...

Page 48: ...TY Adjustleftandrightlinearity Vertical BOW Adjusthorizontalcenterlinebow Horizontal BOW Adjustverticalcenterlinebow Vertical AMPLITUDE Adjustverticalheightofimage Horizontal AMPLITUDE Adjusthorizonta...

Page 49: ...or Horizontal KEY BALANCE Equalize left and right keystone balance error Vertical LINEAR BALANCE Equalize top and bottom linearity balance error Horizontal LINEAR BALANCE Equalize left and right linea...

Page 50: ...Press the R or B button to display the pattern to be aligned with the Green pattern You can turn on or off each CRT beam R and B separately 4 Hold down the CTL button then select the CRT you wish to...

Page 51: ...isplayed See pages 54 to 56 for the explanation of the selected adjust ment NOTE Youcanalsoselectadjustmentsdirectlyusingbuttonsonthe fullfunctionremotecontrol IfyouareintheALIGNMENT mode seepage41 pr...

Page 52: ...ALANCE Press and hold the CTL button then press any one of the CURSOR buttons to select the position to be adjusted CTL CTL CTL CTL Use the CURSOR buttons to correct the error C O N V E R G E N C E T...

Page 53: ...nceagain RETURN USER MODE Y E S N O C O N V E R G E N C E K E Y S T O N E C R T R 1 0 S C R E E N T O P CONVERGENCE LINE DIST CENTER 0 CONVERGENCE LINE DIST EDGE CRT R 0 CRT R SCREEN TOP 3 Use the CUR...

Page 54: ...by pressing the corresponding INPUT number button The CROSS COARSE test pattern will be automatically displayed The POINT convergence screen can be also displayed by pressing the POINT button on the...

Page 55: ...CROSS COARSE test pattern will be automatically displayed and the adjustments will be cancelled You can also display the adjustment screen by pressing PHASE button on the service remote control 2 Use...

Page 56: ...ontalcenterline KEYSTONE Adjusttheselectedpart WhenTOPisselected Vertical LINEARITY Adjusttopandbottomlinearity Vertical AMPLITUDE Adjusttopandbottomheight Vertical BOW Adjusthorizontalcenterlinebow W...

Page 57: ...ected WhenBOTTOMisselected WhenLEFTisselected Horizontal POINT Adjust the point peak horizontally Vertical POINT Adjust the point peak vertically LINE DIST CENTER Correct S shaped horizontal line LINE...

Page 58: ...PHASE Adjust the pattern so the sharp turns at the left and right edges in the diagonal lines are equal CURSOR PHASE Align the vertical center line of the point cursor with the point peak ADJUSTMENT...

Page 59: ...white level WHT The CURSOR button increases the black level BLK The CURSOR button decreases the black level BLK 4 Repeat the above steps for the other CRTs if necessary 5 To end this adjustment press...

Page 60: ...Connect the projector and the Switcher with a oscillo scope then adjust the CURSOR buttons to obtain a value of 0 7Vp p of the projector input level or the Switcher output level on the oscilloscope 5...

Page 61: ...g the 1 through 0 buttons 1 Each time you press the INPUT button an asterisk appears under the PASSCODE message 2 After you have finished entering the four digit passcode press ENTER NOTE If you have...

Page 62: ...e you press the INPUT button an asterisk will appear under the NEW PASSCODE message NOTE 0000 and 9999 cannot be used as a passcode 2 Once you have finished entering your four digit passcode press ENT...

Page 63: ...OMPLETE message will be displayed NOTE If the passcode is not correct the WARNING DIFFER ENT PASSCODE message will be displayed You are required to enter the new passcode correctly 6 To complete press...

Page 64: ...e using the 1 through 0 buttons 1 Each time you press the INPUT button an asterisk will appear under the CURRENT PASSCODE message 2 Once you have finished entering the four digit passcode press ENTER...

Page 65: ...ssage 2 Once you have finished entering the four digit new passcode press ENTER NOTE If you have made an error press the NORMAL button to delete the asterisk Then re enter the correct passcode To dele...

Page 66: ...the current passcode using the 1 through 0 buttons 1 Each time you press the INPUT button an asterisk will appear under the CURRENT PASSCODE message 2 Once you have finished entering the four digit p...

Page 67: ...to select YES When selecting YES the current passcode will be canceled You will not be required to re enter your passcode when you press the ADJUST button to re enter the ADJUST mode N O When selectin...

Page 68: ...nd press INFO To eliminate the display press END The parameters cannot be changed on the SETTING VIEW screen shown on the right For changing parameters of the setting features refer to the follow ing...

Page 69: ...ight the 1 SETTING MODE line Press ENTER to display the SETTING MODE menu You can also select the SETTING MODE menu directly by pressing the INPUT 1 button 4 Use the CURSOR or button to select the PJ...

Page 70: ...button is pressed the menus will sequence in this order OPTION menu ADJUST menu Source screen If the RETURN USER MODE menu appears use the CURSOR or button to select either YES or NO and press ENTER...

Page 71: ...the button to return to P01 from P02 or P03 press and hold down the CTL button then press the button 5 Use the CURSOR or button to select your desired connec tion condition of Switcher and press ENTE...

Page 72: ...ever the END button is pressed the menus will sequence in this order OPTION menu Adjust menu Source screen If the RETURN USER MODE menu appears use the CURSOR or button to select YES or NO and then pr...

Page 73: ...ectthe DEFAULT INPUTSELECT item thenpressENTERtodisplaythe DEFAULTINPUTSELECT menu NOTE TheSETTINGMODEhasthreemenus The DEFAULT INPUT SELECT item is on the first menu P01 To access P02 or P03 from P01...

Page 74: ...e desired slot number 1 through 10 0 andthenpressENTER When used with two or more Switchers The MASTER and SLAVE slotnumbermenuwillbe displayed UsetheCURSOR or buttontoselectthemasterslotnumber first...

Page 75: ...ERMODE menuappears usethe CURSOR or buttontoselecteither YES or NO and press ENTER This will exit the ADJUST mode Items to select YES When you try to enter the ADJUST mode the next time you will need...

Page 76: ...on 4 UsetheCURSOR or buttontoselectthe FOCUSEDGE MODE item on Page 1 then press ENTER to display the FOCUSEDGEMODE menu NOTE TheSETTINGMODEhasthreemenus The FOCUS EDGE MODE item is on the first menu P...

Page 77: ...nthisorder OPTION menu ADJUST menu Sourcescreen Ifthe RETURNUSERMODE menuappears usethe CURSOR or buttontoselecteither YES or NO and press ENTER This will exit the ADJUST mode Items to select YES When...

Page 78: ...et proceed as follows NOTE An identifying result will be displayed in the SOURCE INFORMATIONscreen 1 PresstheADJUSTbuttontodisplaythe ADJUST menu Theprojectormayaskyoutoenteryourpasscode See page 61 f...

Page 79: ...ther YES or NO and press ENTER This will exit the ADJUST mode Items to select YES When you try to enter the ADJUST mode the next time you will need to re enter your passcode N O When you try to enter...

Page 80: ...2 UsetheCURSOR or buttontohighlightthe 8 OPTION line Press ENTER to display the OPTION menu You can also selectthe OPTION menudirectlybypressingtheINPUT 8 button 3 UsetheCURSOR or buttontohighlightthe...

Page 81: ...e PAL mode SECAM Switches to the SECAM mode Select MANUAL when connecting to poor quality signal or non standardsignalssuchasvideogames NOTE The projector may not function correctly with a mono chrome...

Page 82: ...heINPUT 1 button 4 UsetheCURSOR or buttontoselectthe AUTOPOWER ON MODE item on Page 2 then press ENTER to display the AUTOPOWERONMODE menu NOTE TheSETTINGMODEhasthreemenus The AUTO POWER ON MODE item...

Page 83: ...ched outlet 6 To complete press the END button Whenever the END button is pressed the menus will sequence inthisorder OPTION menu ADJUST menu Sourcescreen Ifthe RETURNUSERMODE menuappears usethe CURSO...

Page 84: ...4 UsetheCURSOR or buttontoselectthe WARM UP MODE item on Page 2 then press ENTER to display the WARM UPMODE menu NOTE TheSETTINGMODEhasthreemenus The WARM UP MODE item is on the second menu P02 To ac...

Page 85: ...ENDbutton 6 To complete press the END button Whenever the END button is pressed the menus will sequence inthisorder OPTION menu ADJUST menu Sourcescreen Ifthe RETURNUSERMODE menuappears usethe CURSOR...

Page 86: ...ING MODE menu directly bypressingtheINPUT 1 button 4 UsetheCURSOR or buttontoselectthe AUTOMATIC DATA STORE item on Page 2 then press ENTER to display the AUTOMATICDATASTORE menu NOTE TheSETTINGMODEha...

Page 87: ...ctoristurnedoff Every10minutes NOTE After DISABLE isselectedintheAUTOMATICDATA STORE menu the settings will not be stored in the memory unless you select YES in the STORE menu 6 Ifthe RETURNUSERMODE m...

Page 88: ...directly bypressingtheINPUT 1 button 4 UsetheCURSOR or buttontoselectthe PHOSPHOR SAVER item on Page 2 then press ENTER to display the PHOSPHORSAVER menu NOTE TheSETTINGMODEhasthreemenus The PHOSPHOR...

Page 89: ...screen Ifthe RETURNUSERMODE menuappears usethe CURSOR or buttontoselecteither YES or NO and thenpressENTER Items to select YES When you try to enter the ADJUST mode the next time you will need to re e...

Page 90: ...1 button 4 Use the CURSOR or button to select the SIGNAL SWITCHING item on Page 2 then press ENTER to display the SIGNAL SWITCHING menu NOTE The SETTING MODE has three menus The SIGNAL SWITCHING menu...

Page 91: ...complete this press END Whenever the END button is pressed the menus will sequence in this order OPTION menu ADJUST menu Source screen If the RETURN USER MODE menu appears use the CURSOR or button to...

Page 92: ...u can also select the SETTING MODE menu directly by pressing the INPUT 1 button 4 Use the CURSOR or button to select the DIRECT ENTRY ACCESS item on Page 3 then press ENTER to display the DIRECT ENTRY...

Page 93: ...plete this press END Whenever the END button is pressed the menus will sequence in this order OPTION menu ADJUST menu Source screen If the RETURN USER MODE menu appears use the CURSOR or button to sel...

Page 94: ...press the button twice to return to P01 from P03 press and hold down the CTL button then press the button twice 5 Use the CURSOR or button to select either OFF or ON and press ENTER Items to select OF...

Page 95: ...cess P03 from P01 press and hold down the CTL button then press the button twice to return to P01 from P03 press and hold down the CTL button then press the button twice 5 Use the CURSOR or button to...

Page 96: ...s and hold down the CTL button then press the v button twice to return to P01 from P03 press and hold down the CTL button then press the button twice A D J U S T 1 S I G N A L E N T R Y 2 F O C U S 3...

Page 97: ...and then press ENTER This will exit the ADJUST mode Items to select YES When you try to enter the ADJUST mode the next time you will need to re enter your passcode NO When you try to enter the ADJUST...

Page 98: ...the 8 OPTION line Press ENTER to display the OPTION menu You can also select the OPTION menu directly by pressing the INPUT 8 button 3 Use the CURSOR or button to highlight the 2 MENU MODE line Press...

Page 99: ...er the DISPLAY button is pressed If no button operation is made for 20 minutes or more the on screen message will automatically turn off 6 To end this mode press the END button When the END button is...

Page 100: ...ODE line Press ENTER to display the MENU MODE menu You can also select the MENU MODE menu directly by pressing the INPUT 2 button 4 Use the CURSOR or button to highlight the MESSAGE COLOR item Press E...

Page 101: ...ode press the END button Whenever the END button is pressed the menus will sequence in this order OPTION menu ADJUST menu Source screen If the RETURN USER MODE menu appears use the CURSOR or button to...

Page 102: ...ng the INPUT 2 button 4 Use the CURSOR or button to highlight the DATE TIME DISPLAY item Press ENTER to display the DATE TIME DISPLAY menu 5 Use the CURSOR or button to select any one of the three ite...

Page 103: ...AM PM Is the time in hours minutes seconds am pm format HH MM SS 24 HOUR Is the time in hours minutes seconds 24 hour format OFF Does not display the time NOTE You can select the time input format for...

Page 104: ...n also select the MENU MODE menu directly by pressing the INPUT 2 button 4 Use the CURSOR or button to highlight the DATE TIME PRESET item Press ENTER to display the DATE TIME PRESET menu A D J U S T...

Page 105: ...ER MODE menu appears use the CURSOR or button to select either YES or NO and press ENTER This will exit the ADJUST mode I t e m s t o s e l e c t YES WhenyoutrytoentertheADJUSTmodethenext time youwill...

Page 106: ...ddress ON Displays PJ address 6 To end this mode press END Whenever the END button is pressed the menu will sequence in this order OPTION menu ADJUST menu Source screen If the RETURN USER MODE menu ap...

Page 107: ...GNAL message OFF Does not display the NEW SIGNAL message 6 To end this mode press END Whenever the END button is pressed the menu will sequence in this order OPTION menu ADJUST menu Source screen If t...

Page 108: ...EDIT and press ENTER This will bring you to the EDIT mode and a program line is highlighted I t e m s t o s e l e c t START Executestheprogram EDIT Correctsorcreatestheprogramdata A D J U S T 1 S I G...

Page 109: ...desiredtime P O F F Programstoturnoffthepoweratthedesiredtime INSERT Insertstheselectedlineandmovesdownthe following lines DELETE Deletestheselectedlineandmovesupthe following lines m Selecting INPUT...

Page 110: ...If you have made an error in the input of numbers press the END button to return to the MASTER menu then start from step 2 The WEEK SELECT screen will appear 4 Use the CURSOR or button to select any d...

Page 111: ...f the week then select either YES or NO with ENTER When DAILY selected the entire week is changed to YES When END is selected the current setting is saved To return to Step 4 press the END button In t...

Page 112: ...IDEO then type 99 99 99 in the TIME input screen then select DAILY in the WEEK SELECT menu for INPUT Second line Select type 00 20 00 in the TIME input screen for WAIT Third line Type 99 99 99 then se...

Page 113: ...1 Use the CURSOR or button to select LOOP and press ENTER The LOOP COUNT input screen will be displayed 2 Enter the number of the destination line LOOP and the number of the loop times COUNT in this o...

Page 114: ...gnoredifsetinthefirstline Inthis case theprogramwillstartitsexecutionfromthesecondline m Selecting P OFF 1 Use the CURSOR or button to select P OFF and press ENTER The POWER OFF input screen will be d...

Page 115: ...I O N S E Q U E N C E R P 0 1 N O 0 1 0 2 0 3 0 4 0 5 0 6 0 7 0 8 0 9 1 0 I N P U T M 1 0 M 0 2 M 0 1 W A I T M 0 1 W A I T L O O P M 0 2 P O F F P O N S 0 1 S 0 2 S 0 2 S 0 1 0 3 C O U N T 0 5 S 0 2...

Page 116: ...MODE menu appears use the CURSOR or button to select either YES or NO and then press ENTER This will exit the ADJUST mode I t e m s t o s e l e c t YES WhenyoutrytoentertheADJUSTmodethenext time youwi...

Page 117: ...TER to display the ADDRESS screen You can also select the ADDRESS menu directly by pressing the INPUT 4 button or the ADDRESS button on the full function remote control 4 Enter the address number usin...

Page 118: ...n If the RETURN USER MODE menu appears use the CURSOR or button to select either YES or NO and press ENTER This will exit the ADJUST mode I t e m s t o s e l e c t YES WhenyoutrytoentertheADJUSTmodeth...

Page 119: ...The new remote control address is displayed on the screen When the new remote control address is configured at 00 the display will not be changed However its address has been changed by pressing ENTER...

Page 120: ...or 2 LEVEL 4 To exit this menu press END Whenever the END button is pressed the menus will sequence in this order OPTION menu ADJUST menu Source screen If the RETURN USER MODE menu appears use the CUR...

Page 121: ...ngtimeofCRT USERPJRUNNINGTIME Theamountofoperatingtimeoftheprojector Userresetable How to reset the user projector or CRT running time 1 Use the CURSOR buttons to select the item and then press ENTER...

Page 122: ...NO and press ENTER This will exit the ADJUST mode I t e m s t o s e l e c t YES WhenyoutrytoentertheADJUSTmodethenext time youwillneedtore enteryourpasscode N O WhenyoutrytoentertheADJUSTmodethenext t...

Page 123: ...tory REF ADJUST 1 ASTIG 2 BRIGHT UNIFORM 3 WHITE UNIFORM 4 RASTER CENTERING 5 FOCUS BAL 6 REF WHITE BAL For service personnel only cannot be selected ASTIG menu Adjustment screen Adjustment screen NOT...

Page 124: ...NER Adjusts the four corners on the creen 3 Use the CURSOR or button to select the CENTER EDGE or CORNER item Press the ENTER button to display the ASTIG adjustment screen The DOT COARSE test pattern...

Page 125: ...to adjust the selected position diagonally 8 To end this mode press the END button Whenever the END button is pressed the menus will sequence in this order REF ADJUST menu Source screen If the RETURN...

Page 126: ...button to increase or decrease the brightness on the right and the left side Press CURSOR or button to increase or decrease the brightness on the top and the bottom side 4 To end this mode press the E...

Page 127: ...SOR or button to increase the amount of blue on the right side and the amount of red on the left side Press CURSOR or button to increase the amount of red on the right side and the amount of blue on t...

Page 128: ...s t t h e r a s t e r p o s i t i o n P r e s s i n g C U R S O R o r m o v e s t h e r a s t e r u p P r e s s i n g C U R S O R o r m o v e s t h e r a s t e r d o w n 4 T o e n d t h i s m o d e p...

Page 129: ...129 Appendix CONTENTS Timing Charts Pre set Signals 130 Input Signal Referecne Chart 131 Input Signal Timing 132 Message List 133...

Page 130: ...following signals have been set by factory P 0 1 1 0 1 I N P U T S E L E C T S T A N D A L O N E N O 0 1 0 2 0 3 0 4 0 5 0 6 0 7 0 8 0 9 1 0 S O U R C E V I D E O V I D E O V I D E O V I D E O R G B N...

Page 131: ...VIDEO C D E A B VIDEO C D E A B C D E A B VIDEO C D E A B VIDEO HORIZONTAL VERTICAL HORIZONTAL VERTICAL HORIZONTAL VERTICAL Separate Sync Composite Sync Composite Sync Video Sync on Green Sync Polari...

Page 132: ...1 13 19 26 29 15 14 21 16 13 71 26 1 15 79 11 56 12 68 16 00 12 510 15 754 15 880 E 0 3 0 99 0 3 0 16 1 13 0 12 2 12 0 09 0 3 0 06 0 46 0 044 1 12 0 722 0 369 0 062 Polarity 1 1 1 1 1 1 IBM VGA 350 IB...

Page 133: ...d i s p l a y s t h e g H V 6 5 6 5 H V RANGE OVER 6 5 Conditions T h i s m e s s a g e m i g h t b e d i s p l a y e d a t t h e t i m e o f t h e C O N V E R G E N C E F O C U S E D G E S E P A R A...

Page 134: ...selectionfromINPUTLISTwhile intheexternalcontrolmode DepresstheR G Bbuttonorexecute PICTUREFUNCTIONadjustmentitems duringthePICTUREMUTEsettingin theexternalcontrolmode ExecutetheSOUNDFUNCTION adjustme...

Page 135: ...The projector will turn off in three minutes when ON OFF or SLEEP TIMER is set to ON Select a registered line Reset the SEQUENCER Reset the SEQUENCER There is an unselectable item due to the input si...

Page 136: ...136 NEC Corporation Printed in Japan 78409151...

Reviews: