background image

Setting the Clock

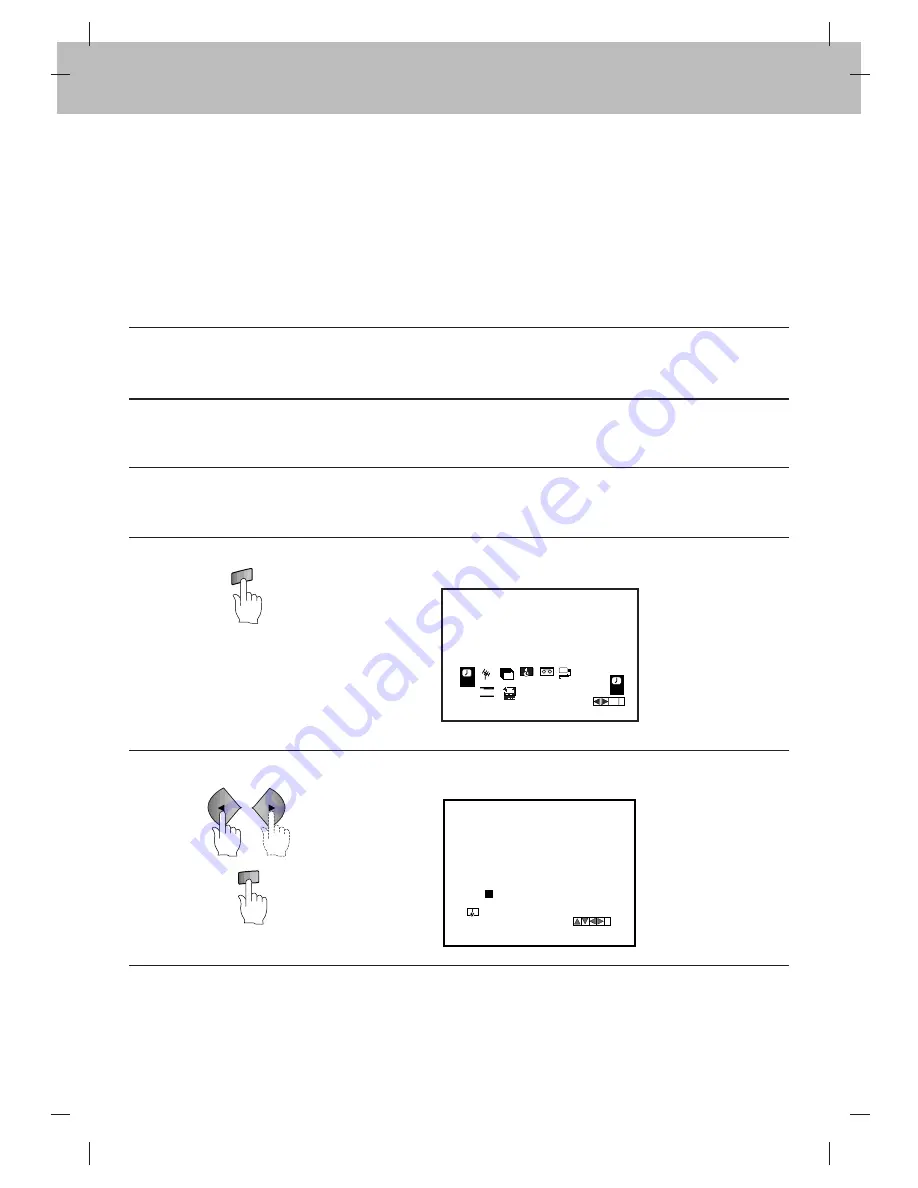
Use the On-Screen Display and the remote control unit to set the clock.

Before You Start

The clock uses a 24-hour system.

When you first plug in your VCR, the clock will read “- -  - -”.

While you are setting the clock, a menu on the TV screen will prompt you to go through the correct procedure.

If you enter an incorrect number, press CURSOR (

F

F

/

G

G

) to clear the entry, then enter the correct number again.

14

PROCEDURE

:

1

Turn on the power of both the VCR and the TV.

2

Make sure that the TV is set to the VCR output channel.

3

Aim the remote control at the remote sensor window on the front panel of the VCR.

4

Press 

i

on the remote control. The menu below will appear on the TV screen.

G.CODE

CHILD LOCK

SKIP

AV

MENU

OPERATE

i

CH/TRK

CH/TRK

CH/TRK

CH/TRK

CH/TRK

CH/TRK

CH/TRK

CH/TRK

CH/TRK

CH/TRK

G.CODE

CHILD LOCK

SKIP

CLK/C

TR

OK

AV

OPERATE

CH/TRK

CH/TRK

CH/TRK

CH/TRK

CH/TRK

CH/TRK

CH/TRK

CH/TRK

CH/TRK

CH/TRK

5

Press CURSOR (

F

F

/

G

G

) to select “TIME DATE” and press OK.

REC

REC

SYS-

TEM

SET

OPR

Pr-12

ACMS

OSD

ON

OFF

OSD

f

1 2

TIME

DATE

Dr.

VCR

A B

C

OSD

P
R

OK

i

i

MM

HH

DD

YY

MM

- - 

- -

:

- - .

- -  - - - 

- - .

1 2

TIME

DATE

Summary of Contents for VN-212

Page 1: ...ote Control Unit 7 l Inserting and Removing Video Cassettes 9 l VCR TV Connection 10 l Antenna Connection 11 l On Screen Menu Programming 13 l Setting the Clock 14 l Setting the Reception Channels 16 l Playing Back Video Cassettes 24 l Searching for Particular Scenes 25 l Special Playback 26 l ez easy operations 27 l Convenient Features 28 l Recording TV Programmes 30 l Quick Start Recording QSR 3...

Page 2: ...ECT BUTTON Press this button to stop or eject the tape CASSETTE COMPARTMENT Insert a cassette in the compartment loading will be completed automatically NOTE Power is turned on automatically when the cassette is loaded If the cassette is loaded without the safety tab in place the video programme will play automatically FULL AUTO PLAY REWIND REVIEW BUTTON Press to start rewind Press this button dur...

Page 3: ... Display 5 PLAY Button 4 REW Button 6 FF Button 2 STOP EJECT Button 3 Cassette Compartment Remote Sensor Window 7 P STILL Button 11 9 CH Buttons 8 REC QSR Button AUDIO AV1 IN OUT AERIAL VIDEO RF OUT 12 Mains Lead 13 AUDIO IN OUT Terminals 16 VIDEO OUT Terminal 14 AERIAL Terminal RF OUT Terminal 17 VIDEO IN Terminal 15 ...

Page 4: ... tape in the VCR 2 REC Appears when the VCR is in Recording mode 3 Switchable Display Clock QSR Quick Start Recording off time Channel number AV Tape recording speed Current tape mode 4 Timer Appears when the VCR is set to record a programme in TIMER mode 5 VCR Appears when the TV VCR button is set to VCR mode ...

Page 5: ...Function Indicator 5 PLAYBACK RECORD PAUSE REWIND REVERSE SEARCH STILL PLAYBACK RECORD FAST FORWARD FAST FORWARD SEARCH REC REC I I I I I I I I I I I I I I I I I STOP ...

Page 6: ...e counter and the remaining tape length will also appear on the TV screen After three seconds OSD will disappear If OK button is pressed twice in quick succession the clock display will remain on the TV screen Each time OK button is pressed you can change the switchable display to the current time or to the tape counter and the remaining tape length Press OK button again to remove OSD from the TV ...

Page 7: ...lid by sliding it forward Remove the flat batteries Load new AAA batteries taking care to align their polarities and as indicated Replace the lid NOTE If you do not intend using the remote control unit for an extended period of time remove the batteries and store them in a cool dry place CLK CTR OK CLEAR P STILL i FF PLAY STOP TV VCR TV VCR AV AV EASY OFF EASY OFF CHILD LOCK CHILD LOCK EASY RPT EA...

Page 8: ...reeze the picture Press PLAY to resume playback 8 MENU i Used to enter into menu on the TV screen 9 CLK CTR OK Press while the clock is displayed to show the tape counter The tape position will be stored in memory Confirms menu selection Calls up OSD On Screen Display 10 CURSOR E ED DF F G G CH TRK D D E E During OSD menu for moving the cursor selection bar up or down Switches one channel programm...

Page 9: ...ECT The cassette compartment will open and the cassette will be partially ejected Carefully remove the cassette from the VCR It is not recommended to leave the cassette in the VCR when not in use Accidental Erasure Protection To prevent accidental erasure Prevent accidental erasure of a tape by breaking off the safety tab on the back edge of the cassette To re record If you later want to record ov...

Page 10: ...L VIDEO RF OUT Aerial To AUDIO OUT terminal To AUDIO IN terminal Stereo TV Coaxial cable supplied To RF OUT To VIDEO IN terminal To VIDEO OUT To VIDEO OUT terminal To VIDEO IN terminal To AUDIO IN terminal To AUDIO OUT terminal To AERIAL 1 Connect the VCR to the TV as shown above 2 Turn the VCR ON by pressing OPERATE button AV OPERATE CH TRK CH TRK CH TRK CH TRK CH TRK CH TRK CH TRK CH TRK CH TRK ...

Page 11: ...al aerial cable from your TV set and plug it into the AERIAL terminal on your VCR Using the coaxial cable supplied connect the aerial terminal on your TV set to the RF OUT terminal on your VCR AUDIO AV1 IN OUT AERIAL VIDEO RF OUT Aerial To AC outlet 110 240V 50 60Hz 12W To RF OUT To aerial terminal To AERIAL Coaxial cable Supplied TV ...

Page 12: ...ears on the TV screen NOTE Refer to your TV user s manual when tuning the video channel 6 If channel 68 is already occupied on your TV set or the picture is distorted you can change the transmitted channel of the video recorder 1 During power off mode the clock indicator will be dimmed hold down both the CH D D and CH E E buttons on the VCR for more than 4 seconds Then RF 68 will be displayed on t...

Page 13: ... is used to set the Colour TV System see p 32 6 Dr This feature is used to check a problem with your VCR see p 28 7 ABC OSD This function is used to select the language Press D D E E to select from English Deutsch Français Polish and Russian or vice versa 8 OSD ON OFF This feature is used to display VCR operation modes on the TV screen Press D D E E to select it ON or OFF 9 OPR This function is us...

Page 14: ...OCEDURE 1 Turn on the power of both the VCR and the TV 2 Make sure that the TV is set to the VCR output channel 3 Aim the remote control at the remote sensor window on the front panel of the VCR 4 Press i on the remote control The menu below will appear on the TV screen G CODE CHILD LOCK SKIP AV MENU OPERATE i CH TRK CH TRK CH TRK CH TRK CH TRK CH TRK CH TRK CH TRK CH TRK CH TRK CLK CTR OK CH TRK ...

Page 15: ...n the remote control Enter 2 more for the minutes e g 1530 for 15 30 i MM HH DD YY MM 30 15 1 2 TIME DATE 7 Set the date by pressing the number buttons to enter 6 digits day month and year in order For example 010103 for 1 January 2003 The day of the week will appear automatically when you have entered all 6 digits for the date i MM HH DD YY MM 30 15 1 2003 WED 1 1 2 TIME DATE G CODE CHILD LOCK SK...

Page 16: ...on channels NOTE Entering ACMS will automatically delete all existing programmed channels Manual Channel Tuning Manual channel tuning allows you to store channels in preferred order as on your TV set Programme numbers 01 to 99 can be used G CODE CHILD LOCK SKIP AV MENU OPERATE i CH TRK CH TRK CH TRK CH TRK CH TRK CH TRK CH TRK CH TRK CH TRK CH TRK 1 Press i on the remote control The following menu...

Page 17: ...ION If you require a channel name for your programmed station you can select from a menu or manually change a channel name Press OK button once the following station name list will appear on the TV screen 1 If the station name required is on the menu use the CURSOR D D E E buttons to select it Press OK button The TV station table menu will be displayed 2 If the desired station name is not on the m...

Page 18: ...e CURSOR D D E E then press the OK button The process can be repeated from step 3 Press i to end manual channel tuning 1 Enter the first letter of the station name by pressing the CURSOR D D and E E buttons repeatedly 2 Now move the cursor with CURSOR G G to the next position and write in the next letter of the station name For corrections move the F F and G G buttons back and forth 3 When you hav...

Page 19: ...els before storing the new channels Pr 12 ACMS ACMS OK i CLK CTR OK AV CH TRK CH TRK CH TRK CH TRK CH TRK CH TRK CH TRK CH TRK 3 Press OK to start automatic channel search Pr 12 ACMS S E i Auto Channel Tuning Important This VCR has the following channels preset when it is shipped from the factory It must be noted that by entering the Auto Channel Tuning mode ACMS all factory preset channels and ma...

Page 20: ...V Station table menu appears on the TV screen MOVE DELETE OK i 01 C03 08 PR 01 02 C02 02 PR 02 03 C11 01 PR 03 04 C40 03 PR 04 05 C02 01 PR 05 06 07 08 SET P R NOTE AUTO SEARCH will stop if all channels are scanned or if the i button is pressed again ...

Page 21: ... i 01 C22 08 PR 01 02 C32 02 PR 02 03 C31 01 PR 03 04 C40 03 PR 04 05 C52 01 PR 05 06 07 08 SET P R MOVE AV OPERATE CH TRK CH TRK CH TRK CH TRK CH TRK CH TRK CH TRK CH TRK CH TRK CH TRK 4 Press CURSOR F F to delete the channel The station will be cleared To skip other channels repeat steps 3 and 4 DELETE OK i 01 C22 08 PR 01 02 C32 02 PR 02 03 C31 01 PR 03 04 C52 01 PR 05 05 06 07 08 SET P R MOVE ...

Page 22: ...R F F G G to select PR SET press OK and press i MOVE DELETE OK i 01 C03 08 PR 01 02 C02 02 PR 02 03 C11 01 PR 03 04 C40 03 PR 04 05 C02 01 PR 05 06 07 08 SET P R CH TRK CH TRK CH TRK CH TRK AV CH TRK CH TRK CH TRK CH TRK CH TRK CH TRK CH TRK CH TRK 3 NOTE When changing the program order start with the highest transferred channel number through to the lowest transferred channel number For example T...

Page 23: ... for example PR No 04 and press OK The selected station will be moved to the new programme number Move other stations if you wish by repeating steps 3 to 4 MOVE DELETE OK i 01 C22 08 PR 01 02 C32 02 PR 02 03 C31 01 PR 04 04 C40 03 PR 03 05 C52 01 PR 05 06 07 08 SET P R G CODE CHILD LOCK SKIP AV MENU OPERATE i CH TRK CH TRK CH TRK CH TRK CH TRK CH TRK CH TRK CH TRK CH TRK CH TRK 5 Press i to end pr...

Page 24: ...r a piece of cellophane tape in place the VCR will automatically function in sequence as follows The power will be turned on The VCR will start playback immediately At the end of the cassette the tape will be rewound automatically AUTO REWIND The cassette will be ejected automatically when the rewinding is complete The power will be turned off NOTE The cassette will be ejected when the EJECT butto...

Page 25: ...ar on the Multi Function Display When the desired point in the tape has been located press PLAY to return to the normal playback mode Visual searching will only continue for about 3 minutes then it will return to playback mode NOTES While searching the audio portion is automatically muted While searching noise streaks may appear in the picture G CODE CHILD LOCK SKIP REW CH TRK CH TRK CH TRK CH TRK...

Page 26: ...CH TRK CH TRK CH TRK CH TRK CH TRK CH TRK NOTES If distortions can be seen in the picture remove them with the CURSOR D D E E buttons While using the special playback effects picture logic search or still playback with the tape recorded in LP mode there will be a loss of colour and there may be noise bars in the picture Skip Search During playback press SKIP to skip commercials or other programme ...

Page 27: ...asy power off During play back press EASY OFF Your VCR will be operated as the following ez easy repeat During play back press hold EASY RPT at the point where repeat play is to be concluded Then your VCR will go into reverse search Release EASY RPT at the point where repeat play is to start The holding section is replayed twice automatically NOTE Pressing EASY RPT again during repeat play will re...

Page 28: ...a portion of the tape To set the counter to 0 00 00 press CLEAR The counter displays the travelling time of the tape in hours minutes and seconds G CODE CHILD LOCK SKIP AV OPERATE CH TRK CH TRK CH TRK CH TRK CH TRK CH TRK CH TRK CH TRK CH TRK CH TRK G CODE CHILD LOCK CHILD LOCK SKIP AV OPERATE CH TRK CH TRK CH TRK CH TRK CH TRK CH TRK CH TRK CH TRK CH TRK CH TRK Diagnostic Advising System This fun...

Page 29: ... OK AV CH TRK CH TRK CH TRK CH TRK CH TRK CH TRK CH TRK CH TRK G CODE CLEAR CHILD LOCK SKIP CH TRK CH TRK G CODE CHILD LOCK SKIP PLAY AV OPERATE CH TRK CH TRK CH TRK CH TRK CH TRK CH TRK CH TRK CH TRK CH TRK CH TRK G CODE REC QSR CH TRK CH TRK CH TRK CH TRK CH TRK CH TRK 2 Start playback or recording 3 G CODE STOP CH TRK CH TRK CH TRK CH TRK CH TRK CH TRK Press STOP when playback or recording is c...

Page 30: ...ressing CURSOR D D E E When recording from another source via AUDIO IN VIDEO IN in the rear panel AV1 select AV mode with AV button The AV indicator AV will appear on the Multi Function Display and AV will appear on the TV screen NOTE Press AV to select TUNER mode if you need to record from TUNER mode G CODE CH TRK CH TRK CH TRK CH TRK G CODE CHILD LOCK SKIP AV AV OPERATE CH TRK CH TRK CH TRK CH T...

Page 31: ...me while watching another simply by choosing the desired channel with the TV channel buttons If two programmes that you want to watch are broadcast at the same time you can record one while watching the other Follow steps 1 4 above Use the TV channel selector of the TV set to select the channel for watching Do not change the VCR channel You cannot watch another programme simultaneously if you reco...

Page 32: ...e NTSC system in 3 58 mode NTSC 4 43 Use when playing back a tape recorded in the NTSC system in 4 43 mode Set NTSC to record Line Recording NTSC 3 58 Use when recording NTSC 3 58 signals NTSC 4 43 Use when recording NTSC 4 43 signals G CODE CHILD LOCK SKIP AV OPERATE CH TRK CH TRK CH TRK CH TRK CH TRK CH TRK CH TRK CH TRK CH TRK CH TRK CH TRK CH TRK i OK SYS TEM REC SYS TEM PSET R Dr VCR Pr 12 AC...

Page 33: ...RK CH TRK CH TRK CH TRK CH TRK CH TRK CH TRK CH TRK 1 Turn on the VCR and set the TV to the video channel 2 Press i on the remote control The following menu will appear on the TV screen NOTE The clock time must be set before setting the programme timer If the clock time has not been set the display will change to the clock menu Now you can set the clock REC REC SYS TEM SET OPR Pr 12 ACMS OSD ON OF...

Page 34: ...ing type then select it with OK Daily event For recording up to 7 programmes which are broadcast at the same time from Monday to Friday Weekly event For recording up to 7 programmes on a certain day of every week from Sunday to Saturday Enter the day using the number buttons PR DATE TIME PR 01 15 SP SP SP SP SP SP SP OK i PR DATE TIME PR 01 15 SP SP SP SP SP SP SP OK i SU MO TU WE TH FR SA DLY PR ...

Page 35: ... i DELETE G CODE CHILD LOCK SKIP AV MENU OPERATE i CH TRK CH TRK CH TRK CH TRK CH TRK CH TRK CH TRK CH TRK CH TRK CH TRK AV OPERATE CH TRK CH TRK CH TRK CH TRK CH TRK CH TRK CH TRK CH TRK CH TRK CH TRK 9 Additional programmes can now be entered by repeating steps 3 to 8 10 Press i to remove the menu from the TV screen 11 When you finish specifying programmes and want to set the VCR to record them ...

Page 36: ...DE CLK CTR OK CH TRK CH TRK CH TRK CH TRK CH TRK CH TRK 2 Press CURSOR F F G G to select the REC and select it with OK G CODE CH TRK CH TRK CH TRK CH TRK 3 SKIP AV OPERATE CH TRK CH TRK CH TRK CH TRK CH TRK CH TRK CH TRK CH TRK CH TRK CH TRK 4 Press CURSOR D D E E to select the programme that you want to delete Press CURSOR F F when the programme information to be erased is displayed 5 When you fi...

Page 37: ...given priority Example Programme 1 is programmed to start at 10 30 and end at 11 30 Programme 2 is programmed to start at 11 00 and end at 12 00 In this case Programme 1 will be recorded in its entirety but only the last 30 minutes of Programme 2 will be recorded PROGRAMME 1 PROGRAMME 2 12 00 11 00 OVERLAPPED PROGRAMME This part will not be recorded 10 30 11 30 ...

Page 38: ... To AERIAL TV Coaxial cable supplied To RF OUT To AUDIO OUT terminals RECORDING VCR RF OUT AERIAL 32 40 CHANNEL R L AUDIO OUT VIDEO OUT To VIDEO OUT terminal To VIDEO IN PLAYING VCR To AUDIO IN terminals AV OPERATE CH TRK CH TRK CH TRK CH TRK CH TRK CH TRK CH TRK CH TRK CH TRK CH TRK 1 Press OPERATE buttons on both VCRs AV AV OPERATE CH TRK CH TRK CH TRK CH TRK CH TRK CH TRK CH TRK CH TRK CH TRK 2...

Page 39: ...VCR 5 Start playback on the playing VCR and start recording on the recording VCR NOTES If VN 212 is the recording VCR select the AV mode by pressing AV Unauthorized recording of copyrighted television programmes films video tapes and other material may infringe the right of copyright owners and be contrary to copyright laws Recording that you make of television broadcasts or other pre recorded mat...

Page 40: ...ection between VCR and aerial correct Has the receiving channel of VCR been tuned correctly Is erasure prevention tab intact Has the recording start end times been set correctly Is the timer recording indicator TIMER lit Check and correct the connections Tune into the channel correctly If broken off fix adhesive tape over the hole Set the times correctly If there is a power interruption before or ...

Page 41: ...hould remain con nected to the mains Cleaning the VCR Wipe off the VCR exterior with a clean dry cloth Never use cleaning fluids chemicals or wax Video Head Cleaning This VCR incorporates an automatic head cleaner which operates whenever the cassette is ejected or inserted Cleaning of the video and audio heads is the customer s responsibility and is not covered under the terms of the warranty Alwa...

Page 42: ...mically processed cloths etc These could damage the surface finish or cause the coating to peel Use the unit only in a horizontal position Do not place heavy objects on the VCR Keep the unit away from flower vases tubs sinks etc If any liquids should spill into the unit serious damage could occur In this case please disconnect the VCR from the mains and consult qualified service personnel Do not o...

Page 43: ...C 35 C Operating Humidity Less than 80 Dimensions W x H x D 360 x 94 x 230 14 2 x 3 7 x 9 1 Weight About 3 2Kg Clock 24 hour display type VIDEO Input VIDEO IN RCA type 1 0 Vp p 75 ohms unbalanced Output VIDEO OUT RCA type 1 0 Vp p 75 ohms unbalanced S N Ratio More than 43 dB RF Modulation UHF Channel 28 68 Adjustable AUDIO Input AUDIO IN RCA type 6 0 dBs More than 47 kohm Output AUDIO OUT RCA type...

Page 44: ...ensland Brisbane 116 Ipswich Road Woollongabba 4102 07 3361 5858 Southport Shop 1 48 Ferry Road Southport 4215 07 5591 3670 South Australia Adelaide 84A Richmond Rd Keswick 5053 08 8375 5710 Western Australia Perth 45 Sarich Court Osborne Park 6017 08 9445 5901 For service in outer areas please contact your NEC retailer for the address of the nearest NEC Australia Pty Ltd Authorized Service Centre...

Page 45: ...P N 3834RP0092R ...

Reviews: