background image


- 80 - 

Audio Options

Audio Options

Audio Options

Audio Options    

The notebook comes equipped with built-in audio ports that let you record and play sound. 
 

Note


For more information on Audio features, refer to the 

“Audio” 

section of this guide. 


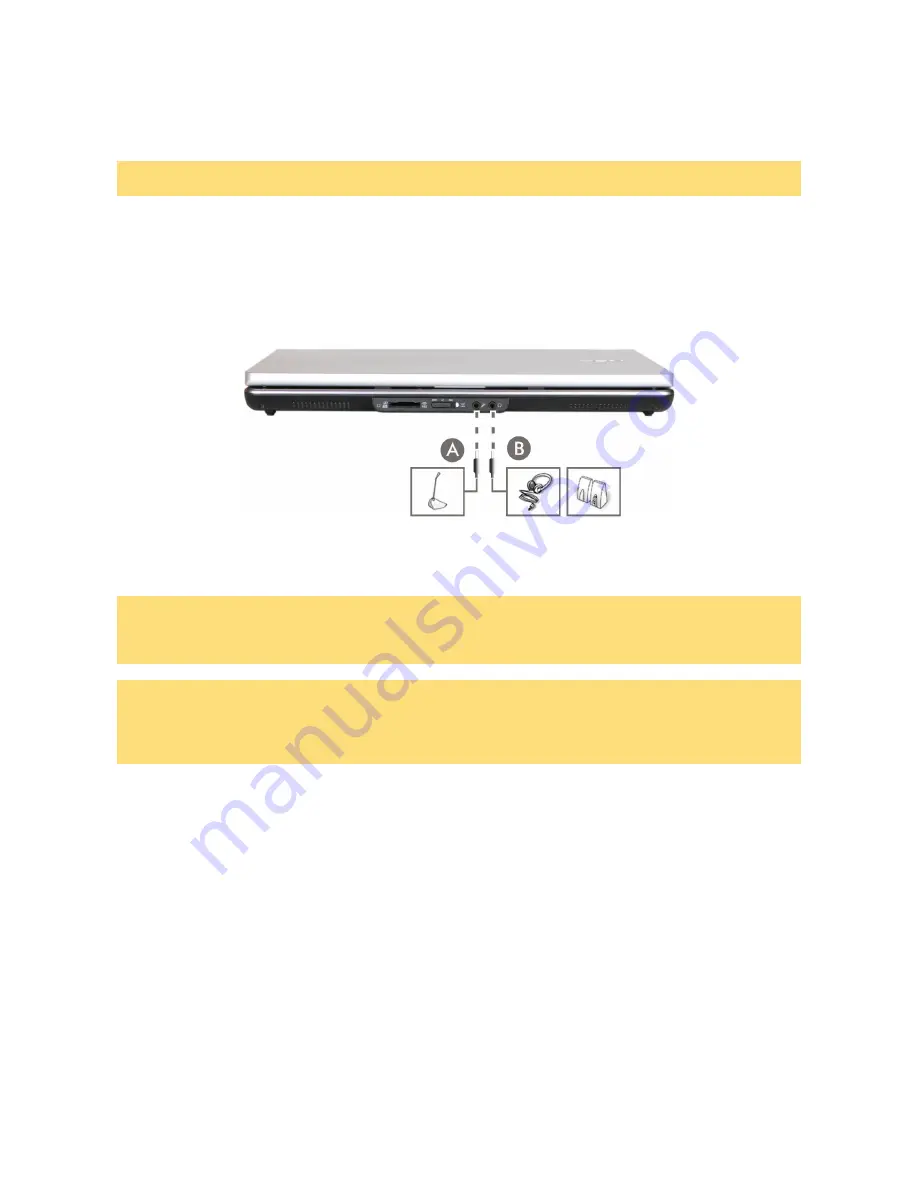
Connect audio jacks, like a microphone, headphones, or external speakers to the audio ports as 
follows. 

 
1.  Locate the audio port that you want to use. 

2.  Plug the jack into the appropriate port on the notebook. 


Microphone In Jack (A)


Headphones (B)


Note


The illustrations, colours and pictures shown are for illustration purposes. They may vary slightly from 
country to country and the unit you purchase. Please refer to the finished product for final configurations. 
Specifications and model names are subject to change without notice. 


Note


If you are using external speakers or an external microphone and experience sound distortion or feedback, 
lower the volume. 


Having the microphone and speakers too close to each other causes some feedback, so moving the external 
audio option away from the unit may also help.  


Summary of Contents for VERSA P7500 Series

Page 1: ... 1 05 2008 NEC VERSA P7500 Series Electronic User s Guide ...

Page 2: ...purposes or b for the transfer of the floppy disk portion of the Software to a single hard disk provided you keep the original solely for backup or archival purposes You may not copy the CD ROM disc portion of the Software or the written materials accompanying the Software OTHER RESTRICTIONS You may not rent or lease the Software but you may transfer the Software and accompanying written materials...

Page 3: ...ons thereof and AMD PowerNow are trademarks of Advanced Micro Devices Inc Microsoft Encarta MSN Windows Outlook Office logo and Windows logo are either registered trademarks or trademarks of Microsoft Corporation in the United States and or other countries Windows Vista is either a registered trademark or trademark of Microsoft Corporation in the United States and or other countries Norton Interne...

Page 4: ... Windows XP Home Edition Windows XP Windows XP Professional Internet Explorer Windows Media Center Official Name Windows Vista Home Basic Windows Vista Home Premium Windows Vista Business Windows Vista Ultimate Microsoft Windows XP Home Edition operating system Service Pack 2 Microsoft Windows XP Professional operating system Service Pack 2 Windows Internet Explorer Windows Media Center ...

Page 5: ...ration purposes They may vary slightly from country to country and the unit you purchase Please refer to the finished product for final configurations Specifications and model names are subject to change without notice Text Setup Text Setup Text Setup Text Setup To make this guide as easy to use as possible the text is laid out as follows Note Notes give particularly important information about wh...

Page 6: ...Check the computer for condensation If condensation is present allow it to evaporate before switching on the computer Keep the computer away from dust sand and dirt Note For information on the specification of your notebook please refer to the System Configuration Label on the packaging box that comes with your system Note The illustrations colours and pictures shown are for illustration purposes ...

Page 7: ...nnect the notebook from the electrical outlet if it is not going to be used for a long time This will avoid damage by transient over voltage Do not attempt to disassemble the computer Do not push any foreign objects into the notebook bays connectors or slots Do not set the computer on top of a magnetised area Doing so can destroy the data on your hard disk drive Some airline tray tables are magnet...

Page 8: ...ts section for more information Keep the storage area free from vibration and magnetic fields Keep the notebook and its components away from organic solvents or corrosive gases Avoid leaving the notebook and its components in direct sunlight or near heat sources Routine Cleaning Clean or dust your notebook as follows Caution Never use harsh solutions household cleaners or spray cleaners that conta...

Page 9: ... Interference Statement Connections and Remote Earth Power Supply and Cables Batteries Laser Compliance Statement Thunderstorm Warning Virus Warning Epilepsy Warning Radio communication Regulation if applicable Additional Notices Electrostatic Discharge ESD and ESD Protection Product Storage Environment Guidelines ...

Page 10: ...responsible for compliance could void the user s authority to operate the equipment Note This is a Class B Digital Device This equipment has been tested and found to comply within the limits for a Class B digital device pursuant to the CISPR22 Standard These limits are designed to provide reasonable protection against harmful interference in a residential installation This equipment generates uses...

Page 11: ...tra Low Voltage Every input and output of this product is classified as Safety Extra Low Voltage except the modem which is classified as TNV 3 Remote Earth To prevent electrical shocks connect all local individual office computers and computer support equipment to the same electrical circuit of the building s wiring If you are unsure check the building s wiring to avoid remote earth conditions Bui...

Page 12: ...if equipped are classified as Hazardous Voltage You must unplug the power supply cord to disconnect the equipment from the power supply For this purpose the socket outlet should be installed as close to the equipment as possible and should be easily accessible In European countries before plugging the power cord into an AC outlet check that the voltage selector switch of the computer s power suppl...

Page 13: ... replace the battery For battery replacement information call your dealer or your Customer Assistance Centre Unauthorized repairs or changes of battery cells or whatever parts in a battery pack will void the safety and fire warranty WARNING There is a danger of explosion if the battery is incorrectly replaced Replace only with the same or equivalent type recommended by the manufacturer Discard use...

Page 14: ...by viruses Trojans worms and intruders Epilepsy Warning Epilepsy Warning Epilepsy Warning Epilepsy Warning Some people are susceptible to epileptic seizures or loss of consciousness when exposed to certain flashing lights or light patterns in everyday life Such people may have a seizure while watching television images or playing certain games This may happen even if the person has no medical hist...

Page 15: ...ment Guidelines 1 When the product is in use or powered on This product is best to be used from 15 degrees C to 25 degrees C though it will operate as normal from 5 degrees C to 35 degrees C Avoid placing the product in a dusty environment as excessive dust might be sucked into the machine body which may reduce the cooling effect Do not try to block any ventilation holes as you may cause the produ...

Page 16: ...isk of developing nerve muscle or tendon disorders Read through this Electronic User s Guide to familiarize yourself with the notebook NEC VERSA Note The illustrations and pictures shown are for illustration purposes They may vary slightly from country to country and the unit you purchase The notebook offers you a portable system filled with exciting resources for home business or travel Note The ...

Page 17: ...es Front Features Note The illustrations colours and pictures shown are for illustration purposes They may vary slightly from country to country and the unit you purchase Please refer to the finished product for final configurations Specifications and model names are subject to change without notice ...

Page 18: ...ath Start Menu Æ All Programs Æ Logitech Æ Logitech QuickCam User Guide To launch the Logitech QuickCam utility There are two ways to launch i First double click on the Logitech QuickCam shortcut located at your desktop ii Second browse Logitech Utility path Start Menu Æ All Programs Æ Logitech Æ Logitech QuickCam C LCD Panel The notebook comes with a high resolution colour LCD display ...

Page 19: ... specific keyboard layouts J Power Button with LED at the bottom Press the button to power on off the system Refer to the LEDs Behaviour section K ECO Button with LED at the bottom There are three power modes in the ECO button and power plan can be set respectively Power mode can be switched by the ECO button Power plan that can be set to each mode is common to the power plan that can be selected ...

Page 20: ...This port allows you to access three different types of memory card For SD xD MS Pro Note The memory card is not supplied N Radiowave Wireless LAN Bluetooth wireless technology On Off Slide Switch Slide the switch towards ON to activate the radiowave Wireless LAN Bluetooth wireless technology module and vice versa O Wireless LAN LED Refer to the LEDs Behaviour section P Microphone In Jack Allows y...

Page 21: ...B Port Each Universal Serial Bus USB port allows you to connect USB equipped peripheral devices e g printers monitors scanners to your notebook Note The USB devices are not supplied B Battery Equipped with a rechargeable battery C AC Power Port Allows you to attach the notebook to the AC Power source using the AC adapter that comes with your system Keep the system connected to the AC power wheneve...

Page 22: ...Security Cable Slot Allows you to attach an anti theft device to your notebook Note An anti theft device is not supplied B LAN Port This port can be used to connect your notebook to a network Note The LAN cable is not supplied C VGA Port Use this 15 pin port to attach on external monitor to your notebook Note The external monitor is not supplied D USB Gadget Charger Allows you to charge your USB G...

Page 23: ...rsal Serial Bus USB port allows you to connect USB equipped peripheral devices e g printers monitors scanners to your notebook Note The USB devices are not supplied B Modem Port Use this port to connect the system to an analog telephone line for access to the internet Note The modem cable is not supplied C Optical Drive This slot houses an optical drive The optical drive that comes with your syste...

Page 24: ...ns and model names are subject to change without notice Item Description A Battery Security Lock Refer to Installing the battery and Removing the battery section for details B Battery Equipped with a rechargeable Lithium Ion Li Ion battery C Battery Release Latch Refer to Installing the battery and Removing the battery section for details D Ventilator Allows your system to cool properly and mainta...

Page 25: ...matical operands as you would on a calculator The keypad is ideal for entering long lists of numbers When you press Fn Num Lock again the keys revert to their normal functions as typewriter keys Control keys C Ctrl Alt Fn and Shift are controls used in conjunction with other keys to change their functions To use control keys press and hold the control key while pressing another key For example Pre...

Page 26: ...plug is disconnected from the wall outlet Note Connect the AC adapter cable into the power port on the notebook when the battery is in warning or low status Under AC LED Colour Blue Mode 1 Light Blue Mode 2 Green Mode 3 Power Plan High performance VERSA Power saver Performance Performance Performance Power saving Power saving Power saving Description Time remaining Plugged in Time remaining Plugge...

Page 27: ...pends on the Wireless LAN card in use Blinks Blue Scanning for Wireless LAN Wireless LAN LED at the side of the button Blue Fast Blinking Data is Transferring HDD ODD Access LED Indicator Blinks When the notebook accesses the hard disk drive or optical disc drive Caps Lock LED Indicator On When Caps Lock is activated Scroll Lock LED Indicator On When Scroll Lock is activated Num Lock LED Indicator...

Page 28: ...g ways Press the Power button to power on Press the Power button to move from Standby mode and to proceed with normal operations Press and hold the Power button in place for 4 or more seconds to initiate power override powers off the system Only use this option if you cannot power off your system using the normal procedure described in the Tips section relevant to your operating system Put the uni...

Page 29: ...untry to country and the unit you purchase Please refer to the finished product for final configurations Specifications and model names are subject to change without notice If you find the double tap difficult to use go to the next section for general directions about adjusting the touchpad properties Note If you install another mouse driver over the shipping default the double tap capability may ...

Page 30: ...n your computer on alternating current AC power or to recharge the battery pack Use the AC adapter whenever a wall outlet is nearby Keep the adapter connected whenever possible The AC adapter charges the battery when it is connected whether the notebook is powered on or off Note Consult your dealer or the local electrical authorities if you are unsure of the type of power cord to use in your count...

Page 31: ...er Keeping the adapter clear of objects lets the adapter cool properly during use Only use the AC adapter that comes with your notebook Although other adapters look similar using them can damage your system Powering The System On and Off To power on locate the power button or switch and press or switch it on Caution This equipment uses an ungrounded power cable Replace the cord if it becomes damag...

Page 32: ...n your notebook is not in use or when you know that your notebook will be unattended for long hours Do not disassemble the battery Charging the Battery Charge time depends on whether or not you are using the system For maximum battery performance fully discharge the battery before recharging it To do so unplug the AC adapter turn off power management features through BIOS Setup and Windows power m...

Page 33: ... explosion if the battery is incorrectly replaced Replace only with the same or equivalent type recommended by the manufacturer Discard used batteries according to the manufacturer s instructions To avoid personal injury and property damage read these battery precautions on handling charging and disposing batteries Keep the battery away from heat sources including direct sunlight open fires microw...

Page 34: ...re to save your data before replacing the battery pack or connecting the AC adapter Failure to do so can result in data loss 1 2 3 4 5 6 Note The illustrations colours and pictures shown are for illustration purposes They may vary slightly from country to country and the unit you purchase Please refer to the finished product for final configurations Specifications and model names are subject to ch...

Page 35: ...cifications and model names are subject to change without notice Note Place your notebook in this position and follow the steps stated to install the battery Turn the notebook over CAUTION Be extra careful to avoid damage to your system Left View Make sure you unlock the battery security lock Align the battery with the battery bay slot and connector Place the battery into the battery bay Carefully...

Page 36: ...symptoms shorter work times discolouration warping hot to the touch strange odour Disposing of the Battery Before disposing of the battery put adhesive tape on the connectors Contact your local waste management officials for information regarding environmentally sound collection recycling and disposal of batteries CMOS Battery CMOS Battery CMOS Battery CMOS Battery The CMOS battery provides power ...

Page 37: ...f the system detects an error during POST it prompts you with a double beep and a message Press F1 to resume If you press F2 the system enters BIOS Setup automatically If you want to fix the error carefully read the error message that appears above the prompt taking notes if you want and press F2 You will see this message if your CMOS battery becomes fully discharged BIOS Setup Menus The Setup uti...

Page 38: ... On Self Test POST and displays the current CMOS RAM settings If the system detects an error during POST it prompts you with a double beep and a message Press F1 to resume If you press F2 the system enters BIOS Setup automatically If you want to fix the error carefully read the error message that appears above the prompt taking notes if you want and press F2 You will see this message if your CMOS ...

Page 39: ...se the BIOS Setup utility to configure your system s software and hardware features Only use the BIOS update files for your specific models to update your computer BIOS Caution You only need to update the BIOS if significant improvements or fixes have been made to the current system BIOS Your authorised dealer or Support Services representative can help you determine this ...

Page 40: ...ating systems provide a means of running applications navigating through your file structure and using your notebook computer Each operating system offers its own look and tools through an easy to use graphical interface Dual Boot Windows Language Selection This option is applicable for Hong Kong dual boot models only IMPORTANT Your PC has already been pre installed with 2 language versions of Win...

Page 41: ...nd also choose a picture at the bottom of the screen for your user account Click the Next button 4 Type a computer name and choose a desktop background screen Enter a computer name then choose a desktop background out of 6 options provided at the bottom of the screen 3 backgrounds are provided by Windows at the left hand side 3 backgrounds are provided by NEC at the right hand side Click the Next ...

Page 42: ... cursor to hover over the icon and display its function Right click on the icon to display its menu options or double click on the icon to launch it Right click an empty area of the taskbar and select Properties to customise the taskbar refer to the Tip section for more information The quick launch A i e the left hand side of the taskbar can be hidden or active The notification area B i e the righ...

Page 43: ...ower Managing System Power Managing System Power Managing System Power Windows Vista Windows Vista Windows Vista Windows Vista Operating System Operating System Operating System Operating System In the Windows Vista operating system environment your notebook manages its power resources using the Advanced Configuration and Power Interface ACPI while the system is powered on using AC or battery DC p...

Page 44: ...the system sleep timeout period for your notebook when running under AC power System Sleep running on batteries 1 2 3 5 10 20 25 30 45 minutes 1 2 3 4 5 hours Never Selects the system sleep timeout period for your notebook when running under DC power System Hibernates plugged in Never Selects the system hibernation timeout period for your notebook when running under AC power System Hibernates runn...

Page 45: ...s the system action when the Power button is used Default settings are shown in red Tips for Using Windows Vista Tips for Using Windows Vista Tips for Using Windows Vista Tips for Using Windows Vista For more information we advise you to check out the new features specific to Windows Vista To do so click on Start button click on Help and Support and pick the What s new topic FAQ Windows Vista FAQ ...

Page 46: ...gating through your file structure and using your notebook computer Each operating system offers its own look and tools through an easy to use graphical interface Dual Boot Windows Language Selection This option is applicable for Hong Kong dual boot models only Your PC has already been pre installed with 2 language versions of Windows XP operating system that is English and Traditional Chinese Whe...

Page 47: ...p 6 5 Do you use a username and password to connect to the Internet screen Answer the question by checking the relevant option and click the Next button If you selected Yes I use a username and password to connect the Let s set up your Internet account screen is displayed Enter your username password and ISP s service name Click the Next button and go directly to step 7 If you selected No this com...

Page 48: ...ing system or the Windows XP Home operating system edition Note that all the features available in the Home edition are also included in the Professional edition The Professional edition also includes support for Remote Desktop allows you to remotely access your system from another PC in order to work with all of your data and applications while away from your office Off line Files and Folders all...

Page 49: ...rver For more information about the Desktop and taskbar icons refer to the Windows XP operating system online help To do this click on Start and select Help and Support Depending on the version of Windows XP operating system installed on your notebook or if you have deactivated certain programs the icons described here may differ slightly and or may be accompanied by others Start Menu The Start me...

Page 50: ...s Power schemes Use the Power Schemes tab options to define the appropriate power scheme for your system and to set timeouts for standby monitor and hard disk Parameter Options Description Power Schemes VERSA Home office desk Always On Defines the most appropriate power scheme for your computer Turn off monitor plugged in 1 2 3 5 10 15 20 25 30 45 minutes 1 2 3 4 5 hours Never Selects the time del...

Page 51: ...r auditive Alarm Action None Standby Hibernate Power off Allows you to define which action is taken by the system when the alarm goes off Run a program None Allows you to define which program is launched when the alarm goes off Default settings are shown in red Power Meter The Power Meter tab displays the remaining battery power and charging status for the primary and secondary batteries if applic...

Page 52: ...tem devices Hibernation also known as Save To Disk or Save To File STF Hibernation manages power by saving the current working environment to an area on your hard disk before turning off your computer When you restart the computer any programs and documents that were open when you turned the computer off are restored on the Desktop Recognising the Power Management States It is important to recogni...

Page 53: ...ted or damaged If your computer does not start successfully using the safe mode you might need to use either the Windows Recovery Console feature click on Start Help and Support for more information or to restore your system using the Recovery Program refer to the Quick Reference delivered with your notebook Restarting in Safe Mode 1 Click on Start Turn Off Computer and then click on Restart 2 Whe...

Page 54: ...an optical disc to play automatically upon insertion Windows XP operating system makes this feature very convenient to use by allowing you to match types of optical discs music mixed content blank with a specific program Follow this example to configure your system to automatically play a music CD with the Windows Media Player upon insertion in the optical drive 1 Click on Start My Computer and ri...

Page 55: ...sword 6 Follow the on screen instructions and when finished click on Create Password You will now be prompted for this password each time you log on to Windows both when you boot and when you resume from the Hibernate state To be prompted for this password when you resume from Standby follow the steps below 1 Click on Start Control Panel and Performance and Maintenance 2 Click on the Power Options...

Page 56: ...rea pane click on Customize to change the notification area behaviour for instance if you do not wish to take advantage of the feature that hides the seldom used notification icons Note If you wish to restore the Speaker icon to the notification area as in previous versions of Windows follow the steps below 1 Click on Start Control Panel Sounds Speech and Audio Devices 2 Pick Change the speaker se...

Page 57: ...em Components For details of system components please refer to the System Configuration Label System Configuration Label Recommended Environment Operation Temperature 5 C to 35 C Relative Humidity 10 to 80 Non condensing Gradient 10 C hr System Configuration Label ...

Page 58: ...eady to print ShockWave Plug In ShockWave by Macromedia is one of the industry standards for downloading and experiencing interactive multimedia graphics and audio on the web This plug in allows you to experience high resolution images and graphics zooming and panning up to 25000 without losing any of the original picture quality The plug in also lets you experience exciting interactive animations...

Page 59: ...iscovered security vulnerabilities Network protection configures security settings when logged on at home or on public networks Full System Scan performs a deep scan to remove existing viruses spyware and other threats Norton Protection Center provides a central place to easily check overall security settings Includes protection updates and new product features as available throughout the renewabl...

Page 60: ...ription ensuring that you always have up to date protection Real time alerting Security alerts notify you of emergency virus outbreaks and security threats and provide response options to remove neutralize or learn more about the threat Convenient protection A variety of renewal options help keep your McAfee protection current Performance Tools Remove unused files defragment used files and use sys...

Page 61: ...e PC performance New Automated daily signature updates help keep your PC protected from recently discovered virus and spyware threats Inline cleaning automatically cleans infections when virus worm Trojan ActiveX control and Java applet threats are detected from Comprehensive fast and unobtrusive scans identify and remove viruses Trojans worms unwanted programs such as spyware and adware dialers a...

Page 62: ... Personal Firewall helps ensure your personal files and information are not compromised Product Benefits New Advanced controls for granting an application Internet access for a specified session only New Gaming mode auto detects whenever you re in Full Screen mode suppressing pop up messages and enhancing your on line experience Exclusive Hackerwatch org integration links to an anti hacking databa...

Page 63: ... want them Music Copy music CDs or create your own music mix from several CDs Automatically burn hundreds of songs across multiple CDs Easily rip audio CDs into MP3 WMA OGG WAV FLAC and more Create Jukebox CDs MP3 WMA WAV CDs Make custom Audio CDs for your car or home CD player Data Create mastered data discs Make exact copies of data discs Erase re writable discs Create bootable discs to recover ...

Page 64: ...ducts techniques and tips Advanced Options Normalization and Noise reduction for audio CDs Ability to control burn speeds Control write format including ISO and UDF Record types Disc at once Track at once open or closed Premastering cache file date and time Switch between mini mode and full mode interface Primary volume descriptor fields publisher ID data preparer application ID The software varie...

Page 65: ...or an administrator password or confirmation type the password or click Continue 3 Note the Intel Turbo Memory Console window has both Windows ReadyBoost and Windows ReadyDrive enabled If not please check the enable box accordingly You will be prompted to restart system 4 After your computer restarts Intel Turbo Memory will be functional You will enhance your system performance and ensure certain ...

Page 66: ...Bluetooth Bluetooth wireless wireless wireless wireless technology technology technology technology Steps to launch Bluetooth wireless technology Click Start go to All Programs select Application Setup and then click Bluetooth ...

Page 67: ...t the end of a paper clip into the eject hole and push in until you hear a click Manually open the drawer General Information about General Information about General Information about General Information about Optical Discs Optical Discs Optical Discs Optical Discs Disc Loading To insert a disc into the optical disc drive follow these steps 1 Press the Release button The disc tray emerges a short ...

Page 68: ...es of discs but avoid exposing re writable disks to liquids In case of accidental spills on discs rinse it off with lukewarm water and wipe dry with a soft cloth Be careful with sticky or oily substances that trap dirt and dust Proper cleaning is important to achieve optimal performance Using a soft slightly damp cloth wipe the disc from inside the disk and rub outwards Do not wipe in circles but ...

Page 69: ...our system configuration the hard disk drive may be upgraded to a larger capacity drive Note Please contact your authorised service representative if you wish to replace your hard disk drive This procedure should only be performed by a qualified technician ...

Page 70: ...ine to the modem during lightning storms Always use a proper power cord to plug your system to the line power When using an extension cord make sure it is a reliable cord Look into the energy absorption features Surge suppressors are rated by the amount of energy they can absorb which is measured in joules The higher the surge ratings the better the unit Experts say around 200 joules is basic prot...

Page 71: ...al devices before cleaning them Clean the outside of the computer with a soft clean cloth You can remove stubborn stains with a cloth slightly dampened with a mild detergent Never use a strong cleaner or solvent on any part of the system Keep food and liquids away from your computer Periodically clean the keyboard with a vacuum cleaner brush attachment Do not use any liquid cleaners on the keyboar...

Page 72: ...of furniture or fixture a table or desk leg with a cross bar 2 Take the looped end of the steel cable For specific models only and wrap around the immovable object Be sure to choose an object that prevents an intruder from slipping the cable out from under the object 3 Feed the locking device through the looped end of the cable 4 To install the Kensington Lock make sure that the lock is in the unl...

Page 73: ...ng and leaving their notebooks at the most unlikely places like the kitchen the bathroom on the garden table or by the swimming pool where the chance of it getting wet is high Placing a notebook near an open window is also not advisable since it can easily collect and expose some parts to moisture Be wary of liquid spilling into the power supply since it may trigger an electric short circuit Keep ...

Page 74: ...oftware Refer to Norton Internet Security 2007 section pre installed on your hard drive For better security we recommend you use the automatic scanning option and perform on demand scanning Refer to the software documentation for more information Caution Update the virus definition files at least once every month or as soon as you hear about a new virus Back up your data on a regular basis you can...

Page 75: ...Zip disks floppy disks or CDs so that they are not exposed to magnetic fields or electrical impulses 2 Remove any media from its respective drive 3 Turn off the system unit and any external options connected to it 4 Unplug the AC adapter from the wall outlet or Back UPS unit then from the notebook itself 5 Pack the system components in the original shipping materials and cartons If these are not a...

Page 76: ... the following steps to connect the analogue phone cable to your modem Note When using a modem outside of the country where you purchased it you might need an international telephone adapter available at most electronic supply stores 1 Locate the analogue phone cable that comes with the notebook Each end of the cable is fitted with a RJ 11 connector 2 Connect one end of the cable into a standard t...

Page 77: ...a files on diskette that you might need Check that you have everything you need before you leave on a trip What To Take The following are what you should take with you when you travel with your notebook Extra fully charged batteries Single outlet surge protector Appropriate AC plug adapter for international voltage requirements AC extension cord Extra phone cord to reach wall jacks A copy of proof...

Page 78: ...r country o Line access outside of a hotel may require an additional digit preceding the phone number string Be sure to modify your dial up connection as required o To avoid unusual dialling tone sounds sometimes encountered in hotels you may have to modify a modem configuration setting to ignore the dialling tone 3 Always check the phone line to determine whether or not it is digital or analogue ...

Page 79: ... reducing battery life Always connect your system to an AC power source before connecting these devices Connect an external USB device to your system as follows 1 Locate any of the USB ports on your system 2 Follow any specific set up instructions in the device s user s guide Note USB devices can be hot swapped or plugged meaning that you do not need to turn off your system before plugging or remo...

Page 80: ...e port on the notebook Microphone In Jack A Headphones B Note The illustrations colours and pictures shown are for illustration purposes They may vary slightly from country to country and the unit you purchase Please refer to the finished product for final configurations Specifications and model names are subject to change without notice Note If you are using external speakers or an external micro...

Page 81: ...owing for sharp effective visuals right on the system Using Digital Video Files Your notebook may feature one or several IEEE 1394 ports that allow you to plug any video device including VCRs televisions camcorders and laser disc players into your notebook and record motion graphics to your hard drive For more information on these features please refer to the corresponding Frequently Asked Questio...

Page 82: ...ng Up a Healthy Work Environment Arrange Your Equipment o Your Chair o Your Desk o Your Input Devices o Your Screen or Monitor Reducing the Risk of Injuries o Vary Your Workday o Practice Some Stretching Exercises Potential Medical Conditions o Repetitive Strain Injury RSI o Pre Existing Conditions and Psychosocial Factors ...

Page 83: ...as described below by lowering the table or stand that holds your computer equipment or raising the seat height of your chair Position your notebook computer directly in front of you for increased safety and comfort Your Chair Your chair should be adjustable and stable Vary your posture throughout the day Check the following Keep your body in a relaxed yet upright position The backrest of your cha...

Page 84: ...ges Type with your wrists straight Instead of twisting your wrists sideways to press hard to reach keys move your whole arm Keep from bending your wrists hands or fingers sideways Press the keys gently do not bang them Keep your shoulders arms hands and fingers relaxed Your Screen or Monitor Correct placement and adjustment of the screen or external monitor can reduce eye shoulder and neck fatigue...

Page 85: ...d keep your hands and wrists warm Practice Some Stretching Exercises The daily exercises described below can be very effective in stopping Repetitive Strain Injury development or in minimising its effects They can easily be carried out behind your PC Bend wrists stretch and close fingers stretch your arms and wrists with closed fingers keep this pose for 8 seconds Repeat the exercise 3 times You c...

Page 86: ... wrists arms shoulders neck back and or legs Repetitive Strain Injury RSI Repetitive Strain Injury is caused by a constant tension of the muscles in your arms and by making the same repetitive movements with fingers wrist and elbow when controlling the mouse The symptoms of RSI are pain and stiffness in neck shoulders arms wrists and hands Other symptoms are cramps tingling and exhaustion in these...

Page 87: ...itis prior trauma to the hands wrists arms shoulders neck back or legs prior musculoskeletal disorders aging fluid retention due to pregnancy poor physical conditioning dietary habits and other conditions Psychosocial factors associated with these disorders include workplace stress poor job satisfaction lack of support by management and or lack of control over one s work Contact a doctor if you ex...

Page 88: ...board key The built in LCD may not be selected Press specific function key once or twice to select the LCD video mode Screen brightness needs adjustment Use the specific functions keys The system entered Standby mode due to low battery power Plug in the AC adapter before resuming operation Battery power does not last long Use power saving modes Refer to the Managing System Power chapter relevant t...

Page 89: ...ions the current configuration information doesn t match configuration information stored in Auto Setup such as when an internal option is added the system loses configuration information If the system frequently loses the Setup configuration data the internal CMOS battery may need to be replaced at an authorised repair centre If You If You If You If You Need Assistance Need Assistance Need Assist...

Page 90: ...tored on your computer s hard disk If you wish to restore your computer using Recovery DVD please see note below NEC Recovery Program from backup partition This backup partition is hidden Due to the wide range of reasons for which the NEC Recovery Program may be used no guarantee can be given that all data will be retained You are strongly recommended to create a set of Recovery DVD for future use...

Page 91: ...y all software titles that you have installed on your computer must be reinstalled before you can use them again Only the pre installed titles e g DVD Player CD writer will function without additional installation IMPORTANT Please read this section carefully before using NEC Recovery Program Backup your personal files Save a copy of your personal documents onto floppy disks memory cards or high ca...

Page 92: ...Options page 3 Select your preferred keyboard layout Then click NEXT button 4 Select User Name Password if available Then click OK button 5 At System Recovery Options choose NEC Recovery Tools Starting The NEC Recovery Program For notebook before starting the NEC Recovery Program please make sure your computer is in AC mode ...

Page 93: ...tinue 7 Select either Partial Recovery or Full Recovery Then click Next button to continue 8 Click OK button to continue 9 Click Start button to start the recovery process Please wait a while for the recovery process to be completed ...

Page 94: ...o find other files 4 Finally reinstall software titles you wish to use Note For information on the specification of your notebook please refer to the System Configuration Label on the packaging box that comes with your system Note The illustrations colours and pictures shown are for illustration purposes They may vary slightly from country to country and the unit you purchase CAUTION Before you co...

Page 95: ...artition This backup partition is hidden but can be tampered with using the Disk Management utility Do NOT erase the partition with this utility Due to the wide range of reasons for which the Recovery Program may be used no guarantee can be given that all data will be retained You are strongly recommended to create a set of Recovery CD DVD for future use Be ready with a blank DVDR or 4 to 5 pieces...

Page 96: ...high capacity disks If you own a CD writer you can backup larger amounts of data and create your own archives Return your computer to its original configuration 1 Remove any additional hardware components e g sound card video card network card that you may have added to your computer 2 Reinstall the original NEC hardware components if you have removed them 3 Make sure that your keyboard mouse moni...

Page 97: ... screen displays a summary of your selected options Click on Next to launch recovery Note There may be a delay the first time Windows restarts after the recovery process This delay depends on the amount of data that must be retrieved from the selected account 4 After the Partial Recovery process has been completed and if you have used default Windows settings you may retrieve your data in the foll...

Page 98: ... virus free o What are the different types of viruses o What can I do to keep my PC virus free Internet o How do I connect to the Internet o How do search engines work o How can I narrow down a search on the Internet o What are the cookies o Are cookies a threat to privacy o Can a virus attach itself to cookies Digital Video and IEEE 1394 Devices o IEEE 1394 Devices o What are the benefits of the ...

Page 99: ...ou do NOT need to insert a bootable floppy disk instead and follow the on screen instructions Why can t I boot from the floppy disk drive To boot from the floppy disk drive be sure that you have a floppy disk in the drive containing operating system files also known as bootable floppy or system floppy Be sure to check the boot sequence in the BIOS Setup chapter See your operating system documentat...

Page 100: ...sector virus will only be effective if you start your computer using an infected floppy disk or an infected bootable CD An example of a boot sector virus is Parity Boot This virus displays the message PARITY CHECK and freezes the operating system Macro viruses a macro is an instruction that carries out program commands automatically Many common applications like Microsoft Word and Microsoft Excel ...

Page 101: ...websites that will recognize the newest viruses You will also find the latest news about viruses and hoaxes Some additional tips Always be cautious when opening email attachments even those coming from friends co workers or family members Never open email attachments from strangers delete them right away You should also be careful when downloading files from websites Only use websites that are tru...

Page 102: ...ork Searching the Web actually means searching intermediate databases since it is not possible to directly search the World Wide Web which contains an estimated 1 billion documents The Web is the totality of web pages found in computers called servers worldwide Search engines use software or robot programs called spiders to search the Net for documents and the corresponding addresses Uniform Resou...

Page 103: ... the hard drive of an Internet user whenever the user visits a Web site that offers cookies Although cookies are tiny files around 255 characters and 4k of disk space it contain miscellaneous information such as the name of the Web site that issued them pages viewed by the user log in names and credit card numbers that have been supplied via forms When information such as a name hobbies and educat...

Page 104: ...EE 1394 standard works just like in the old analogue days you plug in a cable and it works The IEEE 1394 standard defines its interface as Digital requires no conversion of digital data into analogue implying better signal integrity Hot plug allows a device to be added and removed without turning off or rebooting the system Scalable supports multiple speeds Fast supports guaranteed delivery of tim...

Reviews: