background image


- 14 - 

Step 5 

 
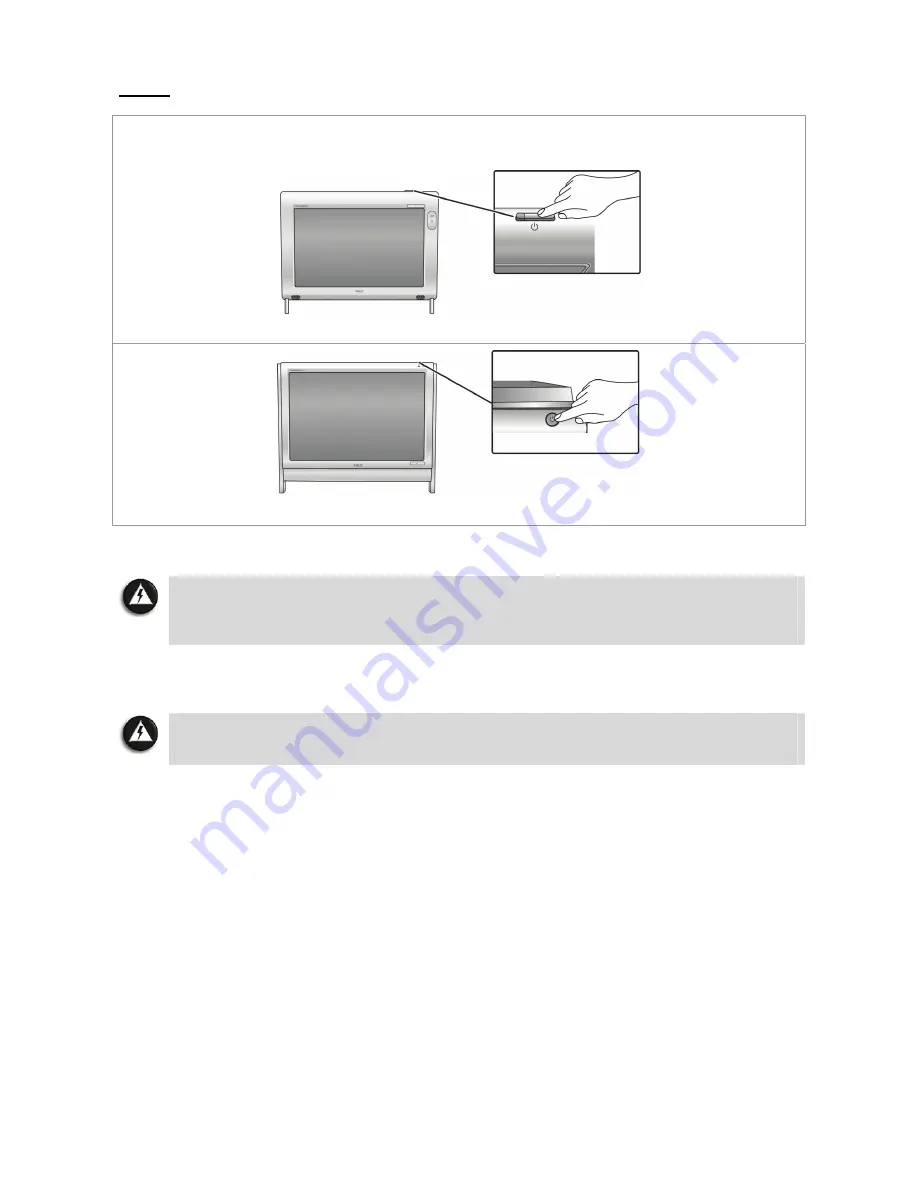
Switch on the AC power outlet. Then, press the “Power” button on the system unit to boot or 
start up your computer for the first time. The power button is located on the top of the 
system. 


P4000 series


P6000 series 

 
And that’s all! You’ve successfully booted your computer for the first time.  


Note 

If you are using a wireless keyboard and wireless mouse, proceed to “Using a Wireless 

Keyboard and Wireless Mouse”. Then, proceed to the section on “Setting up Your 
Operating System”.


Now, proceed to the section on “Setting up Your Operating System” to learn how to set up 

your computer’s operating system. 


WARNING 

Do not place this computer on your lap and/or allow it to be in contact with any 
part of your body while operating.


Summary of Contents for POWERMATE P

Page 1: ...POWERMATE P Electronic User s Guide...

Page 2: ...ommunicating With Your Computer 40 Applications 42 Introducing BIOS Setup for Windows Vista 70 Recovery Information for Windows Vista only 72 Frequently Asked Questions FAQ 77 Setting Up a Healthy Wor...

Page 3: ...that they are not applicable to the system you have just purchased hence they are not included for you in the system Electronic User s Guide To help you familiarise yourself with your new system we ha...

Page 4: ...r dry Do not wipe the computer with a wet cloth or pour fluid onto it Protect the computer from strong physical contact such as being bumped or dropped Check the computer for condensation If condensat...

Page 5: ...ponents Before turning on the computer wait until the computer s internal temperature stabilises with the new environment and any internal moisture has evaporated Operate and store your computer withi...

Page 6: ...low 1 System Unit P4000 Series P6000 Series 2 Wired Keyboard Wired Mouse 3 Wireless Keyboard Wireless Mouse 4 Power Cable AC Adaptor 5 Gadget Pocket only available for P4000 series 6 Cable Cover only...

Page 7: ...to your system unit before proceeding to Step 2 Step 1a for P4000 series only The P4000 series system unit is shipped with a complete setup with its stand already open and a pre installed hinge stoppe...

Page 8: ...clips c Align the slots on the back of the gadget pocket with the fastening clips on the back of the system unit Left slot to left fastening clip Right slot to right fastening clip d Push down lightl...

Page 9: ...g To store a keyboard remove the two plates from inside the gadget pocket first These plates can slide in and out along grooves inside the gadget pocket Removing the metal plates Storing a keyboard No...

Page 10: ...creen CAUTION The hinge stopper must be installed Without it the system unit will fall and may get damaged b Carefully open the stand The stand is attached with a spring so use your hand to hold it op...

Page 11: ...d wireless mouse ignore Step 2 and proceed to Step 3 Connect the USB connectors of the keyboard and mouse into any USB ports on the system unit In this example we will be using the USB ports located o...

Page 12: ...bles may look similar using them may damage your computer P4000 series i Now connect the power cable to the system unit ii Hold the cable cover over the cable head iii Push the cover down lightly unti...

Page 13: ...or place objects on the AC adaptor Keeping the adaptor clear of objects will allow the adaptor to cool properly during use Only use the AC adaptor that comes with your computer Although other adaptor...

Page 14: ...ed your computer for the first time Note If you are using a wireless keyboard and wireless mouse proceed to Using a Wireless Keyboard and Wireless Mouse Then proceed to the section on Setting up Your...

Page 15: ...ss keyboard by sliding off the cover Take care not to break the cover b Insert batteries into the battery compartment according to the polarity signs inside the battery compartment c Place the battery...

Page 16: ...wireless mouse on the bottom back of the wireless mouse Step 2 Synchronise the keyboard with your system unit You will now perform the ID pairing procedure This is a recognition function that helps t...

Page 17: ...t c Press and hold the connect button on the bottom of the wireless mouse for about 6 seconds until its LED is off then release That s all You should be able to properly use your wireless keyboard and...

Page 18: ...ng instructions will be provided with the purchased parts Check with the supplier you have purchased it from to make sure you obtain the specific instructions a Position the system unit carefully so t...

Page 19: ...mounting parts back cover has been removed CAUTION When mounting the system unit please be extra careful not to drop or damage any parts Handle all the steps carefully and do not expose yourself to u...

Page 20: ...sername and password optional and also choose a picture at the bottom of the screen to represent your user account Click the Next button 4 Computer name and desktop background selection screen Enter a...

Page 21: ...wait for a moment while the initial Windows setup screen loads Please refer to section Windows Vista Operating System Setup for the rest of the instructions IMPORTANT Windows Language Selection This o...

Page 22: ...low the steps below to correctly shutdown Windows Vista and switch off your computer Step 1 Save all of your work before closing them Then exit all of the programs that you have opened Ensure that the...

Page 23: ...accessing the memory card reader C N A N A Speakers Provides sound for your multimedia presentations or listening pleasure P6000 series Part Icon Name Description A N A Power LED Indicator When white...

Page 24: ...escription A Memory Card Reader This slot enables you to read data from SDHC memory cards B Microphone Jack Allows you to plug in and use a microphone C Headphone Jack Allows you to plug in headphone...

Page 25: ...om SDHC memory cards C IEEE 1394 Mini IEEE 1394 Port An IEEE 1394 port also known as FireWire or i LINK allows you to connect high speed digital devices to your computer such as digital video cameras...

Page 26: ...CDs and DVDs This drive only supports the standard 5 inch 12 cm diameter optical disc C Disc Eject Button Pressing this button opens the optical disc drive door D N A Night Mode LED Indicator When LED...

Page 27: ...door C N A N A Wireless LAN LED Indicator LED blinks blue when Wireless LAN is enabled D Wireless LAN Button Enables or disables a Wireless LAN connection E N A Night Mode LED Indicator When LED is b...

Page 28: ...ou connect the computer to an AC power source D Ethernet LAN Port Connects to a network cable E USB 2 0 Ports The USB allows for instant plug and play access F N A N A Connect Button LED Indicator LED...

Page 29: ...s C N A N A Connect LED Indicator LED blinks blue when the wireless keyboard or wireless mouse is connected D Ethernet LAN Port Connects to a network cable E CONNECT Connect Button Lets you connect a...

Page 30: ...oard For more information please refer to the section on Media Keys F Special Function Keys Lets you position the cursor on the screen where you want to On the screen the cursor is a blinking underlin...

Page 31: ...on Pressing Num Lock toggles the mode on and off these keys can be used to enter numbers and mathematical symbols Otherwise they can also be used as Cursor Control keys LED Indicators Item Descriptio...

Page 32: ...ping it again resumes playback Stop Key Tap the icon once to stop the media player Volume Down Key Tap the icon once to decrease the volume of your system s sound audio Volume Up Key Tap the icon once...

Page 33: ...ttery LED Indicates that the wireless keyboard is enabled G Mouse Cursor Button Enables you to move the mouse cursor by manipulating the button H Number Keys Used to enter numbers or special character...

Page 34: ...g playback Back Returns to the previous screen Information Brings up information about the selected item if available Record Records active TV programme to disk Play Plays the selected media Pause Pau...

Page 35: ...type discs Some discs vibrate when playing This does not affect the optical disc drive Precautions To avoid malfunctions or damage to your optical drive please observe the following tips Insert the d...

Page 36: ...CD writer drives are more sensitive and should be stored at room temperature whenever possible Moisture does not affect other types of discs but avoid exposing re writable discs to liquids In case of...

Page 37: ...ll be attracted to the magnetic pad on the stand when placed close to it Attach the web camera to its stand in this way 3 Connect the USB connector of the web camera into any USB ports on the system u...

Page 38: ...Hong Kong region and other countries which share the same type of broadcast signal USB Analog DVB TV Tuner applies to Australia New Zealand Singapore and other countries which share the same broadcas...

Page 39: ...TNV 1 circuit The common sides or earthed side of the circuit are connected to the screen of the coaxial cable through an antenna connector of tuner and to all accessible parts and circuits SELV and...

Page 40: ...s managed through the Ethernet LAN port only available on some models Follow these steps to take advantage of the internal LAN feature 1 Locate the Ethernet LAN port on the system 2 Plug one end of yo...

Page 41: ...de the Wireless LAN button on the back panel of the system unit to the On position The Wireless LAN LED will light up indicating that the Wireless LAN is enabled For P6000 series series slide the Wire...

Page 42: ...Double click the Adobe Reader icon to launch the application 2 Adobe Reader license agreement screen will appear After you have already read the agreement click Accept 3 Next beyond Adobe Reader scre...

Page 43: ...thy media file uploads Your friends and family get access using their own web browser Your Anywhere Access to Personal Documents and Multimedia Live TV Programs With a TV tuner card connected to your...

Page 44: ...Express Yourself CyberLink Live allows you to describe and rank your multimedia so you can share the content you ve created and share your stories too Build a community While your invited guests are...

Page 45: ...tically decide to keep or cut out scenes With a simple thumbs up thumbs down and OK concept you can also edit swiftly and easily via remote control One click Video and Audio Cleaning MagicDirector inc...

Page 46: ...les Keep your best clips remove the worst and let MagicDirector decide the rest Use Magic Clean to enhance your video s images and audio Choose your video quality to meet your file size requirements B...

Page 47: ...lties Quickly identify exciting game moments Navigate to the next exciting moment Watch the rest of the game from any highlight Key features of CyberLink MagicSports Fast analysis and navigation of re...

Page 48: ...ratios ensures that recorded TV programs are output and authored in the same menu size as the captured content MakeDisc intelligently detects the aspect ratio of the majority of the captured digital T...

Page 49: ...roud to present you with 1 licensed copy of SoftDMA that can be installed onto any of your other existing computers The SoftDMA installation files are located in the folder c Apps SoftDMA You need to...

Page 50: ...they ve started with time shift recording Record programmes to a hard disk Switch between channels language settings and subtitles DVDs Videos Music and Pictures watch listen and enjoy Play movie DVDs...

Page 51: ...movies Enjoy the ultimate movie experience Watch new HD movies on HD DVDs and Blu ray Discs Experience exceptional audio quality with 7 1 home theatre audio and high definition Dolby Digital Plus Dol...

Page 52: ...inition audio with Dolby Digital Plus TrueHD DTS HD 8 channel surround sound The ultimate home theatre audio support with true 7 1 channel Dolby Digital EX and 5 1 channel DTS Advanced audio effects E...

Page 53: ...files across a home network using SoftDMA Play media files stored on other computers by accessing them across your home network Auto search for media servers on the network Access shared folders avai...

Page 54: ...o the FM radio Here is what you can do o Enable your PC to watch TV and listen to radio required TV Tuner with radio receiver o Record your favourite TV shows automatically via EPG o Search for record...

Page 55: ...arranged to facilitate easier channel surfing TV Format and Tuner Card Support TV Enhance supports the following TV and radio types DVB T S TV and Radio ATSC Banquet services from DVB S or DVB T Analo...

Page 56: ...ensure your personal files and information are not compromised Product Benefits New Advanced controls for granting an application Internet access for a specified session only New Gaming mode auto dete...

Page 57: ...the configure button to configure the setting Key Features Redesigned protection status Easily review your computer s security status check for updates and fix potential security issues Continual upda...

Page 58: ...Web sites you visit or that appear in your Web search results You can view detailed safety ratings that show how a site tested for e mail practices downloads online affiliations and annoyances such a...

Page 59: ...ne cleaning automatically cleans infections when virus worm Trojan ActiveX control and Java applet threats are detected Comprehensive fast and unobtrusive scans identify and remove viruses Trojans wor...

Page 60: ...MDVD Creator As part of our drive to continually improve our products please visit our Questions and Answers website frequently to obtain the latest information and updates regarding your system http...

Page 61: ...yback control and much more Easy Zoom Easy Zoom allows flexible application independence zoom with just a click and scroll Zoom in to have a clearer view and zoom out to see more in different applicat...

Page 62: ...figured with just a few clicks away Control your multimedia playback web navigation office application and office in the same interface with the easy to use Quick Jump control No more fiddling around...

Page 63: ...age to make sure you have the latest Web page WWW Back To return the last page you viewed WWW Forward To view the next page you ve viewed before WWW Stop If a page you re trying to view is taking too...

Page 64: ...s like Word Excel Power Point Calendar and Shortcut 1 Shortcut 4 are included Word Opens Microsoft Word Excel Opens Microsoft Excel Power Point Opens Microsoft PowerPoint Calendar Opens Calendar funct...

Page 65: ...65 Office Quick Control The software varies according to the model and is subject to change without notice for specific models only...

Page 66: ...CDs or create your own music mix from several CDs Automatically burn hundreds songs across multiple CDs Easily rip Audio CDs into WAV WMA OGG FLAC Create Jukebox CDs MP3 WMA WAV CDs Make custom Audio...

Page 67: ...t update of Roxio s new products techniques and tips Advanced Options Normalisation and Noise reduction for audio CDs Ability to control burn speeds Control write format including ISO ISO level 2 Joil...

Page 68: ...order to activate SRS Premium Sound please double click on its icon on the Windows desktop Once activated it will be automatically loaded every time you start your computer For further information pl...

Page 69: ...n type the password or click Continue 3 After it has refreshed you will see this Your computer has a Windows Experience Index base score of The value at the end of this statement is your base score Ge...

Page 70: ...message Press F1 to resume If you press F2 the system enters BIOS Setup automatically If you want to fix the error carefully read the error message that appears above the prompt taking notes if you w...

Page 71: ...ur system s Flash ROM As indicated in this chapter you use the BIOS Setup utility to configure your system s software and hardware features Only update your system s BIOS using the update files specif...

Page 72: ...ou FIRST try fixing your computer with Windows Vista System Restore System Restore can be used to restore your computer to a previous state when it was known to function correctly without affecting yo...

Page 73: ...nd card video card and network card that you may have added to your computer 2 Reinstall the original NEC hardware components if you have removed them 3 Make sure that your keyboard mouse monitor and...

Page 74: ...ame Password if available Then click OK button 5 At System Recovery Options choose NEC Recovery Tools 6 Click Next button to continue 7 Select either Partial Recovery or Full Recovery Then click Next...

Page 75: ...automatically after the recovery is completed 11 Finally you have to restart your computer by clicking the Restart button at System Recovery Options If You Wish to Perform a Full Recovery CAUTION Full...

Page 76: ...and if you have used default Windows settings you may retrieve your data in the following locations Your Documents and Settings C user Previous User Name Applications C Program Files Application Name...

Page 77: ...ing sound Recovery and Diagnosis 4 What are the tools on my computer 5 How to use the Windows Vista System Restore Keyboard and Mouse 6 My keyboard does not work 7 My mouse does not work Sound 8 My co...

Page 78: ...power plug is disconnected from the wall outlet 2 Upon startup my computer displays unusual commands My computer says Non system disk or Invalid system disk Possible cause Possible solutions The syste...

Page 79: ...al configuration i Remove any additional hardware components such as sound card video card or network card that you may have added to your computer ii Reinstall the original NEC hardware components if...

Page 80: ...r OFF ii Disconnect then reconnect the keyboard properly iii Switch your computer ON 7 My mouse does not work Possible cause Possible solutions Your mouse is not properly connected Follow the same pro...

Page 81: ...peaker icon in the Notification Area on your taskbar Your computer will not play audio CDs Make sure that your computer sound is set up properly Make sure that the disc s surface is clean and scratch...

Page 82: ...ogram may have been changed or your internet connection settings may have been changed When you subscribe your ISP usually provides connection details such as user name password server phone number an...

Page 83: ...the latest protection against malicious viruses Note NEC guarantees that your computer is 100 virus free at the time of purchase and does not cover damages due to viruses ii Use a Personal Firewall A...

Page 84: ...formation about resolving error messages The printer is not connected properly Check that the cables are securely connected to the printer and computer Use a grounded AC power outlet or power strip No...

Page 85: ...ur Chair o Your Desk o Your Input Devices o Your Screen Reducing the Risk of Injuries o Vary Your Workday o Practise Some Stretching Exercises Potential Medical Conditions o Repetitive Strain Injury o...

Page 86: ...stand that holds your computer equipment or raising the seat height of your chair Position your computer directly in front of you for increased safety and comfort Your Chair Your chair should be adju...

Page 87: ...t your sides Adjust the keyboard slope so that your wrists are straight while you are typing Type with your hands and wrists floating above the keyboard Use a wrist pad only to rest your wrists betwee...

Page 88: ...e Stretching Exercises The daily exercises described below can be very effective in stopping Repetitive Strain Injury development or in minimising its effects They can easily be carried out behind you...

Page 89: ...the muscles in your arms and by making the same repetitive movements with fingers wrist and elbow when controlling the mouse The symptoms of RSI are pain and stiffness in neck shoulders arms wrists an...

Page 90: ...es This may happen even if the person has no medical history of epilepsy or has never had any epileptic seizures If you or anyone in your family has ever had symptoms related to epilepsy seizures or l...

Page 91: ...Earth Power Supply and Cables Laser Compliance Statement Thunderstorm Warning Radio communication Regulation if applicable Precautions When Using TV Tuner With External Antenna Additional Notices Elec...

Page 92: ...id the user s authority to operate the equipment The manufacturer is not responsible for any radio or TV interference caused by unauthorised modifications to this equipment Note This is a Class B digi...

Page 93: ...product is classified as Safety Extra Low Voltage except the modem which is classified as TNV 3 Remote Earth To prevent electrical shocks connect all local individual office computers and computer sup...

Page 94: ...zardous Voltage You must unplug the power supply cord to disconnect the equipment from the power supply For this purpose the socket outlet should be installed as close to the equipment as possible and...

Page 95: ...erfaces Only Ethernet LAN or RTC modem cables can have lengths exceeding 3 metres For Ethernet LAN cable use FTP shielded cables only Cat 5 Heat build up The AC adaptor and the underside of the comput...

Page 96: ...nly at an ESD workstation If one is not available provide some ESD protection by wearing an antistatic wrist strap attached to any unpainted metal surface when handling parts If you do not have one di...

Page 97: ...ur computer has ventilation holes at the bottom side of casing do not place it on a carpet or other surfaces which may block the ventilation holes The computer you have purchased may be supplied with...

Page 98: ...nd even risk of injury or damage to property It may pose several threats to personnel and property Some hazards associate with batteries include but not are limited to Caustic and or acid burns Hydrog...

Page 99: ...of the same brand and type Remove exhausted batteries immediately from its equipment and dispose of them properly Store unused batteries in their original sealed packaging until ready to use and keep...

Page 100: ...ildren so keep the batteries out of reach from young children and infants If swallowing or ingestion accidentally happens consult a doctor immediately Do not connect positive and negative terminals wi...

Page 101: ...Electrical and Electronics Engineers Interface 1394 ISO International Organisation for Standardisation ISP Internet Service Provider LAN Wireless LAN Local Area Network Wireless Local Area Network LCD...

Page 102: ...when it is loaded into the temporary memory i e RAM or installed in the permanent memory e g hard disk CD ROM or other storage device of that computer A copy of Software installed on a network server...

Page 103: ...ited Warranty and which is returned to NECCAP with a dated proof of purchase and authorisation number to NECCAP at your own cost risk and expense If dated proof of purchase is not provided NECCAP s au...

Page 104: ...en permission of NECCAP Disclaimer NECCAP specifically disclaims all warranties either expressed or implied including but not limited to implied warranties of merchantability and fitness for a particu...

Page 105: ...either registered trademarks or trademarks of 2008 Microsoft Corporation in the United States and or other countries Windows Vista is either a registered trademark or trademark of 2008 Microsoft Corpo...

Page 106: ...used Notation Windows Windows Vista Internet Explorer Windows Media Center Official Name Windows Vista Home Basic Windows Vista Home Premium Windows Vista Business Windows Vista Ultimate Windows Inte...

Reviews: