background image

OSD Menu

25

ENGLISH

.

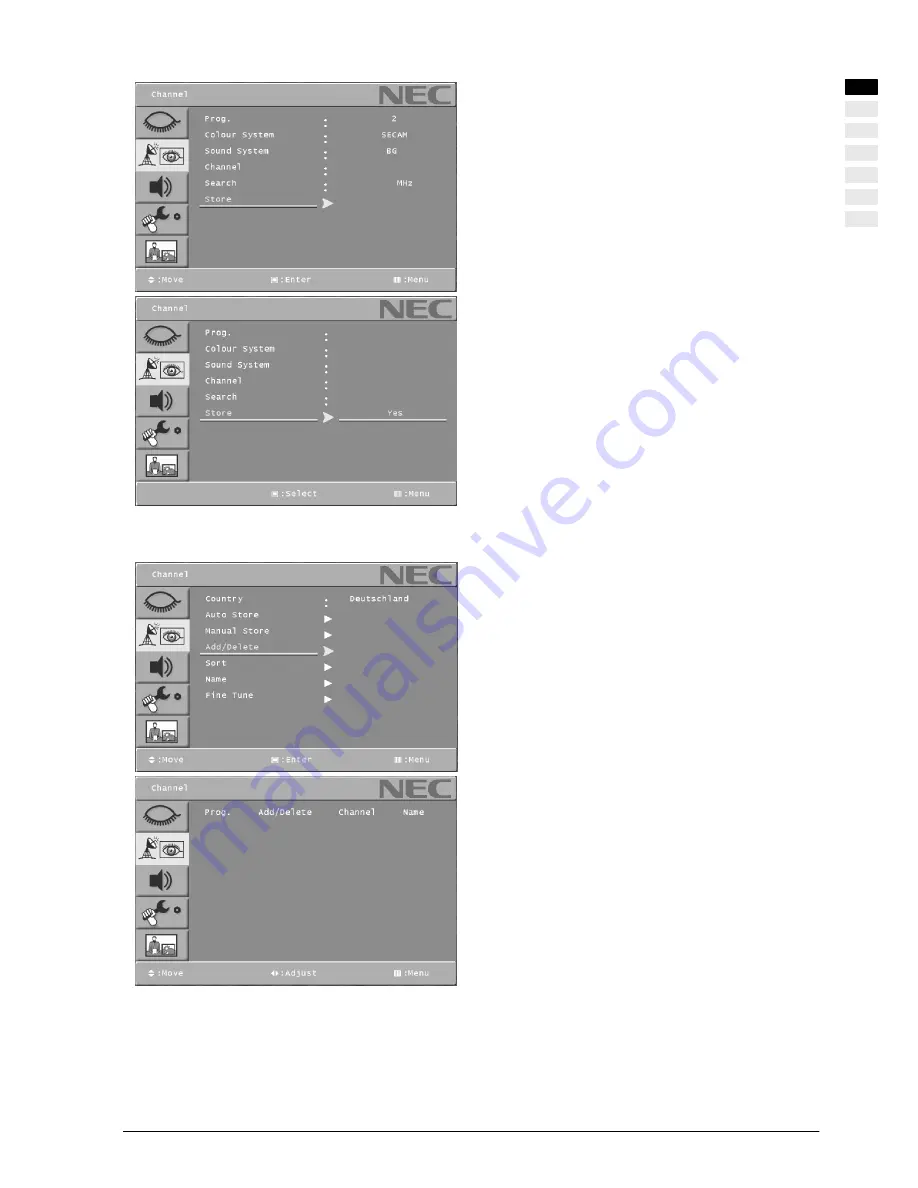
Select the Store menu with [

Y

] or [

B

] button on the remote

control.

.

Press [ENTER] / [

"

] to enter the sub menu.

.

Press [ENTER] to Store.

Add / Delete

.

Press [MENU] button to display the main OSD menu.

.

Select the Channel main menu with [

Y

] or [

B

] button on the

remote control and press [ENTER] / [

"

] to enter the sub

menu.

.

Select the Add/Delete menu with [

Y

] or [

B

] button on the

remote control.

.

Press [ENTER] / [

"

] to enter the sub menu. Then you can

see the favorite program list.

.

You can select a program with [

Y

] or [

B

] button on the re-

mote control.

To edit the list
You can ADDED or ERASED the programs in the list.

To edit the program in the list
If you want to edit a program, press [ENTER] button. Then
you can select a field with [

Y

] or [

B

] button. Adjust the field

with [

A

] / [

"

] button. To return, press [MENU] button.

C

52

719

E

N

GL
IS

H

P1

Added

C21

BBC1

P2

Added

C75

C4

P3

Added

C80

R5

P4

Added

C5

IV04

P5

Added

C7

AUT8

P1

Added

C21

BBC1

P2

Added

C75

C4

P3

Added

C80

R5

P4

Added

C5

IV04

P5

Added

C7

AUT8

Summary of Contents for PlasmaSync T1000

Page 1: ...English German Spanish Italian French Swedish Russian T1000 42 Wide VGA Plasma User Manual ...

Page 2: ...nni materiali ed ambientali FRANÇAIS Ce pictogramme vous avertit qu un comportement inapproprié peut causer des dommages matériels et des dommages à l environnement SVENSK Denna symbol anger farligt eller osäkert handhavande som kan leda till personskada eller egendomsskada РИССКИЙ ЯЗЫК Этот символ обозначает сопряженную с риском деятельность которая может привести к травмам или порче имущества EN...

Page 3: ...OSD Menu 15 Select Source 15 Volume Control 15 OSD Menu Structure 15 Picture 16 Picture Mode 16 Custom 16 Contrast 17 Brightness 17 Colour 17 Sharpness 17 Colour Tone 17 Size 18 NR Noise Reduction 19 TV channel 20 Country 20 Auto Store 20 Manual Store 21 Manual Store Prog 21 Manual Store Colour System 22 Manual Store Sound System 22 Manual Store Channel 23 Manual Store Search 24 Manual Store Store...

Page 4: ... H Position 42 V Position 42 Phase 42 Troubleshooting 43 Technical specfication 44 Appendix 45 Supported timings PC 45 Connecting pin assignment for VGA 46 Connecting pin assignment for DVI D 46 Connecting pin assignments for SCART 46 ...

Page 5: ...only the mains cable supplied This plasma TV is completely disconnected from the electrical mains only when the mains switch is switched off and the mains cable is pulled out of the unit or the plug is pulled out of the plug receptacle Connect this plasma TV only to a MAINS plug receptacle with an earth conductor connection Ensure that the mains plug and plug receptacle are accessible at all times...

Page 6: ...r the monitor s brightness and contrast settings to the lowest acceptable level without impairing readability of the screen image Settings of approximately 50 of maximum brightness and contrast are recommended D Whenever possible display an image with many colours and colour gradations i e photographic or photo realistic images D Create content using complementary pastel colours with minimal contr...

Page 7: ...ications directive 92 31 ECCE of April 1992 and directive 93 68 ECCE of 22 July 1993 D 73 23 ECCE of 19 February 1973 with subsequent modifications directive 93 68 ECCE of 22 July 1993 D EN55013 EN55020 EN61000 3 2 3 ElectroMagnetic Compatibility D EN60065 Safety Requirements Conformity with the requirements is certified by the designation of the mark on the product The manufacturer cannot be held...

Page 8: ...al television set the plasma TV is ideal for use in living rooms as well as conference rooms Equipment D High quality aluminium frame D Fanless design D 16 9 format D Full screen in 16 9 and 4 3 format D Digital comb filter D Compatible with PAL SECAM and NTSC D Compatible with VGA SVGA WXGA XGA and UXGA D TOP FLOF Videotext D Automatic channel identification and channel sorting where available D ...

Page 9: ...lite receiver video recorder 4 ANTENNA 12 SCART 2 Antenna input HF Connection of a DVD player satellite receiver RGB terrestrial antenna or cable connection video recorder decoder 5 DVI D 13 RS232 Input for digital video signals e g from the PC or Serial interface for service purposes from a DVD player with DVI output 6 VGA 14 Mains input socket Input for analogue RGB signals e g PC Connection for...

Page 10: ... PR B Reduces the channel number Navigation within the OSD menu 14 STORE FLOP LIST Changes between FLOP and LIST mode SIZE Changes the size HOLD Stops the updating of video text pages CANCEL Exits video text mode INDEX Back to index page TIME Changes between TV picture with time display and video text page REVEAL Displays hidden text on video text pages 15 RED GREEN YELLOW BLUE Selection of a vide...

Page 11: ...of a function in the OSD menu 27 MIX Shows the selected programme and video text at the same time Local operator control The functions of the buttons on the unit match those on the re mote control 1 VOL button 2 VOL button 3 PR button 4 PR button 5 POWER SOURCE button 1 2 3 4 5 POWER ON indicator blue STANDBY indicator red Remote control sensor ENGLISH ...

Page 12: ...ugh the plasma display has a large display angle its best performance is achieved when viewed directly from a central front position Align the display with the most frequent viewing position Location D Light reflection Avoid placing the display opposite windows or other light sources D Access to the mains input The mains input and mains switch should be easily accessible at all times D Air supply ...

Page 13: ...eek the advice of a qualified installer D Before installing it make sure that the display is switched off and that the mains cable and signal cable are unplugged D Two people are required to mount the display screen on the wall Turn the plasma TV screen so that the front side screen is pointing downwards and place it on a completely flat and firm surface Loosen the 6 screws that fasten it to the t...

Page 14: ...as a HDMI output port you can use the DVI input port and the audio input port DVI D VGA L R on the plasma TV using com mercially available cable If a DVD player is connected to the DVI input port of the dis play screen the following must be ensured D Before you make a connection between the DVD playerand the display screen using the cables you must disconnect the mains plug of the DVD player from ...

Page 15: ...Comments standard YUV YPrPb Sync On Green PAL NTSC 480i30 576i25 Sync On Green YUV 3 x RCA CCIR601 480p60 BiLevel Sync YUV 3 x RCA CEA770 2 576p50 BiLevel Sync YUV 3 x RCA CEA770 2 720p50 TriLevel Sync YUV 3 x RCA 720p60 TriLevel Sync YUV 3 x RCA 1080i25 TriLevel Sync YUV 3 x RCA 1080i30 TriLevel Sync YUV 3 x RCA RGB PAL NTSC 480i30 576i25 Composite Sync SCART1 VGA analogue 30 kHz 80 kHz 50 Hz 90 ...

Page 16: ...n OSD activated Closes the child menu Stops auto frequency search ENTER Changes input source that selected by source select naviga tion Executes function by OSD help commands when main OSD activated Activates child menu when child menu exists EXIT Close the OSD Y Increases program number tune channel when no OSD acti vated Navigates input source when source OSD activated Executes function by OSD h...

Page 17: ...adjust various features and settings in accordance with his her preferences Main Menu Press the MENU button on the remote control to enter the main OSD menu First select Main menu item you need with Y and B but ton To select a main menu items just press ENTER or button on the remote control Sub Menu Each menu item has its own sub menu items to set Sub Menu items If there is a part the item has an ...

Page 18: ...U A button Press MENU button to return Quick way to select the Picture Mode Press the PSM button on the remote control As you press the button continuously you can select the picture mode in the following sequence Custom Dynamic Standard Movie Mild In RGB DVI mode you can select Custom High Middle Low Custom Press MENU button to display the main OSD menu Select the Picture main menu Press ENTER to...

Page 19: ... between bright part of the screen and dark part Brightness Adjust brightness of the screen Colour Adjust deep and light colour of the screen Sharpness Adjust vividness of the screen Colour Tone Your Plasma TV has 5 screen temperatures colour set tings Press MENU button to display the main OSD menu Select the Picture main menu Press ENTER to enter the sub menu ENGLISH Distinct A Vague Dark A Brigh...

Page 20: ...MENU button to return Warm 1 2 Screen seems warm Strong Red Normal Normal Factory default Cool 1 2 Screen seems cool Strong Blue Size Press MENU button to display the main OSD menu Select the Picture main menu Press ENTER to enter the sub menu Select Size and press ENTER button toenter thesub menu Then the picture popup window appears Select the Size with Y or B button and press MENU A button ...

Page 21: ...on to display the main OSD menu Select the Picture main menu Press ENTER to enter the sub menu Select NR and press ENTER button to enter the sub menu Then the picture popup window appears Select the On Off with Y or B button and press MENU A button Press MENU button to return ENGLISH ...

Page 22: ...NTER button to enter the sub menu Then the Channel popup window appears Select the country with Y or B button and press MENU A button Press MENU button to return Auto Store Press MENU button to display the main OSD menu Select the Channel main menu with Y B button on the remote control Press ENTER to enter the sub menu Select Auto Store with Y B button and press ENTER button ...

Page 23: ...s MENU button to return Manual Store Press MENU button to display the main OSD menu Select the Channel main menu with Y B button on the remote control Press ENTER to enter the sub menu Select Manual Store and press ENTER to enter the sub menu Manual Store Prog Select the Prog menu with Y B button on the remote control and press ENTER to enter the sub menu Select the programme with A or button and ...

Page 24: ... to enter the sub menu Select the Colour System menu with Y B button on the remote control Then the channel popup window appears Press ENTER to enter the sub menu Select the colour system with Y or B button and press MENU A button Manual Store Sound System Press MENU button to display the main OSD menu Select the Channel main menuwith Y or B button onthe remote control and press ENTER to enter the...

Page 25: ...ontrol and press MENU A button Manual Store Channel Press MENU button to display the main OSD menu Select the Channel main menuwith Y or B button onthe remote control and press ENTER to enter the sub menu Select the Manual Store menu with Y or B button on the remote control Press ENTER to enter the sub menu Select the Channel menu with Y or B button on the re mote control Press ENTER to enter the ...

Page 26: ... control Press ENTER to enter the sub menu Select the Search menu with Y or B button on the re mote control Press ENTER to enter the sub menu You can start the Search with Y or B button on the re mote control Press MENU button to return Manual Store Store Press MENU button to display the main OSD menu Select the Channel main menuwith Y or B button onthe remote control and press ENTER to enter the ...

Page 27: ... ENTER to enter the sub menu Then you can see the favorite program list You can select a program with Y or B button on the re mote control To edit the list You can ADDED or ERASED the programs in the list To edit the program in the list If you want to edit a program press ENTER button Then you can select a field with Y or B button Adjust the field with A button To return press MENU button C 52 719...

Page 28: ... this picture isn t a real operating mode but a design mode You can select a program with Y or B button on the re mote control To sort the program in the list If you want to sort a program press ENTER button Then you can select a field with Y or B button Press ENTER button on the field to sort Adjust the field with Y or B button To return press ENTER button Name Press MENU button to display the ma...

Page 29: ...on on the field to change Adjust the field with Y or B button To return press MENU button Fine Tune The Fine Tuning function lets you manually adjust the PDP s tuner if you are difficult to tune analog Channels Press MENU button to display the main OSD menu Select the Channel main menuwith Y or B button onthe remote control and press ENTER to enter the sub menu Select Fine Tune with Y or B button ...

Page 30: ...ER to enter the sub menu Select Mode and press ENTER button to enter the sub menu Then the sound popup window appears Select the Mode with Y or B and press MENU Quick way to select the sound Mode Press the SSM button on the remote control As you press the button continuously you can select the sound mode in the following sequence Custom Standard Music Movie Speech Startup Volume Press MENU button ...

Page 31: ...th A button Then press MENU button Equalizer You can use the OSD menu to change the Treble Bass and Balance according to your preference Press MENU button to display the main OSD menu Select the Sound main menu with Y or B button on the remote control Press ENTER to enter the sub menu Select Equalizer and press ENTER button to enter the sub menu Then you can see the Equalizer bar Select a gain bar...

Page 32: ...er the sub menu Then you will see a popup menu You can select On Off with Y or B button and press MENU A button Sound Mode Press MENU button to display the main OSD menu Select the Sound main menu with Y or B button on the remote control Press ENTER to enter the sub menu Select Sound Mode and press ENTER button to en ter the sub menu Then you will see a popup menu Select the sound mode with Y or B...

Page 33: ... sub menu Select Reset and press ENTER button to enter the sub menu If you want to reset your TV press ENTER button Then the system will reset Time Clock Set the current time Press MENU button to display the main OSD menu Select the Setup main menu with Y or B button on the remote control Press ENTER to enter the sub menu Select the Time menu with Y or B button on the remote control ENGLISH ...

Page 34: ...fore using timer you must set the Plasma TV s Time as described previously Press MENU button to display the main OSD menu Select the Time main menu with Y or B button on the remote control Press ENTER to enter the sub menu Move the cursor by pressing A button and adjust on time by Y or B button Press MENU button to return Notice You can t see the real time on this picture since this picture isn t ...

Page 35: ...U button to return Notice You can t see the real time on this picture since this picture isn t a real operating mode but a design mode In a real mode you can see the real clock time Time On Timer Channel Set the channel when Plasma TV power turns on automatically Available only when the Time is set and On Time is ON Press MENU button to display the main OSD menu Select the Time main menu with Y or...

Page 36: ...the sound volume level with A button Press MENU button to return Language Set the language to use in OSD Supported languages are English Français German Italiano Español Português Nederland Sverige Press MENU button to display the main OSD menu Select the Setup main menu with Y or B button on the remote control Press ENTER to enter the sub menu Select Language and press ENTER button to enter the s...

Page 37: ...menu Select the Setup main menu with Y or B button on the remote control Press ENTER to enter the sub menu Select Blue Screen andpress ENTER button toenter the sub menu Then you will see the popup menu Select the On Off with Y or B button and press MENU A button TTX Group Press MENU button to display the main OSD menu Select the Setup main menu with Y or B button on the remote control Press ENTER ...

Page 38: ...enu Then you will see the popup menu Select the On Off with Y or B button and press MENU A button PIP Input Source You can watch two programs or sources at the same time And set up PIP size and position Press MENU button to display the main OSD menu Select the PIP main menu with Y or B button on the re mote control Press ENTER to enter the sub menu Select Input Source and press ENTER button to en ...

Page 39: ... main menu with Y or B button on the re mote control Press ENTER to enter the sub menu Select Position and press ENTER button to enter the sub menu Then you will see the popup menu Select the PIP position with Y or B button and press MENU A button PIP Swap Using swap fuction you can exchange two programs or sources at the same time Press MENU button to display the main OSD menu Select the PIP main...

Page 40: ...ER to enter the sub menu Select Sound Select and press ENTER button to swap the sound of two programs or sources that you want Press MENU button to return Picture PC Picture Mode Press MENU button to display the main OSD menu Select the Picture main menu Press ENTER to enter the sub menu Select Picture Mode and press ENTER button to en ter the sub menu Then the picture popup window appears Select ...

Page 41: ...of the custom setting but the changed values are stored as in Custom mode Press MENU button to return Colour Tone Press MENU button to display the main OSD menu Select the Picture main menu Press ENTER to enter the sub menu Select Colour Tone and press ENTER button toenter the sub menu Then the picture popup window appears ENGLISH Picture Mode Dynamic Custom Color Tone Cool2 Size Auto Wide NR Off ...

Page 42: ...e Colour Tone setting Press MENU button to return Size Press MENU button to display the main OSD menu Select the Picture main menu Press ENTER to enter the sub menu ColourTone Colour Tone Custom Red R Cool2 Green G Cool1 Blue B Normal Warm1 Warm2 Move Enter Menu Colour Tone Custom Red R 50 Green G 50 Blue B 50 Move Adjust Menu Colour Tone Custom Red R 75 Green G 50 Blue B 50 Move Adjust Menu Colou...

Page 43: ...e Picture main menu Press ENTER to enter the sub menu Select PC and press ENTER button to enter the sub menu Then you will see the sub menu of PC Picture Mode Custom Color Tone 4 3 Size Wide PC Picture Move Adjust Menu Picture Mode Custom Custom Colour Tone Size Wide PC Picture Move Enter Menu ENGLISH Picture Mode Custom Custom Color Tone Size 4 3 PC Picture Move Adjust Menu Auto Adjust Custom Pha...

Page 44: ... You can adjust each values of the PC setting with A button H Position V Position Phase Press MENU button to return Picture Auto Adjust Custom Phase 52 H Posittion 16 V Position 24 Frequency 76 Move Enter Menu Phase A A A ...

Page 45: ...et correctly D Correct the picture position Use the function Picture PC Auto Ad just The picture is too large or too small D Picture format set wrongly D Press ARC button repeatedly until the picture is displayed as full screen The remote control is not working D The batteries are worn out D There is an obstruction between the remote control and the sensor D The remote control is located outside o...

Page 46: ...T1 CVBS input Monitor out SCART2 CVBS input RGB RF out CVBS 1 x RCA Y C S video MiniDIN HOSIDEN YUV 3 x RCA Audio Integrated loudspeaker 2 x 2 broadband Stereo input 6 x RCA L R 500 mVrms YUV CVBS YC VGA DVI D 2 x SCART 500 mVrms Stereo output 2 x RCA LINE OUT L R Synchronization Sync on green max 1024 x 768 Separate H and V sync Operator control elements Mains switch IR remote control OSD menu lo...

Page 47: ...x 624 49 726 74 551 57 284 1024 x 768 48 780 60 001 64 11 1024 x 768 48 363 60 004 65 0 1024 x 768 56 476 70 069 75 0 1024 x 768 57 703 72 039 78 476 1024 x 768 60 241 74 927 81 724 1024 x 768 60 030 75 029 78 75 1024 x 768 68 677 84 997 94 5 1024 x 768 72 810 90 0 100 187 1152 x 864 53 700 60 0 81 624 1152 x 864 62 932 69 924 96 663 1152 x 864 67 500 75 0 104 993 1152 x 870 68 681 75 062 100 0 11...

Page 48: ...ed 9 TMDS Data 1 19 TMDS Data 0 5 C5 Not connected 10 TMDS Data 1 20 TMDS Data 5 Connecting pin assignments for SCART SCART 1 1 Audio right output 8 Not connected 15 Not connected 2 Audio right input 9 GND 16 Not connected 3 Audio left output 10 Not connected 17 GND 4 GND Common earth for audio 11 Not connected 18 GND 5 GND 12 Not connected 19 CVBS output 6 Audio left input 13 GND 20 CVBS input 7 ...

Reviews: