background image

NEC Mobile Suite User Guide for N411i

Rev 1.0    6/May/2005

4.3.3

Personal Information Manager - PIM

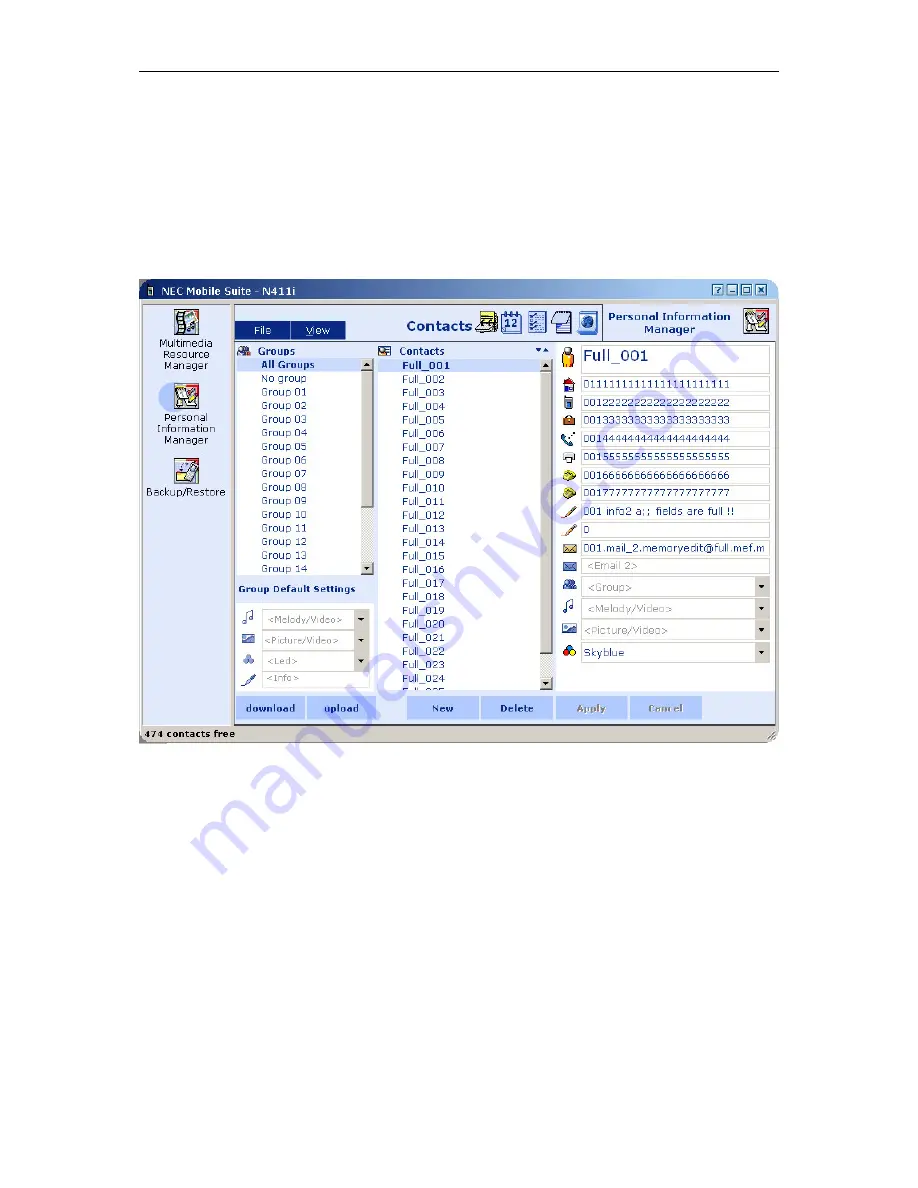
The PIM, which can be seen below, manages four or five(depending on the users phone model) types

of data; the phone  

Contacts

,  

Schedule

,  

ToDo

,  

Notepad

  and  

Bookmarks  

(not available in all phone

models) and provides the user a way to transfer any of these from the Phone to the PC and vice-versa.

A detailed explanation of how it works, features it provides and how to interpret the environment (the

structure of the application, the purpose of each area, button, etc) will be given now, for each of the

mentioned data types.


4.3.3.1

PIM selection icons 

On the top of the PIM window (on the left of the module name) there are three icons,  

Contacts

,

Schedule, ToDo, Notepad and Bookmark

. The icon selected will be coloured, and the name will be

displayed on the left of the icons.

4.3.3.1.1 Action buttons

The following buttons are available in all PIM modules:

[download] –

 Transfers all data, of the selected data type, from the Phone into PIM.

[upload]

 – Transfers all data, of the selected data type,  from PIM into the Phone

[new] – 

allows the user to create a new contact.

[delete] – 

allows the user to delete the selected contact.

Summary of Contents for N411I - MANUAL 2

Page 1: ...NEC Mobile Suite User Guide for N411i Rev 1 0 6 May 2005 NEC Mobile Suite User Guide Ver 1 01 6 May 2005...

Page 2: ...3 2 1 1Resource selection icons 21 4 3 2 1 2PC Area 21 4 3 2 1 3Phone Area 21 4 3 2 1 4Preview Area 21 4 3 2 1 5Pop up menu 21 4 3 2 1 7Transfer UP Button 21 4 3 2 1 8Transfer DOWN Button 22 4 3 2 1 9...

Page 3: ...ings 34 4 3 3 4ToDo 35 4 3 3 4 1Viewer 35 4 3 3 4 2Settings 35 4 3 3 5Notepad 37 4 3 3 5 1Settings 37 4 3 3 5 2Viewer 37 4 3 3 6Bookmark 38 4 3 3 6 1Settings 38 4 3 3 6 2Viewer 38 4 3 3 7File Menu 39...

Page 4: ...whilst depressing the next key then release them all Cancel Square brackets mean the command button with the given label in this case Cancel a setup Bold fixed point text indicates some information w...

Page 5: ...ll describe in a comprehensive way all the features of this application 2 1 Purpose This document describes in detail the NEC Mobile Suite environment all its features and how the user accesses them I...

Page 6: ...XP Home Edition SP1 Minimum required by the operating system NEC Mobile Suite requires processor with clock speed of 350 MHz 64 MB RAM is required Recommendation CPU clock speed of 1GMHz 256 MB RAM Av...

Page 7: ...s please double click on the setup exe file The first screen that will appear is the Choose Setup Language The user just has to choose the language be aware that the installation language will also be...

Page 8: ...the Cancel button Pressing Next will lead you to the Licence Agreement screen Read it carefully before pressing I accept the terms of the license agreement and Next if you agree and want to proceed w...

Page 9: ...ide for N411i Rev 1 0 6 May 2005 Now the user will be asked to enter some personal information NOTE The first option will install the NEC Mobile Suite for all users i e all users that log in will be a...

Page 10: ...NEC Mobile Suite User Guide for N411i Rev 1 0 6 May 2005 On this screen the user can either select the installation directory by clicking on the Browse button or use the default directory Press Next...

Page 11: ...Mobile Suite User Guide for N411i Rev 1 0 6 May 2005 Through this screen the user will be able to create select the Program Folder in which the shortcut for the NEC Mobile Suite will be created Press...

Page 12: ...NEC Mobile Suite User Guide for N411i Rev 1 0 6 May 2005 In this screen the user can check the installation settings before the process is initialised Press Next when ready to start installation...

Page 13: ...NEC Mobile Suite User Guide for N411i Rev 1 0 6 May 2005 In this screen Setup Status the user can monitor the installation progress When concluded the next screen Installation Completed will appear...

Page 14: ...uite at Windows startup After pressing Finish one last screen is displayed enabling the user to start the NEC Mobile Suite application immediately 3 2 Configuration No further configuration is needed...

Page 15: ...t the correct phone can be detected After that the NEC Mobile Suite application will be loaded NOTE The Phone Selection screen will only be presented automatically the first time the NEC Mobile Suite...

Page 16: ...he same name already discussed above Configure COM port enables the user to set manually the COM port used to communicate with the Phone By default all existing COM ports are listed When the user conn...

Page 17: ...1 When the NEC Mobile Suite is started for the first time none of its modules are opened and it will look like this The user can open one or more of its modules only the last one will be seen by clic...

Page 18: ...backed up by ticking the boxes on the left side The Select All option will tick all boxes After this clicking on the Backup button or File Backup will show a Save As screen where the user selects the...

Page 19: ...r File Open and select a backup file After confirming the file all the boxes corresponding to the backed up data will be ticked The user may untick items if they are not to be restored To initiate the...

Page 20: ...anages the Images Melodies Movies and MP3 resources and provides the user a way to transfer both from the Phone to the PC and vice versa A detailed explanation of how it works what features it provide...

Page 21: ...er the PC area In it the user can select the resources images melodies movies or MP3 depending on which Resource type is selected to be transferred to the PC navigating through the folders structure d...

Page 22: ...age files only 4 3 2 1 11 Transfer Button The button can be found next to the Get List button it does the actual transfer uploads and or downloads of all the marked Resources whether they are visible...

Page 23: ...13 New Folder Button The button can be found next to the Delete button and it enables the user to create a new folder on the Phone Area If a folder with the same name already exists the user is warned...

Page 24: ...different colour as showed below red text in the destination area until they are actually transferred The process of selecting and transferring the Resources can be repeated for different source dire...

Page 25: ...on the current directory or on any directory listed All marked resources assume a different colour as showed bellow red text in the destination area until they are actually transferred The process of...

Page 26: ...pen regarding the new folders folders created by the user and not yet transferred to the Phone in the Phone Area There are also a number of situations that can occur when marking a file Those are Size...

Page 27: ...the user tries to mark a DRM file into the Phone Area a warning message will appear the file will change colour and it will not be marked Sample Corrupted files If a file is corrupted a warning messa...

Page 28: ...e for N411i Rev 1 0 6 May 2005 File name already exists When transferring files with names that already exist both on the PC and the Phone these will be changed automatically and marked Sample 4 3 2 3...

Page 29: ...board Delete button Move Up Same as Transfer UP button Move Down Same as Transfer DOWN button Get Resource List Same as Get List button Transfer Same as Transfer button Close Closes MRM 4 3 2 3 2 View...

Page 30: ...e of the application the purpose of each area button etc will be given now for each of the mentioned data types 4 3 3 1 PIM selection icons On the top of the PIM window on the left of the module name...

Page 31: ...ble including those that are in No Groups No Groups all contacts that have no defined group will be shown When a particular group is selected the corresponding contacts are shown The All Groups and th...

Page 32: ...eld 4 3 3 2 3 Details area The Details area shows all the details of the selected contact if no contact is selected only the field names will be shown Here the user can at any time consult the data an...

Page 33: ...ed and a recurrence interval The Schedule is divided in two main sections on the right is the zone where the user can insert and or modify an event which will be known as the Settings on the left is t...

Page 34: ...the melody that is played when the event occurs The user has to tick the checkbox on the left of the field icon before being allowed to select the melody Private If the user ticks this checkbox the e...

Page 35: ...ft is the zone where the user can view the all ToDo items which will be known as Viewer 4 3 3 4 1 Viewer The Viewer is the area where the existing ToDo items are displayed There are three columns of i...

Page 36: ...sed done In the Phone this ToDo is marked as such Private If the user ticks this checkbox the event is set as private therefore when accessing it on the Phone a security code must be provided If the u...

Page 37: ...all Notepad entries which will be known as Viewer 4 3 3 5 1 Settings Settings have two fields which are available only if a Notepad is selected or if a new one is being set The fields are Title In th...

Page 38: ...known as Viewer 4 3 3 6 1 Settings Settings have two fields which are available only if a Notepad is selected or if a new one is being set The fields are Title In this field the user can write a smal...

Page 39: ...one into PIM Upload to Phone Transfers all data of the selected data type from PIM into the Phone Import This submenu has three options has can be seen in the picture bellow Those are o Import from CS...

Page 40: ...ft Outlook appointments events scheduled in the Outlook calendar o Export all vCalendar ToDo Saves all ToDo events in the format of Microsoft Outlook appointments events scheduled in the Outlook calen...

Page 41: ...the Browse button in order to select the import file 2 The user must choose the character that is separating the fields name home mobile etc in the CSV file If the user doesn t know what is the separa...

Page 42: ...essed an automatic correspondence will be done in which the first CSV field corresponds to the first PIM field the second CSV field corresponds to the second PIM field and so on and so forth On the ri...

Page 43: ...f a situation like this occurs Force The field is not imported Skip The complete record is not imported The process will continue with the next record If the check box Apply to all the warnings of the...

Page 44: ...warnings and at the end shows the number of records imported skipped and the number of warnings Click Finish to exit 4 3 3 7 2 Exporting a CSV File There is a Wizard to guide the user through the exp...

Page 45: ...destination path where the file is going to be stored or use the Browse button in order to select the file path 2 The user must choose the character that will separate the fields name home mobile etc...

Page 46: ...6 May 2005 Clicking the Next button will take the user to the Final Screen In this last screen the user can verify the complete file path the number of records contacts exported and if the process wa...

Page 47: ...the application Key Combination Function F2 Edit resource name F5 Refresh PC area F6 Toggle between PC and Phone areas F7 Get Resource List F8 Transfer F10 Access menus Ctrl TAB Toggle between Resour...

Reviews: