background image

18

26

25

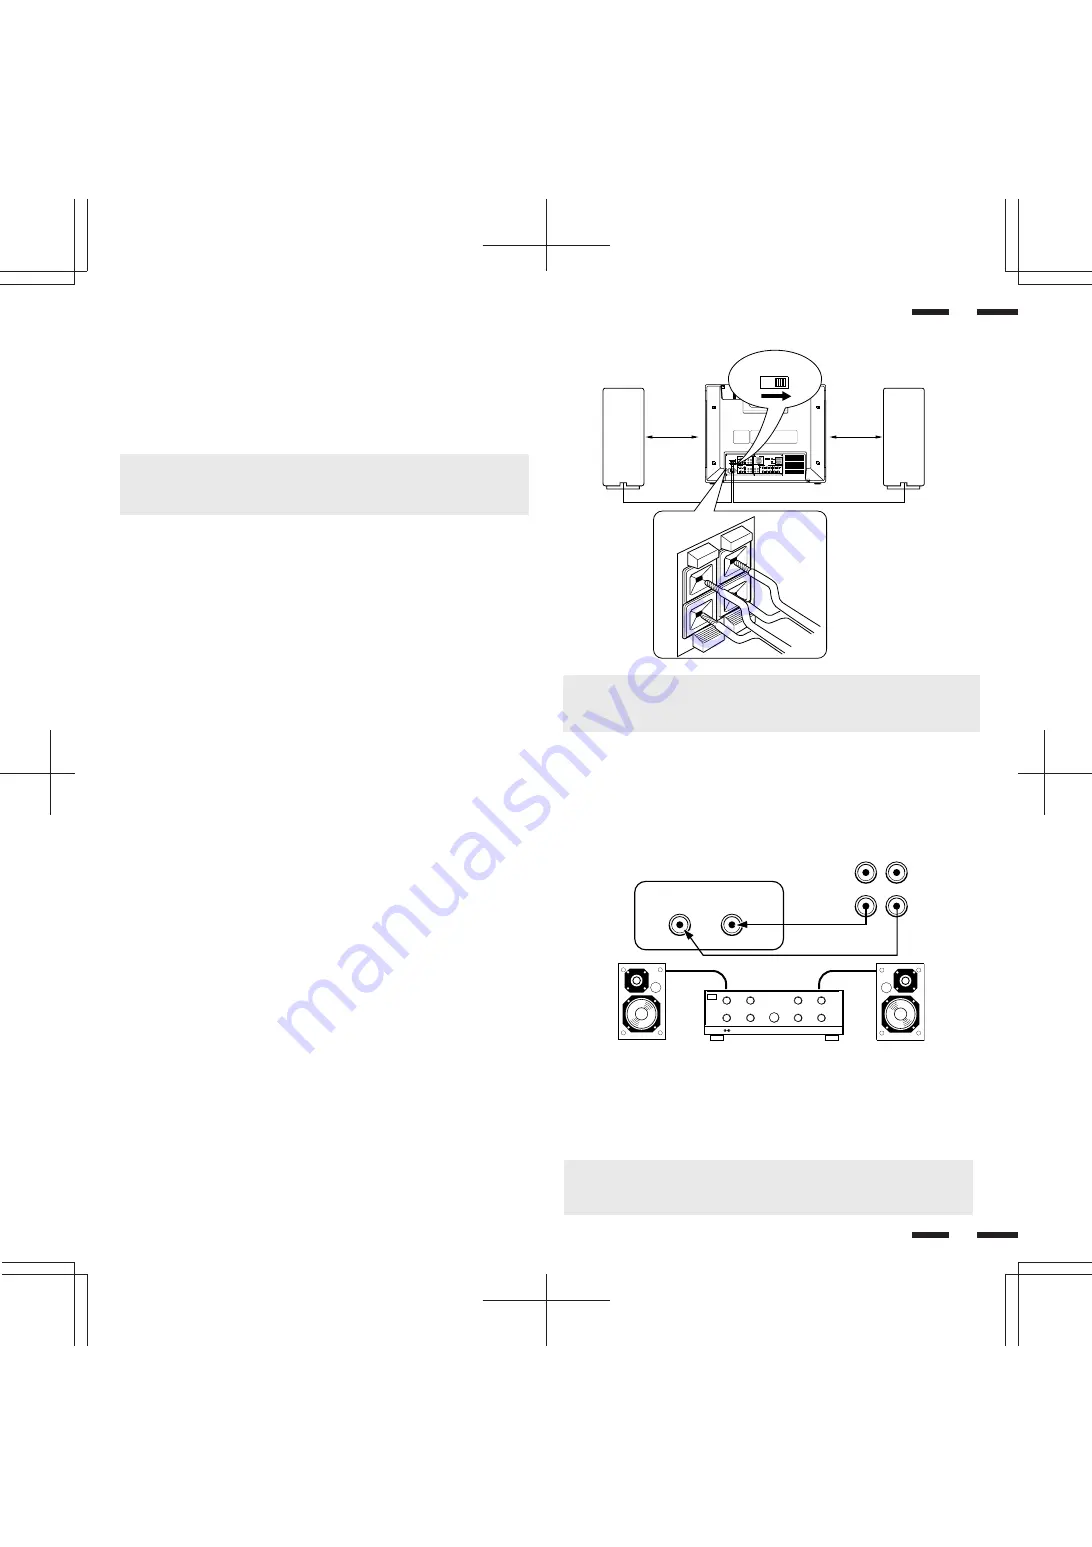
External Speaker  Connections

External speakers may be connected to the monitor to reproduce sound from

VIDEO 1, VIDEO 2, RGB 1 or RGB 2 signal sources.

External speakers may be connected directly to the EXTERNAL SPEAKERS

terminals or indirectly by connecting a stereo system amplifier to the audio

outputs.

WARNING: Speakers that are installed next to the monitor must be

shielded against electromagnetic radiation which can cause color distortion

in the CRT and is not covered under the warranty.

If non-shielded speakers are used, they must be located a minimum of 4 feet

away from the monitor.

To connect the monitor to stereo system speakers:

1. Connect L AUDIO output to the stereo amplifier L AUX input.

2. Connect R AUDIO output to the stereo amplifier R AUX input.

3. Set SPEAKER SELECT switch at EXT to use external speakers only. For

center channel audio fill, set SPEAKER SELECT at INT for sound from both

monitor and external speakers.

IMPORTANT:  Do not connect speakers to both the monitor EXTERNAL

SPEAKERS terminals and to the stereo amplifier. This could damage both

the monitor and the speakers.

VIDEO or

RGB AUDIO L and R outputs of XP29Xtra/XM29Xtra

CAUTION: Unplug the monitor and all connected components before con-

necting external speakers. Use only speakers with 8-ohm impedance and a

power output rating of 5 watts or more.

To connect external speakers directly to the monitor:

1. Strip the ends of the speaker wires.

2. Press down a button below the EXTERNAL SPEAKERS terminals, insert

the speaker wire and release the button to secure a speaker wire connec-

tion:

[a] Connect the right speaker (located at right side of the monitor when

viewed from the front) positive (+) wire to RIGHT +.

[b] Connect the right speaker negative (-) wire to RIGHT -.

[c] Connect the left speaker negative (-) wire to LEFT -.

[d ]Connect the left speaker positive wire (+) to LEFT +.

3. Set SPEAKER SELECT switch at EXT.

HJJKKKASDFFF

BNGGDFDFGHY

ZZXXC

 CCVDFVFF  

ADFGRTRYT

ADFGRTRYT

SFGHHHJJ

SFGHHHJJ

DFFGGGG

AFHUJTT

AFHUJTT

DFFGGGG

2Q

2Q

2Q

2Q

JGHDYSTEOYII   DYASGHIROYUKIAIZAWA

OUT

IN

R

R

L

LINE OR
AUX INPUT

LINE OR 
AUX INPUT

STEREO  AMP

L (MONO)

DIP SW

REMOTE

EXT SPEAKERS

SPEAKERS MUST HAVE

MORE THAN 5WATT RATING

IMPEDANCE 8 OHM

AC IN

SPEAKER SELECT

RIGHT LEFT

75

HIGH

INT

EXT

BNC

IN

IN

R

L(MONO)

AUDIO

VIDEO 1

S

1  2  3  4  5  6  7  8

ON

75

HIGH

THROUGH

OUT

THROUGH
OUT

THROUGH
OUT

THROUGH
OUT

THROUGH
OUT

THROUGH
OUT

THROUGH
OUT

IN

RGB1

PC / EXT CTL

75

HIGH

BNC

IN

IN

R

L(MONO)

AUDIO

VIDEO 2

S

IN

R

R/CR/PR

G/Y/Y

B/CBPB

IN

OUT

H

V

L(MONO)

IN

75

HIGH

75

HIGH

RGB AUDIO

RGB 2

SPEAKER  SELECT

INT

EXT

RIGHT

LEFT

4 ft.

120cm

4 ft.

120cm

LEFT

RIGHT

Summary of Contents for MultiSync XM29 Xtra

Page 1: ...ies Inc 1250 N Arlington Heights Road Suite 500 Itasca Illinois 60143 1248 R 29 Xtra Xtra 29 Printed in Thailand 78410091 MultiSync is a registered trademark of NEC Technologies Inc in the U S A NEC is registered trademark of NEC Corporation 1993 by NEC Technologies Inc ...

Page 2: ... avoid excessive bending A damaged cord can cause electric shock or fire 5 Unplug unit during electrical storms or if unit will not be used over a long period 6 Do not open the cabinet which has potentially dangerous high voltage components inside If the unit is damaged in this way the warranty will be void Moreover there is a serious risk of electric shock 7 Do not attempt to service or repair th...

Page 3: ...our une installation en intérieur Ne pas utiliser cet appareil dans des conditions autres que celles initialement spécifiées 9 Ne pas utiliser l appareil sur une surface instable 10 Ne pas mettre l appareil sur fin lorsqu il est en marche ou en train de mémoriser 11 Reposez vos yeux périodiquement Mises en garde et précautions de sécurité Les moniteurs MultiSync Multimédia XP29 Xtra et XM29 Xtra d...

Page 4: ...ts of initial technical adjustments set up including adjustment of user controls These costs are the responsibility of the NECTECH dealer from whom the product was purchased 3 Payment of shipping charges HOW YOU CAN GET WARRANTY SERVICE 1 To obtain service on your product consult the dealer from whom you purchased the product or ship it prepaid to any authorized NECTECH service center 2 Whenever w...

Page 5: ...ussing 27 Using OSM Controls 28 Direct Control Screen 29 Accessing OSM 32 CONTENTS OSM Menus 32 Visual Controls Group 32 H position H width Pin cushion Controls Group 33 V position V height V linearity Controls Group 33 Keystone Tilt Rotation Scan Select Controls Group 34 RGB Controls Group 35 OSM Location OSM Turn Off Time Control 36 Source Information 36 DV Controls Group 37 CV Controls Group 38...

Page 6: ...rofessionalism of your presentations Microsoft Plug and Play compatibility The monitor includes this standard that automatically optimizes display settings Supports most IBM VGA S VGA XGA Macintosh or any other RGB signals within a horizontal frequency range or 15 75 31 to 100 kHz 15 75 31 to 70 kHz for XM29 Xtra and a vertical frequency range of 45 to 120 Hz This includes NTSC PAL SECAM and M NTS...

Page 7: ...an RGB or component video source that is connected to the RGB 2 input terminals BNC type When you are in the OSM mode this button works as the plus button 5 RGB 1 Press to select an RGB video source that is connected to the RGB 1 input terminal D SUB 15 pin type When you are in the OSM mode this button works as the minus button 6 VIDEO 2 Press to select an NTSC PAL SECAM or M NTSC compatible video...

Page 8: ...NC type Connect to a second monitor s video input to relay the video signal input at VIDEO 1 IN THROUGH OUT S VIDEO Connect to a second monitor s S connector input to relay the video signal input at S VIDEO 1 IN 75 Ω HIGH Impedance Select Switch for BNC type Set to 75 Ω during normal operation In multiple connections using VIDEO 1 IN and THROUGH OUT BNC type terminals set to HIGH on all but the la...

Page 9: ...his is your right channel audio input for stereo sound AUDIO L IN MONO This is your left channel audio input for stereo sound coming from video equipment or audio system It also serves as the mono audio input AUDIO R THROUGH OUT Connect to a second monitor s right channel audio input AUDIO L THROUGH OUT Connect to a second monitor s left channel audio input Terminal Board continued F RGB 1 Mini D ...

Page 10: ...e pages 17 and 18 for more details J REMOTE IN OUT Connect the optional remote cable included with the optional remote control to the REMOTE IN terminal The REMOTE OUT terminal is used to connect several monitors together and allows all of the monitors to be controlled by one remote control NOTE Up to 50 monitors can be connected in the serial connection This can be done only when the supplied rem...

Page 11: ...mpatible video source from a VCR laser disc player document camera or an S Video source from a VCR connected to the VIDEO 2 IN terminal RGB 1 Press to select an RGB video source from a computer connected to the RGB 1 IN terminal RGB 2 Press to select an RGB Component video source from a computer NEC scan converter or Y PB PR Y CB CR signal source connected to the RGB 2 IN terminal 3 4 OSM Control ...

Page 12: ...the raster adjustment settings of user changeable memory and recalls the factory preset data Visual Control B BRIGHT Adjusts the overall image and screen brightness Press and hold for a brighter picture Press and hold for a darker picture C CONTRAST Adjusts the image brightness in relation to the background Press and hold for higher contrast Press and hold for lower contrast NOTE The VISUAL CONTRO...

Page 13: ...of the remote sensor of the monitor The monitor will not function if there are objects between the remote control and the sensor or if strong light falls on the sensor Weak batteries will also prevent the remote control from properly operating the monitor 3 Close the battery compartment cover 1 Turn the remote control unit upside down Press down on the battery compartment grip and slide the compar...

Page 14: ...is the description of the LED indicator for the IPM power saving modes Pin No 6 EXT CONTROL When this switch is set to ON the External Control function is activated See page 46 for pin assignments Pin No 7 REMOTE ON OFF When this switch is set to ON the monitor can be controlled by the wireless remote control unit If you have some monitors you do not want to control by remote set to OFF Pin No 8 O...

Page 15: ...Y Y B CBPB H CS V EXTERNAL CONTROL PROCEED VIDEO 1 EXIT VIDEO 2 RGB 1 RGB 2 POWER STANDBY 19 20 Document camera VCR Video copy stand or Multimedia application IBM XGA SuperVGA VGA or Compatibles or Macintosh G3 series Installation To Mini D SUB 15 Pin input To R G B H V inputs BNC To EXTERNAL CONTROL Mini D SUB 15 Pin input XP29Xtra XM29Xtra NEC IPS 4000 Image Processor XP29 Xtra XM29 Xtra Macinto...

Page 16: ...M29 Xtra monitor To make these connections simply 1 Turn off the power to your monitor and VCR or laser disc player 2 Connect one end of your RCA video cable to the video output connector on the back of your VCR or laser disc player connect the other end to the VIDEO 1 or 2 input terminal BNC type of the monitor NOTE You will need an RCA to BNC adaptor not included to convert to the XP29 Xtra XM29...

Page 17: ...T to external component to relay the signal input at VIDEO 2 IN BNC type or S VIDEO 2 IN 2 Connect the external component mono audio or stereo left channel audio input to L AUDIO 3 Connect the external component stereo right channel audio input to R AU DIO 4 Set the 75Ω HIGH impedance select switch of the corresponding input signal BNC S VIDEO on all but the last monitor to HIGH position Only the ...

Page 18: ... all connected components before con necting external speakers Use only speakers with 8 ohm impedance and a power output rating of 5 watts or more To connect external speakers directly to the monitor 1 Strip the ends of the speaker wires 2 Press down a button below the EXTERNAL SPEAKERS terminals insert the speaker wire and release the button to secure a speaker wire connec tion a Connect the righ...

Page 19: ...ed which may require demagnetizing to clear the problem Also if powered on for extended periods of time magnetic fields can be produced by the CRT itself causing color impurities In these cases use the DEGAUSS key once to demagnetize the picture tube Pressing this key once demagnetizes the picture tube for 5 seconds CAUTION Please allow a minimum of 30 minutes to elapse between uses of the DEGAUSS...

Page 20: ... Control Screen You can adjust the raster visual and sound using the direct key on the remote control To switch to another control screen press any one of the other keys To end the OSM display press EXIT If no key operation is made within 3 seconds the OSM display will disappear a POSITION CONTROL Press to move the image right Press to move the image left Press to move the image up Press to move t...

Page 21: ...uration level TINT Pressing or increases or decreases the red and green values NOTE The color tint and sharpness controls are not available for RGB input For RGB2 input signals you can select the RGB CTL menu under RGB2 SOURCE SELECT in DV to change the color tint and sharpness controls The tint is not available for PAL and SECAM input NOTE Pressing the visual NORMAL key resets all the visual cont...

Page 22: ...DEO display and to reduce moire H POSITION Pressing or moves the image horizontally right or left H WIDTH Pressing or decreases or increases the horizontal size of the image wider or narrower PIN CUSHION Pressing or decreases or increases the curvature of the sides either inward or outward PIN BALANCE Pressing or decreases or increases the curvature of the sides to right or to left PIN CORNER TOP ...

Page 23: ...G B GAIN Pressing or increases or decreases the gain level for each color R G B BIAS Pressing or increases or decreases the bias level for each color MODE2 is used for the wide video band mode This mode is recommended for text display AUTO automatically selects either the high contrast mode for horizontal frequencies of less than 49 kHz or the wide band video mode for 49 kHz or over COLOR TEMP Pre...

Page 24: ... 1 H C O N V E R G E N C E V C O N V E R G E N C E A R E A C O N V E R G E N C E 1 A R E A C O N V E R G E N C E 2 R E S S P R O C E E D F O R C O N V E R G E N C E 1 S E T T I N G S 37 38 H CONVERGENCE Pressing or adjusts the alignment of the red and Blue lines in the left right direction AREA CONVERGENCE1 You can enter the four selection mode with the PROCEED key Now you can use the up or down k...

Page 25: ... T T I N G S 39 40 BOTTOM HORIZONTAL1 Corrects the vertical lines on the lower half of the screen The closer to the bottom the greater you get correction value BOTTOM VERTICAL1 Corrects the horizontal lines on the lower half of the screen The closer to the bottom the greater you get correction value TOP HORIZONTAL1 Corrects the vertical lines on the upper half of the screen The closer to the top t...

Page 26: ...trol The Reset control allows you to return image parameters to factory presets All Raster Settings The above warning statement will appear to confirm that you do want to reset all raster settings If you want to reset all raster settings press PROCEED The following items can be reset H POSITION H WIDTH PIN CUSHION PIN BALANCE PIN CORNER TOP PIN CORNER BOTTOM V POSITION V HEIGHT V LIN1 V LIN2 KEYST...

Page 27: ... control unit function as follows POSITION CONTROL up down highlights one of the control items in the System control menus POSITION CONTROL proceeds to the selected menu choice POSITION CONTROL exits the current control and returns to its original System control menus EXIT exits the OSM controls FRONT CONTROL This control allows you to disable the keys on the front panel such as PROCEED EXIT VIDEO...

Page 28: ...elect Power ON OFF No Connection Degauss ON OFF Signal Ground EXT CTL EXT CTL EXT CTL EXT CTL External Control Pin No VIDEO1 VIDEO2 RGB1 RGB2 POWER OFF POWER ON DEGAUSS OFF DEGAUSS ON 4 OPEN GND OPEN GND 5 OPEN OPEN GND GND 10 OPEN GND 14 OPEN GND NOTE EXT CTL ON EXT CTL active OFF EXT CTL inactive PC CTL can work regardless of whether EXT CTL is set or not Pin No 8 is connected to pin No 12 PC Ex...

Page 29: ... equipment such as personal computer using the PC EXT CTL terminals The following sections explain the interface Interface Condition RS 232C Baud rate 9600 bps Data length 8 bits Parity Odd parity Stop bit 1 bit Communications mode Full duplex Command 1 Code based on the command system UNIT ID Code allocated to each equipment Allocate 80H to the XP29 Xtra XM29 Xtra Command 2 Code allocated to the ...

Page 30: ... On Power Off Degauss Control Length 00 00 00 COM2 4E 4F A1 COM1 3F 7F Contents Power On ACK Power Off ACK Input Switching ACK Degauss Control ACK Length 00 00 00 01 COM2 4E 4F B0 A1 PC CONTROL COMMAND LIST FOR USE WITH THE XP29 Xtra XM29 Xtra PC XP29 Xtra XM29 Xtra COM1 DF UA 80 COM2 B0 Length 02 Data 1 00 Data 2 VIDEO1 01 VIDEO2 02 RGB1 03 RGB2 04 Sum 12 13 14 15 COM1 3F UA 80 COM2 B0 Length 00 ...

Page 31: ...ote control directly at Sensor Window Use the remote control unit within 30 left and right of center at a distance of within 22ft Set Pin no 7 of DIP SW to ON SHORT Set Pin no 6 of DIP SW to OFF OPEN Check the input signal Possible Cause Power cord unplugged Power outlet inactive Power of external equipment is not ON External equipment has been incorrectly connected Incorrect input selection Impro...

Page 32: ... 15 7 31 KHz to 70 KHz Automatically Vertical 45 Hz to 120 Hz Automatically Picture tube 27 inch Visual size 29 inch CRT size Diagonal Type M68LMF256X 108 degree deflection Stripe trio pitch Ph 0 60 mm at center Ph 0 78 mm at corner Pv 0 56 mm Invar mask Medium short persistence phosphor Anti static electricity coating Optical filter coating Dynamic focus RGB Input Terminals RGB 1 Mini D SUB 15pin...

Page 33: ...sec 63 2kHz fH 2 7µsec Vertical 0 4 msec Current Rating AC 100 120 200 240 V 50 60 Hz Power Consumption XP29 Xtra XP 2991 3 5 A maximum XM29 Xtra XM 2961 3 5A maximum Dimensions 645 W x 533 H x 518 D mm 25 4 W X21 H X20 4 D inches Weight 54 kg 119 lbs Environmental Considerations Operating Temperature 0 to 40 Humidity 0 to 90 Altitude 0 to 10 000 feet Storage Temperature 10 to 50 Humidity 0 to 95 ...

Page 34: ...34 Multisync PROCEED VIDEO 1 EXIT VIDEO 2 RGB 1 RGB 2 DTV POWER STANDBY 21 0 533mm 20 4 518mm 14 94 379 5mm 25 4 645mm 23 27 591mm Dimensions 20 4 518mm 58 57 ...

Page 35: ...rence Chart Separate Sync Timing Charts Composite Sync 60 A B C D E VIDEO O P Q R S VIDEO Sync Polarity Positive Negative HORIZONTAL VERTICAL VIDEO A B C D E O P Q R S VIDEO Sync Polarity Positive Negative HORIZONTAL VERTICAL ...

Page 36: ...ept when at 15KHz Horizontal blanking should exceed 15 75 10µsec 31KHz fH 63 2KHz 3 6 µsec 63 2KHz fH 2 7 µsec Vertical Duty should be 0 2 to 10 Vertical sync width should exceed 40 µsec or 2 horizontal lines Vertical sync width plus back porch should exceed 0 4 msec Interlaced signals are not recommended Interlaced signals with composite sync may not be displayed A B C D E VIDEO O P Q R S P VIDEO...

Page 37: ...ntal Front Porch 640 480 37 860KHz 26 413µsec 1 270µsec 4 063µsec 20 317µsec 0 762µsec VESA 640 480 at 72Hz VESA 800 600 at 56Hz 800 600 35 156KHz 28 444µsec 2 000µsec 3 556µsec 22 222µsec 0 667µsec 1024 768 48 363KHz 20 677µsec 2 092µsec 2 462µsec 15 754µsec 0 369µsec VESA 1024 768 at 60Hz 1024 768 35 587KHz 28 100µsec 3 910µsec 1 247µsec 22 760µsec 0 178µsec 8514 A XGA Interlaced Compartible 832...

Page 38: ...sec 0 577 0 563msec 0 000 0 014msec Resolution Vertical Frequency O Vertical Period P Vertical Pulse Width Q Vertical Back Porch R Vertical Active Area S Vertical Front Porch 640 350 70 080Hz 14 268msec 0 064msec 1 716msec 11 504msec 0 985msec 720 400 70 080Hz 14 268msec 0 064msec 0 890msec 13 156msec 0 159msec 720 350 87 850Hz 11 383msec 0 051msec 1 496msec 8 873msec 0 963msec 640 480 59 940Hz 16...

Page 39: ...equency NEC PRESET USER PRESET MODE4 32 5 36 5KHz MODE5 36 5 42 0KHz MODE6 42 0 44 2KHz MODE7 44 2 49 0KHz MODE8 49 0 51 0KHz MODE2 31 0 32 5KHz MODE1 15 5 21 0KHz REMARKS MODE POS NEG NEG NEG POS POS NEG NEG NEG POS POS NEG NEG NEG POS POS NEG NEG NEG POS POS NEG NEG NEG POS POS NEG NEG NEG POS POS NEG NEG NEG POS POS NEG POS NEG NEG POS NEG POS NEG NEG POS NEG POS NEG NEG POS NEG POS NEG NEG POS...

Page 40: ...s missing contents such as manuals cables etc NECTECH reserves the right to repair rather than replace any product Eligibility Return for Exchange Procedure If a product is suspected of being DOA customers must call NECTECH VSD Technical Support A representative will assist in making the product fully functional or verify it as a DOA VSD Technical Support 1 800 836 0655 NEC technical support will ...

Reviews: