background image

English-32

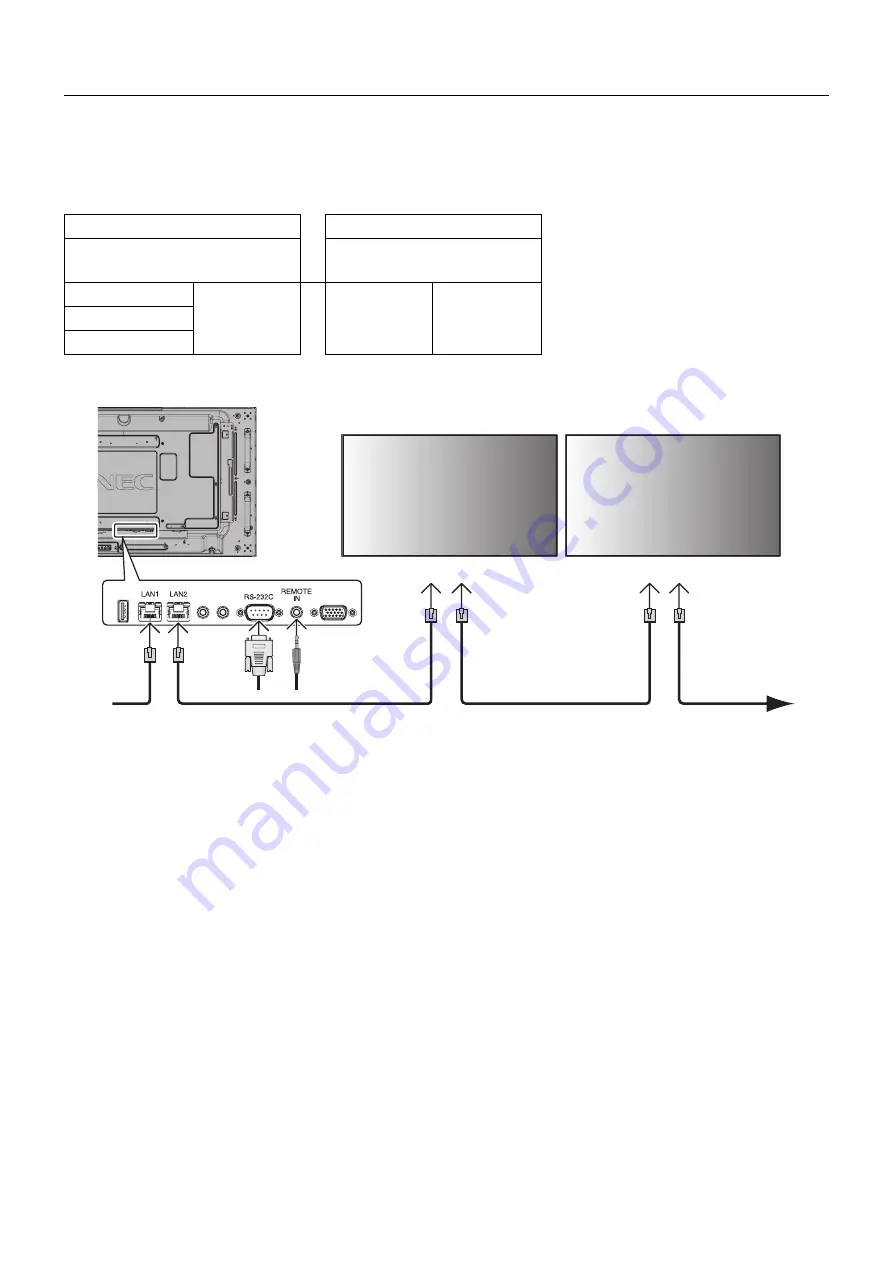
You can control multiple monitors by using RS-232C, REMOTE IN or LAN daisy-chain connection.

NOTE:


Multiple monitors that are daisy-chained have a limit to the connectable monitors.
When manually specify the ID number or control by the specifi ed ID number, please execute AUTO ID (see page 24) 
previously.

Main Monitor

Sub Monitors

Connector

Connector

IN

OUT

IN

OUT

RS-232C

LAN2

LAN1

LAN2

REMOTE IN

LAN1

Connection

LAN1

LAN Cable

MultiSync

MultiSync

LAN2

LAN1

LAN2

MultiSync

LAN Cable

Multiple Monitors Connection

Summary of Contents for MultiSync X464UNV-3

Page 1: ...c X464UN MultiSync X464UNS 2 MultiSync X464UNV 3 MultiSync X554UN MultiSync X554UNS 2 MultiSync X554UNV 2 Please find your model name in the label on the backside of monitor Large Format Display User...

Page 2: ...ish 17 Selecting a video source English 17 Picture Aspect English 17 Information OSD English 18 Picture Mode English 18 OSD On Screen Display Controls English 19 PICTURE English 20 ADJUST English 20 A...

Page 3: ...g booklet prepared by the Federal Communications Commission helpful How to Identify and Resolve Radio TV Interference Problems This booklet is available from the U S Government Printing Office Washing...

Page 4: ...the table below If a power cord is not supplied with this equipment please contact your supplier For all other cases please use a power cord that matches the AC voltage of the power outlet and has bee...

Page 5: ...fetime of the monitor or cause condensation If condensation happens let the monitor stand unplugged until there is no condensation Connecting to a TV Cable distribution system should be grounded earth...

Page 6: ...10 x 1 X464UN X464UNS 2 X464UNV 3 x 3 X554UN X554UNS 2 X554UNV 2 Setup Manual Video Signal Cable DisplayPort cable Thumbscrew for optional stand x 2 2 LAN cable Remember to save your original box and...

Page 7: ...harm Refer to the instructions included with the mounting equipment for detailed information Make sure there is no gap between the monitor and the bracket When used in a video wall configuration for a...

Page 8: ...55UN L or WM 55UN P 2 Using Option Board 1 Turn off the main power switch 2 Remove the handle 2 3 Remove the attached slot cover by unscrewing the installed screws Figure 1 4 Insert option board in t...

Page 9: ...s 640 mm X554UN X554UNS 2 X554UNV 2 1 X464UN X464UNS 2 X464UNV 3 Before attaching the LCD monitor to the wall make sure that the wall can support the weight of the monitor Be sure to remove the cord o...

Page 10: ...ted area down to select adjustment items within OSD menu EXIT button EXIT Activates the OSD menu when the OSD menu is turned off Acts as EXIT button within the OSD to move to previous menu Remote cont...

Page 11: ...n be used with an RGB or COMPONENT source Please select signal type in TERMINAL SETTING See page 28 NOTE When you use this connector for COMPONENT please use a suitable signal cable If you have any qu...

Page 12: ...n off the information OSD See page 18 MENU button Turns on off the menu mode AUTO SET UP button Enters auto setup menu See page 20 EXIT button Returns to previous menu within OSD menu UP DOWN button A...

Page 13: ...trol If the remote control gets wet wipe it dry immediately Avoid exposure to heat and steam Other than to install the batteries do not open the remote control PIP Picture In Picture button ON OFF but...

Page 14: ...monitor so as not to scratch the panel 2 Install the remote control Optional batteries The remote control is powered by two 1 5V AAA batteries To install or replace batteries A Press and slide to open...

Page 15: ...8 Adjust the screen See pages 20 and 21 Make adjustments of the screen display position when necessary 9 Adjust the image See page 20 Make adjustments such as backlight or contrast when required 10 R...

Page 16: ...mputer Analog Computer Digital DVD Player Multiple monitors that are daisy chained have a limit to the connectable monitors Connected equipment Connecting terminal Setting in terminal mode Input signa...

Page 17: ...or more information about your computer s video output requirements and any special identification or configuration your monitor s image and monitor may require Input TMDS signals conforming to DVI st...

Page 18: ...will turn green while powered on and will turn red or amber while powered off NOTE The Main Power Switch must be in the ON position in order to power up the monitor using the remote control or the Pow...

Page 19: ...ecting failure Red Blinking See Troubleshooting page 47 1 If OFF is selected in POWER INDICATOR page 25 the LED will not light when the LCD monitor is in active mode 2 Without any option with factory...

Page 20: ...o bring up the Information OSD Input Name Audio input mode Picture aspect Input Signal Information Sub picture information Picture Mode DVI VGA RGB HV DPORT STANDARD sRGB CUSTOM1 CUSTOM2 HIGHBRIGHT HD...

Page 21: ...MENT CARBON FOOTPRINT 86 0 Input source Main Menu Icons Main Menu Item Sub Menu Key Guide Adjustment Settings Remote Control Press UP or DOWN button to select sub menu Press SET POINT ZOOM Press UP or...

Page 22: ...MABLE1 except sRGB setting NATIVE Gamma correction is handled by the LCD panel 2 2 Typical display gamma for use with a computer 2 4 Good for video DVD etc S GAMMA Special gamma for certain types of m...

Page 23: ...pixel format If the input resolution is higher than a 1920 x 1080 resolution the image will be scaled down to fit the screen TILE MATRIX becomes invalid ZOOM The image can be expanded reduced NOTE The...

Page 24: ...ar for the real time clock MONTH Configures the month for the real time clock DAY Configures the day for the real time clock TIME Configures the time for the real time clock DAYLIGHT SAVING Configures...

Page 25: ...ges The information OSD will also give a warning when there is no signal or the signal is out of range An interval between 3 to 10 seconds for the Information OSD to appear is available ON 3 SEC MONIT...

Page 26: ...RESS settings will be individual settings even though monitors are connected with LAN NOTE When the number of monitors connected with LAN was changed please select the same item that you selected at S...

Page 27: ...NG NOTE All monitors which follow in the chain with LAN should be ON When executing this function while in standby mode or power save mode LAN POWER should be set to ON AUTO ID will be automatically e...

Page 28: ...is selected NOTE Do not select this function when ROOM LIGHT SENSING is MODE1 or MODE2 OFF MOTION The screen image is slightly expanded and moves in 4 directions UP DOWN RIGHT LEFT at user determined...

Page 29: ...urce and a new secondary source is supplied to the monitor the monitor will automatically switch to the new video source When current video input signal is not present the monitor searches for a video...

Page 30: ...Pb Pr SCART 1 VIDEO 1 S VIDEO 1 HDMI2 1 HDMI3 1 inputs only Some video formats may require different scanning modes in order to best display the image ON ON Image size is larger than what can be disp...

Page 31: ...SING is enabled the Backlight level of the screen changes automatically according to the lighting conditions of the room see figure below BACKLIGHT level set for the monitor to use when ambient lighti...

Page 32: ...r ghost image of a previous image remains visible on the screen Unlike CRT monitors LCD monitors image persistence is not permanent but constant images being displayed for a long period of time should...

Page 33: ...emote control towards the remote sensor of the desired monitor and press the REMOTE ID SET button The MONITOR ID number is shown on the display when your remote control is in ID mode Use the remote co...

Page 34: ...it to the connectable monitors When manually specify the ID number or control by the specified ID number please execute AUTO ID see page 24 previously Main Monitor Sub Monitors Connector Connector IN...

Page 35: ...pter is required Contact your dealer for details For the pin assignment please see page 54 2 RS 232C input output To control a monitor please use the control command Instructions for the control comma...

Page 36: ...71 0d Input Source Select VGA 01 30 41 30 45 30 41 02 30 30 36 30 30 30 30 31 03 73 0d Input Source Select HDMI 01 30 41 30 45 30 41 02 30 30 36 30 30 30 31 31 03 72 0d Input Source Select Y Pb Pr 01...

Page 37: ...ary depending on the version of browser Please refer to the help files and the other information provided in your software Access is gained to the HTTP server function by starting the Web browser on t...

Page 38: ...s of the monitor has been configured in the HOSTS file of the computer being used you can then access the network settings of the display via that host name using a compatible browser Example 1 When t...

Page 39: ...cted to the monitor when MANUAL is selected for IP SETTING NOTE Set as 0 0 0 0 to delete the setting DNS Set for IP ADDRESS setting of DNS server AUTO Automatically assign an IP address of DNS server...

Page 40: ...be used AUTHENTICATION METHOD This selects the authentication method of the e mail transmission POP3 SERVER This specifies the address of the POP3 server that is used in the authentication of the e m...

Page 41: ...the temperature that the user had specified condition DISPLAY PROTECTION FAN CONTROL COOLING FAN AUTO Reconfirm the setting condition from OSD DISPLAY PROTECTION FAN CONTROL or please contact your sup...

Page 42: ...rap Community name The default setting of community name is public It is read only You can set community names for up to 3 settings Trap Sending error message to specified address when an error occurs...

Page 43: ...RESTRON Setting Click CRESTRON on the left side of HOME CRESTRON ROOMVIEW compatibility The monitor supports CRESTRON ROOMVIEW allowing multiple devices connected in the network to be managed and cont...

Page 44: ...ASSWORD Set a password for PJLink A password must be 32 characters or less Do not forget your password However if you forget your password consult with your dealer HTTP PASSWORD Set a password for HTT...

Page 45: ...s that are daisy chained Only the master monitor can show the list Memo Setting Click MEMO on the left side of HOME Set a title and meesage TITLE A title must be 24 characters or less MESSAGE A messag...

Page 46: ...ring POINT ZOOM DYNAMIC and ZOOM will be FULL image The magnifier icon does not move to no image area POINT ZOOM will be released after changing input signal or power off POINT ZOOM will be released w...

Page 47: ...nication even while the monitor is off Some menu of OSD you can set by this function NOTE Sensor position see page 9 Please contact your supplier for detailed information Function name Setting Copy Se...

Page 48: ...ds that allow the monitor to shift to a lower power consumption level when on but not in use saving two thirds of your monitor energy costs reducing emissions and lowering the air conditioning costs o...

Page 49: ...er on or changing the settings Image of component signal is greenish Check to see if the Y Pb Pr input connector is selected LED on monitor is not lit no green or red color can be seen Power Switch sh...

Page 50: ...7 Vp p 75 ohm HDTV DVD 1080p 1080i 720p 50Hz 60Hz 576p 50Hz 480p 60Hz 576i 50Hz 480i 60Hz Output Signal DisplayPort DisplayPort Connector Digital RGB DisplayPort Complies with Standard V1 2 applicabl...

Page 51: ...Pr 0 7 Vp p 75 ohm HDTV DVD 1080p 1080i 720p 50Hz 60Hz 576p 50Hz 480p 60Hz 576i 50Hz 480i 60Hz Output Signal DisplayPort DisplayPort Connector Digital RGB DisplayPort Complies with Standard V1 2 appl...

Page 52: ...0 7 Vp p 75 ohm HDTV DVD 1080p 1080i 720p 50Hz 60Hz 576p 50Hz 480p 60Hz 576i 50Hz 480i 60Hz Output Signal DisplayPort DisplayPort Connector Digital RGB DisplayPort Complies with Standard V1 2 applicab...

Page 53: ...m HDTV DVD 1080p 1080i 720p 50Hz 60Hz 576p 50Hz 480p 60Hz 576i 50Hz 480i 60Hz Output Signal DisplayPort DisplayPort Connector Digital RGB DisplayPort Complies with Standard V1 2 applicable to HDCP V1...

Page 54: ...DTV DVD 1080p 1080i 720p 50Hz 60Hz 576p 50Hz 480p 60Hz 576i 50Hz 480i 60Hz Output Signal DisplayPort DisplayPort Connector Digital RGB DisplayPort Complies with Standard V1 2 applicable to HDCP V1 3 A...

Page 55: ...hm HDTV DVD 1080p 1080i 720p 50Hz 60Hz 576p 50Hz 480p 60Hz 576i 50Hz 480i 60Hz Output Signal DisplayPort DisplayPort Connector Digital RGB DisplayPort Complies with Standard V1 2 applicable to HDCP V1...

Page 56: ...MI HDMI HDMI Yes Yes Yes Yes No No Yes Yes Yes Yes Yes Yes Yes Yes Yes Yes Yes Yes Yes Yes Yes Yes Yes Yes Yes Yes VGA VGA D Sub D Sub Yes Yes Yes Yes Yes Yes No No No No Yes Yes Yes Yes Yes Yes Yes Y...

Page 57: ...Energy Saving mode is activated The monitor enters a single Energy Saving mode Mode Power consumption LED colour Normal Operation 1 2 Approx 120 W X464UN Approx 120 W X464UNS 2 Approx 90 W X464UNV 3...

Reviews: