background image

English−34

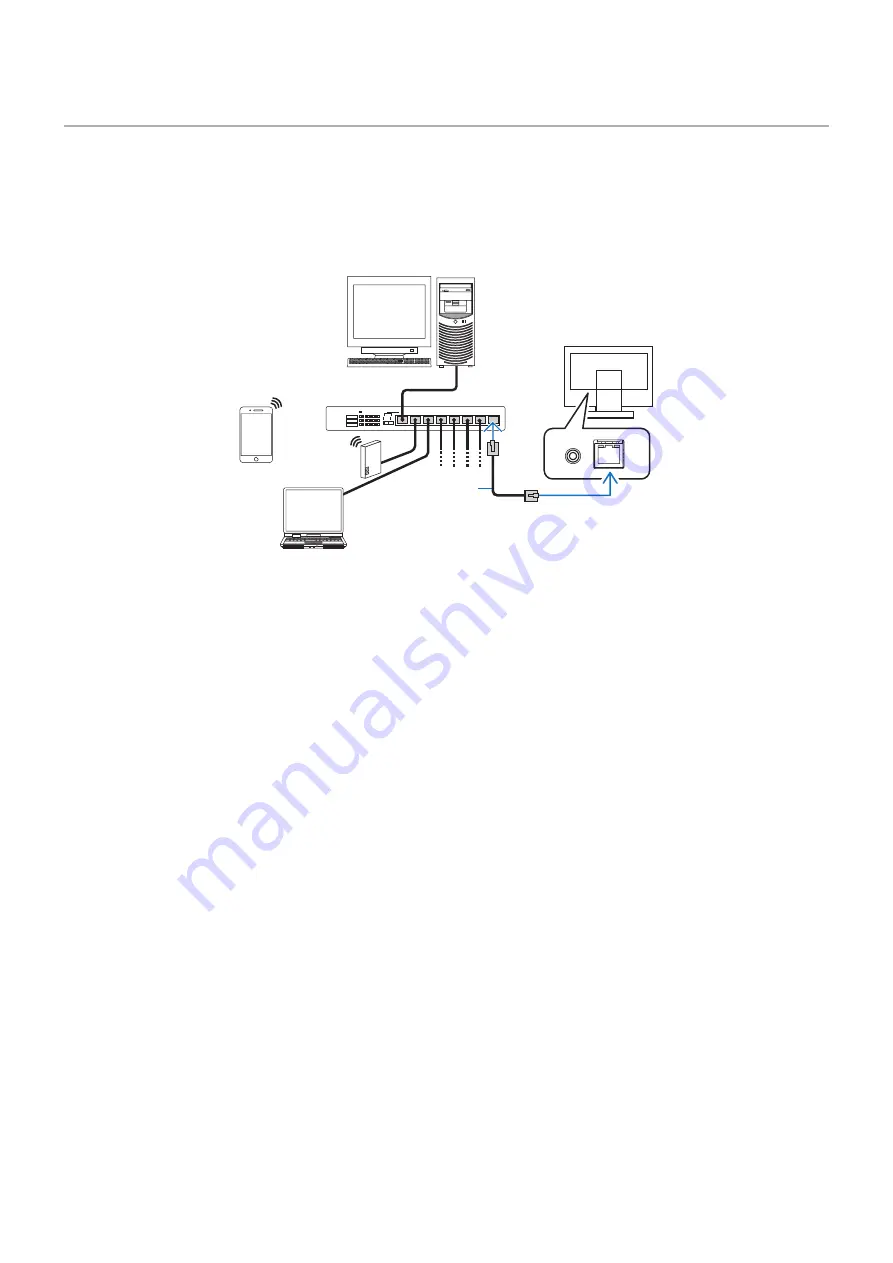
Controlling the monitor via LA

LAN Control Function

Provides control of the monitor settings over the network, via a custom application or a web browser on a connected computer 
or smartphone.

Example of a LAN connection:

Server

Hub

OTEE:

Use a category 5 or higher LAN cable.

LAN cable  

(not supplied)

Preparation Before Use

Connect the monitor to the network by using a commercially available LAN cable. Set the IP address (see 

page 52

).

Using Control Software

Control software allows you to control the monitor settings and get the monitor status, including calibration information.

Please download the software from our web page and install it on your computer.

OSD control via web browser (HTTP server function)

You can switch the picture modes and video inputs via a web browser.

To access this function, enter the monitor’s URL in the web browser on a connected smartphone or computer. 

http://<the monitor’s IP address>/index.html

You can control the OSD menu using the web browser instead of the touch keys on the monitor. By using the [Hot key] setting in 
the OSD, you can customize the functions.

Summary of Contents for MultiSync PA311D

Page 1: ...Desktop Monitor MultiSync PA311D User s Manual MODEL PA311D BK The model name and serial number can be found in the label on the rear side of monitor ...

Page 2: ...n Display Controls 22 Changing the Input Picture mode Luminance and Volume 24 Power management function LED indicator patterns 25 Chapter 3 Advanced Operation Changing the Picture Mode and Preset 27 About the SpectraView engine picture modes 27 Running Stand alone calibration 29 Using the USB C port functions 31 Configuring Multi Picture Mode 33 Controlling the monitor via LAN 34 Import export and...

Page 3: ...icture 45 Video 48 Audio 49 USB 50 Multi Picture 51 System 52 Customize 53 Tools 54 Information 54 Appendix C Manufacturer s Recycling and Energy Information Disposing of your old NEC product 56 Energy Saving 56 WEEE Mark European Directive 2012 19 EU and amendments 56 ...

Page 4: ......

Page 5: ...een approved by and complies with the safety standards in the country of purchase This equipment is designed to be used in the condition of the power cord connected to the earth If the power cord is not connected to the earth it may cause electric shock Please make sure the power cord is earthed properly This symbol warns user that uninsulated voltage within the unit may have sufficient magnitude ...

Page 6: ...s and other countries Adobe and the Adobe logo are either registered trademarks or trademarks of Adobe Systems Incorporated in the United States and or other countries All other brands and product names are trademarks or registered trademarks of their respective owners NOTE 1 The contents of this user s manual may not be reprinted in part or whole without permission 2 The contents of this user s m...

Page 7: ...e harmful interference to radio or television reception which can be determined by turning the equipment off and on the user is encouraged to try to correct the interference by one or more of the following measures Reorient or relocate the receiving antenna Increase the separation between the equipment and receiver Connect the equipment into an outlet on a circuit different from that to which the ...

Page 8: ...itor s power then unplug the power cord from the power outlet Failure to do so could not only lead to fire or electric shock it could also result in vision impairment Contact your dealer for repairs Never try to repair the monitor on your own Doing so is dangerous To prevent damage to the monitor caused by tipping over due to earthquakes or other shocks make sure to install the monitor in a stable...

Page 9: ... molded plug having a black 5 A fuse installed for use with this monitor Do not disassemble the monitor Do not remove or open the monitor s cabinet Do not modify the monitor There are high voltage areas in the monitor Modifying the monitor could lead to a fire or electric shock Do not play with the plastic bag which covers the monitor Do not use this bag for any other purpose To avoid the danger o...

Page 10: ...f time always unplug the power cord from the power outlet Handle with care when transporting To safely transport and securely install the monitor please use as many people as necessary to be able to lift the monitor without causing personal injury or damage to the monitor To ensure the monitor s reliability please clean the ventilation holes at the rear side of the cabinet at least once a year to ...

Page 11: ... time should be avoided To alleviate image persistence turn off the monitor for as long as the previous image was displayed For example if an image was on the monitor for one hour and a residual image remains the monitor should be turned off for one hour to erase the image NOTE As with all personal display devices NEC DISPLAY SOLUTIONS recommends using a moving screen saver at regular intervals wh...

Page 12: ... or reference material directly in front of you to minimize turning your head while you are typing Blink often Eye exercise helps to reduce eye strain Please contact your ophthalmologist Get regular eye checkups To avoid eye fatigue adjust the brightness to a moderate setting Place a sheet of white paper next to the LCD screen for luminance reference Do not position the Contrast control to its max...

Page 13: ...vides a more consistent luminance and color across the screen by compensating for variations in luminance and color that are inherent to LCD panels Wide viewing angle technology Professional grade IPS In Plane Switching panel for viewing the monitor with minimal color shift Provides a 178 viewing angle of the screen from any direction for all orientations Minimal light leakage on dark tones when v...

Page 14: ...re modes or other functions can be assigned to the keys on the front bezel for easy access LED indicator see page 53 The color of the LED on the front bezel can be associated with different Picture Modes or video inputs for easy reference Area marker function see page 54 Shows a customizable on screen marker used to indicate different aspect ratios and safe areas in video production Display manage...

Page 15: ...English 11 English Chapter 1 Installation This Chapter Includes Parts Name and Functions on page 12 Connections on page 14 Setup on page 16 Flexible Arm Installation on page 19 ...

Page 16: ...pstream port2 This selection will reset when you change the input signal or turn off the monitor H Key8 Power Turns the monitor on and off The touch key on the screen can be customized 1 Picture mode menu Touch the Up Down keys to select Picture mode in Active picture 2 To avoid data loss before changing the USB upstream ports ensure that no USB storage devices are in use by the operating system o...

Page 17: ...ream Port Type B USB1 2 Connects with external equipment such as a computer NOTE Please use this port to control the monitor from connected external equipment E USB C IN Type C USB C Connects with USB Type C compliant external equipment such as a computer Please refer to Video Input Connections on page 14 for more information F DisplayPort IN DisplayPort1 2 DisplayPort signals input G HDMI IN HDMI...

Page 18: ...nect to a computer depends on the computer s display adapter The following table shows the typical factory preset signal timing for each connection type Some display cards may not be able to support the required resolution for proper image reproduction with the selected connection The monitor will show the proper image by automatically adjusting the factory preset timing signal Major supported tim...

Page 19: ...d computer is turned on sometimes an image is not displayed In this case please turn off the computer then turn it on again Connecting to a Computer with USB Type C When using USB C port for video audio please use SuperSpeed USB 10Gbps USB 3 1 Gen 2 cable with USB compliance logo Hi Speed USB USB 2 0 cable or charging cable doesn t support video audio transmission When using USB C port for video a...

Page 20: ...heet provided in the box The accessories included depends on the location where the monitor was shipped To connect the monitor to your system follow these instructions NOTE Make sure to read Recommended Use on page 4 before installation 1 Turn off the power to your computer 2 Height adjustment is locked by a lock switch Place a hand on top of the stand to push down to the lowest position Slide the...

Page 21: ...ase use a shielded signal cable Use of other cables and adapters may cause interference with radio and television reception CAUTION Do not bind the USB cable It may trap heat and cause a fire Do not connect headphones to the monitor while you are wearing them Depending on the volume level it may damage your ears and cause loss of hearing NOTE Adjustment of the volume control as well as the equaliz...

Page 22: ...alled the cables then slide the cable cover down 6 Connect the power cord to a power outlet NOTE Please refer to the Caution section of this manual for proper selection of the AC power cord see page 1 Please make sure that enough power is supplied to the monitor Please refer to Power Supply in the Chapter 5 Specifications on page 42 7 Turn on the monitor by touching the key and then turn on the co...

Page 23: ...CAUTION Flexible Arm Installation This monitor is designed for use with a flexible arm Contact NEC for more information Follow the instructions provided by the manufacturer of the display mount Remove the monitor stand before mounting CAUTION To meet the safety requirements the monitor must be mounted to an arm that supports the weight of the monitor See page 42 for details Remove the Monitor Stan...

Page 24: ...Tighten all screws recommended fasten torque 98 137 N cm Attaching the flexible arm should be done by two or more people if the monitor cannot be placed face down on a flat surface for installation When using the monitor in the portrait position it should be rotated clockwise so that the left side is moved to the top and the right side is moved to the bottom This will allow for proper ventilation ...

Page 25: ...hapter 2 Basic Operation This Chapter Includes Using the OSD On Screen Display Controls on page 22 Changing the Input Picture mode Luminance and Volume on page 24 Power management function LED indicator patterns on page 25 ...

Page 26: ...e keys functions and labels change based on which menu is opened Some functions may not be available depending on the model or optional equipment Menu Pic L Lumi Volume Mult P Input USB Power To access the OSD menu touch the Menu key Main Menu Icons Main Menu Item Sub Menu Information Adjustment Settings The keys guide and their functions change when the OSD menu is open Control Panel Touch the Do...

Page 27: ...nal format Audio Audio Select source adjust volume and enable audio delay USB USB Configure the USB hub and USB C settings MultiPic Multi Pic Enable and configure multi picture viewing System System Set the OSD language time position transparency rotation and configure power management human sensing network settings and perform a factory reset Custom Customize Configure the hot key functions and L...

Page 28: ... For HDCP Content HDCP is a system for preventing illegal copying of video data sent over a digital signal If you are unable to view material via the digital inputs this does not necessarily mean that the monitor is not functioning properly With the implementation of HDCP there may be cases in which certain content is protected by HDCP and might not be displayed due to the decision intention of th...

Page 29: ...r consumption Condition Normal operation Maximum brightness Blue Approx 84 W Normal operation Backlight is on Energy saving mode Amber Approx 10 W When meeting one of the conditions below the monitor has passed a certain amount of time with no video signal input A computer is connected to the USB upstream port Quick recovery is set to On Dark amber 2 W The monitor has passed a certain amount of ti...

Page 30: ...e Picture Mode and Preset on page 27 Running Stand alone calibration on page 29 Using the USB C port functions on page 31 Configuring Multi Picture Mode on page 33 Controlling the monitor via LAN on page 34 Import export and firmware update with USB storage device on page 36 ...

Page 31: ... processor engine integrated in the monitor It combines individual characterization and calibration of the monitor during production together with temperature and time monitoring to provide an unparalleled level of color control accuracy and stability The SVE provides the utmost in versatility from faster and more advanced color calibration to the ability to accurately emulate colorspaces such as ...

Page 32: ...he European Color Initiative DCI P3 Color setting for digital cinema Rec 709 Color setting for High definition television Rec 2100 HLG Color setting for HDR High Dynamic Range broadcasting Rec 2100 PQ Color setting for HDR High Dynamic Range digital cinema on disc and internet streaming High Bright Highest brightness setting Low Blue Reduces blue light emitted from the monitor Paper like color set...

Page 33: ... and White copy are not available NOTE Other color sensor models and types are not supported NOTE For best calibration results it is recommended the monitor be allowed to warm up for at least 30 minutes before starting the calibration or measurement process It is not necessary to recalibrate the other Picture modes in the monitor after performing the Self calibration Updating the monitor s interna...

Page 34: ... is indicated as an average color difference dE value Larger values mean there is a larger difference between the measurements and the internal reference If the dE value is higher than 3 0 Self Calibration is recommended to update the internal reference color data The Self Calibration function must have been previously performed before this function is available on the OSD menu White copy This fun...

Page 35: ...ctual status from the USB data setting To open the USB C settings menu 1 Touch the Menu key 2 Navigate to the USB menu then highlight the USB C settings function 3 Touch the key to highlight Power delivery limit 4 Touch the or keys to raise or lower the power limit 5 Touch the Exit key to save the change and exit the setting Video and audio function Please use a computer port with the DP Alt Mode ...

Page 36: ...B data setting on page 50 Compatibility See the cable type comparison chart on page 15 Information about the tested USB Type C devices and cables are on the NEC Display Solutions website For safety and reliability purposes it is highly recommended that only the tested cables be used ...

Page 37: ... the inputs viewed next to each other 6 Touch the Exit key to save the change and exit the setting PiP Picture in Picture settings 1 Navigate to Active Picture on the OSD Change the Active Picture to Picture2 The picture Position and Size functions are for configuring the settings of the sub picture window Picture2 They will remain disabled as long as Picture1 is the active picture 2 You can now a...

Page 38: ...g Control Software Control software allows you to control the monitor settings and get the monitor status including calibration information Please download the software from our web page and install it on your computer OSD control via web browser HTTP server function You can switch the picture modes and video inputs via a web browser To access this function enter the monitor s URL in the web brows...

Page 39: ...onitor may not respond if the buttons shown on the browser are repeatedly pressed in rapid intervals Should this happen wait a moment and repeat If you still can t get a response turn the monitor off and then back on The HTTP server function is confirmed on some major web browsers however it is not guaranteed to work with all web browsers If the HTTP server screen does not appear in the web browse...

Page 40: ...cture mode settings of the current active window All Picture modes Export all picture modes settings All monitor settings Export all OSD settings The export file name is automatically set to avoid duplication Import monitor settings Imports the exported setting file and overwrites the current OSD settings Only the OSD settings which are contained in the exported file are overwritten Please put the...

Page 41: ...uration menu 8 Use the Exit Up Down and keys to navigate the Hot key settings menu and select the option you want to assign to the selected hot key The functions you can assign to the hot keys include the following Picture mode This menu lets you assign a specific picture mode to the hot key such as sRGB or Low Blue Note that the number of picture modes you can choose from in this list depends on ...

Page 42: ...English 38 Chapter 4 Troubleshooting This Chapter Includes Screen Image and Video Signal Issues on page 39 Hardware Issues on page 40 Image Persistence on page 41 ...

Page 43: ...ormation about tested computers and USB Type C cables for connecting to the USB C port on the monitor The image is unstable unfocused or swimming is apparent The signal cable should be completely attached to the computer Check the monitor and your display card with respect to compatibility and recommended signal timings If text looks garbled change the video mode to non interlaced and use a 60 Hz ...

Page 44: ...ke sure the power cord is properly connected to the monitor and the wall and make sure the monitor s main power switch is on Increase LED brightness adjustment LED colors except for blue are blinking or glowing A certain failure might have occurred please contact your supplier If the monitor is powered off by the internal temperature being higher than the normal operating temperature the LED will ...

Page 45: ...cing the USB Type C cable Refer to the NEC Display Solutions website for the information of tested computers and USB Type C cables Set Power delivery limit to 15W Image Persistence Please be aware that LCD Technology may experience a phenomenon known as Image Persistence Image Persistence occurs when a residual or ghost image of a previous image remains visible on the screen Unlike CRT monitors th...

Page 46: ...5 inches 368 1 mm 14 5 inches 698 0 mm 27 5 inches USB Hub I F Port Load Current SuperSpeed USB USB 3 1 Gen 1 Upstream 3 incl 1 x USB C Port Downstream 3 Downstream Port 5V 0 9A Max USB C Port 65 W Max AUDIO AUDIO Input DisplayPort Connector HDMI Connector Digital Audio Digital Audio PCM 2ch 32 44 1 48 kHz 16 20 24bit PCM 2ch 32 44 1 48 kHz 16 20 24bit Headphone Output STEREO Mini Jack Headphone I...

Page 47: ...ection to the display The latest version of the MultiProfiler software is available on the NEC Display Solutions website NaViSet Administrator software This free software is an advanced and powerful network based control monitoring and asset management system for NEC display monitors and projectors The software is available for Microsoft Windows and macOS The latest version of the NaViSet Administ...

Page 48: ...st This Chapter Includes Picture on page 45 Video on page 48 Audio on page 49 USB on page 50 Multi Picture on page 51 System on page 52 Customize on page 53 Tools on page 54 Information on page 54 Default values can be provided on request ...

Page 49: ...ia and streaming videos Peak luminance value is adjustable Peak Lumi Sets the peak luminance value to display HDR ST2084 PQ luminance range A larger value will improve white saturation but the picture become darker When Auto is selected Luminance is used as the peak luminance setting DICOM DICOM GSDF Grayscale Standard Display Function is typically used for medical imaging Programmable A programma...

Page 50: ...Depending on the vision of the user including those with color vision deficiency there will be a variation in how the screen s color is seen and experienced A simulation is used to illustrate the view of those with a color vision deficiency It is not their actual view The simulation is a reproduction of those with a strong color vision mode of type P type D or type T People with a slight color vis...

Page 51: ...ambient light Uniformity This function improves color reproduction and evens out the non uniformity in luminance and color of the monitor Select between 1 and 5 uniformity options NOTE A higher number produces a better effect but may also affect power consumption and lifetime of the monitor ECO mode Decreases the amount of power consumed by reducing the brightness level Off The ECO mode function i...

Page 52: ...e s overscan setting and automatically set either On Off Sharpness Adjusts the crispness of the image Video range Adjusts the gradation range to be displayed according to the video signal to improve the whiteout and blackout of the image Auto This option attempts to detect the source s video signal range and automatically set either Full or Limited Full This option shows the input signal s gray le...

Page 53: ... DDC CI Turns on or off the two way communication and control of the monitor via the video cable Advanced signal settings DisplayPort version DP1 DP2 USB C Selects the DisplayPort version 1 1a or 1 2 1 2 is the recommended setting If there are compatibility problems please try using 1 1a HDMI mode HDMI1 HDMI2 Selects the HDMI mode from Mode1 or Mode2 Mode2 is the recommended setting If there are c...

Page 54: ...en 1 Type B USB2 USB 3 1 Gen 1 Type B USB C Type C DP2 USB C HDMI1 HDMI2 USB C settings Power delivery limit Selects the maximum supplied power for a connected computer Normally use the 65W setting but if power charging does not start or is unstable try the 15W settings The selection of 15W or 65W sets the maximum power wattage that can be supplied to a connected computer Depending on the type of ...

Page 55: ...limitation when picture number is set to 4 In the selection of DP1 DP2 USB C you can set two inputs only e g You can set DP2 USB C HDMI1 HDMI2 You cannot set DP1 DP2 USB C HDMI Active picture Selects a target picture for OSD operations NOTE Active frame is the white frame shown around the currently selected Active Picture area when the OSD menu is open All OSD settings you set are applied to the a...

Page 56: ...llows you to choose what the Backlight and Volume conditions will be after no person has been detected for a period of time Sensor setting Adjusts the threshold level of human sensing The current threshold is shown to the right of the adjustment slider To adjust the sensor s distance threshold use the key to move the slider left or right Detects a person within about 1 5 m from the monitor Start t...

Page 57: ...re modes Number of Picture modes Limits the number of selectable Picture modes Select 1 if you want to prevent the picture mode from being changed LED indicator LED brightness Controls the brightness of the LED on the front bezel of the monitor LED color Selects the color of the LED on the front bezel from Blue Green or Custom Custom1 Change LED color along with the selected Picture mode Custom2 C...

Page 58: ...anually make sure it is a unique address and there is no duplicate on the network Information Info Menu Monitor information Shows the model name serial number input signal and audio information for your monitor SpectraView engine status Shows the status of internal sensors and the calibration information for your monitor USB information Shows the USB hub and USB C data setting System information S...

Page 59: ... NEC DISPLAY SOLUTIONS is strongly committed to environmental protection and sees recycling as one of the company s top priorities in trying to minimize the burden placed on the environment We are engaged in developing environmentally friendly products and always strive to help define and comply with the latest independent standards from agencies such as ISO International Organisation for Standard...

Page 60: ...x html Global For Energy Saving information Default setting Quick recovery Off For ErP requirement For ErP Network standby requirement Setting Quick recovery Off Power consumption 2 W or less Dark amber Time for power management function Approx 1 min Except for a condition that the monitor has plural signal inputs Power consumption 0 5 W or less slowly pulsating Time for power management function ...

Reviews: