background image

English-15

English

Advanced OSD Controls without video input

If no video signal is available, the display enters the power save mode and the OSD cannot be displayed. 
In this case, please follow the procedure below.

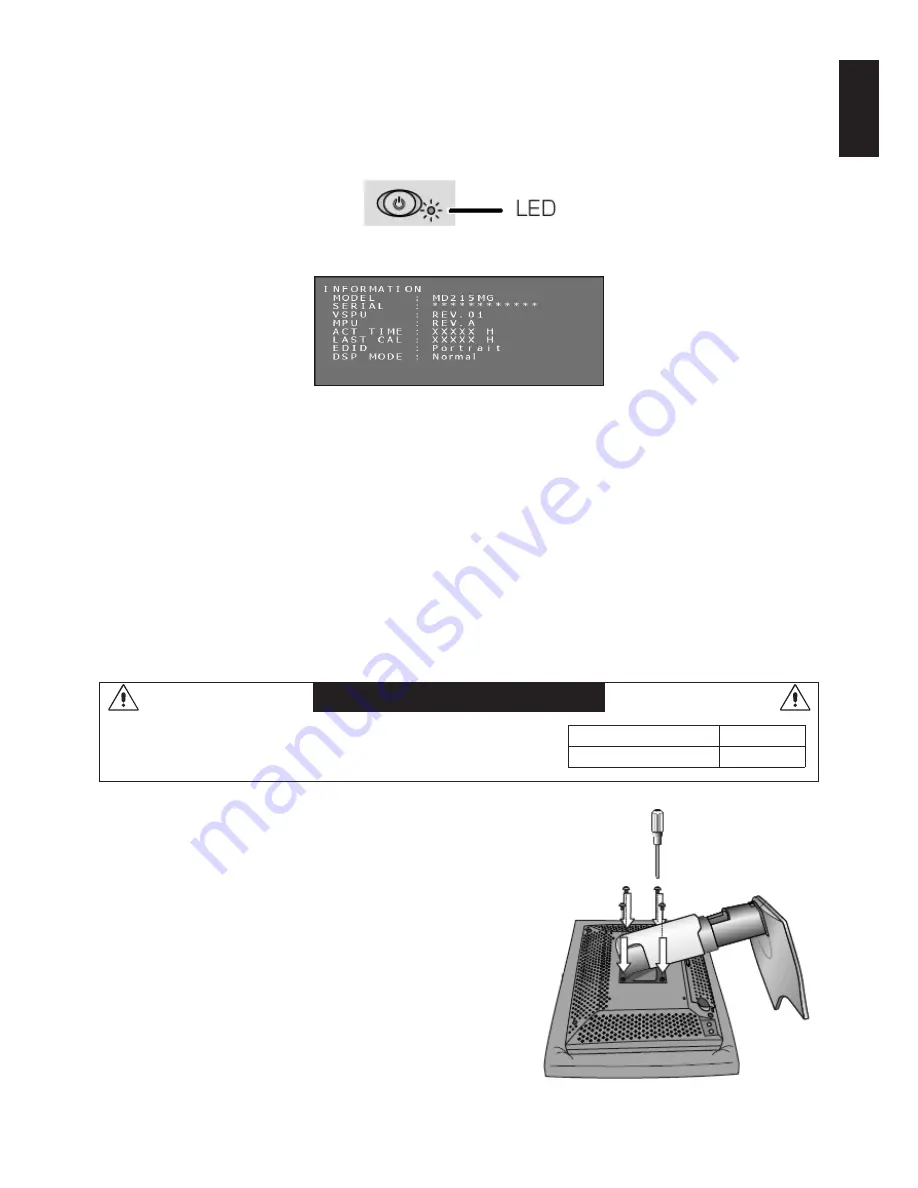
1.  Confi rm that the display is in power save mode and the LED next to the power switch is lit orange. If the LED is off, please 

push the power switch to turn on the monitor.

2.  Hold down the (+) plus button and the (-) minus button simultaneously for over 2 seconds.

The “INFORMATION” OSD menu opens on the screen. The LED color changes from Orange to Green.

3.  Switch EDID, Display Mode or Confi guration referring to this manual.


How to Change the EDID settings (see page 12)


How to Change the Display Mode (see page 13)


How to Change Confi guration (see page 14)

4.  If the display enters the power save mode during the change process, please start from the beginning again.

Attaching a wall mount or multi-display mounting arm

The tilt and swivel stand, as shipped with the display, is interchangeable with commercially available wall mounts or multi-display 
mounting arms that:

• 

Come with a mount plate with 4 slotted screw holes at 100 mm x 100 mm and

• 

Can bear the total weight of the LCD panel (without the stand) and the cables connected to it.

For more information ask your mounting arm supplier.

Note:

 Use the original screws to use the LCD panel back on its original tilt stand.

Choose the screw size carefully according to the mount plate thickness.
If the screws are too long, they could damage the internal parts. If they are 
too short, the connection becomes loose and the display could fall out.

Mounting plate thickness

Screw size

1.5-4.0mm

ISO M4x16

CAUTION

How to attach wall mounts or multi-display mounting arms

1.  Place a soft cloth or cushioning material over a stable even surface.

2.  Put the display face down on the soft cloth or cushioning material.

3.  Remove 4 screws and detach the tilt and swivel stand shipped with the display.

4.  Attach the wall mount or multi-display mounting arm according to the 

manufacturer’s instructions.

Summary of Contents for MultiSync MD215MG-S5

Page 1: ...MD215MG...

Page 2: ...and or registered trademarks of Microsoft Corporation in the United States and or other countries VESA is a trademark of the Video Electronics Standard Association All other products and company name...

Page 3: ...English...

Page 4: ...erts the user that important literature concerning the operation and maintenance of this unit has been included Therefore it should be read carefully in order to avoid any problems Protective earth te...

Page 5: ...e equipment off and on the user is encouraged to try to correct the interference by one or more of the following measures Reorient or relocate the receiving antenna Increase the separation between the...

Page 6: ...DE REFER SERVICING TO QUALIFIED SERVICE PERSONNEL CAUTION Power Cord Important Information CAUTION Please use the power cord provided with this display in accordance with the table below If a power co...

Page 7: ...wer to the unit please disconnect the power cord from the AC outlet Do not open the back cover or AC adapter No user serviceable parts inside Refer servicing to qualified service personnel The AC outl...

Page 8: ...service personnel under the following conditions If the monitor is used in this condition the monitor may cause fall fire and electric shock If the monitor stand has been cracked or peeled If the moni...

Page 9: ...directly in front of you to minimize turning your head Avoid displaying fixed patterns on the monitor for long periods of time to avoid image persistence after image effects Get regular eye checkups...

Page 10: ...le 1 AC adapter MW122 Power Cord 2 Quick Reference Guide USB Cable Remember to save your original box and packing material to transport or ship the monitor 1 Dual link DVI cable 2 Type and number of p...

Page 11: ...gnal cable to the connector of the display controller in your system Figure A Tighten all screws Figure A 3 Remove the cable cover Figure B To remove the cable cover unlock the slide latch 1 on the ca...

Page 12: ...lled the cables NOTE Handle with care when raising lowering rotating or tilting the monitor screen 8 Connect the AC adapter with the proper AC cord then plug the AC cord to the power outlet NOTE Pleas...

Page 13: ...process 5 plus Button To open the OSD On Screen Display 1st click Display information 2nd click Present operating state 3rd click OSD off otherwise OSD disappears in 15 sec 6 minus Button Same as plus...

Page 14: ...l Power saved Approx 90W w supplied AC adapter Less than 10W w supplied AC adapter Dimensions weight Net W x H x D Packed 390 x 487 8 584 x 227 6 mm W x H x D Portrait approx 11 1 kg 475 x 705 x 345 m...

Page 15: ...e of a customized driver for the display controller Make sure that a customized driver is available for your specific display controller model For the availability of a packed pixel driver please cont...

Page 16: ...Click the plus button or minus button on the back side of the monitor once to display the INFORMATION OSD A display which is similar to this picture opens on the screen 2 Hold down the plus button and...

Page 17: ...rator Manual 1 Click the plus button or minus button on the back side of the monitor twice to display the PRESENT STATE OSD A display like this picture opens on the screen 2 Hold down the plus button...

Page 18: ...m The tilt and swivel stand as shipped with the display is interchangeable with commercially available wall mounts or multi display mounting arms that Come with a mount plate with 4 slotted screw hole...

Page 19: ...ay is equipped with the security slot supported by MicroSaver Security Lock System by Kensington Technology Group The MicroSaver locks are available at PC supply stores Note Kensington is the register...

Page 20: ...s http www nec display solutions com in Europe http www nec display com in Japan or http www necdisplay com in USA Energy Saving This monitor features an advanced energy saving capability Mode Power c...

Page 21: ...8 0023 Japan NEC Display Solutions of America 500 Park Blvd Suite 1100 Itasca Illinois 60143 USA Phone 630 467 3000 Fax 630 467 3010 NEC Display Solutions Europe GmbH Landshuter Allee 12 14 D 80637 Mu...

Reviews: