background image

English-7

English

8. The Vacation Switch on the left side of the monitor must be turned on

(Figure H.1). Turn on the monitor with the Power Button and the
computer.

NOTE:

The Vacation Switch is a true on/off switch. If this switch is on
the OFF position, the monitor cannot be turned on using the
front button DO NOT switch on/off repeatedly.

9. No-touch auto adjust automatically adjusts the monitor to optimal

settings upon initial setup for most timings. For further adjustments,
use the following OSM controls:

• Auto Adjust Contrast

• Auto Adjust

Refer to the Controls section of this User’s Manual for a full description
of these OSM controls.

NOTE:

If you have any problems, please refer to the Troubleshooting
section of this User’s Manual.

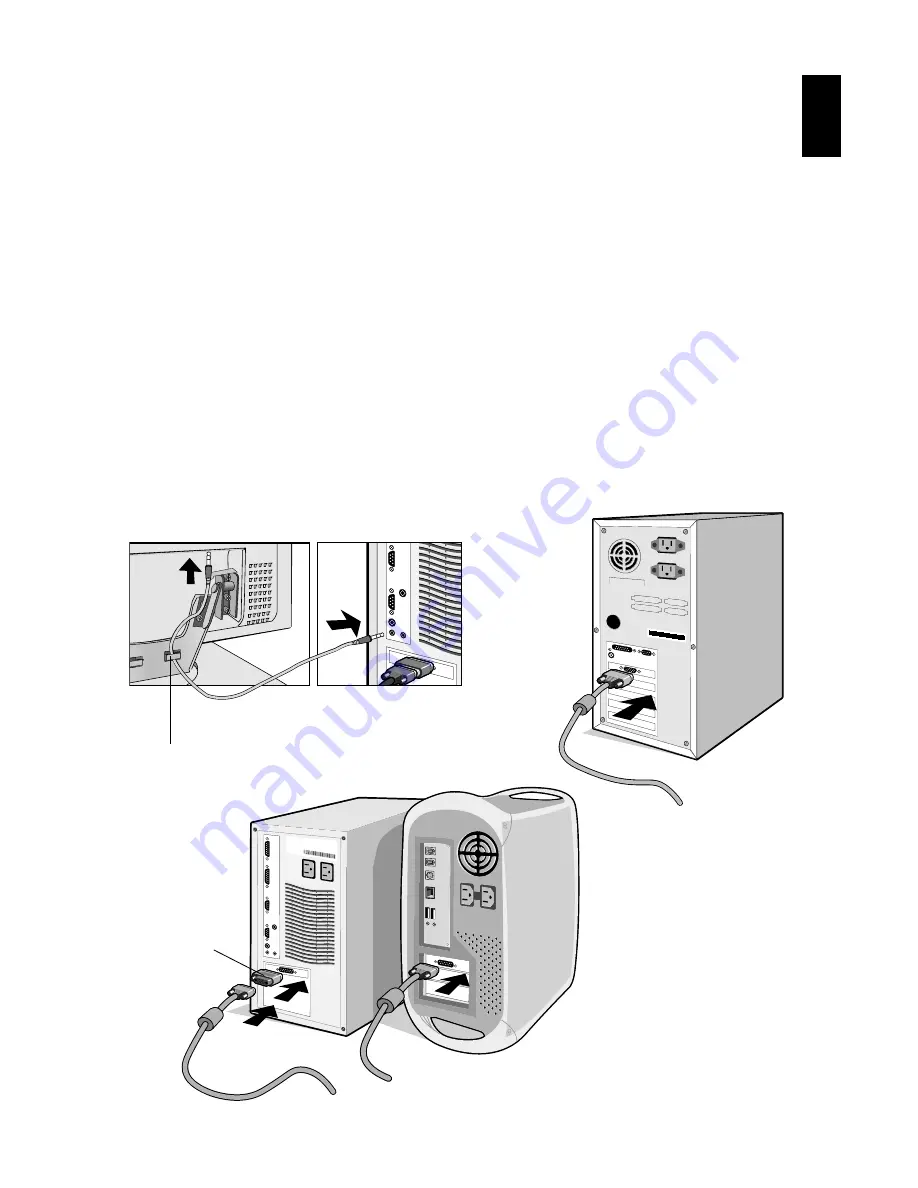
Figure C.1

Macintosh
Cable
Adapter
(not included)

Macintosh G3
and G4 do not
need a
Macintosh cable
adapter

Figure B.1

Figure A.1

Clip B

Summary of Contents for MultiSync LCD1550M LCD1550M LCD1550M

Page 1: ...MultiSync LCD1550M User s Manual...

Page 2: ...C power source in Europe use the power cord provided with the monitor In the UK a BS approved power cord with a moulded plug has a Black five Amps fuse installed for use with this equipment If a power...

Page 3: ...15R03 BK is in compliance with Council Directive 73 23 EEC EN 60950 Council Directive 89 336 EEC EN 55022 EN 61000 3 2 EN 61000 3 3 EN 55024 and marked with NEC Mitsubishi Electric Visual Systems Corp...

Page 4: ...ations according to CSA C22 2 950 Ce produit porte la marque C UL et se conforme aux r glements de s rele Canadiens selon CAN CSA C22 2 No 950 FCC Information 1 Use the attached specified cables with...

Page 5: ...to which the receiver is connected Consult your dealer or an experienced radio TV technician for help If necessary the user should contact the dealer or an experienced radio television technician for...

Page 6: ...nitor with tilt swivel base Power Cord s Video Signal Cable Audio Cable USB Cable User s Manual CD ROM includes complete User s Manual in PDF format To see the User s Manual Acrobat Reader 4 0 must be...

Page 7: ...the back of the monitor Figure D 1 Place the Video Signal Cable under Clip B 5 Headphones may be connected to the Headphones output on the front of the monitor s bezel marked Figure E 1 While the hea...

Page 8: ...ly 9 No touch auto adjust automatically adjusts the monitor to optimal settings upon initial setup for most timings For further adjustments use the following OSM controls Auto Adjust Contrast Auto Adj...

Page 9: ...English 8 Figure E 1 Figure D 1 Figure F 1 Figure G 1 Connector cover Cable cover Clip B A Type B Type...

Page 10: ...onitor face down on a non abrasive surface Figure R 2 4 Remove the 4 screws connecting the monitor to the stand and lift off the stand assembly Figure R 2 the monitor is now ready for mounting in an a...

Page 11: ...English 10 Figure R 1 Figure R 2 Figure TS 1 Non abrasive surface...

Page 12: ...ust be mounted to an arm which guaranties the necessary stability under consideration of the weight of the monitor The LCD monitor shall only be used with an approved arm e g GS mark Figure R 3 4 SCRE...

Page 13: ...the adjustment Activates Auto Adjust function Enter the sub menu Moves the highlighted area of main menu right to select one of the controls Resets the highlighted control to the factory setting When...

Page 14: ...he LCD H SIZE Adjusts the horizontal size by increasing or decreasing this setting FINE Improves focus clarity and image stability by increasing or decreasing this setting Colour Control Systems Six c...

Page 15: ...left right down or up OSM TURN OFF The OSM control menu will stay on as long as it is use In the OSM Turn Off submenu you can select how long the monitor waits after the last touch of a button to shu...

Page 16: ...gnal present After power is turned on or when there is a change of input signal or video is inactive the No Signal window will appear RESOLUTION NOTIFIER This function gives a warning of use with opti...

Page 17: ...rt stand or table as the monitor may fall causing serious damage to the monitor Do not place any objects onto the monitor and do not use the monitor outdoors The inside of the flourescent tube located...

Page 18: ...level Your eyes should look slightly downward when viewing the middle of the screen Position your monitor no closer than 40 cm and no further away than 70 cm from your eyes The optimal distance is 53...

Page 19: ...o realize the maximum ergonomics benefits we recommend the following Use the preset Size and Position controls with standard signals Use the preset Colour Setting Use non interlaced signals with a ver...

Page 20: ...s Separate sync TTL Level Horizontal sync Positive Negative Vertical sync Positive Negative Notes Active matrix thin film transistor TFT liquid crystal display LCD 0 30 mm dot pitch 300cd m2 white lum...

Page 21: ...technologies when displaying non native resolutions full screen In flat panel technologies each dot on the screen is actually one pixel so to expand resolutions to full screen an interpolation of the...

Page 22: ...automatically adjusts the monitor to optimal settings upon initial setup ErgoDesign Features Enhance human ergonomics to improve the working environment protect the health of the user and save money E...

Page 23: ...tions significantly expanding image size VESA Standard Mounting Interface Allows users to connect their MultiSync monitor to any VESA standard 75 mm pitch third party mounting arm or bracket Allows fo...

Page 24: ...tor for bent or pushed in pins Power Button does not respond Unplug the power cord of the monitor from the AC outlet to turn off and reset the monitor Check the Vacation Switch on the left hand side o...

Page 25: ...UT OF RANGE is displayed on a blank screen Signal frequency is out of range Choose one of the supported modes LED on monitor is not lit no green or amber colour can be seen Power Switch should be in t...

Page 26: ...if speaker cable is properly connected Check to see if mute is activated Check to see if volume in OSM is set at minimum USB Hub does not operate Check to make sure the USB cord is properly connected...

Page 27: ...y of electronics equipment to be recycled in a satisfactory way most of these potentially damaging substances sooner or later enter Nature There are also other characteristics of a computer such as en...

Page 28: ...ergonomics and good usability Environmental Requirements Flame retardants Flame retardants are present in printed circuit boards cables wires casings and housings In turn they delay the spread of fir...

Page 29: ...freons CFCs freons are sometimes used for washing printed circuit boards CFCs break down ozone and thereby damage the ozone layer in the stratosphere causing increased reception on Earth of ultraviole...

Page 30: ...entially damaging substances sooner or later enter Nature There are also other characteristics of a computer such as energy consumption levels that are important from the viewpoints of both the work I...

Page 31: ...skyddsforeningen The Swedish Society for Nature Conservation and NUTEK The National Board for Industrial and Technical Development in Sweden Environmental Requirements Brominated flame retardants Brom...

Page 32: ...ept the back light system CFCs freons CFCs freons are sometimes used for washing printed circuit boards and in the manufacturing of expanded foam for packaging CFCs break down ozone and thereby damage...

Reviews: