background image

English−20

Signal type and terminal connection

Video Input Connections

•  HDMI – High definition digital video and audio signal connection to a computer, streaming media player, Blu-ray player, 

game console, etc. 

•  DisplayPort – High definition digital video and audio signal connection to a computer.
•  USB-C – Supports DisplayPort input of high-definition digital video and audio signal (DisplayPort Alt Mode on USB Type-C 

only) connection to a computer.
OOTEN

This monitor does not support other USB Type-C Alt Modes such as MHL and HDMI. This port is not for use with 

USB devices such as mouse, keyboards, or storage media. 

Depending on the computer, you may need to manually set the computer’s audio to output through the DisplayPort, HDMI, or 

USB-C connection. Please refer to the computer’s user manual.
The type of video connections that can be used to connect to a computer depends on the computer’s display adapter. 
The following table shows the typical factory preset signal timing for each connection type. Some display cards may not be able 

to support the required resolution for proper image reproduction with the selected connection. The monitor will show the proper 

image by automatically adjusting the factory preset timing signal. 
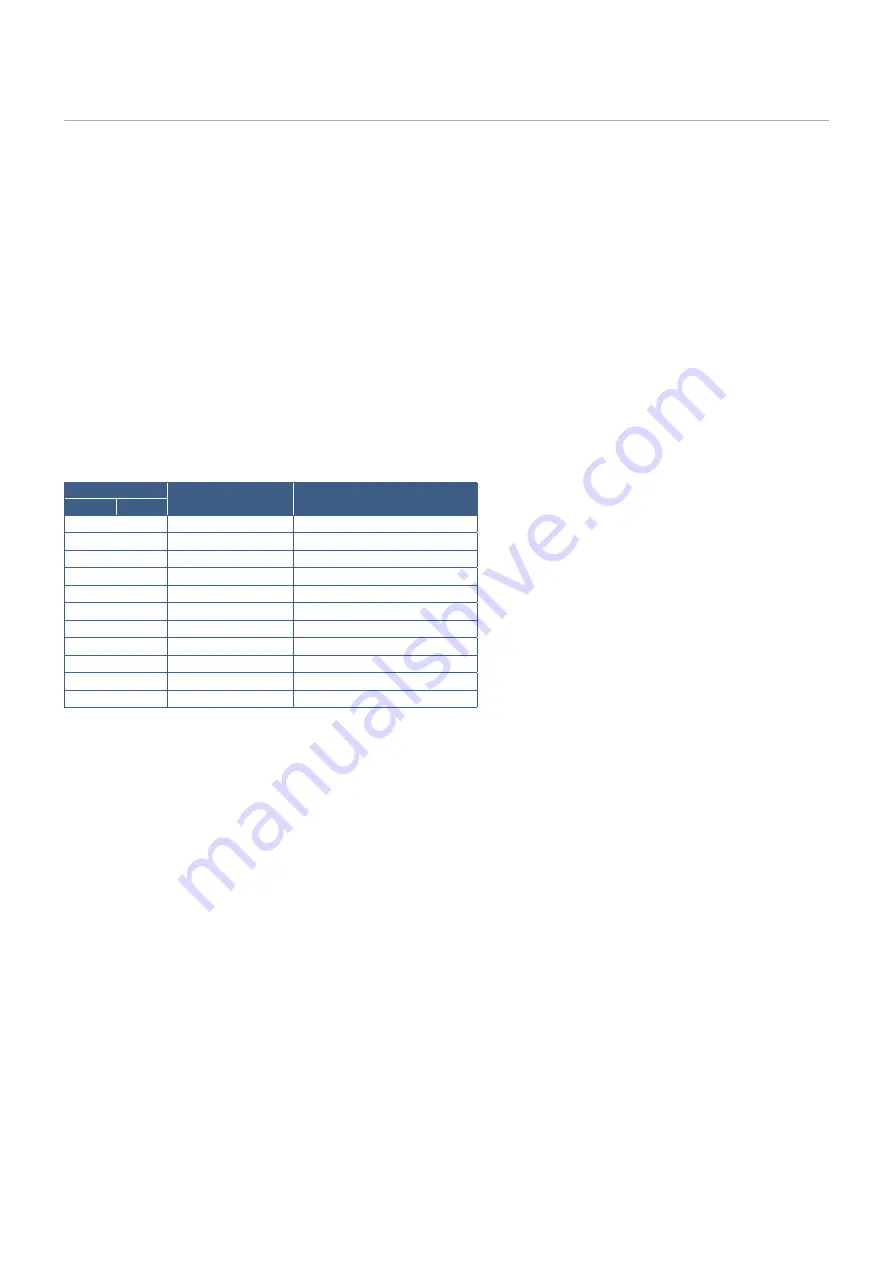
<Major supported timings>

Resolution

Vertical Frequency

Ootes

H

V

640

x

480 60 Hz

720

x

480 60 Hz

720

x

576 50 Hz

800

x

600 56/60 Hz

SVGA

1024 x

768 60 Hz

XGA

1280 x

720 50/60 Hz

720p

1280 x

960 60 Hz

1280 x 1024 60 Hz

SXGA

1440 x

900 60 Hz

1680 x 1050 60 Hz
1920 x 1080 50/60 Hz

1080p, Recommended (60 Hz)
Interlace signal is not supported.

OOTEN:  

When the selected monitor resolution is not a native panel resolution, the text contents appearance in the monitor 

screen is expanded in a horizontal or vertical direction to show the non-native resolution to full screen. This expansion 

is done by interpolated resolution technologies, which are normal and widely used in flat panel devices.

Connecting to a Computer with HDMI

•  Please use an HDMI cable with the HDMI logo. 
•  It may take a moment for the signal to appear after turning on the computer.
•  Some display cards or drivers may not display an image correctly.
•  If the monitor’s power is turned on after a connected computer is turned on, sometimes an image is not displayed. In this 

case, please turn off the computer then turn it on again.

Summary of Contents for MultiSync E224FL

Page 1: ...4FL MultiSync E244FL MultiSync E274FL MODEL E224FL E224FL BK E244FL E244FL BK E274FL E274FL BK The regulations for this monitor applied to one of model names listed above Please find your model name o...

Page 2: ...nitor Stand for Mounting 23 Mount the Flexible Arm 23 Re attaching the Original Stand 24 Chapter 2 Basic Operation Using the OSD On Screen Display Controls 26 Changing the Input 27 Power management fu...

Page 3: ...erence will not occur in a particular installation If this equipment does cause harmful interference to radio or television reception which can be determined by turning the equipment off and on the us...

Page 4: ...ntended primary use of this product is as an Information Technical Equipment in an office or domestic environment The product is intended to be connected to a computer and is not intended for the disp...

Page 5: ...cates a mandatory action This symbol indicates that the power cord should be unplugged from the power outlet WARNING 1 UNPLUG THE POWER CORD Unplug the power cord if the product malfunctions Should th...

Page 6: ...orresponds to the AC voltage of the power outlet and has been approved by and complies with the safety standards in the country of purchase 7 REQUIRED PROHIBITED Please install the product in accordan...

Page 7: ...ct set ALWAYS use furnitures that can safely support the product ALWAYS ensure the product is not overhanging the edge of the supporting furniture ALWAYS educate children about the dangers of climbing...

Page 8: ...electric shock or start a fire 12 PROHIBITED Do not use flammable gas sprays to remove dust when cleaning the product Doing so could lead to a fire 13 PROHIBITED Usage of the product must not be accom...

Page 9: ...ected to the wall outlet directly and earthed properly Do not use a 2 pin plug converter adapter 2 REQUIRED Please confirm the distribution system in building installation shall provide the circuit br...

Page 10: ...it may damage your ears and cause loss of hearing 12 PROHIBITED Do not play with the plastic bag which covers the product Do not use this bag for any other purpose To avoid the danger of suffocation...

Page 11: ...gonomics benefits we recommend the following For optimum performance of the monitor allow 20 minutes for warming up Avoid reproduction of still patterns on the monitor for long periods of time to avoi...

Page 12: ...ive cloth Avoid using any cleaning solution or glass cleaner Please do not rub the LCD Screen with hard or coarse material Please do not apply pressure to the LCD Screen surface Please do not use OA c...

Page 13: ...vides for industry leading low power consumption and less hazardous materials Enhance human ergonomics to improve the working environment The ergonomic features include a fully articulating monitor st...

Page 14: ...English 12 Chapter 1 Installation and Connections This Chapter Includes Parts Name and Functions on page 13 Installation on page 16 Connections on page 17 Flexible Arm Installation on page 23...

Page 15: ...seconds Turns the monitor off LEFT RIGHT Opens the OSD menu RIGHT Enters sub menus or adjustment settings in the OSD menu when the OSD menu is open LEFT Exits the OSD sub menus adjustment settings and...

Page 16: ...Type A Connects with USB devices 4 USB C Port Connects with USB Type C compliant external equipment such as a computer Charges a connected USB device USB Power Delivery See Specifications page NOTE S...

Page 17: ...he monitor to a fixed object with an optional security cable Please follow the security cable supplier s recommended instructions to install NOTE A security cable purchased separately is designed as a...

Page 18: ...stand then tighten the screw at the base s bottom Figure 2 NOTE Reverse this procedure if you need to re pack the monitor WARNING Please refer to WARNING 8 Connect the power cord and signal cables Pl...

Page 19: ...ift up to the highest position Figure 3 CAUTION Please refer to CAUTION 6 Maximum Tilt Up 25 Down 5 Figure 3 2 Connect devices to the monitor Turn off the power to your computer DisplayPort Power cord...

Page 20: ...se the ear headphones output voltage and therefore the sound pressure level Incorrect cable connections may result in irregular operation damage display quality components of the LCD module and or sho...

Page 21: ...ease refer to the Caution section of this manual for proper selection of the AC power cord see page 9 Please make sure that enough power is supplied to the monitor Please refer to Power Supply in the...

Page 22: ...resolution for proper image reproduction with the selected connection The monitor will show the proper image by automatically adjusting the factory preset timing signal Major supported timings Resolut...

Page 23: ...o audio please use a computer port that supports the DP Alt Mode HDMI Alt Mode or MHL is not supported When using computer battery charging Power delivery please use a computer and cable that support...

Page 24: ...he OSD Menu option USB Functionality to On Please set the OSD Menu option USB LAN to On After connecting a LAN cable to the monitor make sure the LED on the side of the LAN port lights up This monitor...

Page 25: ...the monitor stand before mounting WARNING Please refer to WARNING 8 See the Specifications on page 32 for details Remove the Monitor Stand for Mounting NOTE Handle with care when removing the monitor...

Page 26: ...ng the Original Stand Reverse the process in the previous section to re attach stand NOTE Match TOP SIDE mark on stand to top side of the monitor when re attaching stand TOP SIDE mark Please match top...

Page 27: ...ish 25 English Chapter 2 Basic Operation This Chapter Includes Using the OSD On Screen Display Controls on page 26 Changing the Input on page 27 Power management function LED indicator patterns on pag...

Page 28: ...the DOWN or UP keys to make adjustments or selections 1 UP key 2 DOWN key 3 RIGHT key 4 LEFT key Adjustment Settings Sub menu Main Menu Selected Main Menu name Below is a brief summary of where contro...

Page 29: ...HDCP video content is generally commercially produced Blu rays and DVDs television broadcast and streaming media services Power management function LED indicator patterns The power management functio...

Page 30: ...English 28 Chapter 3 Troubleshooting This Chapter Includes Screen Image and Video Signal Issues on page 29 Hardware Issues on page 30...

Page 31: ...e connected computer s port complies with DisplayPort Alt Mode When using a USB C cable for connecting a computer to the monitor check that the USB C cable complies with SuperSpeed USB Image Persisten...

Page 32: ...o see if headphones are connected if not using headphones The USB Hub does not operate Check to make sure that the USB cable is properly connected Refer to your USB device User s Manual Check that the...

Page 33: ...a LAN cable to the monitor Please refer to the Terminal Panel see page 14 for information about the LAN port s LEDs states Check if USB Functionality is set to Auto or On Check if USB LAN is set to O...

Page 34: ...English 32 Chapter 4 Specifications This Chapter Includes E224FL on page 33 E244FL on page 34 E274FL on page 35...

Page 35: ...ort Downstream 2 Downstream Port DC 5 V 0 9 A Max USB C Port 60 W DC 20 V 3 A Max LAN RJ 45 10 BASE T 100 BASE TX 1000 BASE T AUDIO AUDIO Input DisplayPort Connector USB C Port DisplayPort Alt Mode HD...

Page 36: ...am 2 Downstream Port DC 5 V 0 9 A Max USB C Port 60 W DC 20 V 3 A Max LAN RJ 45 10 BASE T 100 BASE TX 1000 BASE T AUDIO AUDIO Input DisplayPort Connector USB C Port DisplayPort Alt Mode HDMI Connector...

Page 37: ...SuperSpeed USB 5Gbps Upstream 1 USB C Port Downstream 2 Downstream Port DC 5 V 0 9 A Max USB C Port 60 W DC 20 V 3 A Max LAN RJ 45 10 BASE T 100 BASE TX 1000 BASE T AUDIO AUDIO Input DisplayPort Conn...

Page 38: ...ntrols List This Chapter Includes Luminance on page 37 Image Setup on page 37 Color Setup on page 37 OSD Setup on page 37 System Setup on page 38 Extra on page 38 OSD Warning on page 38 Default values...

Page 39: ...color settings suitable for various situations NOTE The individual Red Green and Blue values can only be adjusted for the USER preset sRGB sRGB dramatically improves the color fidelity in the desktop...

Page 40: ...rt set this On Please refer to LAN connection see page 22 FACTORY PRESET Resets all OSD control settings back to the default settings except Language Extra Extra Menu Input Select Selects the input si...

Page 41: ...page 40 We are strongly committed to environmental protection and sees recycling as one of the company s top priorities in trying to minimize the burden placed on the environment We are engaged in de...

Page 42: ...mode is activated The monitor enters a single Energy Saving mode For additional information visit https www sharpnecdisplays us in USA https www sharpnecdisplays eu p hq en home xhtml in Europe https...

Reviews: