background image

English-10

Menu

Detects the level of ambient lighting allowing the monitor to make adjustments to various settings
resulting in a more comfortable viewing experience. Do not cover this sensor.

Open OSD main menu.
Exits the OSD controls.
Exits to the OSD main menu.

Moves the highlighted area left/right to select control menus.
Moves the bar left/right to increase or decrease the adjustment.
Direct adjust of BRIGHTNESS if HOT KEY is set to ON.
Enters the OSD menu if HOT KEY is set to OFF.

Moves the highlighted area down/up to select one of the controls.
Direct adjust of CONTRAST if HOT KEY is set to ON.
Enters the OSD menu if HOT KEY is set to OFF.

Enter the OSD sub menu. Active the selected function.
Change the Input source (No OSD condition).

Resets the highlighted control menu to the factory setting. Switches the ECO MODE (No OSD
condition).
Activates Auto Adjust function if pushed for 3 seconds (No OSD condition and Analog input only).

Turns the monitor on and off.
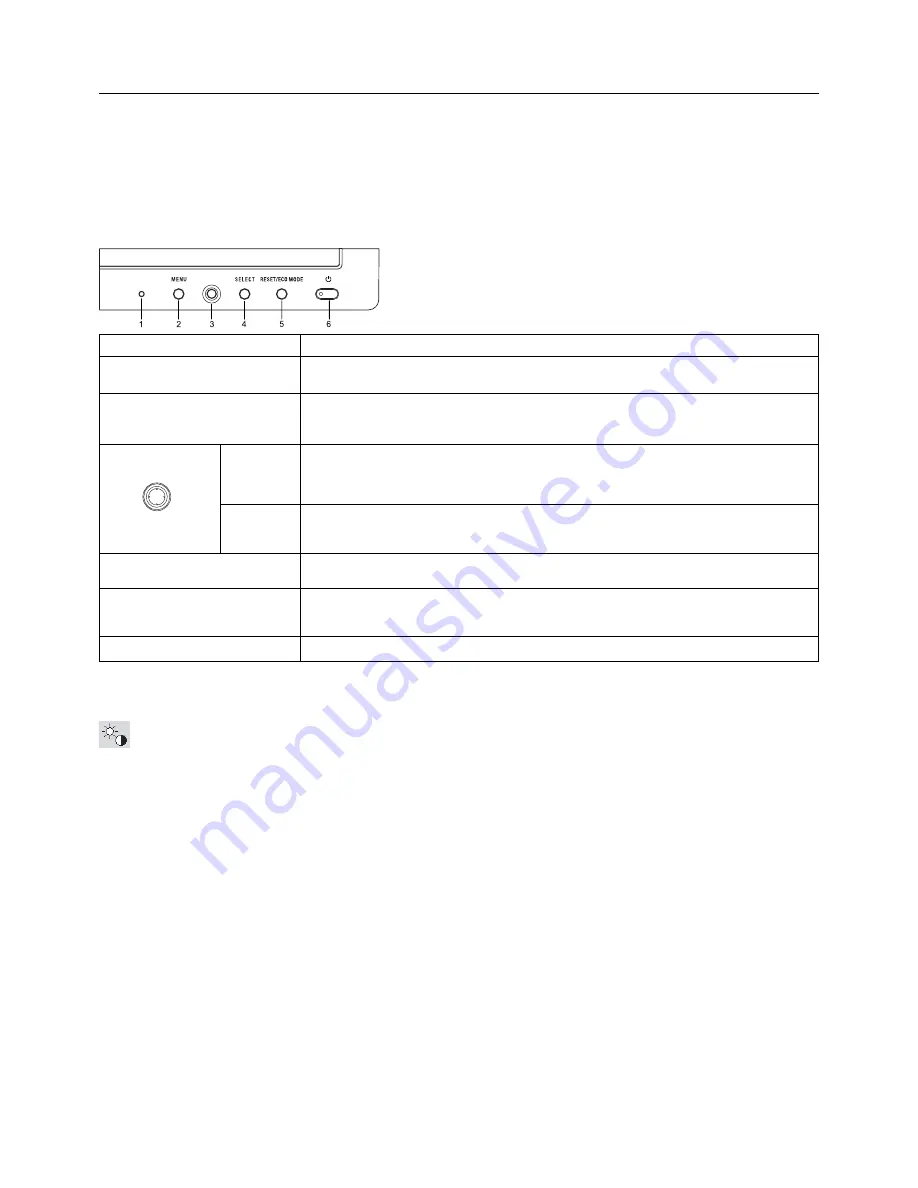
Button

1 Ambibright Sensor

2 MENU

3 4-Direction-Key

Left/Right

Down/Up

4  SELECT

5 RESET/ECO MODE

6 Power

Controls

OSD (On-Screen Display) control buttons on the front of the monitor function
as follows:

To access OSD menu, press any of the control buttons (MENU, Left, Right, Down, Up).
To change signal input, press the SELECT button.
To change ECO MODE, press the RESET/ECO MODE button.

NOTE:

OSD must be closed in order to change signal input.

NOTE:

When 

RESET

 is pressed in the main and sub-menu, a warning window will appear allowing you to cancel the

RESET

 function by pressing the MENU button.

Brightness/Contrast Controls

BRIGHTNESS

Adjusts the overall image and background screen brightness.
If ECO MODE is set to 1 or 2, a bar for CARBON FOOTPRINT will appear.

CONTRAST

Adjusts the image brightness in relation to the background.

AUTO CONTRAST (Analog input only)

Adjusts the image displayed to optimal settings.

ECO MODE

Decreases the power consumption by reducing the brightness level.

OFF: 

Sets brightness variable from 0% to 100%.

(ECO MODE) 1: 

Sets brightness variable range from 0% to 80%.

This setting can adjust brightness to a range in which power is reduced to meet Energy Star measurement
conditions.

(ECO MODE) 2: 

Sets brightness variable range from 0% to 40%.

This setting can adjust brightness to a range in which power is reduced by 40% compared to the maximum
brightness setting.
When this function is set to ON, a CARBON FOOTPRINT bar will appear alongside the brightness adjustment bar.

NOTE:

This function is disabled when DV mode is set for Dynamic.

Up

Down

Right

Left

Summary of Contents for MULTISYNC E201W

Page 1: ...MultiSync E201W User s Manual...

Page 2: ...use English 3 Contents English 5 Quick Start English 6 Controls English 10 Specifications English 14 Features English 15 Troubleshooting English 16 Using the Auto Brightness function English 17 TCO Di...

Page 3: ...ERVICING TO QUALIFIED SERVICE PERSONNEL Declaration of the Manufacturer We hereby certify that the colour monitor MultiSync E201W L200NX is in compliance with Council Directive 2006 95 EC EN 60950 1 C...

Page 4: ...dealer or an experienced radio TV technician for help If necessary the user should contact the dealer or an experienced radio television technician for additional suggestions The user may find the fo...

Page 5: ...outlet and refer servicing to qualified service personnel under the following conditions When the power supply cord or plug is damaged If liquid has been spilled or objects have fallen into the monito...

Page 6: ...image persistence after image effects Get regular eye checkups Ergonomics To realize the maximum ergonomics benefits we recommend the following Adjust the Brightness until the background raster disapp...

Page 7: ...al Cable 15 pin mini D SUB male to 15 pin mini D SUB male Video Signal Cable DVI D to DVI D Setup Manual Power Cord Type of power cord included will depend on the where the LCD monitor is to be shippe...

Page 8: ...computer then attach the 15 pin mini D SUB signal cable to the Macintosh cable adapter Figure A 3 Tighten all screws For the PC with DisplayPort output Connect the DisplayPort cable to the connector...

Page 9: ...r screen Figure TS 1 6 Connect the power cord to the power outlet Figure C 1 NOTE Please refer to Caution section of this manual for proper selection of AC power cord 7 Turn on the monitor with the fr...

Page 10: ...Rotation Before rotating the screen must be raised to the highest level to avoid knocking the screen on the desk or pinching with your fingers To raise the screen with one hand grip the top of the di...

Page 11: ...al attach the arm to the monitor Figure F 1 NOTE 1 When mounting use ONLY the screws 4 pcs that were removed from the stand to avoid damage to the monitor or stand 2 The LCD monitor should only be use...

Page 12: ...lows To access OSD menu press any of the control buttons MENU Left Right Down Up To change signal input press the SELECT button To change ECO MODE press the RESET ECO MODE button NOTE OSD must be clos...

Page 13: ...omatically adjusts the Image Position Horizontal Size and Fine settings Image Controls Analog input only LEFT RIGHT Controls Horizontal Image Position within the display area of the LCD DOWN UP Contro...

Page 14: ...u will stay on as long as it is in use In the OSD Turn Off submenu you can select how long the monitor waits after the last touch of a button to shut off the OSD control menu OSD LOCK OUT This control...

Page 15: ...y setting to Euro icon from US dollar icon using the Left or Right key in Current setting item 4 Select Currency Convert Setting item using the Up or Down key 5 Adjust Currency Convert Setting item us...

Page 16: ...SOLUTIONS cites recommended 1600 x 900 60 Hz resolution for optimal display performance Active Landscape Horiz 442 8 mm 17 4 inches Display Area Vert 249 1 mm 9 8 inches Portrait Horiz 249 1 mm 9 8 i...

Page 17: ...litates setup and installation by allowing the monitor to send its capabilities such as screen size and resolutions supported directly to your computer automatically optimizing display performance IPM...

Page 18: ...blank or shows rough images only Image is displayed only roughly pixels are missing and OSD warning OUT OF RANGE is displayed Either signal clock or resolution is too high Choose one of the supported...

Page 19: ...level Figure 2 2 Set the DARK level This is the level of brightness that the monitor will go down to when the ambient light level is low Make sure the room is at its darkest when setting this level Th...

Page 20: ...dards at an impartial laboratory Electric and magnetic fields emissions as low as normal household background levels Low acoustic noise emissions Some of the Environmental features of the TCO Certifie...

Page 21: ...nec display com in Japan or http www necdisplay com in USA Energy Saving This monitor features an advanced energy saving capability When a VESA Display Power Management Signalling DPMS Standard signal...

Reviews: