background image

E–23

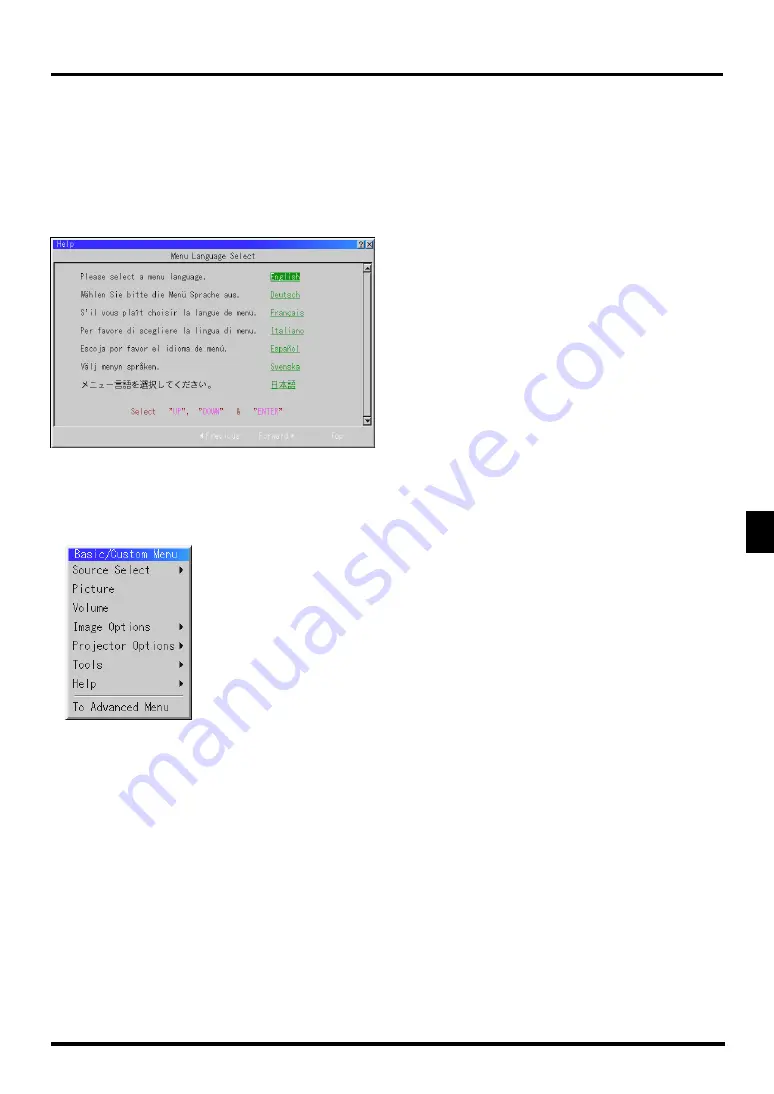
About Startup screen 

(Menu Language Select screen)

When you first turn on the projector, you will get the Startup screen.
This screen gives you the opportunity to select one of the seven menu
languages: English, German, French, Itilan, Spanish,Swedish and
Japanese.

To select a menu language, follow these steps:
1. Use the Select 

  or 

  button to select one of the seven lan-

guages for the menu.

2. Press the Enter button to execute the selection.

3. The Basic/Custom menu will be displayed in the language you

have selected.

To close the menu, press the Cancel button.

After this has been done, you can proceed to the advanced menu
operation.
If you want, you can select the menu language later. See “Language”
on page E-36.

Summary of Contents for LT150Z - MultiSync XGA DLP Projector

Page 1: ...Micro Portable Projector LT150Z User s Manual English Deutsch Français Italiano Español Svenska ...

Page 2: ...sion does not allow any modifications or changes to the unit EX CEPT those specified by NEC Technologies in this manual Failure to comply with this government regu lation could void your right to operate this equipment This equipment has been tested and found to com ply with the limits for a Class B digital device pursu ant to Part 15 of the FCC Rules These limits are designed to provide reasonabl...

Page 3: ...allation must be in accor dance with any local building codes d Please consult your dealer for more information Power Supply 1 The projector is designed to operate on a power supply of 100 120 or 200 240V 50 60 Hz AC Ensure that your power supply fits this requirement before attempting to use your projector 2 Handle the power cable carefully and avoid excessive bend ing A damaged cord can cause el...

Page 4: ...revent the build up of heat inside your projector Allow at least 3 inches 10 cm of space between your projector and a wall 2 Prevent foreign objects such as paper clips and bits of pa per from falling into your projector Do not attempt to re trieve any objects that might fall into your projector Do not insert any metal objects such as a wire or screwdriver into your projector If something should f...

Page 5: ...e Balance E 36 Projector Options E 36 Menu E 36 Menu Mode E 36 Advanced Menu Basic Custom Menu Language E 36 Projector Pointer E 37 Menu Display Time E 37 Message Source Display No Input E 37 Direct Button Volume Bar Keystone Bar E 37 Setup E 37 Orientation E 37 Cinema Position E 37 Background E 37 Mouse Settings E 38 PC Card Viewer Options E 38 Show Folder List E 38 Auto Play E 38 Auto Play Inter...

Page 6: ...tal frequency range of 15 to 100 kHz and a vertical frequency range of 50 to 120 Hz This includes NTSC PAL PAL N PAL M PAL60 SECAM and NTSC4 43 standard video signals NOTE Composite video standards are as follows NTSC U S TV standard for video in U S and Canada PAL TV standard used in Western Europe PAL N TV standard used in Argentine Paraguay and Uruguay PAL M TV standard used in Brazil PAL60 TV ...

Page 7: ...al box and packing materials if you ever need to ship your LT150Z Projector Lens cap Projector String and rivet Remote control Power cable RGB signal cable Q u i c k C o n n e c t G u i d e U s e r s M a n u a l PJ FO CUS ZO OM VO L SH IFT HELP POINTER KEYSTONE MAGNIFY FREEZE PIC MUTE O F F V ID E O A U T O A D J S V ID E O R G B 1 R G B 2 L A S E R P O W E R O N PC CARD SLIDE FOLDER SLIDE LIST SE...

Page 8: ...ls Zoom Ring Adjustable Tilt Foot Button Remote Sensor Ventilation inlet Adjustable Tilt Foot Lens Lens Cap Attaching the lens cap to the bottom with the supplied string and rivet Front Side Features 1 Thread the string through the hole on the lens cap and then tie a knot in the string 2 Use the rivet to attach the string to the bottom of the projector Attaching the lens cap Focus Ring ...

Page 9: ...tally position Terminals and PC card Ventilation inlet Bottom Lamp cover Lamp cover screw Ventilation inlet Rear Foot Rear Foot Spacer black rubber NOTE The projector has an internal temperature sensor The sensor controls the speed of the fan to keep constant tem perature in the inside When the internal temperature rises the built in fan automati cally runs at a high speed high speed mode During t...

Page 10: ...hange as follows RGB Video S Video PC Card Viewer If no input signal is present the input will be skipped 5 Auto Adjust Button RGB only Use this button to adjust Position H V and Pixel Clock Phase for an optimal picture Some signals may not be displayed correctly or take time to switch between sources 6 PC Card Access Indicator Lights while accessing a CompactFlash memory card 7 Enter Button Execu...

Page 11: ...rojector via a serial cable This enables you to use your PC and serial communi cation protocol to control the projector The NEC optional serial cable is required to use this port Also PC Control Utility 1 0 in cluded in the supplied CD ROM must be installed on your PC If you are writing your own program typical PC control codes are on page E 56 A cap is put on the port at the factory Remove the ca...

Page 12: ... item you wish to adjust Use these buttons to change the level of a selected menu item A press of the button executes the selection When the pointer is displayed these buttons move the pointer 15 ENTER Left Click Button When you are in the Computer mode this button works as the mouse left button When this button is pressed and held for a minimum of 1 5 seconds the drag mode is set When you are in ...

Page 13: ... When the image is magnified the pointer is changed to the magnify ing icon 25 FREEZE Button This button will freeze a picture Press again to resume motion 26 PICTURE MUTE Button This button turns off the image and sound for a short period of time Press again to restore the image and sound NOTE When the menu is displayed a press of this button mutes an image and sound without turning off the menu ...

Page 14: ...mediately Avoid excessive heat and humidity If you will not be using the remote control for a long time re move the batteries Do not place the batteries upside down Do not look into the laser pointer while it is on Do not point the laser beam at a person 30 7m 7m 30 30 30 Setting the function switch ON OFF There are two switches on the bottom of the battery case an appli cable projector selector s...

Page 15: ...hange your computer settings When connecting using the USB terminal For PC the mouse receiver can only be used with a Windows 98 Windows ME or Windows 2000 operating system NOTE Wait at least 5 seconds after disconnecting the mouse receiver before reconnecting it and vice versa The computer may not identify the mouse receiver if it is repeatedly connected and disconnected in rapid intervals When u...

Page 16: ...When the PJ button is lit if you want to use the mouse function immediately press the PJ button to return to the Computer mode not lit Works as the Select button on the projector MENU ENTER CANCE L PJ FOCUS ZOOM OFF VIDEO AUTO ADJ S VIDEO RGB1 RGB2 LASER ON VOLUME SHIFT HELP POINTER KEYSTONE MAGNIFY FREEZE PIC MUTE PC CARD SLIDE FOLDER SLIDE LIST SELECT POWER MENU ENTER CANCE L FOCUS ZOOM OFF VIDE...

Page 17: ... size the image can be is approximately 30 0 8 m measured diagonally when the projector is roughly 4 feet 1 3 m from the wall or screen The largest the image can be is 200 5 1 m when the projector is about 29 feet 8 8 m from the wall or screen Screen and Projection Distance The following shows the proper relative positions of the projector and screen Refer to the table to determine the position of...

Page 18: ...0 40 60 67 72 80 84 90 100 120 150 180 200 mm 762 1016 1524 1702 1829 2032 2134 2286 2540 3048 3810 4572 5080 inch 24 32 48 54 58 64 67 72 80 96 120 144 160 mm 610 813 1219 1361 1463 1626 1707 1829 2032 2438 3048 3658 4064 inch 18 24 36 40 43 48 50 54 60 72 90 108 120 mm 457 610 914 1021 1097 1219 1280 1372 1524 1829 2286 2743 3048 inch 12 16 24 27 29 32 34 36 40 48 60 72 80 mm 307 409 613 685 736...

Page 19: ...ress the POWER button again to resume NOTE If using video S video or audio cables the cables should be 3 m 9 8 feet or shorter Optional 15 pin to RCA female 3 cable ADP CV1 To connect SCART output RGB Before connections An exclusive SCART adapter ADP SC1 and a commercially available SCART cable are required for this connection NOTE Audio signal is not available for this connection 1 Turn off the p...

Page 20: ...r IBM VGA or Compatibles Notebook type or Macintosh Notebook type RGB signal cable supplied To mini D Sub 15 pin connector on the projector It is rec ommended that you use a commercially available distri bution amplifier if connecting a signal cable longer than the supplied one IBM VGA or Compatibles Desktop type Audio cable not supplied Connecting your PC or Macintosh computer to your LT150Z proj...

Page 21: ... a commercially available component video cable RCA 3 and the optional 15 pin to RCA female 3 cable to connect your DVD player to the RGB INPUT connector on the projector For a DVD player without component video Y Cb Cr outputs use common RCA cables not provided to connect a composite VIDEO output of the DVD player to the Video Input of the projector 3 Turn on the projector and DVD player NOTE Ref...

Page 22: ...ctor Use an audio cable not supplied to connect the audio from your VCR or laser disc player to your audio equipment if your VCR or laser disc player has this capability Be careful to keep your right and left channel connections correct for stereo sound 3 Turn on the projector and the VCR or laser disc player NOTE Refer to your VCR or laser disc player owner s manual for more information about you...

Page 23: ...nd Japanese To select a menu language follow these steps 1 Use the Select or button to select one of the seven lan guages for the menu 2 Press the Enter button to execute the selection 3 The Basic Custom menu will be displayed in the language you have selected To close the menu press the Cancel button After this has been done you can proceed to the advanced menu operation If you want you can selec...

Page 24: ...power indicator will glow orange After the projector turns off the cooling fans keep operating for 90 seconds NOTE Do not disconnect the power cable during this time Then unplug the power cable The power indicator will go out Power button MENU ENTER CANCE L OFF VIDEO AUTO ADJ S VIDEO RGB1 RGB2 LASER ON SELECT POWER POWER POWER ON STAND BY POWER Status of indicator light turn on Status of indicator...

Page 25: ...iewer NOTE If no input signal is available the projector will display a blue back ground factory preset Adjusting the Image Size and the Focus Use the Zoom ring to fine adjust the image size on the screen Use the Focus ring to obtain the best focus Place your projector on a flat level surface and Ensure that the projector is square to the screen Lift the front edge of the projector to center the i...

Page 26: ...t remove the spacer black rubber and rotate the rear foot to the desired height If the projected image does not appear square to the screen then use keystone correction for proper adjustment M E N U E N T E R C A N C E L S E LE C T AU TO AD JU ST PC C AR D AC C ES S ST AT U S PO W ER O N S TA N D BY SO U R C E 4 4 3 up down Adjusting the Image Using Auto Adjust TheAutoAdjust function automatically...

Page 27: ...ary when you connect your computer for the first time NOTE The Auto Adjust function does not work for component signal Each time the Source button is pressed the input source will change as follows RGB Video S Video PC Card Viewer If no input signal is present the input will be skipped Turning off picture and sound Press the Picture Mute button to turn off the image and sound for a short period of...

Page 28: ...ton Correcting Keystone distortion Press or to correct keystone trapezoidal distortion to make the top or bottom of the screen longer or shorter so that the projected image is rectangular Freezing a picture Press the Freeze button to freeze a picture Press again to resume motion Keystone distortion Normal NOTE The keystone angle can be corrected between 30 degrees upward and 30 degrees downward at...

Page 29: ...require ments Selecting a menu item from the Basic Custom Menu Edit list allows you to custom tailor the menu items to your needs 1 Select Basic Custom Menu Edit to display the Basic Custom Menu Edit screen 2 Use the Select buttons or to highlight your selection and press the Enter button to place a check mark next to an option This action enables that feature Press the Enter button again to clear...

Page 30: ...use button on the slide bar horizontally to adjust it To save the adjustments click The display is closed If you click anywhere in the background while displaying ad justment and setting menu or dialog box you will get the main menu at the clicking point An item To Advanced Menu will be added to the bottom of the Basic Cus tom Menu Selecting this item and pressing the En ter button will display th...

Page 31: ...p Front Ceiling Rear Desktop Rear Ceiling Front Cinema Position Top Center Bottom Page 2 PC Card Viewer Options Show Folder List Auto Play Manual Play Interval 5 300 sec Capture Options High Quality Normal High Compression Page 3 Signal Select RGB Auto RGB Component Scart Video Auto NTSC3 58 NTSC4 43 PAL PAL M PAL N PAL60 SECAM S Video Auto NTSC3 58 NTSC4 43 PAL PAL M PAL N PAL60 SECAM Page 4 Auto...

Page 32: ...e square box to turn the option On Slide bar Indicates settings or the direction of adjustment OK button Press to confirm your setting You will return to the previous menu Cancel button Press to cancel your setting You will return to the previous menu Close button Click to close the window with saving changes USB mouse only Help button Indicates that help about that feature is available USB mouse ...

Page 33: ...s slide or folder Next Advances to the next slide or folder Play Plays back automatically or manually depending on the setting on PC Card Viewer Options of the menu This allows you to move on to the next slide when Manual Play is selected Stop Stops Auto Play while you are playing back and to resume play ing from the selected slide or folder when Auto Play is se lected Jump Displays a list of slid...

Page 34: ...al distortion NOTE The keystone angle can be corrected between 30 degrees upward and 30 degrees downward at a 0 degree projection angle Depending on the type of graphics being used the picture may get blurred or keystone correction may not be possible when excessive keystone correction is used The idea is the closer you are to native resolution the better image you will see Lamp Mode Image Options...

Page 35: ... items in the Projector Options can be reset only when All Data is selected Noise Reduction not available for RGB and PC Card Viewer You can select three levels video noise reduction NOTE The lower the Noise Reduction level the better the image quality by way of higher video bandwidth Position Clock when Auto Adjust is off This allows you to manually adjust the image horizontally and verti cally a...

Page 36: ...ttons to select R G or B for the brightness and the contrast Next use the or buttons to adjust the level White Balance not available for PC Card Viewer Menu Allows you to set preferences for the on screen menu Press OK to save your changes for all the features of Page 1 and Page 2 Page1 Menu Mode This feature allows you to select two menu modes Advanced Menu and Basic Custom Menu Advanced Menu Thi...

Page 37: ... Orientation This reorients your image for your type of projection The options are desktop front projection ceiling rear projection desktop rear projection and ceiling front projection Cinema Position This feature selects the vertical position of the image when viewing video with Cinema aspect ratio selected When Cinema aspect ratio is selected on earlier models the image is displayed with black b...

Page 38: ...ions for JPEG compression quality High quality Normal and High Compression High Quality Gives quality of JPEG a priority Normal Gives normal JPEG quality High Compression Gives compression a priority Page3 Signal Select RGB Allows you to choose RGB for an RGB source such as a com puter or Component for a component video source such as a DVD player Normally select Auto and the projector automatical...

Page 39: ...esets the lamp clock back to zero Pressing this button appears a confirmation dialog box To reset the lamp usage hour press OK NOTE The projector will turn off and go into standby mode after 1100 hours up to 1600 hours in Eco mode of service If this happens press the Help button on the remote control for ten seconds to reset the lamp clock back to zero Do this only after replacing the lamp Communi...

Page 40: ...ompactFlash card or damage to the card itself NOTE Captured images with higher resolution than the projector s native resolution cannot be displayed correctly Selecting Execute displays the file you selected When you select a JPEG or BMP file and press the Enter button on the remote or the cabinet or Execute on the above you will get a toolbar This toolbar is used to return to the PC Card Files sc...

Page 41: ...king Right clicking anywhere on the screen displays the ChalkBoard tool bar again Exit Clears the complete drawing and exits the ChalkBoard NOTE The ChalkBoard feature is available only when a USB mouse is used Free hand drawings cannot be saved or captured The menu is not available while you display the ChalkBoard screen The Capture and the Source Display function are not available on ChalkBoard ...

Page 42: ...eferred to as PowerPoint into indexes playable with PC Card Viewer Microsoft Windows and PowerPoint are registered trademarks of Microsoft Corporation Inserting and Ejecting a CompactFlash Card A CompactFlash card is used to view presentation data prepared on the computer and to capture and play images projected with the pro jector Eject button Inserting the CompactFlash Card Hold the CompactFlash...

Page 43: ... Viewer slides In this manual it is referred to as the PC Card Viewer software PC Card Viewer PPT Converter 1 0 This is an application that converts files created with Microsoft PowerPoint 97 2000 into indexes so that they can be played di rectly with the PC Card Viewer Utility 1 0 PC Card Viewer PPT Converter is installed automatically when you install the PC Card Viewer Utility To start PC Card ...

Page 44: ...cally or manually depending on the setting on PC Card Viewer Options of the menu This allows you to move on to the next slide when Manual Play is selected Stop This allows you to stop Auto Play while you are playing back and to resume playing from the se lected slide or folder when Auto Play is selected Jump Displays a list of slides while you are playing back Select Displays a list of folders whi...

Page 45: ... and moving pictures from a VCR etc it is possible to switch from a PC Card Viewer slide to the video picture then back to the PC Card Viewer slide simply by using a source button and PC CARD button NOTE Even if you switch the current PC Card Viewer source to an other source the current slide is retained When you return back to the PC Card Viewer you will get the slide that has been retained Folde...

Page 46: ...puter to repair the data NOTE The folder in the right bottom is always a folder exclusively for cap tured images To display the list of folders when there are 13 or more indexes stored on the CompactFlash card select Edit index from the PC Card Viewer software s File menu and move the index you want to display to within 12 indexes from the top of the folder index For details on indexes refer to th...

Page 47: ...ges Digital images can be played with the PC Card Viewer if the follow ing conditions are met If the image can be stored on an MS DOS format CompactFlash card If the image can be stored in a format supported by the PC Card Viewer With the PC Card Viewer images on the card are searched for in directories and images in JPEG or BMP format are recog nized as slides Searchable directories are directori...

Page 48: ... 2 1 PC cards are divided into three types according to their thickness Type I 3 3 mm Type II 5 0 mm and Type III 10 5 mm A type of image format The standard Windows Bit Map format used for MS DOS Windows compatible comput ers A type of image format JPEG is the abbreviation of Joint Photographic Experts Group JPEG compression offers efficient data storage The data not required for displaying the i...

Page 49: ...p 1 Loosen the lamp cover screw until the screwdriver goes into a freewheeling condition and remove the lamp cover The lamp cover screw is not removable 2 Loosen the three screws securing the lamp housing until the screw driver goes into a freewheeling condition The three screws are not removable 4 Insert a new lamp housing until the lamp housing is plugged into the socket A C IN PC CA RD US B AU ...

Page 50: ...ange Steady orange Steady orange Steady green Blinking orange No light in Normal mode Steady green in Eco mode Steady red Steady red Blinking red 1 sec interval Blinking red 4 sec interval Blinking red 8 sec interval Blinking red 12 sec interval Blinks green for 90 seconds The projector retries 3 times at an interval of 15 sec for max 45 sec Message appears on screen during 1000 1100 hours 1500 16...

Page 51: ...round the projector or if the room where you re presenting is particularly warm move the projector to a cooler location Use the menu to select your source Video S Video RGB or PC Card Viewer See page E 33 Ensure your cables are connected properly Use menus to adjust the brightness and contrast See page E 33 Remove the lens cap Reset the settings or adjustments to factory preset levels using the Fa...

Page 52: ... lines SECAM RGB 1024 dots horizontal 768 dots vertical Power Requirement 100 120 200 240 VAC 50 60 Hz Input Current 2 2 A 100 120 VAC 1 1A 200 240 VAC Mechanical Dimensions 9 6 W x 2 1 H x 7 7 D 243mm W x 53mm H x 196mm D not including protrusions Net Weight 3 3 lbs 1 5 kg Environmental Considerations Operational Temperatures 41 to 95 F 5 to 35 C 20 to 80 humidity Storage Temperatures 14 to 122 F...

Page 53: ...L SELECT AUTO ADJUST PC CARD ACCESS STATUS POWER AC IN PC CARD USB VIDEO S VIDEO RGB AUDIO PC CONTROL ON STAND BY SOURCE Cabinet Dimensions Unit mm inch Lens center Lens center 29 5 1 16 53 2 1 8 0 31 196 7 7 238 9 4 243 9 6 43 5 1 71 ...

Page 54: ... Red Cr 2 Green or Sync on Green Y 3 Blue Cb 4 Ground 5 Ground 6 Red Ground Cr Ground 7 Green Ground Y Ground 8 Blue Ground Cb Ground 9 No Connection 10 Sync Signal Ground 11 12 Bi directional DATA SDA 13 Horizontal Sync or Composite Sync 14 Vertical Sync 15 Data Clock Signal Level Video signal 0 7Vp p Analog Sync signal TTL level ...

Page 55: ...0 35 16 56 25 36 VESA 800 600 37 879 60 32 40 VESA 800 600 48 077 72 19 50 VESA 800 600 46 88 75 49 5 VESA 800 600 53 674 85 06 56 25 MAC 832 624 49 725 74 55 57 283 VESA 1024 768 35 5 43 Interlaced 44 9 VESA 1024 768 48 363 60 65 VESA 1024 768 57 476 70 07 75 MAC 1024 768 60 241 74 93 80 VESA 1024 768 60 023 75 03 78 75 VESA 1024 768 68 677 85 94 5 VESA 1152 864 67 5 75 108 MAC 1152 870 68 681 75...

Page 56: ...0H 12H PICTURE MUTE OFF 02H 11H 00H 00H 00H 13H SOUND MUTE ON 02H 12H 00H 00H 00H 14H SOUND MUTE OFF 02H 13H 00H 00H 00H 15H ON SCREEN MUTE ON 02H 14H 00H 00H 00H 16H ON SCREEN MUTE OFF 02H 15H 00H 00H 00H 17H NOTE Contact your local dealer for a full list of PC Control Codes if needed Cable Connection Communication Protocol Baud rate 38400 bps Data length 8 bits Parity No parity Stop bit One bit ...

Reviews: