


© NEC Display Solutions of America. All Rights Reserved, 2007
5
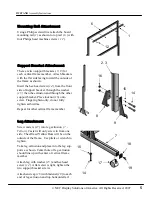
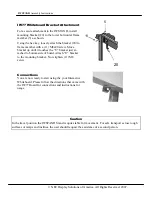
Support Bracket Attachment
There are two support brackets (
8, 9
)for
each vertical frame member. Attach brackets
with the flat side facing toward the outside of
the frame as shown.
Insert the hex head screw (
14
) from the front
side of support bracket, through the washer
(
15
) then the extrusion and through the other
support bracket. Place locknut (
16
)
onto
screw. Finger tighten only, do not fully
tighten at this time.
Repeat for other vertical frame member.
IWSTAND
Assembly Instructions
Mounting Rail Attachment
Using a Philips screwdriver attach the board
mounting rail (
1
) as shown to top rail (
6
) with
four Philips head machine screws (
12
).
Leg Attachment
Screw casters (
17
) into leg extrusion (
7 -
Yellow
). Caster will only screw in from one
side. The affixed Yellow Dots will be on the
outside of the frame. Use pliers or wrench to
tighten.
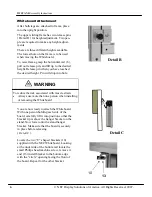
Take leg extrusion and place into the leg sup-
ports as shown. Center hole of leg extrusion
should line up with center of vertical frame
member.
Attach leg with washer (
15
) and hex head
screw (
14
). After screw is tight, tighten the
two support bracket screws.
Attach end cap (
18
)with fastener(
19
)to each
end of leg extrusion and top horizontal rail.
2, 3
8
9
16
14
7
18
19
17
15
14
1
6
12
15