


The
IWSTAND
is designed to hold the NEC
IW77
Interactive Whiteboard.
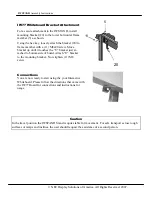
Before you attach your board to the
stand, please review these important instructions.
IWSTAND Assembly Instructions
© NEC Display Solutions of America. All Rights Reserved, 2007
3
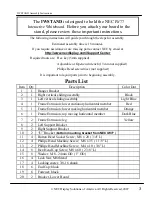
Parts List
Item
Qty
Description
Color Dot
1
1
Hanger Bracket
2
1
Right vertical sliding assembly
Black
3
1
Left vertical sliding assembly
Light Blue
4
1
Frame Extrusion; lower stationary horizontal member
Red
5
1
Frame Extrusion; lower moving horizontal member
Orange
6
1
Frame Extrusion; top moving horizontal member
Dark Blue
7
2
Frame Extrusion; leg
Yellow
8
2
Left Support Bracket
9
2
Right Support Bracket
10
2
“U” Bracket (
bottom mounting bracket from NEC IW77
)
11
4
Button Head Socket Screw; M8 x 20 ( 3/4" L)
12
4
Philips Head Machine Screw; M6 x 35 ( 1 1/8" L)
13
2 Philips Head Machine Screw; M4 x 10 ( 3/8" L)
14
8
Hex Head Cap Screw; M8 x 60 ( 2 3/8" L)
15
8
Washer; M8 - 24mm OD ( 1" OD)
16
4
Lock Nut; M8 thread
17
4
Locking caster; 3/8-16 shank
18
6
End Cap; black
19
6
Fastener; black
20
2 Bracket, Lower Board
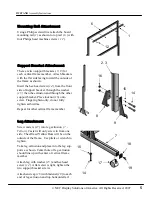
The following instructions will guide you through the steps for assembly.
Estimated assembly time is 15 minutes.
If you require assistance or are missing parts, contact NEC by email at
http://www.necdisplay.com/SupportCenter
Required tools are: Hex key (5mm supplied)
Adjustable or Open end wrench (13 mm not supplied)
Philips Head screwdriver (not supplied)
It is important to layout parts prior to beginning assembly.


