background image

E-15

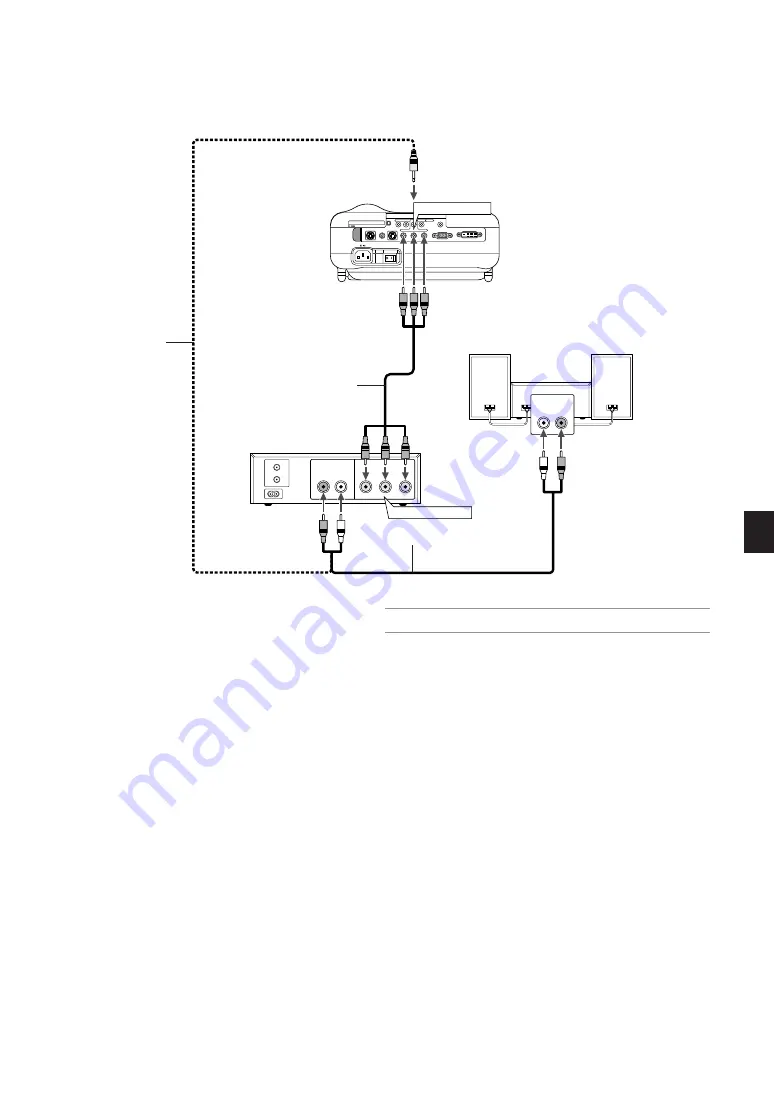
Connecting Your DVD Player

PC CONTROL

RGB IN

DVI-D IN

SC TRIGGER

VIDEO IN

S-VIDEO IN

S-VIDEO

S-VIDEO

RGB/DVI

RGB/DVI

VIDEO

VIDEO

AUDIO IN

AUDIO IN

COMPONENT

Y

Cb/Pb

Cr/Pr

COMPONENT IN

AUDIO OUT

R

L

COMPONENT OUT

AUDIO IN

L

R

DVD player

You can connect your projector to a DVD player with component output
or Video output. To do so, simply:

1. Turn off the power to your projector and DVD player.

2. If your DVD player has the component video (Y,Cb,Cr) output, use

the supplied component video cable (RCA

3) to connect your DVD

player to the COMPONENT IN connectors on the projector.

For a DVD player without component video (Y,Cb,Cr) output, use com-
mon RCA cables (not provided) to connect a composite VIDEO out-
put of the DVD player to the Video Input of the projector.

Use an audio cable (not supplied) to connect the audio from your
VCR or laser disc player to your audio equipment (if your VCR or
laser disc player has this capability). Be careful to keep your right and
left channel connections correct for stereo sound.

3. Turn on the projector and DVD player.

Component video RCA

3 cable

(supplied)

NOTE: 

Refer to your DVD player's owner's manual for more information about

your DVD player's video output requirements,

Audio cable (not supplied)

Audio Equipment

Audio cable
(supplied)

COMPONENT
AUDIO IN

Summary of Contents for HT1000 Series

Page 1: ...HT1000 Entertainment Projector User s Manual ...

Page 2: ...echnischen Anfangseinstellungen Setup einschließlich der Einstellungen der Benutzersteuerungen Diese Kosten sind vom Händler zu tragen von dem das Produkt erworben wurde 6 Bezahlung von Transportkosten GARANZIA LIMITATA A parte la specificazione seguente la graanzia che potrebbe essere fornita dal rivenditore copre tutti i difetti di materiali o nella lavorazione in questo prodotto I seguenti non ...

Page 3: ...om whom you purchased the product 2 Whenever warranty service is required the original dated invoice or a copy must be presented as proof of warranty coverage In order to obtain warranty service you may be required to describe and demonstrate the problem to your dealer or to NEC Solutions 3 All products returned to NEC Solutions for service MUST have prior approval To receive approval or for the n...

Page 4: ...or Class B Peripheral HT1000 We hereby declare that the equipment specified above conforms to the technical standards as specified in the FCC Rules This device complies with Part 15 of FCC Rules Operation is subject to the following two conditions 1 This device may not cause harmful interference and 2 this device must accept any interference received including interference that may cause undesired...

Page 5: ...HT1000 Entertainment Projector User s Manual English Deutsch Français Italiano Español Svenska ...

Page 6: ...ide reasonable protection against harmful interference in a residential installation This equipment generates uses and can radiate radio frequency energy and if not installed and used in accordance with the instructions may cause harmful interference to radio communications However there is no guar antee that interference will not occur in a particular installa tion If this equipment does cause ha...

Page 7: ...ive days From the Advanced menu select Projector Options Setup Page 4 High Speed Fan Mode 4 Do not unplug the power cable from the wall outlet under any one of the following circumstances Doing so can cause damage to the projector While the Hour Glass icon appears While the message Please wait a moment appears This mes sage will be displayed after the projector is turned off While the cooling fans...

Page 8: ...on and Clock E 38 Zoom Position E 38 Selecting Resolution E 38 Selecting Overscan Percentage E 38 Selecting Video Filter Level E 38 Selecting Noise Reduction Level E 38 Selecting Signal Type E 38 Picture Management E 38 Picture E 39 User Adjust when using User 1 to 4 E 39 Selecting Reference Setting E 39 Selecting Gamma Correction Mode E 39 Selecting Color Correction E 39 Adjusting Color Temperatu...

Page 9: ...intain and control your projector from your computer Smart security settings for password protection control panel lock and PC card protection key to help prevent unauthorized use Multiple video mode selections depending on your source Control the unit with a PC using the PC Control port NEC s exclusive Advanced AccuBlend intelligent pixel blending tech nology an extremely accurate image compressi...

Page 10: ...ee page E 19 PC CONTROL RGB IN DVI D IN SG TRIGGER VIDEO IN S VIDEO IN S VIDEO S VIDEO RGB DVI RGB DVI VIDEO VIDEO AUDIO IN AUDIO IN COMPONENT Y Cb Pb Cr Pr Stereo Speaker 2W AC Input Connect the supplied power cable s three pin plug here and plug the other end into an active wall outlet See page E 17 Main Power Switch When you plug the supplied power cable into an active wall outlet and turn on t...

Page 11: ...el Clock Phase for an optimal picture Some signals may not be displayed correctly or take time to switch between sources NOTE This function may not be available depending upon the input signal 6 PC CARD Access Indicator Lights while accessing a PC card 7 ENTER Button Executes your menu selection and activates items selected from the menu 8 CANCEL Button Press this button to exit Menus Press this b...

Page 12: ...EO IN 8 S VIDEO IN Mini DIN 4 Pin Connect a VCR DVD player or laser disc player with S Video output NOTE S Video provides more vivid color and higher resolution than the tra ditional composite video format 9 S VIDEO AUDIO IN Mini Jack Stereo Mini This is where you connect audio output from your VCR DVD player or laser disc player connected to S VIDEO IN 10 PC CONTROL Port Mini DIN 8 Pin Use this p...

Page 13: ... COMPONENT RGB DVI ON 3D REFORM EFFECTOR PICTURE POSITION MAGNIFY HELP PIC MUTE VIEWER SLIDE FOLDER SLIDE LIST VOLUME ENTER CANCEL POWER SELECT FREEZE 24 19 17 25 26 27 28 15 18 20 22 23 21 14 13 11 10 9 8 5 7 6 3 4 2 16 12 A S P E C T F R E E Z E 3 D R E H E L P P O IN T E R V O L U M E M O FF VI DE O AU TO AD J S VI DE O CO M PO NE NT RG B DV I O N PO W ER S E LE C T 1 1 Infrared Transmitter Dir...

Page 14: ... batteries together or use different types of batteries together Operating Range 30 30 30 25 7m 22 feet 7m 22 feet Remote control Remote sensor on the projector cabinet The infrared signal operates by line of sight up to a distance of about 22 feet 7 m and within a 55 Front 60 Rear angle of the remote sensor on the projector cabinet The projector will not respond if there are objects between the r...

Page 15: ... screen or wall the larger the image The minimum size the image can be is approximately 30 0 8 m measured diagonally when the projector is roughly 4 feet 1 0 m from the wall or screen The largest the image can be is 200 5 08 m when the projector is about 23 feet 7 m from the wall or screen Use the drawing below as a guide 406 4 W X 304 8 H 160 W X 120 H 365 8 W X 274 3 H 144 W X 108 H 304 8 W X 22...

Page 16: ...ted within the limits of the above values α Wide Tele inch 18 24 30 36 48 60 72 90 108 120 Screen Size B C Wide Tele D Diagonal Width Height inch 35 7 43 4 48 2 58 4 60 7 73 5 73 2 88 5 98 1 118 6 123 1 148 6 148 1 178 7 185 5 223 8 223 0 268 9 248 0 298 9 inch 3 6 4 8 6 0 7 2 9 6 12 0 14 4 18 0 21 6 24 0 degree 19 3 16 1 19 1 16 0 19 0 15 9 18 9 15 8 18 9 15 8 18 8 15 7 18 8 15 7 18 7 15 7 18 7 1...

Page 17: ...ojector It is recommended that you use a commercially avail able distribution amplifier if con necting a signal cable longer than the supplied cable NOTE When using with a notebook PC be sure to connect between the projector and the notebook PC before turning on the power to the notebook PC In most cases signal cannot be output from RGB output unless the notebook PC is turned on after connecting w...

Page 18: ... the composite video cable to the video output connector on the back of your VCR or laser disc player connect the other end to the Video input on your projector Use an audio cable not supplied to connect the audio from your VCR or laser disc player to your audio equipment if your VCR or laser disc player has this capability Be careful to keep your right and left channel connections correct for ste...

Page 19: ...NENT IN connectors on the projector For a DVD player without component video Y Cb Cr output use com mon RCA cables not provided to connect a composite VIDEO out put of the DVD player to the Video Input of the projector Use an audio cable not supplied to connect the audio from your VCR or laser disc player to your audio equipment if your VCR or laser disc player has this capability Be careful to ke...

Page 20: ... a period of inactivity it may be caused by a screen saver installed on the computer you ve connected to the projector NOTE The HT1000 is not compatible with video decoded outputs of NEC ISS 6020 and ISS 6010 For European model only To connect SCART output RGB Before connections The supplied SCART adapter ADP SC1 and a commercially available SCART cable are required for this connection NOTE Audio ...

Page 21: ...Failure to do so may not activate the digital output of the graphics card resulting in no picture being displayed Should this happen restart your PC Do not disconnect the DVI D signal cable while the projector is running If the signal cable has been disconnected and then re connected an im age may not be correctly displayed Should this happen restart your PC NOTE Use the DVI D cable compliant with...

Page 22: ...ish Swedish and Japa nese To select a menu language follow these steps 1 Use the SELECT 왖 or 왔 button to select one of the seven languages for the menu MENU E NTER CANCE L SELECT MENU E NTER CANCE L SELECT 2 Press the ENTER button to execute the selection 3 The Basic menu will be displayed in the language you have selected To close the menu press the CANCEL button After this has been done you can ...

Page 23: ...er RGB or DVI DIGITAL com puter or Viewer slides on a PC card To display the selected source press the ENTER button Detecting the Signal Automatically Adjusting the Picture Size and Position Place your projector on a flat level surface and ensure that the projector is square to the screen Lift the front edge of the projector to center the image vertically Move the projector left to center the imag...

Page 24: ...so that the projected image is rectangular Two options are available for correcting procedures You can save adjustment settings by using the 3D Reform Save option on Setup See page E 42 Keystone Iris Use the Iris lever underneath the lens to adjust the brightness and the contrast optically Iris lever Screen Projected image Screen The CORNERSTONE adjustment screen is displayed NOTE Press the 3D REF...

Page 25: ...of the following are met Image is projected in Wide Zoom lever Resolution is XGA Higher resolution than XGA limits 3D Reform in its adjustable range Menu items should be set as follows Aspect Ratio Normal Screen Type 4 3 Horizontal and Vertical are adjusted separately A combination of both adjustments limits 3D Reform in its adjustable range When Stadium is selected in Aspect Ratio Cornerstone and...

Page 26: ...dicator will go out Last unplug the power cable ASPECT OFF VIDEO AUTO ADJ ON 3D REFORM MAGNIFY PIC MUTE VIEWER SLIDE FOLDER SLIDE LIST POWER FREEZE S VIDEO COMPONENT RGB DVI EFFECTOR PICTURE POSITION HELP VOLUME CAUTION Do not unplug the power cable from the wall outlet or do not turn off the main power under any one of the following circum stances Doing so can cause damage to the projector While ...

Page 27: ... may not work depend ing on the signals or settings Using Zoom Position The POSITION button adjusts the position of a zoomed image When 4 3 is selected in Screen Type When 16 9 is selected in Screen Type Move the viewable area up or down Zoom UP DOWN Table of Availability for Zoom Position For PC DVD Progressive 480p 480i 576p 576i Screen Type 4 3 16 9 Aspect Ratio Normal Not available Not availab...

Page 28: ...eeze a picture Press again to resume motion FREEZE Enlarging and Moving a Picture You can enlarge the area you want up to 400 percent To do so To enlarge the image 1 Press the MAGNIFY button Getting the On line Help You get the contents about Help Display Help Exit Help HELP SELECT MAGNIFY MAGNIFY 2 Press the MAGNIFY button to return to its original size To enlarge the image Use the SELECT button ...

Page 29: ... to select a background logo from graphic files on a PC card and change to it as the background logo 3 Use the SELECT 왖 or 왔 button to select a JPEG or BMP file for your background logo 4 Use the SELECT 왘 and then 왔 button to select Logo 5 Press the ENTER on the remote control or the cabinet You will get the confirmation dialog box 6 Select OK and press the ENTER button This completes changing a l...

Page 30: ... S VID EO RG B DV I RG B DV I VIDE O VIDE O AU DIO IN AU DIO IN COMPONENT Y Cb Pb Cr Pr Removing the PC Card Press the eject button The PC card pops out a little Grasp the edges of the PC card and pull it out NOTE Do not eject the PC card while its data is being accessed Eject button Direction for Inserting the PC Card The PC card has a top and bottom and must be inserted into the PC card slot in ...

Page 31: ...e playing from the selected slide or folder when Auto Play is selected Jump Displays a list of slides while you are playing back Select Displays a list of folders while you are playing back Setup Displays the Viewer Options dialog box on Page 2 of the Setup dialog box Delete Deletes a captured slide s or all the captured slides in the Capture specific folder View Hides the tool bar while you are p...

Page 32: ...Signals from DVI input are not possible to be captured Unless a PC card is inserted into the PC Card slot of the projector the Capture feature is not available The Card Error display means that the free space of the PC card is insufficient for saving images Make more space available on the card by erasing un wanted images with your PC The number of images that can be captured depends on the size o...

Page 33: ...card so that you can select a file you want to display You can also sort files by file name or date or display the file Although a list of all the files in the PC card is displayed you can view files in idx text HTML JPEG and BMP format only Selecting BMP and JPEG files automatically switches to the Viewer source See also page E 35 NOTE This option is not available for selection unless a PC card i...

Page 34: ...n enable all the items within that submenu Also you can turn on an item within the submenu without placing a check mark on the main menu item NOTE Up to 12 main menu items within Custom Menu Edit not including submenu items can be selected 3 In order for the changes to take effect use the SELECT 왗 or 왘 but ton on the remote control or the projector cabinet to highlight OK then press the ENTER butt...

Page 35: ...tion Clock Zoom Position Resolution Overscan Video Filter Noise Reduction Signal Type Video Movie Game Graphic sRGB User1 User2 User3 User4 Brightness Contrast Color Hue Sharpness Video Movie Game Graphic sRGB Dynamic Natural Black Detail Red Green Blue Yellow Magenda Cyan Color Gain 5000 6500 7800 8500 9300 10500 Brightness R G B Contrast R G B SweetVision 3D Y C Separation Deinterlace Black Expa...

Page 36: ...o Page 3 Signal Select RGB Video S Video RGB Component RGB Component Scart Auto NTSC3 58 NTSC4 43 PAL PAL M PAL N PAL60 SECAM Page 5 Communication Speed Default Source Select Control Panel Key Lock 4800 9600 19200 38400 Last Auto Select Video S Video Component RGB DVI DIGITAL Viewer Enable Disable Page 4 Auto Adjust Auto Start Power Management Power Off Confirmation 3D Reform Save High Speed Fan M...

Page 37: ...Mode IP Address Automatic Manual Projector Name DNS Configuration Domain Name IP Address Subnet Mask Gateway Mail Alert Mail Sender s Address SMTP Server Name Recipient s Address 1 Recipient s Address 2 Recipient s Address 3 Test Mail Status IP Address Subnet Mask MAC Address Factory Default All Data Current Signal Advanced Menu Source Select Volume Image Options Picture Management Projector Optio...

Page 38: ... Radio button Use this round button to select an option in a dialog box Menu Elements Title bar Highlight Check box Tab OK Button Cancel Button Solid triangle Radio button Slide bar Tool bar Check box Place a checkmark in the square box to turn the op tion On Slide bar Indicates settings or the direction of adjustment OK button Press to confirm your setting You will return to the previous menu Can...

Page 39: ... get the slide that has been retained A launcher will appear when you press the MENU button A press of the MENU button displays the toolbar a press of the MENU button again displays the Menu and hereafter each press of the MENU button switches displaying between the Menu and the toolbar The launcher is a tool bar including the following buttons Prev Play Jump Setup View Next Stop Select Delete Pre...

Page 40: ...e list Store Enables you to store the currently projected signal Cut Enables you to remove a selected signal from the list and place it on the clipboard in the projector Copy Enables you to copy a selected signal from the list and place it on the clipboard in the projector Paste Enables you to paste the signal placed on the clip board to any other line of the list To do this select Paste and then ...

Page 41: ...a V Zoom mode input 480i 576i DVD progressive 480p 576p 720p 1080i 1080p PC RGB These are the same signals Normal Full Zoom Stadium mode input 480i 576i DVD progressive 480p 576p 720p 1080i 1080p PC RGB These are the same signals When screen size 16 9 is selected for the source the following selections will display ...

Page 42: ...ion Native is not available Selecting Overscan Percentage Select overscan percentage 0 5 and 10 for signal NOTE When Resolution is set to Native this feature is not available and the stored settings and adjustments are invalid NOTE When Stadium is selected in Aspect Ratio this feature is not avail able NOTE The 0 option may not be available depending upon the input signal Selecting Video Filter Le...

Page 43: ...Setting This feature allows you to use color correction or gamma values as reference data to optimize for various types of images You can select one of the following five settings Video Movie Game Graphic sRGB Selecting Gamma Correction Mode Use the 왗 or 왘 buttons to choose one mode from three options Each mode is recommended for Dynamic High contrast picture Black Detail Dark portions of a pictur...

Page 44: ...asic Menu This is the basic menu that contains mini mum essentials of menus and commands Custom Menu This is the menu that you can customize us ing the Custom Menu Edit to fit your needs Customizing the Menu See page E 30 for instructions about how to customize the Menu Selecting Menu Display Time This option allows you to select how long the projector waits after the last touch of a button to tur...

Page 45: ...omponent for a component video source such as a DVD player Normally select RGB Component and the projector automatically detects an either incoming signal However there may be some com ponent signals that the projector is unable to detect If this is the case select Component Select Scart for the European Scart VIDEO and S VIDEO This feature enables you to select composite video standards manu ally...

Page 46: ...g 3D Surround 3D Surround Turn on or off the 3D surround effect After turn on this option select OK Clearing Lamp Hour Meter Clear Lamp Hour Meter Resets the lamp clock back to zero Pressing this button appears a confirmation dialog box To reset the lamp usage hour press OK NOTE The projector will turn off and go into standby mode after 1600 hours up to 2100 hours in Eco mode of service In this co...

Page 47: ...e in domain name of the network connected to the projector Up to 60 alphanumeric characters can be used Screen Type Select either 4 3 Screen or 16 9 Screen for the screen to be used See also Aspect Ratio on pages E 36 and 37 NOTE When Resultion is set to Native this selection is inactive Position This feature adjusts the vertical position of the image when viewing video with an aspect ratio select...

Page 48: ...Name Type in the SMTP server name to be connected to the projector Up to 60 alphanumeric characters can be used Recipient s Address 1 to 3 Type in your recipient s address Up to 60 alphanumeric and symbols characters can be used Test Mail Send a test mail to check if your settings are correct NOTE If you entered an incorrect address in a test you may not receive an Alert mail Should this happen ch...

Page 49: ...PC Card Files Procedures for Password setting apply to both Menu and Logo Entry To assign your password NOTE Up to 15 alphanumeric characters can be assigned 1 Type a password Highlight Entry and press the ENTER button 2 Type the same password again Highlight OK on the Enter the Pass word screen and press the ENTER button Your password will be assigned Delete To delete your password 1 Highlight De...

Page 50: ...the SELECT 왖왔 button to select Delete and use the SELECT 왗 button to select the list window 2 Use the SELECT 왖왔 button to select the PC card data you wish to delete 3 Press the SELECT 왘 button to select Delete and press the ENTER button The PC card data will be deleted If you ve lost your registered PC card proceed as follows NOTE NEC or your dealer will provide you with your Release Code in excha...

Page 51: ... use the menus An underlined link means that you can move to an adjustment item directly Selecting the underlined link and pressing ENTER moves to the corre sponding adjustment item Information Displays the status of the current signal and the lamp and the projector usage hours This dialog box has three pages The information included are as follows NOTE The progress indicator shows the percentage ...

Page 52: ... glass may be scattered in the lamp housing Do not touch them as the pieces of glass may cause injury If this happens contact your NEC dealer for lamp replacement To replace the lamp 1 Loosen the lamp cover screw until the screwdriver goes into a free wheeling condition and remove the lamp cover The lamp cover screw is not removable Interlock 2 Loosen the two screws securing the lamp housing until...

Page 53: ...aper to clean the lens and be careful not to scratch or mar the lens Lens Protector The lens barrel has threads on the outside for mounting a commercially available lens protector φ 82mm to protect the lens from dirt dust scratches and damage Note that both a lens protector and the supplied lens cap cannot be used at the same time CAUTION Use only transparent lens protectors designed for lens prot...

Page 54: ... OFF 2 cycle 0 5 sec ON 0 5 sec OFF 3 cycle 0 5 sec ON 0 5 sec OFF 4 cycle 0 5 sec ON 0 5 sec OFF 6 cycle 0 5 sec ON 0 5 sec OFF Normal Lamp cover error Temperature error Power error Fan error Lamp error Re firing the lamp Control key locked Idle condition Replace the lamp cover correctly The projector is overheated Move the projector to a cooler location Power unit will not work correctly Fans wi...

Page 55: ...ange of the lens See page E 12 Condensation may form on the lens if the projector is cold brought into a warm place and is then turned on Should this happen let the projector stand until there is no condensation on the lens Use menus or Source button on the remote control or the cabinet to select the source you want to input Install new batteries See page E 10 Make sure there are no obstacles betw...

Page 56: ...0 TV lines RGB 1024 dots H 768 dots V External Control RS232C IR LAN wired Sync Compatibility Separate Sync Composite Sync Sync on G Built in Speakers 2W 2 stereo Power Requirement 100 120V AC 200 240V AC 50 60 Hz Input Current 3 2A 100 120V AC 1 6A 200 240V AC Power Consumption 290W 0 8W Standby Mechanical Installation Orientation Desktop Front Desktop Rear Ceiling Front Ceiling Rear Dimensions 1...

Page 57: ...o RGB Signal Analog YCbCr Signal 1 Red Cr 2 Green or Sync on Green Y 3 Blue Cb 4 Ground 5 Ground 6 Red Ground Cr Ground 7 Green Ground Y Ground 8 Blue Ground Cb Ground 9 No Connection 10 Sync Signal Ground 11 SCART Sync Sync 12 Bi directional DATA SDA 13 Horizontal Sync or Composite Sync 14 Vertical Sync 15 Data Clock Signal Level Video signal 0 7Vp p Analog Sync signal TTL level 5 1 4 2 3 10 11 1...

Page 58: ... 55 57 283 VESA 1024 768 35 5 43 Interlaced 44 9 VESA 1024 768 48 363 60 65 VESA 1024 768 56 476 70 07 75 MAC 1024 768 60 241 74 93 80 VESA 1024 768 60 023 75 03 78 75 VESA 1024 768 68 677 85 94 5 HDTV 1080p 1920 1080 67 5 60 Progressive HDTV 1080i 1125i 1920 1080 33 75 60 Interlace 74 25 HDTV 1080i 1125i 1920 1080 28 13 50 Interlace 74 25 HDTV 720p 750p 1280 720 45 60 Progressive 74 25 SDTV 480p ...

Page 59: ...3 VESA 1024 768 35 5 43 Interlaced 44 9 VESA 1024 768 48 363 60 65 VESA 1024 768 56 476 70 07 75 MAC 1024 768 60 241 74 93 80 VESA 1024 768 60 023 75 03 78 75 VESA 1024 768 68 677 85 94 5 쐌 HDTV 1080i 1125i 1920 1080 33 75 60 Interlace 74 25 쐌 HDTV 1080i 1125i 1920 1080 28 13 50 Interlace 74 25 HDTV 720p 750p 1280 720 45 60 Progressive 74 25 SDTV 480p 525p 720 480 31 47 59 94 Progressive 27 SDTV 5...

Page 60: ... 00H 02H 01H 1AH 22H INPUT SELECT VIEWER 02H 03H 00H 00H 02H 01H 1FH 27H PICTURE MUTE ON 02H 10H 00H 00H 00H 12H PICTURE MUTE OFF 02H 11H 00H 00H 00H 13H SOUND MUTE ON 02H 12H 00H 00H 00H 14H SOUND MUTE OFF 02H 13H 00H 00H 00H 15H ON SCREEN MUTE ON 02H 14H 00H 00H 00H 16H ON SCREEN MUTE OFF 02H 15H 00H 00H 00H 17H NOTE Contact your local dealer for a full list of PC Control Codes if needed NOTE Pi...

Page 61: ... nec co jp index html is specified for the ad dress or the entry column of the URL Example 2 When the IP address of the projector is 192 168 73 1 access is gained to the HTTP server functions by specifying http 192 168 73 1 index html for the address or the entry column of the URL Structure of the HTTP Server Power This controls the power of the projector On Power is switched on Off Power is switc...

Page 62: ...model name serial number and name of the store of purchase are not indicated on the warranty or have been altered 2 Problems or damage caused by dropping or shocks during ship ment or movement by the customer or by improper handling by the customers 3 Problems or damage caused by improper usage or unwarrant able alterations or repairs by the customer 4 Problems or damage caused by fire salt damage...

Page 63: ...x Line 65 6 274 2226 Email Address daniel rsc necsin nec com sg WEB Address http www nec com sg Regions Covered Singapore Hyosung Data System Ltd Address 7th Floor Cheongdam Building 52 Cheongdam Dong Kangnam Ku Seoul Korea 135 100 Telephone 82 2 510 0234 Fax Line 82 2 540 3590 Email Address hds ykc hyosung com Regions Covered South Korea Lenso Communication Co Ltd Address 292 Lenso House 4 1st Fl...

Page 64: ... I also confirm following information is correct Regards Application Sheet for TravelCare Service Program Date P 1 Country product purchased User s Company Name User s Company Address Phone No Fax No User s Name User s Address Phone No Fax No Local Contact office Local Contact office Address Phone No Fax No User s Model Name Date of Purchase Serial No on cabinet Problem of units per User Required ...

Page 65: ...n 1 Accidents transportation neglect misuse abuse water dust smoke or default of or by the Customer its employees or agents or any third party 2 Failure or fluctuation of electrical power electrical circuitry air condi tioning humidity control or other environmental conditions such as use it in smoking area 3 Any fault in the attachments or associated products or components whether or not supplied...

Page 66: ...Printed in Japan 7N8P1702 ...

Reviews: