background image

Español

Español-1

RIESGO DE DESCARGAS ELÉCTRICAS • NO ABRIR

PARA PREVENIR EL PELIGRO DE INCENDIO O DESCARGAS ELÉCTRICAS, NO EXPONGA ESTE PRODUCTO A LA LLUVIA O LA HUMEDAD.
TAMPOCO UTILICE EL ENCHUFE POLARIZADO DE ESTE PRODUCTO CON UN RECEPTÁCULO DEL CABLE DE EXTENSIÓN U OTRAS TOMAS A
MENOS QUE LAS PROLONGACIONES SE PUEDAN INSERTAR COMPLETAMENTE.
NO ABRA LA CAJA DEL MONITOR, YA QUE CONTIENE COMPONENTES DE ALTO VOLTAJE. DEJE QUE SEA EL PERSONAL DE SERVICIO
CUALIFICADO QUIEN SE ENCARGUE DE LAS TAREAS DE SERVICIO.

ADVERTENCIA

PELIGRO:

PARA REDUCIR EL RIESGO DE DESCARGAS
ELÉCTRICAS, NO RETIRE LA CUBIERTA (O LA PARTE
POSTERIOR). EL MONITOR NO CONTIENE PIEZAS QUE
DEBA MANIPULAR EL USUARIO. DEJE QUE SEA EL
PERSONAL DE SERVICIO CUALIFICADO QUIEN SE
ENCARGUE DE LAS TAREAS DE SERVICIO.

Este símbolo advierte al usuario de que el producto puede
contener suficiente voltaje sin aislar como para
causar descargas eléctricas. Por tanto, evite el contacto con
cualquier pieza del interior del monitor.

Este símbolo advierte al usuario de que se incluye
documentación importante respecto al funcionamiento y el
mantenimiento de este producto. Por ello, debería leerla
atentamente para evitar problemas.

PELIGRO

Contenido

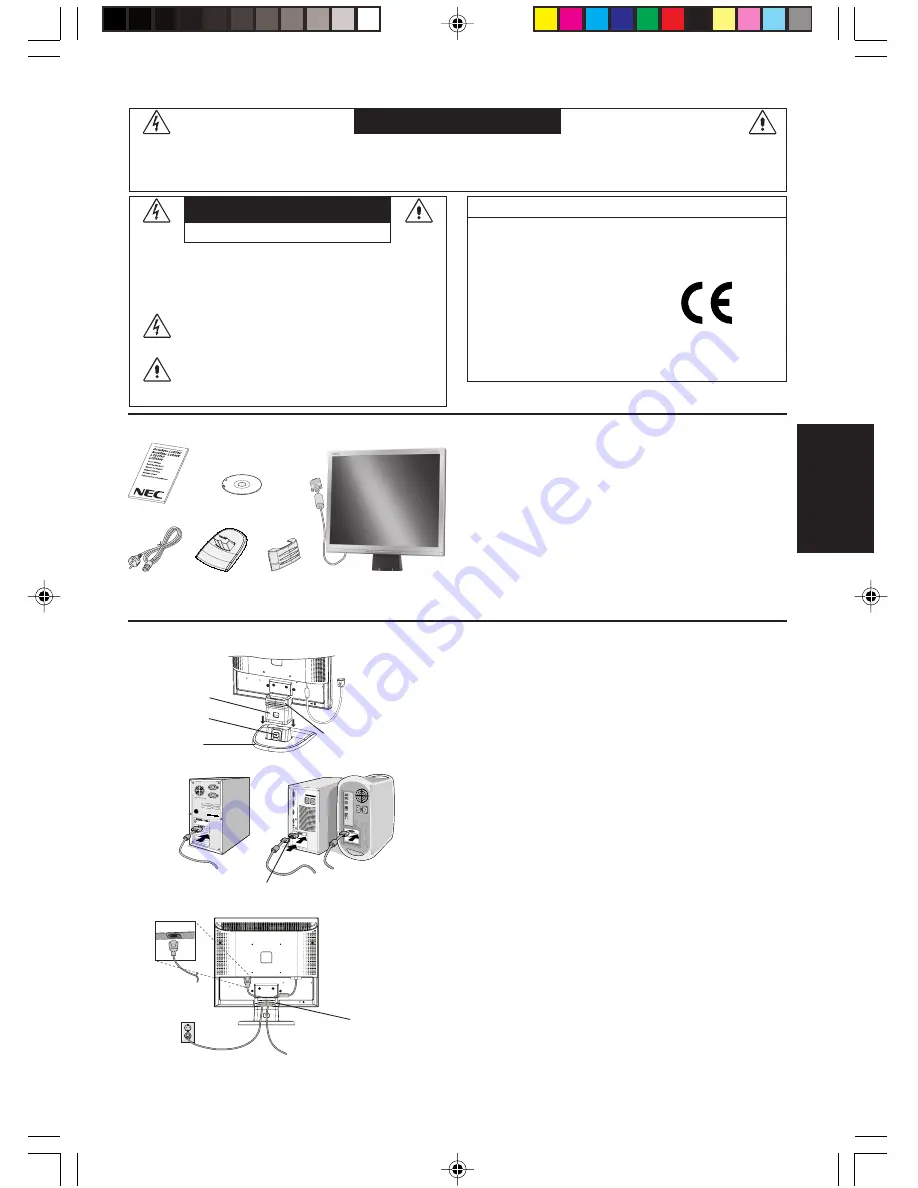
Su nueva caja* de monitor LCD NEC debería contener:

Un monitor LCD con base inclinable

Cable de alimentación

Manual del usuario

CD-ROM

Base

Pasacables

*

Recuerde conservar la caja y el material de embalaje originales
para poder transportar el monitor en el futuro.

Inicio rápido

Para conectar la base al soporte del monitor:

1. Inserte la parte frontal del soporte del monitor en los orificios

situados en la parte delantera de la base (

figura S.1

).

2. Conecte la base al soporte. La lengüeta de sujeción de la base

debería encajar en el orificio de la parte posterior del soporte
(

figura S.1

).

Para montar el pasacables:

1. Conecte el pasacables a la base. Inserte los corchetes del pasacables

en los orificios situados en la parte posterior del soporte y deslice el
pasacables hacia abajo hasta que encaje en su sitio (

figura S.1

).

NOTA:

compruebe que las lengüetas están bien aseguradas.

Para conectar el monitor LCD a su sistema, siga estas indicaciones:

1. Apague el ordenador.

2.

Para PC con salida analógica: 

conecte el cable de señal del

mini D-SUB de 15 clavijas conectado al monitor al conector de la
tarjeta de visualización de su sistema (

figura A.1

). Apriete todos

los tornillos.

Para los Mac: 

conecte el adaptador para Macintosh de MultiSync

(no incluido) al ordenador. Conecte el cable de señal del mini
D-SUB de 15 clavijas al adaptador para Macintosh de MultiSync
(

figura A.2

). Apriete todos los tornillos.

NOTA:

algunos sistemas Macintosh no necesitan adaptador.

3. Conecte el cable de alimentación a la toma de corriente.

Introduzca el cable de señal de vídeo y el de alimentación en el
pasacables (

figura B.1

).

NOTA:

asegúrese de que el cable del pasacables está bien
colocado para evitar daños en él y el monitor.

NOTA:

consulte el apartado Peligro de este manual para asegurarse
de que selecciona el cable de alimentación adecuado.

Declaración del fabricante

Por la presente certificamos que este monitor AccuSync LCD73V
(L175GZ)/AccuSync LCD93V (L195GY)/LCD170V (L175GZ)/
LCD190V (L195GY) en color cumplen la

y lleva la marca

NEC Display Solutions, Ltd.

4-13-23, Shibaura,

Minato-Ku

Tokyo 108-0023, Japón

Directiva 73/23/CEE:

– EN 60950-1

Directiva 89/336/CEE:

– EN 55022
– EN 61000-3-2
– EN 61000-3-3
– EN 55024

Figura S.1

Base

Lengüetas de

sujeción

Soporte

Figura A.1

Figura A.2

Adaptador para
Macintosh (no incluido)

Figura B.1

Pasacables

Manual del

usuario

Cable de

alimentación

Base

Pasacables

Monitor LCD

Tipo fijo (cable de señal de

vídeo conectado)

CD-ROM

Pasacables

03_Spain

13/2/07, 9:45 AM

1

Ofrecido por www.electromanuales.com

Summary of Contents for AccuSync LCD73V

Page 1: ...LCD73V AccuSync LCD93V LCD170V LCD190V User s Manual Bedienerhandbuch Manual del usuario Manuel Utilisateur Manuale utente Руководство пользователя 00_Cover 13 2 07 9 44 AM 1 Ofrecido por www electromanuales com ...

Page 2: ...me beneficial both for the user and the environment Electrical safety Emissions Electromagnetic fields Noise emissions Ecology The product must be prepared for recycling and the manufacturer must have a certified environmental management system such as EMAS or ISO 14 001 Restrictions on chlorinated and brominated flame retardants and polymers heavy metals such as cadmium mercury and lead The requi...

Page 3: ...national Organisation for Standardization and TCO Swedish Trades Union Disposing of your old NEC product The aim of recycling is to gain an environmental benefit by means of re use upgrading reconditioning or reclamation of material Dedicated recycling sites ensure that environmentally harmful components are properly handled and securely disposed To ensure the best recycling of our products NEC DI...

Page 4: ...Chinese RoHS information relevant for Chinese market 00_Cover 13 2 07 9 44 AM 4 Ofrecido por www electromanuales com ...

Page 5: ...pe Video signal cable is connected CD ROM Quick Start To attach the Base to the LCD Stand 1 Insert the front of the LCD stand into the holes in the front of the Base Figure S 1 2 Attach the Base to the Stand The locking tab on the Base should fit into the hole on the back of the Stand Figure S 1 To attach the Cable Holder 1 Attach the Cable Holder on to the Base Insert the hooks on the Cable Holde...

Page 6: ... you have any problem please refer to the Troubleshooting section of this User s Manual Tilt Grasp both sides of the monitor screen with your hands and adjust the tilt as desired Figure TS 1 Remove Monitor Stand for Mounting To prepare the monitor for alternative mounting purposes 1 Disconnect all cables 2 Place monitor face down on a non abrasive surface Figure R 1 3 Remove the 3 screws connectin...

Page 7: ...ontrol menus are available in nine languages OSM TURN OFF The OSM control menu will stay on as long as it is in use In the OSM Turn OFF submenu you can select how long the monitor waits after the last touch of a button to shut off the OSM control menu The preset choices are 10 120 seconds by 5 seconds step OSM LOCK OUT This control completely locks out access to all OSM control functions without B...

Page 8: ...en Kabelhalter zu befestigen 1 Befestigen Sie den Kabelhalter am Standfuß Stecken Sie die Haken des Kabelhalters in die Aussparungen auf der Rückseite des Monitorfußes und schieben Sie den Kabelhalter nach unten in Position Abbildung S 1 HINWEIS Überprüfen Sie bitte dass der Schnappverschluss richtig eingerastet ist Gehen Sie folgendermaßen vor um den LCD Monitor an Ihr System anzuschließen 1 Scha...

Page 9: ... ab 2 Legen Sie den Monitor mit der Vorderseite nach unten auf eine weiche Oberfläche Abbildung R 1 3 Entfernen Sie die 3 Schrauben mit denen der Fuß am Monitor befestigt ist und heben Sie den Fuß ab Abbildung R 2 Der Monitor kann jetzt auf andere Art montiert werden 4 Schließen Sie das Netzkabel an der Rückseite des Monitors an Abbildung R 3 5 Führen Sie die Schritte in umgekehrter Reihenfolge au...

Page 10: ... verlassen Sie das OSM Menü Untermenü SPRACHE Die OSM Menüs sind in neun Sprachen verfügbar OSM ANZEIGEDAUER Das OSM Steuerungsmenü wird ausgeblendet wenn es nicht mehr verwendet wird Im Untermenü OSM Anzeigedauer können Sie festlegen nach welchem Zeitraum das OSM Steuerungsmenü ausgeblendet wird wenn der Benutzer keine Taste drückt Die Voreinstellungen reichen von 10 120 Sekunden in 5 Sekunden Ab...

Page 11: ...arte posterior del soporte figura S 1 Para montar el pasacables 1 Conecte el pasacables a la base Inserte los corchetes del pasacables en los orificios situados en la parte posterior del soporte y deslice el pasacables hacia abajo hasta que encaje en su sitio figura S 1 NOTA compruebe que las lengüetas están bien aseguradas Para conectar el monitor LCD a su sistema siga estas indicaciones 1 Apague...

Page 12: ...nsulte el apartado Controles de este manual del usuario si desea obtener una descripción detallada de estos controles OSM NOTA si surgiera algún problema consulte el apartado Solución de problemas de este manual del usuario Inclinación Sostenga el monitor por ambos lados con las manos y ajuste la inclinación que desee figura TS 1 Cómo retirar el soporte del monitor para el montaje Para montar el m...

Page 13: ...enús del control OSM están disponibles en nueve idiomas ACTIVIDAD OSM El menú de control de OSM permanecerá activado mientras se esté utilizando En el submenú Actividad OSM puede indicar cuánto tiempo debe transcurrir desde que se toca por última vez un botón del menú de control de OSM hasta que éste se desconecta La opción preconfigurada permite un mínimo de 10 segundos y un máximo 120 variable e...

Page 14: ...e câble dans les orifices au dos du support et faites ensuite coulisser le support de câble vers le bas pour le fixer Figure S 1 REMARQUE Veuillez vous assurer que les attaches sont solidement fixées Pour connecter le moniteur LCD à votre système suivez ces instructions 1 Éteignez votre ordinateur 2 Pour un PC équipé d une sortie analogique Branchez le mini connecteur D SUB à 15 broches du câble d...

Page 15: ...r montage du support du moniteur Pour préparer le moniteur en vue d un autre montage 1 Déconnectez tous les câbles 2 Placez le moniteur face vers le bas sur une surface non abrasive Figure R 1 3 Retirez les 3 vis fixant le moniteur à son support et enlevez le support comme indiqué Figure R 2 Le moniteur est maintenant prêt pour un montage différent 4 Connectez le cordon d alimentation CA à l arriè...

Page 16: ...SM ou un sous menu LANGUE Les menus des commandes OSM sont disponibles en neuf langues EXTINCTION DE L OSM Le menu des commandes OSM restera à l écran aussi longtemps qu il sera utilisé Dans le sous menu Extinction OSM vous pouvez choisir la durée d attente du moniteur entre la dernière pression de touche et l extinction du menu des commandes OSM Les choix prédéfinis sont situés entre 10 et 120 se...

Page 17: ... collegare il supporto cavi 1 Fissare il supporto cavi alla base Inserire i ganci del supporto cavi nei fori sulla parte posteriore del supporto e far scivolare il supporto cavi verso il basso per posizionarlo correttamente Figura S 1 NOTA Assicurarsi che le linguette siano ben salde Per collegare il monitor LCD al sistema attenersi alle seguenti istruzioni 1 Spegnere il computer 2 Per il PC con l...

Page 18: ...isporre il monitor a un diverso montaggio 1 Scollegare tutti i cavi 2 Sistemare il monitor verso il basso su una superficie non abrasiva Figura R 1 3 Togliere le 3 viti che fissano il monitor al supporto e sollevare il supporto come illustrato Figura R 2 Il monitor ora è pronto per essere montato in modo diverso 4 Collegare il cavo di alimentazione c a sulla parte posteriore del monitor Figura R 3...

Page 19: ... premendo il pulsante RESET EXIT Selezionando EXIT è possibile uscire dal menu sottomenu OSM LINGUA I menu di controllo OSM sono disponibili in nove lingue DISABILITAZIONE OSM Il menu di controllo OSM rimane attivo per il tempo che è in uso Nel sottomenu Disabilitazione OSM è possibile selezionare l intervallo di tempo dopo il quale nel caso non venga premuto nessun tasto il menu di controllo OSM ...

Page 20: ... Рисунок S 1 Чтобы установить держатель кабеля 1 Закрепите держатель кабеля на основании Вставьте держатель кабеля в отверстия на задней стороне подставки и сдвинув держатель вниз установите его на место Рисунок S 1 ПРИМЕЧАНИЕ Убедитесь что защелки надежно фиксируют держатель Чтобы подключить ЖКД монитор LCD к системе выполните следующие инструкции 1 Отключите питание компьютера 2 Для ПК с аналого...

Page 21: ...Отсоединение подставки монитора перед установкой Чтобы подготовить монитор к установке в другом положении 1 Отсоедините все кабели 2 Положите монитор экраном вниз на неабразивную поверхность Рисунок R 1 3 Отверните 3 винта крепящие монитор к подставке и снимите подставку как показано на рисунке Рисунок R 2 Теперь монитор готов к установке другим способом 4 Подключите кабель питания к разъему на за...

Page 22: ...у RESET EXIT ВЫХОД При выборе кнопки EXIT ВЫХОД можно закрыть меню OSM подменю LANGUAGE ЯЗЫК Меню параметров OSM переведены на девять языков OSM TURN OFF ОТКЛЮЧЕНИЕ МЕНЮ OSM Меню параметров OSM будет оставаться на экране пока оно используется В подменю OSM Turn Off Отключение экранного индикатора можно выбрать время ожидания монитора после последнего нажатия кнопки до закрытия меню параметров OSM ...

Page 23: ...xx_Back 13 2 07 9 46 AM 1 Ofrecido por www electromanuales com ...

Page 24: ...Printed in China Part Number ________ Printed on recycled paper xx_Back 13 2 07 9 46 AM 2 Ofrecido por www electromanuales com ...

Reviews: