background image

English-7

English

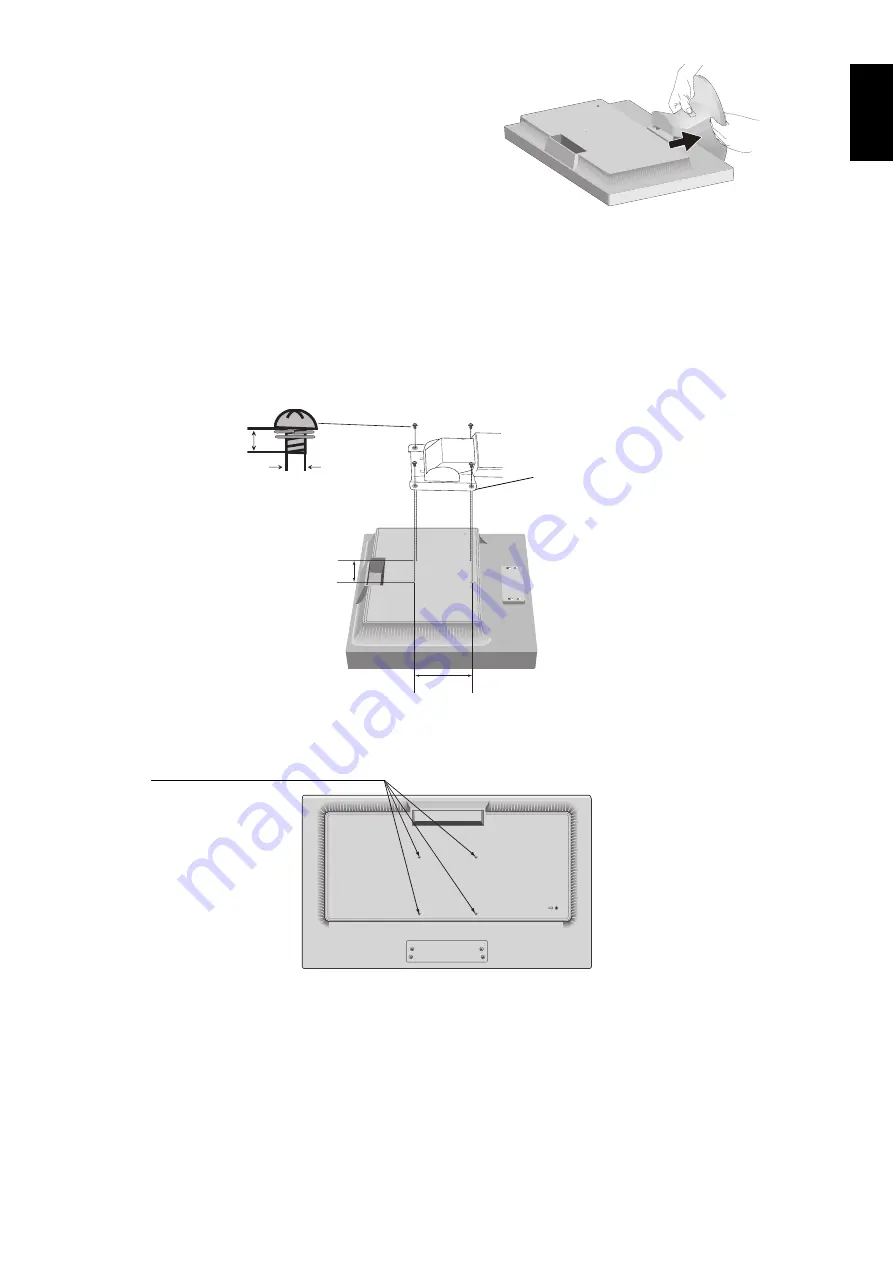
Remove the Base Stand

NOTE:


Always remove the Base Stand when shipping the LCD.

1.  Place monitor face down on a non-abrasive surface (

Figure R.1

).

2.  Using your thumb, press the button to unlock (

Figure R.4

).

3.  With the button pressed in, pull off the Base Stand (

Figure R.4

).

Connect a Flexible Arm

This LCD monitor is designed for use with a fl exible arm.

Please use screws (4pcs) as shown in the picture when installing. To meet the safety requirements, the monitor must be 
mounted to an arm which, guaranties the necessary stability under consideration of the weight of the monitor.

Caution: 

Use ONLY the screws (4 pcs) that were removed from the stand or the specifi ed screws (

Figure F.1

) to avoid 

damage to the monitor or stand. 
To meet the safety requirements, the monitor must be mounted to an arm which guaranties the necessary stability 
under consideration of the weight of the monitor. The LCD monitor should only be used with an approved arm 
(e.g. TUEV GS mark).

NOTE:


Tighten all screws (recommended Fasten Force: 98 - 137 N•cm).

Figure F.1

Tighten all screws

100 mm

100 mm

Thickness of Bracket 
(Arm) 2.0 ~ 3.2 mm 

12 mm

M4

4 x 12 mm with lock washer and 

fl at washer

Specifi cations

4-SCREWS (M4)

(MAX depth: 10 mm)
If use other screw, 
check depth of hole.

Weight of LCD assembly: 3.7 kg (MAX)

Figure R.4

Summary of Contents for AccuSync AS222Wi

Page 1: ...s Manual Please find your model name in the label on the backside of monitor Questo manuale d istruzione è fornito da trovaprezzi it Scopri tutte le offerte per Nec AccuSync AS222Wi o cerca il tuo prodotto tra le migliori offerte di Monitor ...

Page 2: ...y Precautions and Maintenance English 3 Ergonomics English 4 Cleaning the LCD Panel English 4 Cleaning the Cabinet English 4 Contents English 5 Quick Start English 5 Controls English 8 Specifications English 12 Features English 13 Troubleshooting English 14 Manufacturer s Recycling and Energy Information English 15 ...

Page 3: ...rous to make any kind of contact with any part inside this unit This symbol alerts the user that important literature concerning the operation and maintenance of this unit has been included Therefore it should be read carefully in order to avoid any problems CAUTION Please use the power cord provided with this display in accordance with the table below If a power cord is not supplied with this equ...

Page 4: ...ers ENERGY STAR is a U S registered trademark As an ENERGY STAR Partner NEC Display Solutions of America Inc has determined that this product meets the ENERGY STAR guidelines for energy efficiency The ENERGY STAR emblem does not represent EPA endorsement of any product or service HDCP High bandwidth Digital Content Protection HDCP is a system for preventing illegal copying of video data sent over ...

Page 5: ...plug your monitor from the wall outlet and move to a safe location then refer servicing to qualified service personnel under the following conditions If the monitor is used in this condition the monitor may cause fall fire and electric shock If the monitor stand has been cracked or peeled If the monitor has been wobbled If the monitor has an unusual odor When the power supply cord or plug is damag...

Page 6: ...Please contact your ophthalmologist Get regular eye checkups Ergonomics To realize the maximum ergonomics benefits we recommend the following To avoid eye fatigue adjust the brightness to a moderate setting Place a sheet of white paper next to the LCD screen for luminance reference Do not position the Contrast control to its maximum setting Use the preset Size and Position controls with standard s...

Page 7: ...and should fit into the hole on the Stand Figure S 1 To attach the AccuSync LCD monitor to your system follow these instructions 1 Turn off the power to your computer 2 For the PC or MAC with DVI digital output Connect the DVI signal cable not included to the connector of the display card in your system Figure A 1 Tighten all screws For the PC with Analog output Connect the 15 pin mini D SUB signa...

Page 8: ... further adjustments use the following OSD controls Auto Adjust Contrast Analog input only Auto Adjust Analog input only Refer to the Controls section of this User s Manual for a full description of these OSD controls NOTE If you have any problem please refer to the Troubleshooting section of this User s Manual Tilt Grasp both sides of the monitor screen with your hands and adjust the tilt as desi...

Page 9: ...r consideration of the weight of the monitor Caution Use ONLY the screws 4 pcs that were removed from the stand or the specified screws Figure F 1 to avoid damage to the monitor or stand To meet the safety requirements the monitor must be mounted to an arm which guaranties the necessary stability under consideration of the weight of the monitor The LCD monitor should only be used with an approved ...

Page 10: ...s leftward Moves rightward Function Adjustment Reset the function Adjusts the function of the selected icon Adjusts down Adjusts up NOTE You can directly change to LOW BLUE LIGHT MODE by touching the SELECT key for 3 seconds or more 2 OSD structure Example Main Menu Icon Select Sub Menu Icon Select Touch SELECT key Touch SELECT key again Touch or to select an icon Main Menu Adjust Sub Menu Adjust ...

Page 11: ...tings LEFT RIGHT Analog input only Controls Horizontal Image Position within the display area of the LCD DOWN UP Analog input only Controls Vertical Image Position within the display area of the LCD H SIZE Analog input only Adjusts the horizontal size by increasing or decreasing this setting FINE Analog input only Improves focus clarity and image stability by increasing or decreasing this setting ...

Page 12: ...ON SAVINGS Displays the estimated carbon saving information in kg The carbon footprint factor in the carbon saving calculation is based on the OECD 2008 Edition The carbon saving information can be reset by touching the INPUT RESET key CARBON USAGE Displays the estimated carbon usages information in kg This is the arithmetic estimation not actual measurement value The carbon footprint factor in th...

Page 13: ...il OSD LOCKED OUT indicator appears To deactivate touch the SELECT key then repeat the same steps until OSD main menu displays on screen SIGNAL INFORMATION If you select ON monitor displays VIDEO INPUT MENU after changing the input If you select OFF monitor doesn t display VIDEO INPUT MENU after changing the input OSD Warning OSD Warning menus disappear by touching the SELECT key NO SIGNAL This fu...

Page 14: ...t 60 Hz 1280 x 1024 1 at 60 Hz to 75 Hz 1440 x 900 1 at 60 Hz 1680 x 1050 1 at 60 Hz 1920 x 1080 at 60 Hz NEC DISPLAY SOLUTIONS cites recommended resolution for optimal display performance Active Display Area Horizontal Verttical 476 1 mm 18 7 inches 267 8 mm 10 5 inches Power Supply 100 240 V 50 60 Hz Current Rating 0 45 0 25 A Dimensions Landscape 507 4 mm W x 364 7 mm H x 205 1 mm D 20 0 inches...

Page 15: ...formance Intelligent Power Manager System Provides innovative power saving methods that allow the monitor to shift to a lower power consumption level when on but not in use saving two thirds of your monitor energy costs reducing emissions and lowering the air conditioning costs of the workplace Multiple Frequency Technology Automatically adjusts monitor to the display card s scanning frequency thu...

Page 16: ... pixels are missing and OSD warning OUT OF RANGE is displayed Either signal clock or resolution is too high Choose one of the supported modes OSD warning OUT OF RANGE is displayed on a blank screen Signal frequency is out of range Choose one of the supported modes Image is unstable unfocused or swimming is apparent Signal cable should be completely attached to the computer Use the OSD Image Adjust...

Page 17: ... enters a single Energy Saving mode Mode Power consumption LED color Maximum Operation 20 W Blue Normal Operation 18 W Default setting Blue Energy Saving Mode 0 28 W Amber Off Mode 0 26 W Unlit For additional information visit http www necdisplay com in USA http www nec display solutions com in Europe http www nec display com global index html Global For Energy Saving information For ErP requireme...

Reviews: