Display User Interface | 5
Video Format
(Composite, SDI, S-Video only)
Auto:
Examines incoming signals to automatically display the video image in
NTSC
or
PAL
format.
NTSC
/
PAL:
Press the
or
buttons to manually select.
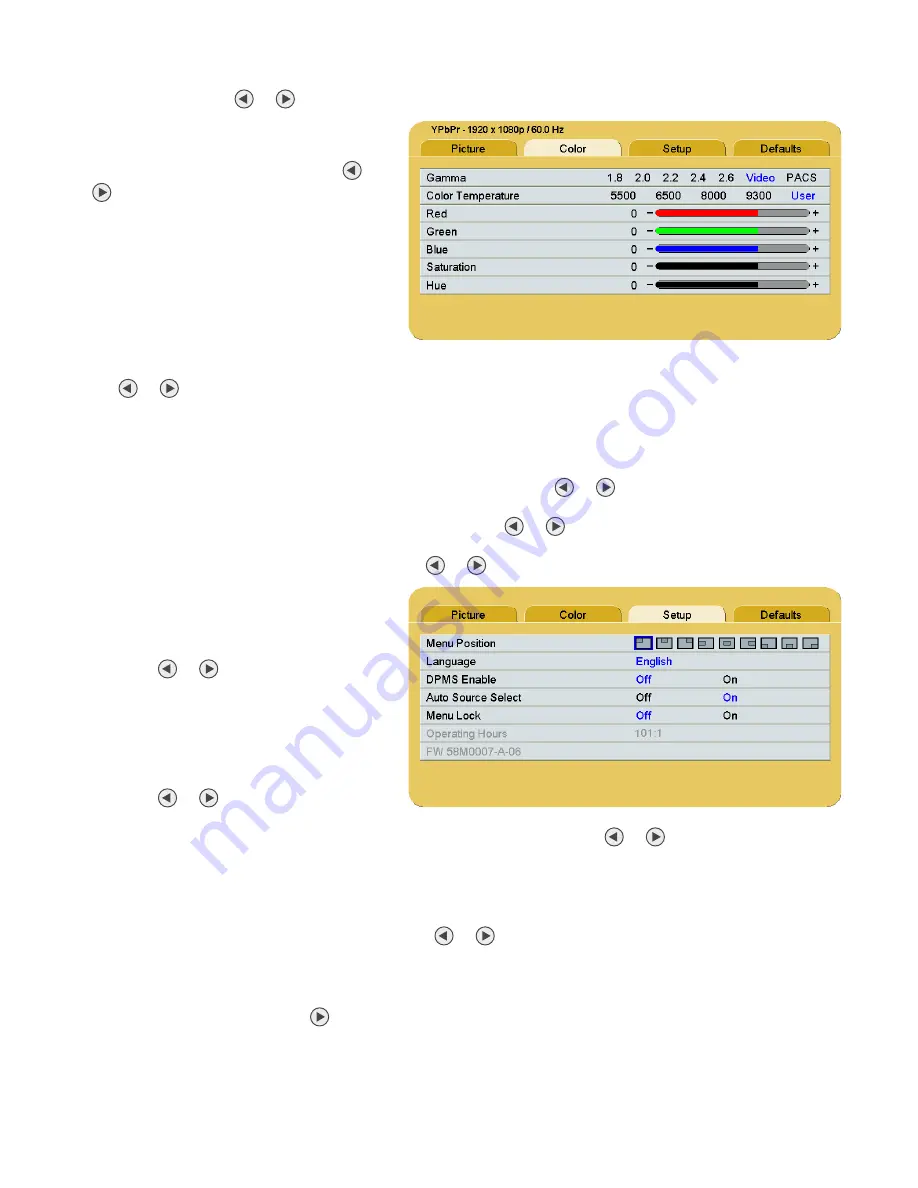
Color Menu
Gamma
To select a gamma setting, press the
or
buttons..
1.8
,
2.0
,
2.2
,
2.4
or
2.6:
Preset gamma
values
Video:
Linear gamma Look Up Table (LUT)
PACS:
DICOM gamma LUT
This product is capable of displaying
Radiology (PACS) images for reference
purposes only.
Color Temperature
To select a preset color temperature, press
the
or
buttons.
5500
,
6500
,
8000
,
9300:
Preset color temperatures.
User:
If a preset color temperature is selected, and any other parameter is subsequently changed, the resulting
values are copied to the
Color Correction User
presets and
User
is selected
Red, Green, Blue
To increase or decrease the intensity of the selected color, press the
or
buttons.
Saturation
To set the saturation (color intensity) of the image, press the
or
buttons.
Hue
To set the hue (color tint) of the image, press the
or
buttons.
Setup Menu
Menu Position:
To select from nine preset screen
locations for display of the OSD menus,
press the
or
buttons.
Language:
To select one of 18 languages:
Chinese
,
Danish
,
Dutch
,
English
,
Finnish, French
,
German
,
Greek
,
Italian
,
Japanese
,
Korean
,
Norwegian
,
Polish
,
Portuguese
,
Russian
,
Spanish
,
Swedish
, and
Turkish
,
press the
or
buttons.
DPMS Enable
To enable or disable Display Power Management System (DPMS), press the
or
buttons.
Off
: Default setting.
On
: If there is no input signal, a “D.P.M.S” message displays for 10 - 15 seconds before the display goes into
Power Saving mode. The display turns on when the input signal is restored.
Auto Source Select
To disable or enable Auto Source Select, press the
or
buttons.
Off
: Video input is manually selected.
On
: Searches through all possible input sources until an active video source is found.
Menu Lock
To enable Menu Lock, press the
button.
Off
: Default setting.
On
: Disables access to OSD menus to prevent inadvertent changes to display settings. The OSD closes, and a
MENU LOCKED message displays briefly. To unlock OSD access, simultaneously press and hold the
MENU
and
SCROLL
buttons until a MENU UNLOCKED message displays.
Summary of Contents for EndoVue 19"
Page 1: ...EndoVue USER MANUAL ENGLISH ...
Page 2: ......
Page 4: ......
Page 22: ...10 Connector Panel Overview ...
Page 26: ...14 Troubleshooting ...
Page 30: ...18 Electromagnetic Compatibility Tables ...
Page 31: ......


