


28
Advantage Install
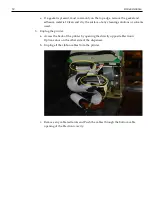
c. Line up with the indicated bolt holes where the sled rails were previously
installed in the bottom of the Electronic cavity. If installing the B side PSU, install
in the Side B Electronic cavity.
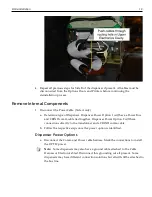
Note:
When placing the PSU assembly, install so that the center printer cable
hole is not entirely covered. Power and Comm cables will be routed through this
opening.
Summary of Contents for Retrofit OPTIC 5 Touch
Page 10: ...viii...
Page 12: ...x...
Page 14: ...2...
Page 16: ...4...
Page 18: ...6...
Page 26: ...14 Kit Deinstallation Monochrome Display b Disconnect ribbon cable from the Card Reader...
Page 38: ...26 Kit Deinstallation b Unbolt the sled rails and discard Move to the installation steps...