background image

Statement/Passbook Printer

How to Clear Paper and Passbook Jams

NCR Personas M Series 5887 Operator Manual

7-13

How to Clear Paper and Passbook 
Jams

7

The indication of a jam within the printer can be either or both of the 
following:

Cardholder complaint that statement/passbook did not come 
out

An error message that a jam is present.

To clear a jam proceed as follows:

1

Open the exterior of the ATM.

2

If your ATM does not have the auto-supervisor option, press the 
switch on the operator panel to the supervisor position.

3

Access the statement/passbook printer as described in Chapter 
1, ‘Getting Started’.

4

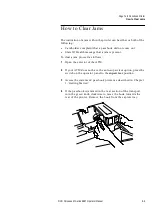
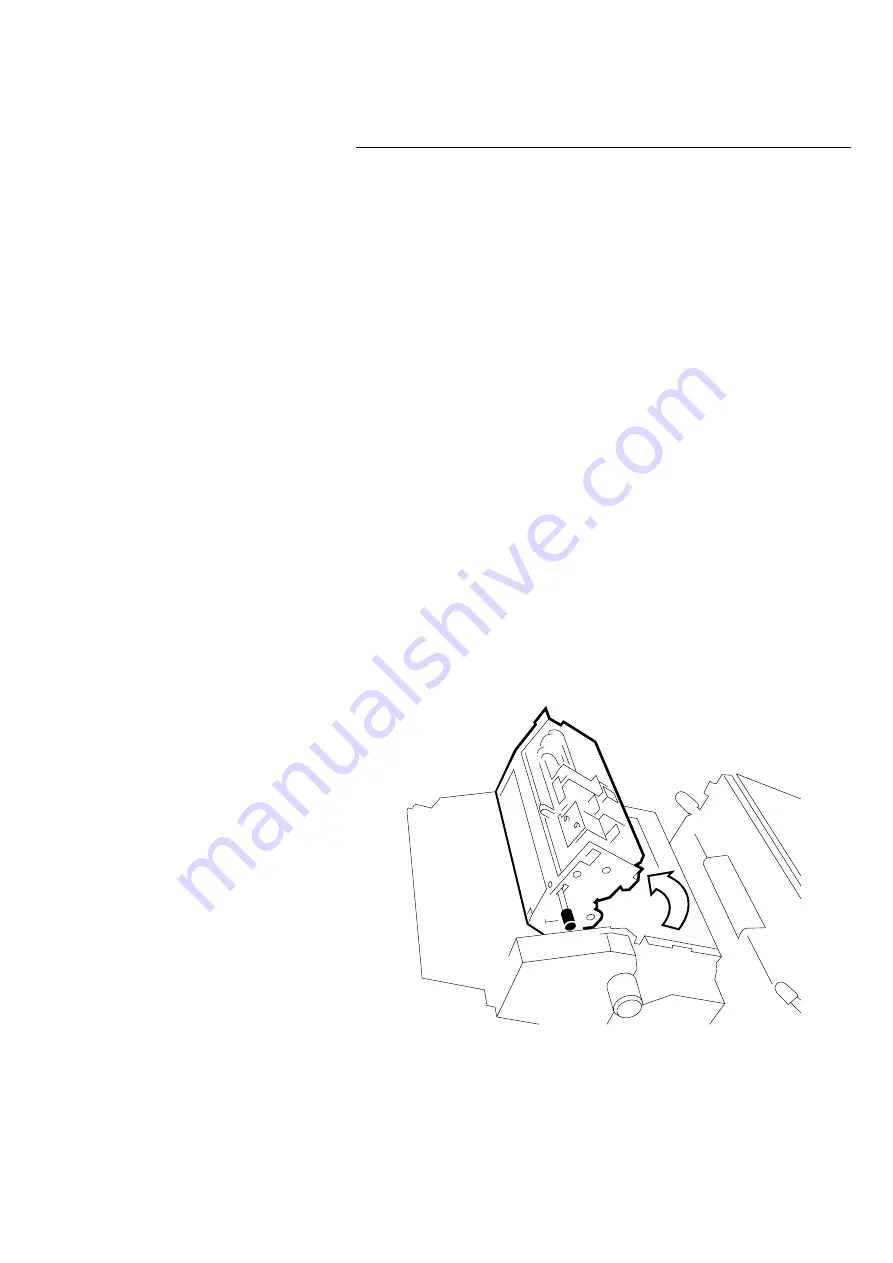
Push back the two levers on the top of the passbook transport 
and raise the top of the transport. 

5

Remove any jammed paper or passbooks and then press down 
the top of the transport. Proceed to Step 16. If there was nothing 
jammed in the transport proceed to Step 6 to locate the jam.

Summary of Contents for Personas M Series

Page 1: ...Personas M Series 5887 Operator Manual B006 6359 C000 1204 ...

Page 2: ...ice All features functions and operations described herein may not be marketed by NCR in all parts of the world In some instances photographs are of equipment prototypes Therefore before using this document consult with your NCR representative or NCR office for information that is applicable and current To maintain the quality of our publications we need your comments on the accuracy clarity organ...

Page 3: ...of Communications Le présent appareil numérique n émet pas de bruits radioélectriques dépassant les limites applicables aux appareils numériques de la classe A prescrites dans le Réglement sur le brouillage radioélectrique édicté par le ministère des Communications du Canada Information to User This equipment must be installed and used in strict accordance with the manufacturer s instructions Howe...

Page 4: ...iv NCR Personas M Series 5887 Operator Manual ...

Page 5: ...te Change to Description of Change May 03 All Revision A New publication May 04 Chapter 1 Chapter 11 12 13 Revision B Instructions for accessing new modules New chapters for Cash Acceptor Cheque Acceptor and Coin Dispenser Dec 04 Chapters 1 and 2 Revision C Incorporate new PC Core ...

Page 6: ...vi NCR Personas M Series 5887 Operator Manual ...

Page 7: ...en the Cheque Acceptor Side box 1 5 How to Switch Your ATM Power On and Off 1 6 How to Enter Supervisor Mode 1 7 Auto Supervisor 1 7 Supervisor Mode 1 7 In service Replenishment 1 9 How to Use the Enhanced Operator Panel 1 10 How to Unlock and Lock a Standard Security Enclosure 1 12 Keylocks 1 13 Combination Locks 1 13 Combination Lock and Separate Keylock 1 15 How to Unlock and Lock an Electronic...

Page 8: ...4 CD ROM in a Type 1 Core 1 36 Flex Disk in a Type 2 Core 1 38 CD or DVD ROM in a Type 2 Core 1 41 Digital Audio 1 44 Chapter 2 Error Reporting How Errors Are Reported 2 1 System Application 2 1 State of Health 2 2 How Errors in the PC Module Are Reported 2 3 How to Read the Remote Status Indicator 2 4 Chapter 3 Currency Dispenser How to Replenish Currency Cassettes 3 1 How to Empty the Currency P...

Page 9: ...s Torn 5 25 How to Clear a Paper Jam When the Paper Has Not Torn 5 29 Chapter 6 Letter Quality Document Statement Printer Important Information for the User 6 1 Overview 6 2 How to Replenish the Statement Printer Paper 6 3 Type 1 6 3 Type 2 6 7 Clearing Printer Jams 6 11 Type 1 6 11 Type 2 6 16 Removing Captured Media 6 19 Adjusting The Contrast 6 21 Chapter 7 Statement Passbook Printer How to Rep...

Page 10: ...tured Cards from a Motorised Card Reader 10 5 Standard Card Capture Container 10 5 Latch Fast Card Capture 10 6 Cleaning 10 8 For ATMs with APTRA Self Service Support system software 10 8 For ATMs with S4I system software 10 8 Chapter 11 Cash Acceptor Cash Acceptor 11 1 Removing Cash from the Cassette s and Capture Bin 11 2 Clearing Jams in the Cash Acceptor 11 8 Infeed Transport Long or Mid 11 10...

Page 11: ...r 11 27 Completing the Sensor Cleaning Procedures 11 27 Chapter 12 Cheque Acceptor Introduction 12 1 Emptying the Cheque Bins 12 2 Open Bin 12 2 Power Pockets 12 4 Clearing Jams in the Cheque Acceptor 12 7 Infeed Transport long or mid 12 8 Infeed Transport short 12 9 Main Transport 12 9 Corner Belt Assembly 12 10 Endorser Track Guide 12 10 Capture Bin Track Guide 12 11 Cheque Bins 12 12 Transport ...

Page 12: ... Required to Maintain an ATM 14 1 Replenishment 14 2 Modules and Consumables 14 2 Printer Media Storage 14 4 Cleaning 14 5 Cleaning Materials 14 5 Facia and Exterior Panels 14 5 Dip Card Reader 14 6 Motorised Card Reader 14 6 Enhanced Page Turn Passbook Printer 14 6 Cash Acceptor 14 6 Index User Feedback Form ...

Page 13: ...ration and maintenance of Personas M Series 5887 Automated Teller Machines ATMs The function of this manual is to allow them to maintain an ATM in an operational state by showing them how to replenish the devices which make up the ATM Support Information If you have a problem using the ATM contact your local Helpdesk or Customer Engineer For any other information contact your local Account Team ...

Page 14: ...es are covered in Chapter 1 Getting Started Chapter 3 Currency Dispenser Chapter 4 Receipt Printer Chapter 5 Journal Printer Chapter 6 Letter Quality Document Statement Printer Chapter 7 Statement Passbook Printer Chapter 8 Page Turn Passbook Printer Chapter 9 Enhanced Page Turn Passbook Printer Chapter 10 Motorised Card Reader Chapter 11 Cash Acceptor Chapter 12 Cheque Acceptor Chapter 13 Coin Di...

Page 15: ...ries 5887 Operator Manual xv Note To make the most efficient use of this manual each copy can be customised to the configuration of the ATM for which it is to be used If you decide to remove a chapter do not destroy it as your ATM may be upgraded later ...

Page 16: ...he sequence of actions to be taken Inserts or zoom boxes show detail of a specific action or area of interest Dotted lines indicate the final position of a highlighted object after the operator has completed the required action The following illustration provides an example of the illustrations as explained x Not required Light Dark Incorrect Correct Definition Dotted lines indicate final position...

Page 17: ... How to Open the Cheque Acceptor Side box 1 5 How to Switch Your ATM Power On and Off 1 6 How to Enter Supervisor Mode 1 7 Auto Supervisor 1 7 Supervisor Mode 1 7 In service Replenishment 1 9 How to Use the Enhanced Operator Panel 1 10 How to Unlock and Lock a Standard Security Enclosure 1 12 Keylocks 1 13 Combination Locks 1 13 Combination Lock and Separate Keylock 1 15 How to Unlock and Lock an ...

Page 18: ... Access the Modules 1 27 Currency Dispenser 1 27 Receipt Printer and Journal Printer 1 28 Statement Printer and Passbook Printer 1 29 Motorised Card Reader 1 30 Coin Dispenser 1 31 Cash Acceptor UD 686 1 31 Cheque Acceptor Type 3 1 32 How to Do a Hardware Reset of Your ATM 1 33 How to Insert and Remove Disks 1 34 Flex Disk in a Type 1 Core 1 34 CD ROM in a Type 1 Core 1 36 Flex Disk in a Type 2 Co...

Page 19: ...ve Up The procedures contained in this manual are identical for both types A PC running self service application software is the heart of the ATM This self service software manages transactions and controls the various devices such as printers card readers monitor screens and keyboards The main functions of the 5887 are listed below Dispensing Notes Coins 5887 Walk Up only Cash Security Depositing...

Page 20: ...tions Transfers Order cheque book Account enquiries Account balance Next loan payment Credit card limit Interest rates Screen advertising and marketing Your ATM may not have all the functions in the list as some are provided by optional features and some are dependent on the application that the ATM runs ...

Page 21: ...ons of the various modules which comprise a 5887 ATM Statement Printer Top Box Digital Audio Volume Control Supervisor Operator Panel Currency Dispenser or Cash Acceptor Power On Off Switch Receipt Journal Printer and Card Reader PC Core Coin Dispenser Card Capture Bin Power Supply Security Enclosure Door Standard Side Box or Cheque Acceptor Side Box ...

Page 22: ...Top box 1 To open the top box proceed as follows 1 Turn the top box key clockwise 2 Open the top box door upwards until the gas struts are fully extended 3 To close your ATM follow the procedure above in reverse pushing the top box shut to lock it How to Open the Coin Dispenser Door 1 To open the coin dispenser door insert the key and turn it counter clockwise then open the door ...

Page 23: ... have a controlled access electronic lock For instructions on how to open the controlled access electronic lock refer to the section How to Unlock and Lock a Controlled Access Electronic Lock To open the cash acceptor side box with locking handle only proceed as follows 1 Insert the key into the keylock on the locking handle and turn it counterclockwise 2 Turn the locking handle counterclockwise a...

Page 24: ...bed in your in house procedures 3 Press the switch to the required ON pressed in at the 1 side or OFF pressed in at the 0 side position Note After you have switched your ATM power on it will take several minutes for the ATM to load all its software and start displaying your application Do not attempt to load paper into the printers until the ATM has completed its power up procedures and started di...

Page 25: ...g When you close your ATM it will automatically return to the Normal Mode If you want to return the ATM to Normal Mode whilst keeping the exterior of the ATM open pull out the button shown in the following illustration Supervisor Mode 1 If your ATM is not fitted with the auto supervisor facility your ATM will continue to run your application when the exterior of the ATM is open In this case you mu...

Page 26: ...onas M Series 5887 Operator Manual 2 Press the switch on the operator panel to the supervisor position 3 After you have completed the task press the switch on the operator panel to the normal position 4 Close and lock the top box of your ATM Supervisor Normal ...

Page 27: ...ng replenished Depending on your application when you attempt to enter the Supervisor Mode you will be prompted through the Operator Panel to select either the Supervisor Mode taking the ATM out of service or to enter the In service Replenishment Mode When in the In service Replenishment Mode depending on your application the menu will Prompt you to select the device or part of device to be servic...

Page 28: ...06 6167 State of Health options are described in the NCR publication Supervisor Functions manual B006 4718 The following illustration shows the layout of the EOP The five indicators on the EOP have the following meanings IN SERVICE this is illuminated to show that the ATM is available for transactions SUPERVISOR this is illuminated to show that the ATM is in the Supervisor Mode and not available f...

Page 29: ...st the brightness of the display panel Note To run a program or a program from any of the subsequent menus which will be displayed press the number key or the Function Display Key FDK on the EOP which corresponds to the option you wish to select It is possible to transfer the operator functions from the operator panel to the front of the ATM using the TRANSFER INTERFACE option This procedure is de...

Page 30: ...es Keylock Combination lock Combination lock with silent alarm Combination lock with integral keylock Secondary lock types Keylock Combination lock Combination lock with silent alarm Combination lock with electronic override Note The make of lock fitted Standard or Sargent and Greenleaf depends on the configuration of the ATM The procedures for opening and closing the locks are the same for both m...

Page 31: ...To unlock a keylock insert the key into the lock and turn it clockwise as far as it will turn How To Lock A Keylock 1 To lock a keylock turn the key counterclockwise as far as it will turn and then remove the key Combination Locks 1 Three variants of combination lock may be fitted to your ATM Basic combination lock Combination lock with integral keylock Combination lock with a silent alarm option ...

Page 32: ...Turn the dial slowly clockwise until the bolt retracts The lock is now open Use the handle on the door to retract the door bolt and open the door Customer Setting Combination 1 If the combination has been set at a three number combination for example 36 82 44 unlock it as follows 1 If a keylock is fitted to the combination lock insert the key into the lock and turn it clockwise 2 Turn the dial cou...

Page 33: ...ed to the combination lock turn the dial until 0 is in line with the opening index and then turn the key counterclockwise and remove it from the lock How To Change The Combination 1 Detailed instructions on how to change the combination of a lock are inside the security enclosure Combination Lock and Separate Keylock 1 Unlocking 1 On arrival at the site the combination lock is set at the original ...

Page 34: ...lock is now open 4 Insert the key into the keylock and turn it clockwise to unlock the keylock 5 Turn the locking handle clockwise through approximately 45o to retract the door bolt The door is now unlocked Locking 1 To close and lock the security enclosure proceed as follows 1 Close the door 2 Turn the locking handle counterclockwise through approximately 45o to the vertical position to engage th...

Page 35: ...e times stop on the first number 36 the FOURTH time 3 Turn the dial clockwise passing the second number 82 twice and stop on the second number 82 the THIRD time 4 Turn the dial counterclockwise passing the third number 44 once and stop on the third number 44 the SECOND time 5 Turn the dial clockwise until it stops The lock is now open Use the handle on the door to retract the door bolt and open th...

Page 36: ...digits of the combination set to 123456 when shipped from factory If the sequence is entered correctly the lock will beep and the led flash If the lock has been set to operate on a single combination proceed to step 3 2 If the lock is set to operate on a dual combination enter the second six digits of the combination set to 456789 when shipped from factory If the sequence is entered correctly the ...

Page 37: ...ay be activated by entering one number higher or lower for the last digit of a combination For example if the combination was 1 2 3 4 5 6 entering 1 2 3 4 5 5 or 1 2 3 4 5 7 would activate the silent alarm Note Repeated beeping of the lock during an opening sequence indicates that the lock battery requires replacing If the lock keypad is completely dead that is it makes no sound or flashes follow ...

Page 38: ... does not flash or beep it is an indication that the lock battery requires replacing To open the lock when it is in this condition you must hold a new 9 volt alkaline battery against the terminals of the lock The larger battery terminal must be against the larger of the lock terminals The battery must be held in place while carrying out the normal procedures for opening the lock ...

Page 39: ...ystem Guide These publications can be purchased from the following order point Kaba Mas Corporation 749 W Short Street LEXINGTON Kentucky 40508 Tel 1 859 253 4744 Toll Free 1 888 959 4715 Fax 1 859 225 2655 Note For the attention of Customer Service Manager The controlled access electronic lock called the master lock can be fitted with or without a sub lock on the Cheque Acceptor door To unlock a ...

Page 40: ...the exterior of the ATM 6 Spin the lock dial counterclockwise to charge the lock until EC is displayed on the LCD Note If DL Dial Left is displayed you must only turn the dial to the left counterclockwise 7 Turn the dial to the home position 8 Enter the 6 digit access code provided by the KMC on the keypad 9 IPI should be displayed on the LCD 2 3 4 5 1 6 7 8 9 0 Keypad LCD Dial Opening Closing Key...

Page 41: ... the LCD Note If an incorrect code or PI key is used or there is a bad PI key contact a lightning bolt symbol will be displayed on the LCD indicating an error condition If the error condition was caused by a bad PI key contact YOU HAVE ONE MORE ATTEMPT AT OPENING THE LOCK If the error condition occurs after the 2nd attempt contact the KMC immediately 12 Turn the lock dial a quarter turn 90o clockw...

Page 42: ...e Ensure that all the locks and doors on the ATM are closed and locked before contacting the KMC 7 Verify identification 8 Provide the 4 digit close code to the KMC 9 The KMC will inform you that either the code is correct or give you the correct procedure to follow if the close code is wrong Unlocking the Sub Lock 1 If a sub lock is configured on your Cheque Acceptor door proceed as follows 1 Car...

Page 43: ... Locking the Sub Lock 1 To lock the sub lock if configured proceed as follows 1 Close the cheque acceptor side box door and turn the locking handle clockwise to hold the catch 2 Turn the key in the keylock clockwise and remove the key 3 Hold the PI key against the key reader of the sub lock until the LED flashes four 4 times This indicates the lock is closed 4 On the master lock turn the lock dial...

Page 44: ...ctronic Lock 1 26 NCR Personas M Series 5887 Operator Manual 9 Verify your identification 10 Provide the 4 digit close code to the KMC 11 The KMC will inform you that either the code is correct or give you the correct procedure to follow if the close code is wrong ...

Page 45: ...e before you carry out the procedures described in its operator guide Currency Dispenser 1 To gain access to the currency dispenser release the green latch and pull the dispenser out of the ATM until its slides are fully extended You do not need to pull the dispenser out of the ATM to replenish cassettes or empty the purge bin but will need to do so to clear jams Note The position and appearance o...

Page 46: ...ceipt printer or the journal printer press the green latch and use the green handle to pull the module tray out of the ATM until its slides are fully extended The journal printer is the printer nearest to you and the receipt printer is the furthest away To return the printers simply push the module tray back into the ATM until it clicks into place 1 2 ...

Page 47: ... Statement Passbook printer the Page Turn Passbook Printer or the Enhanced Page Turn Passbook printer To gain access to the statement or passbook printer press the green latch and using the green handle pull the printer out of the ATM until its slides are fully extended Note The Letter Quality Document Statement printer is shown here To return the printer simply push it back into the ATM until it ...

Page 48: ...eipt and journal printers will also slide out The card reader is located underneath the receipt printer at the back of the module tray Pull out the receipt printer transport locking plunger as shown below and then raise the receipt printer transport To return the card reader pull out the receipt printer transport locking plunger and then lower the printer transport to its normal operating position...

Page 49: ...er out until its slides are fully extended To return the coin dispenser simply push it back in then close and lock the door Cash Acceptor UD 686 1 To gain access to the cash acceptor release the green latch and use it to pull the cash acceptor out of the ATM until its slides are fully extended To return the cash acceptor simply push it back into the ATM until it clicks into place 2 1 ...

Page 50: ...ual Cheque Acceptor Type 3 1 To gain access to the cheque acceptor release the green latch and using the green handle pull the cheque acceptor out of the ATM until its slides are fully extended To return the cheque acceptor simply push it back into the ATM until it clicks into place 1 2 ...

Page 51: ...tch is pressed the ATM executes its diagnostic procedures reloads the system software and initialises the user application program To reset the ATM proceed as follows 1 Open the top box of your ATM 2 Press the reset switch on the operator panel 3 Close and lock the ATM Note After you reset your ATM it will take several minutes for the ATM to load all its software and to start displaying your appli...

Page 52: ...oving a CD ROM in a Type 1 core Inserting and removing a flex disk in a Type 2 core Inserting and removing a CD or DVD ROM in a Type 2 core Flex Disk in a Type 1 Core 1 To insert and remove a flex disk from the drive in a Type 1 core proceed as follows 1 Open the top box of your ATM 2 If a disk drive security cover is fitted unlock or remove the lock or seal supplied by your organization then pull...

Page 53: ...Disks NCR Personas M Series 5887 Operator Manual 1 35 should follow your organization s procedures for accessing an alarmed area 3 To insert a disk firmly push the disk into the disk drive as shown below until the small button ejects slightly ...

Page 54: ...al it as required by your organization 6 Close and lock the ATM CD ROM in a Type 1 Core 1 To insert and remove a CD ROM from the drive in a Type 1 core proceed as follows 1 Open the top box of your ATM 2 If a disk drive security cover is fitted unlock or remove the lock or seal supplied by your organization then pull out the popper and pull out the cover as far as it will go Note If your ATM has a...

Page 55: ... Insert and Remove Disks NCR Personas M Series 5887 Operator Manual 1 37 should follow your organization s procedures for accessing an alarmed area 3 To insert a CD ROM press the eject button to bring out the motorized tray ...

Page 56: ... eject button to retract the tray into the drive 6 If fitted close the disk drive security cover then lock or seal it as required by your organization 7 Close and lock the ATM Flex Disk in a Type 2 Core 1 To insert and remove a flex disk from the drive in a Type 2 core proceed as follows 1 Open the top box of the ATM 2 If a disk drive security latch is fitted unlock or remove the lock or seal supp...

Page 57: ...t and Remove Disks NCR Personas M Series 5887 Operator Manual 1 39 should follow your organization s procedures for accessing an alarmed area 3 Pull the two spring loaded pins out of their latches and pull open the drive bay cover ...

Page 58: ...on the drive This will eject the disk allowing you to remove it 6 Close the drive bay cover by pushing it firmly so that the spring loaded pins fully locate in their latches as shown below Caution This is an ESD electrostatic discharge sensitive device therefore after any maintenance or service actions the drive bay cover must be closed and fully latched home 7 If fitted close the disk security la...

Page 59: ...follows 1 Open the top box of the ATM 2 If a disk drive security latch is fitted unlock or remove the lock or seal supplied by your organization then pull out the popper and pull out the latch as far as it will go Note If your ATM has an enhanced alarm system fitted the disk drive security latch may be alarmed If this is the case you should follow your organization s procedures for accessing an al...

Page 60: ...d Remove Disks 1 42 NCR Personas M Series 5887 Operator Manual 3 Pull the two spring loaded pins out of their latches and pull open the drive bay cover 4 To insert a CD or DVD ROM press the eject button to bring out the motorized tray ...

Page 61: ...he motorized tray Remove the CD or DVD ROM from the tray and press the eject button to retract the tray into the drive 7 Close the drive bay cover by pushing it firmly so that the spring loaded pins fully locate in their latches as shown below Caution This is an ESD electrostatic discharge sensitive device therefore after any maintenance or service actions the drive bay cover must be closed and fu...

Page 62: ...Getting Started Digital Audio 1 44 NCR Personas M Series 5887 Operator Manual Digital Audio 1 To change the digital audio volume use the volume control dial as shown in the Module Location section ...

Page 63: ...as M Series 5887 Operator Manual Chapter 2 Error Reporting How Errors Are Reported 2 1 System Application 2 1 Clearing a Device State 2 1 State of Health 2 2 How Errors in the PC Module Are Reported 2 3 How to Read the Remote Status Indicator 2 4 ...

Page 64: ...Table of Contents Error Reporting NCR Personas M Series 5887 Operator Manual ...

Page 65: ...The following information is provided for each module or device requiring attention Device name This is the name of the module or device that requires attention Description This is a short description of the state Attention This shows whether the state requires attention now or will require attention soon User category This specifies what type of user is able to deal with the state Operator or Cus...

Page 66: ...the SOH message is a message identification number If you have to call a customer engineer at any time quote the SOH message identification number as well as the message text The asterisks indicate the skill level required to fix whatever problem is generating the current SOH message and also indicate which VERIFY SOH option should be selected to clear the SOH message For more information refer to...

Page 67: ...tected on one of the components of the PC module the Light Emitting Diode LED will be illuminated red The following table gives a summary of the LED colour code The location of the LED is different in the two types of PC module as shown in the following illustration Note In some designs of ATM the PC module is fitted in a horizontal position If the LED is unlit or illuminated red after power up or...

Page 68: ... the Remote Status Indicator 2 4 NCR Personas M Series 5887 Operator Manual How to Read the Remote Status Indicator 2 The meaning of each Light Emitting Diode LED when illuminated is marked clearly on the remote status indicator ...

Page 69: ...as M Series 5887 Operator Manual Chapter 3 Currency Dispenser How to Replenish Currency Cassettes 3 1 How to Empty the Currency Purge Bin 3 3 Standard Currency Purge Bin 3 3 Latch Fast Currency Purge Bin 3 4 How to Clear Currency Dispenser Jams 3 7 ...

Page 70: ...Table of Contents Currency Dispenser NCR Personas M Series 5887 Operator Manual ...

Page 71: ...ecurity enclosure 4 Lift the catch on the right hand side of the currency cassette you wish to replenish and pull the cassette out of the ATM 5 If the cassette is to be sent to a secure area for refilling do so in accordance with your institute s rules Refer to the NCR publication H 8015 STD1 01 02 08 Currency Cassette Owner s Manual B006 1297 for details of how to open and replenish the currency ...

Page 72: ...al 8 Close and lock the security enclosure 9 Follow your in house procedures for indicating that the currency cassettes have been replenished 10 If your ATM does not have the auto supervisor option press the switch on the operator panel to the normal position 11 Close and lock the exterior of the ATM ...

Page 73: ...ndard currency purge bin in your ATM proceed as follows 1 Open the exterior of the ATM 2 If your ATM does not have the auto supervisor function press the switch on the operator panel to the supervisor position 3 Open the security enclosure 4 Lift the catch on the left hand side of the currency purge bin and pull the bin out of the ATM 5 Remove the purged currency from the bin 6 Slide the empty pur...

Page 74: ... exterior of the ATM Latch Fast Currency Purge Bin 3 To empty the latch fast currency purge bin in your ATM proceed as follows 1 Open the exterior of the ATM 2 If your ATM does not have the auto supervisor function press the switch on the operator panel to the supervisor position 3 Open the security enclosure 4 If the purge bin is to be removed from the ATM lift the catch to the left of the curren...

Page 75: ...rency Purge Bin NCR Personas M Series 5887 Operator Manual 3 5 6 Press the latch hasp down and pull the bottom of the latch towards you 7 Lift the latch up to free it from the top block Pull the top of the latch towards you and hinge it down ...

Page 76: ...rwards to hook it on to the top block 12 Press the latch down until the latch hasp clicks and locks the latch 13 Secure the bin with a lock seal 14 If the bin was removed from the ATM slide the empty purge bin into the ATM until it clicks into place 15 Close and lock the security enclosure 16 Follow your in house procedures for indicating that you have emptied the currency purge bin 17 If your ATM...

Page 77: ...the supervisor position 3 Open the security enclosure 4 Access the currency dispenser as described in Chapter 1 Getting Started 5 The procedures for clearing a jam depend on where the jam is within the dispenser An error description will indicate where the jam is The following table describes the procedure to follow for each error message Error Description Go To Bill jam at the pick sensor module ...

Page 78: ... right hand side of the currency cassette indicated by the error description cassette position 1 is the top cassette and pull the cassette out of the ATM 7 Reach inside the hole vacated by the cassette and remove any jammed bills 8 Push the cassette back into the ATM until the cassette latch clicks into place Proceed to Step 16 1 2 ...

Page 79: ...he side of the dispenser counterclockwise until the bills enter the stacking area on the top of the main transport 10 If your dispenser has a bill alignment mechanism as shown move it backwards until it stops 11 Insert your hand through the hole in the side or the top of the dispenser and remove any jammed bills Proceed to Step 18 ...

Page 80: ...nd pull the purge bin out of the dispenser Note If the purge bin is a latch fast bin and the jam is caused by an overfill it may be impossible to remove the bin from the ATM In this case you can empty the purge bin whilst it is in position Remove the door see latch fast replenishment section and then remove the jammed cash Replace the door and go to Step 16 2 1 ...

Page 81: ...Reach inside the hole vacated by the purge bin and remove any jammed bills If you cannot reach the bills turn either of the shaft wheels as indicated below until the bills are in an accessible position Remove the jammed bills 14 Push the purge bin back into the ATM until it locks in place Proceed to Step 16 ...

Page 82: ...elts on the right hand side of the transport Reach into the transport and remove the bills 16 Push the dispenser back into the ATM 17 Close and lock the security enclosure 18 Follow your in house procedures for indicating that you have fixed without replacing the faulty module in the currency dispenser 19 If your ATM does not have the auto supervisor option press the switch on the operator panel t...

Page 83: ...Table of Contents Receipt Printer NCR Personas M Series 5887 Operator Manual Chapter 4 Receipt Printer Overview 4 1 How to Replenish Your Receipt Printer Paper 4 2 How to Clear Receipt Printer Jams 4 6 ...

Page 84: ...Table of Contents Receipt Printer NCR Personas M Series 5887 Operator Manual ...

Page 85: ...s occur the illustrations in the following sections show both printers with the yellow coloured printer at the top and the grey coloured printer at the bottom of each illustration Note The angle of the receipt transport on your printer may differ from those in the illustrations This does not affect the instructions that follow The paper used in your printer must conform to the specification given ...

Page 86: ...terior of the ATM 2 If your ATM does not have the auto supervisor function press the switch on the operator panel to the supervisor position 3 Access the receipt printer as described in Chapter 1 Getting Started 4 Open the print mechanism cover either by pulling out one of the green locking levers or by pressing on the lock shaft depending the type of receipt printer you have The cover will spring...

Page 87: ... 5 Lift out the paper roll core spindle and any remaining paper Pull out any paper from the paper entry slot you may have to partially close the print mechanism to see this Discard the paper and paper roll core but retain the spindle 6 Close the print mechanism cover by pushing it down until it clicks shut ...

Page 88: ...e or tape remain on the roll Fold and tear off the end of the paper to leave a clean straight edge 8 Insert the spindle into the core of the new paper roll Lower the paper roll into the printer so that the spindle drops into the slots The paper should feed from the top of the roll 9 Guide the paper into the paper entry slot Manually feed in about 75 mm 3 in of paper until it stops ...

Page 89: ... may not have been loaded correctly Check the paper is feeding from the top of the roll Open the print mechanism rotate the paper roll backwards to pull the paper clear and try loading the paper again starting at Step 9 12 Make sure that you remove the sample receipt and any other paper from the exit slot or receipt transport 13 Push the printer back into the ATM until it clicks into place 14 Foll...

Page 90: ...rvisor function press the switch on the operator panel to the supervisor position 3 Access the receipt printer as described in Chapter 1 Getting Started 4 Inspect the printer to see if you can identify the cause of the paper jam 5 If necessary tear the paper to separate the roll from the paper entering the print mechanism 6 Open the print mechanism cover either by pulling out one of the green lock...

Page 91: ...sm to do this 8 If there is any paper jammed in the receipt transport remove it carefully Caution Do not pull on transport belts to remove paper 9 Make sure the paper roll can turn freely by rotating it backwards away from the print mechanism If the roll does not turn freely remove it from the printer and check that there is nothing jamming the paper roll or spindle 10 Before reloading the paper f...

Page 92: ... 4 8 NCR Personas M Series 5887 Operator Manual 11 Close the print mechanism cover by pushing it down until it clicks shut 12 Lower the paper roll into the printer so that the spindle drops into the slots The paper should feed from the top of the roll ...

Page 93: ...Manually feed in about 75 mm 3 in of paper until it stops 14 Press the paper feed button and continue to feed in the paper by hand until it is gripped by the print mechanism The paper will start to feed automatically and the printer will produce a sample receipt printed with a test graphic This confirms that the printer is operating correctly ...

Page 94: ...he paper clear and try loading the paper again starting at Step 13 16 Make sure that you remove the sample receipt and any other paper from the exit slot or receipt transport 17 Push the printer back into the ATM until it clicks into place 18 Follow your in house procedures for indicating that you have fixed without replacing the receipt printer mechanism 19 If your ATM does not have the auto supe...

Page 95: ...Graphics Journal Printer Jams 5 8 How to Replenish the Dot Matrix Journal Printer 5 11 How to Replace the Dot Matrix Journal Printer Ribbon 5 18 How to Replace the Dot Matrix Journal Printer Print Head 5 21 How to Clear Dot Matrix Journal Printer Paper Jams 5 25 How to Clear a Paper Jam When the Paper Has Torn 5 25 How to Clear a Paper Jam When the Paper Has Not Torn 5 29 ...

Page 96: ...Table of Contents Journal Printer NCR Personas M Series 5887 Operator Manual ...

Page 97: ...NCR account Manager for more information To replace the journal paper roll proceed as follows 1 Open the exterior of the ATM 2 If your ATM does not have the auto supervisor function press the switch on the operator panel to the supervisor position 3 Access the journal printer as described in Chapter 1 Getting Started 4 If there is any paper left on the supply roll press the paper feed button to wi...

Page 98: ...ersonas M Series 5887 Operator Manual 5 Pull the printed journal roll out of the printer The spindle is spring loaded so you will need to tilt the roll as you pull it out If necessary tear off the paper against the serrated cutter 6 Remove the take up spindle from the paper roll ...

Page 99: ...plenish the Graphics Journal Printer Paper NCR Personas M Series 5887 Operator Manual 5 3 7 Lift one of the green locking levers to open the print mechanism 8 Remove the paper roll core and any remaining paper from the printer ...

Page 100: ...sufficient paper from the new journal roll so that there are no traces of glue or tape Place the new roll in the journal printer as shown 10 Tear the end of the paper to leave a clean straight edge 11 Lifting the paper entry cover with one hand feed the paper through until the end is visible Release the paper entry cover 1 2 ...

Page 101: ...printer as the black roll guide Insert the folded edge of the paper into the slot on the take up spindle and wind the paper around the core two or three times in the direction shown Keep the paper central on the spindle 14 Making sure that the black end of the spindle is against the black roll guide push the take up spindle down between the roll guides until it clicks into place Starting with the ...

Page 102: ... indicates that the empty paper core was left in the printer and is still under the new paper roll Lift out the paper remove the empty core and replace the paper 16 Press the paper feed button to wind on the paper until all slack is taken up and the test graphic has disappeared onto the take up roll 17 If nothing is printed on the paper when the print mechanism is closed the paper has probably bee...

Page 103: ... slide the paper until it is centred between the guides Close the print mechanism The smiley graphic should be printed again 19 Push the printer back into the ATM until it clicks into place 20 Follow your in house procedures for indicating that the paper has been replaced in the journal printer 21 If your ATM does not have the auto supervisor option press the switch on the operator panel to the no...

Page 104: ...e journal To clear a paper jam within the journal printer proceed as follows 1 Open the exterior of the ATM 2 If your ATM does not have the auto supervisor function press the switch on the operator panel to the supervisor position 3 Access the journal printer as described in Chapter 1 Getting Started 4 Inspect the printer to see if you can identify the location of the paper jam 5 Lift one of the g...

Page 105: ...ll is winding on evenly and that it is not being crumpled against one of the roll guides If you cannot move the paper away from the guide you should replace the journal roll as explained in the previous section 9 If you are able to straighten out the paper close the print mechanism cover pushing it until it clicks shut A smiley graphic should be printed Press the paper feed button until the paper ...

Page 106: ...phics Journal Printer Jams 5 10 NCR Personas M Series 5887 Operator Manual 13 If your ATM does not have the auto supervisor option press the switch on the operator panel to the normal position 14 Close and lock the exterior of the ATM ...

Page 107: ...supervisor function press the switch on the operator panel to the supervisor position 3 Access the journal printer as described in Chapter 1 Getting Started 4 Push down the paper feed switch on the top of the printer and hold it down until all records are on the take up roll 5 Tear the paper over the serrated edge provided on the printer qwerwe wef qw 1234 qw 234 435666 wef weff asdd asd 244 23 1 ...

Page 108: ...ve the journal roll from the take up spindle 8 If once the existing journal entries are on the take up spindle you want to continue to use the existing supply roll proceed to Step 16 9 Press down the paper feed switch and hold down until the end of the paper is released from the printer asdad adfd ad asdad d asdad adfd 2344 ad adfd dfd asdad adfd ad asdad d asdad adfd 2344 ad adfd dfd ...

Page 109: ...Personas M Series 5887 Operator Manual 5 13 10 Lift the spindle and the remains of the paper roll out of the printer 11 Discard the remaining paper roll but retain the spindle 12 Tear off the end of the new journal roll to remove the tape and make a clean straight edge ...

Page 110: ...erator Manual 13 Slide the spindle through the core of the new paper roll in the same orientation that it was removed 14 Lower the paper roll into the printer so that the paper feeds forwards from the bottom of the printer roll Ensure that the spindle engages in the slots in the sides of the printer ...

Page 111: ...nas M Series 5887 Operator Manual 5 15 15 Insert the end of the paper roll into the slot shown below 16 Push down the paper feed switch and the paper should be fed through the printer Hold down the switch until approximately 254 mm 10in of paper is free of the exit slot 1 2 ...

Page 112: ...orm a clean square edge and insert it into the slot in the take up spindle Rotate the spindle so that the paper wraps around it at least 3 times 18 Push the take up spindle down between the paper guides on the printer until it clicks into position in the centre of the guides The spindle is spring loaded so you will need to tilt it as you push x3 ...

Page 113: ...around the journal take up roll another 2 or 3 times 20 Push the printer back into the ATM until it clicks into place 21 Follow your in house procedures for indicating that the journal paper has been replaced 22 If your ATM does not have the auto supervisor option press the switch on the operator panel to the normal position 23 Close and lock the exterior of the ATM ...

Page 114: ... dried out The ribbon character life has been exceeded an error message will report when the ribbon character life has almost expired To replace the printer ribbon proceed as follows 1 Open the exterior of the ATM 2 If your ATM does not have the auto supervisor function press the switch on the operator panel to the supervisor position 3 Access the journal printer as described in Chapter 1 Getting ...

Page 115: ...Series 5887 Operator Manual 5 19 5 Push apart the clips which secure the ribbon cassette in the printer and pull the cassette upwards and out of the printer 6 Push the new ribbon cassette into the printer ensuring that the ribbon locates between the print head and the plastic guide 1 2 ...

Page 116: ...the ribbon 8 Replace the protective cover on the rear of the printer 9 Push the printer back into the ATM until it clicks into place 10 Follow your in house procedures for indicating that you have replaced the journal printer ribbon 11 If your ATM does not have the auto supervisor option press the switch on the operator panel to the normal position 12 Close and lock the exterior of the ATM ...

Page 117: ...ead is not operating correctly To replace the print head proceed as follows Warning The print head becomes hot when in operation After operation leave print head to cool for three minutes before touching it 1 Open the exterior of the ATM 2 If your ATM does not have the auto supervisor function press the switch on the operator panel to the supervisor position 3 Switch off the ATM power Press in the...

Page 118: ... 6 Push apart the clips which secure the ribbon cassette in the printer and pull the cassette upwards and out of the printer 7 Press gently down on the centre of the print head locking lever while at the same time lifting the end of the lever until it is clear of its latch 8 Pull the print head out of the printer 1 2 1 2 ...

Page 119: ...rint head into the printer so that the printed circuit board locates into the connector in the printer and the print head neck locates in the guide Lock the print head in position using the plastic locking lever 10 Push the ribbon cassette into the printer ensuring that the ribbon locates between the print head and the plastic guide 1 2 ...

Page 120: ...witch on the ATM power 14 Wait for the operator display to come back on this may take up to 5 minutes after switching the power on 15 Push the printer back into the ATM until it clicks into place 16 Follow your in house procedures to indicate that you have fixed without replacing the journal printer mechanism 17 If your ATM does not have the auto supervisor option press the switch on the operator ...

Page 121: ...the switch on the operator panel to the supervisor position 3 Access the journal printer as described in Chapter 1 Getting Started 4 Look at the journal paper roll to see where the jam has occurred and if the paper has torn 5 Try to identify the reason for the paper jam The jam may have been caused by the paper being stuck to the core How to Clear a Paper Jam When the Paper Has Torn 5 If the journ...

Page 122: ...ift the take up spindle with the journal roll out of the printer 3 Remove the journal roll from the take up spindle 4 Press the green lever on the side of the printer and pull any jammed paper from within the printer asdad adfd ad asdad d asdad adfd 2344 ad adfd dfd asdad adfd ad asdad d asdad adfd 344 ad adfd dfd 1 2 ...

Page 123: ...er Jams NCR Personas M Series 5887 Operator Manual 5 27 5 When the jammed paper is free of the printer rip the paper on the serrated edge provided 6 Push and hold down the paper feed switch until approximately 254 mm 10 in of paper is free of the exit slot 1 2 ...

Page 124: ... M Series 5887 Operator Manual 7 Insert the end of the paper in the take up spindle and rotate spindle so that the paper wraps around it at least 3 times 8 Push the take up spindle down between the paper guides on the printer until it clicks into position in the centre of the guides x3 ...

Page 125: ...lace 11 Follow your in house procedures for indicating that you have fixed without replacing the journal printer mechanism 12 If your ATM does not have the auto supervisor option press the switch on the operator panel to the normal position 13 Close and lock the exterior of the ATM How to Clear a Paper Jam When the Paper Has Not Torn 5 If the paper has not torn proceed as follows 1 Press the green...

Page 126: ...fy the reason for the paper jam The jam may have been caused by the paper being stuck to the core 4 Push the printer back into the ATM until it clicks into place 5 Follow your in house procedures for indicating that you have fixed without replacing the journal printer mechanism 6 If your ATM does not have the auto supervisor option press the switch on the operator panel to the normal position 7 Cl...

Page 127: ...tor Manual Chapter 6 Letter Quality Document Statement Printer Important Information for the User 6 1 Overview 6 2 How to Replenish the Statement Printer Paper 6 3 Type 1 6 3 Type 2 6 7 Clearing Printer Jams 6 11 Type 1 6 11 Type 2 6 16 Removing Captured Media 6 19 Adjusting The Contrast 6 21 ...

Page 128: ...Table of Contents Letter Quality Document Statement Printer NCR Personas M Series 5887 Operator Manual ...

Page 129: ... as dot matrix statement printers If your ATM is fitted with an LQD printer but displays a replace ribbon error message select the option that confirms ribbon replacement in a dot matrix statement printer This will resolve the error condition and clear the message If a fault occurs on your LQD printer while running the dot matrix statement printer customer confidence test CCT or VERIFY SOH do not ...

Page 130: ...ferences in the operating instructions between the two types of printer Refer to the appropriate type in the following sections for the instructions specific to your printer The paper used in your printer must conform to the specification given in NCR publication B006 4992 Consumable Items for Self Service The manual also provides details of the ATM consumables which can be ordered from NCR System...

Page 131: ... the switch on the operator panel to the supervisor position 3 Access the statement printer as described in Chapter 1 Getting Started 4 If there is still some paper left in the printer push down the paper feed switch on the top of the printer as shown below to unload the paper When the paper stops moving pull the end of the paper out of the printer Note If the feed button does not function it coul...

Page 132: ... hopper latch and slide the hopper back Remove the remains of the paper stack from the hopper 6 You may need to empty the capture bin For more information refer to the section Removing Captured Media 7 Place the new paper stack into the hopper The black dots must be facing downwards and be closer to the leading edge as it loads into the printer ...

Page 133: ...by a thumbscrew on the underside of the hopper 9 Slide the hopper forward to its operating position 10 Slide the end of the paper between the guides on top of the printer Press the paper feed switch as shown below to load the paper into the printer The paper should feed through the printer 11 If the printer cuts the statement remove it from the capture bin 12 Push the printer back into the ATM unt...

Page 134: ... Personas M Series 5887 Operator Manual 13 Follow your in house procedures for indicating that you have replenished the statement paper 14 If your ATM does not have the auto supervisor option press the switch on the operator panel to the normal position 15 Close and lock the exterior of the ATM ...

Page 135: ...erator panel to the supervisor position 3 Access the statement printer as described in Chapter 1 Getting Started 4 If there is still some paper left in the printer push the paper feed switch on the top of the printer as shown below to unload the paper When the paper stops moving pull the end of the paper out of the printer Note If the feed button does not function it could be because there is a fa...

Page 136: ... hopper latch and slide the hopper back Remove the remains of the paper stack from the hopper 6 You may need to empty the capture bin For more information refer to the section Removing Captured Media 7 Place the paper stack into the hopper The black dots must be facing downwards and be closer to the leading edge as it loads into the printer 1 2 ...

Page 137: ...umbscrew on the underside of the hopper 9 Slide the hopper forward to its operating position 10 Slide the end of the paper between the guides on top of the printer Press the paper feed switch as shown below to load the paper into the printer The paper should feed through the printer 11 If the printer cuts the statement remove it from the capture bin 12 Push the printer back into the ATM until it c...

Page 138: ...R Personas M Series 5887 Operator Manual 13 Follow your in house procedures for indicating that you have replenished the statement paper 14 If your ATM does not have the auto supervisor option press the switch on the operator panel to the normal position 15 Close and lock the exterior of the ATM ...

Page 139: ...lear a jam proceed as follows 1 Open the exterior of your ATM 2 If your ATM does not have the auto supervisor option press the switch on the operator panel to the supervisor position 3 Access the statement printer as described in Chapter 1 Getting Started Paper jams in the printer could occur in the areas identified in the illustration below Print Head Assembly Area Paper Knife Area Top Transport ...

Page 140: ...ont transport area gently free the paper and ease it out Jams in this area will be clearly visible and can be easily removed 5 To clear a paper jam in the top transport push the green handle down and forward to lift the plate and access the transport area 6 Remove any crumpled or jammed paper 7 Lower the plate until it latches into place ...

Page 141: ...87 Operator Manual 6 13 8 To clear jams in the paper knife area pull out the two poppers on the knife assembly and lift it out 9 Remove any crumpled or jammed paper 10 Replace the knife assembly The rollers must mesh before the knife assembly latches into place 11 Press in the two poppers ...

Page 142: ...ter Jams 6 14 NCR Personas M Series 5887 Operator Manual 12 To clear jams in the print head assembly area tear the paper across the perforations immediately prior to the paper entering the paper guides 13 Lift up the latches to open the print head assembly ...

Page 143: ...ween the guides on top of the printer Press the paper feed switch as shown below to load the paper The paper should feed through the printer 17 If the printer cuts the statement remove it from the capture bin 18 Push the statement printer back into the ATM until it clicks into place 19 Follow your in house procedures for indicating that you have fixed without replacing the statement printer mechan...

Page 144: ...n press the switch on the operator panel to the supervisor position 3 Access the statement printer as described in Chapter 1 Getting Started Paper jams in the printer could occur in the areas identified in the illustration below 4 To clear a jam in the front transport area gently free the paper and ease it out Jams in this area will be clearly visible and can be easily removed Front Transport Area...

Page 145: ...ssembly area press down on the green lever to release the assembly cover 6 Remove any crumpled or jammed paper 7 To clear jams in the paper knife area unscrew the two white screws making sure that you retain the screws Lift the knife assembly out Note The print head cover must be open when removing the knife assembly 8 Remove any crumpled or jammed paper ...

Page 146: ...ly cover back down until it clicks into place 11 Push the statement printer back into the ATM until it clicks into place 12 Follow your in house procedures for indicating that you have fixed without replacing the statement printer mechanism 13 If your ATM does not have the auto supervisor option press the switch on the operator panel to the normal position 14 Close and lock the exterior of the ATM...

Page 147: ...emove captured statements proceed as follows 1 Open the exterior of your ATM 2 If your ATM does not have the auto supervisor option press the switch on the operator panel to the supervisor position 3 Access the statement printer as described in Chapter 1 Getting Started 4 Remove any captured statements from the capture area Check that there are no statements stuck to the roof of the area Type 1 6 ...

Page 148: ...al 5 Push the printer back into the ATM until it clicks into place 6 Follow your in house procedures for indicating that you have emptied the capture area 7 If your ATM does not have the auto supervisor option press the switch on the operator panel to the normal position 8 Close and lock the exterior of the ATM ...

Page 149: ... contrast to improve print clarity on statements The contrast control switch located near to the paper feed switch as shown in the following illustrations allows you to adjust the printer contrast Type 1 6 Type 2 6 For both types of printer to darken the image set the switch to the Down position The contrast is increased by applying more heat to Dark Light Normal Dark Light Normal ...

Page 150: ... Operator Manual the paper however if the image is too dark the print may blur slightly To lighten the image set the contrast switch to the Up position If the contrast is too light the print image may fade over time Note that the ATM must be re started for the new contrast settings to take effect ...

Page 151: ...as M Series 5887 Operator Manual Chapter 7 Statement Passbook Printer How to Replace the Paper 7 1 How to Replace the Ribbon 7 5 How to Replace the Print Head 7 8 How to Clear Paper and Passbook Jams 7 13 How to Remove Captured Statements and Passbooks 7 18 ...

Page 152: ...Table of Contents Statement Passbook Printer NCR Personas M Series 5887 Operator Manual ...

Page 153: ...ears and creases and that the paper lies flat in the paper hopper The following steps detail how you should replace the printer paper 1 Open the exterior of the ATM 2 If your ATM does not have the auto supervisor option press the switch on the operator panel to the supervisor position 3 Access the statement passbook printer as described in Chapter 1 Getting Started 4 If the paper is not completely...

Page 154: ...s as indicated Remove the remains of the paper stack from the hopper 6 Place the new paper stack on a table and fan the stack from both ends to make sure that the sheets are not stuck together Check that the paper is free of tears folds and creases Make sure that the black marks on the paper are positioned as shown and then place the paper stack in the hopper 2 1 ...

Page 155: ... How to Replace the Paper NCR Personas M Series 5887 Operator Manual 7 3 7 Slide the hopper forward to its operating position 8 Slide the end of the paper between the guides on top of the printer and down into the slot as shown ...

Page 156: ... the printer when the switch is pressed push the paper further into the slot and press the switch again 10 Remove the statement from the end of the printer transport 11 Push the printer back into the ATM until it clicks into place 12 Follow your in house procedures for indicating that you have replenished the paper 13 If your ATM does not have the auto supervisor option press the switch on the ope...

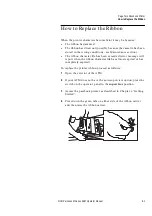
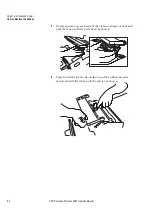
Page 157: ...haracter life has been exceeded error message will report when the ribbon character life has almost expired or when it has completely expired To replace the printer ribbon proceed as follows 1 Open the exterior of the ATM 2 If your ATM does not have the auto supervisor option press the switch on the operator panel to the supervisor position 3 Access the statement passbook printer as described in C...

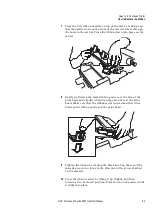
Page 158: ...nas M Series 5887 Operator Manual 5 Push apart the clips securing the ribbon cassette in the printer and pull the cassette out of the printer 6 Insert the new ribbon cassette into the printer Make sure that the ribbon passes between the print head and the ribbon guide ...

Page 159: ...ssette carrier until it clicks in position The printer will be reset when the carrier is pushed down 9 Push the printer back into the ATM until it clicks into place 10 Follow your in house procedures for indicating that you have replaced the statement printer ribbon 11 If your ATM does not have the auto supervisor option press the switch on the operator panel to the normal position 12 Close and lo...

Page 160: ...shows that the print head is not operating correctly Warning The print head becomes hot when in operation After operation leave the print head to cool before touching it To replace the print head proceed as follows 1 Open the exterior of the ATM 2 If your ATM does not have the auto supervisor option press the switch on the operator panel to the supervisor option 3 Switch off the ATM Press the powe...

Page 161: ...Personas M Series 5887 Operator Manual 7 9 5 Pull up the green levers on either side of the printer to raise the print head and ribbon cassette carrier 6 Push apart the clips which secure the ribbon cassette in the printer and pull the cassette out of the printer ...

Page 162: ...nt Passbook Printer How to Replace the Print Head 7 10 NCR Personas M Series 5887 Operator Manual 7 Push apart the clips which hold the print head in the printer and then pull the print head out of the printer ...

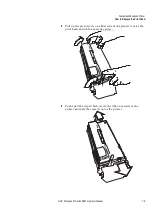
Page 163: ... circuit board locates into the connector in the printer and the print head neck locates in the guide on the printer Push together the clips on either side of the print head until they clip into the recesses on the sides of the print head 9 Insert the ribbon cassette into the printer Make sure that the ribbon passes between the print head and the ribbon guide ...

Page 164: ...s in position 12 Push the printer back into the ATM until it clicks into place 13 Switch on the ATM power 14 Wait for the operator display to display status messages this may take up to 5 minutes 15 Follow your in house procedures for indicating that you have replaced the statement printer print head 16 If your ATM does not have the auto supervisor option press the switch on the operator panel to ...

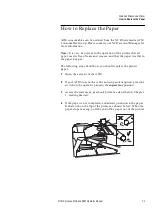
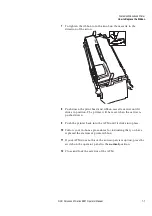
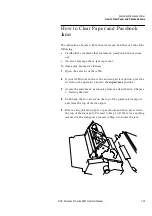
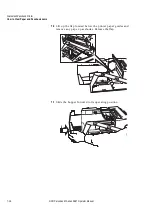
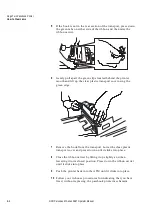
Page 165: ...r a jam proceed as follows 1 Open the exterior of the ATM 2 If your ATM does not have the auto supervisor option press the switch on the operator panel to the supervisor position 3 Access the statement passbook printer as described in Chapter 1 Getting Started 4 Push back the two levers on the top of the passbook transport and raise the top of the transport 5 Remove any jammed paper or passbooks a...

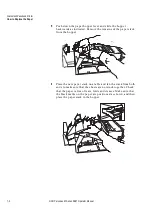
Page 166: ... levers on either side of the printer to raise the print head and ribbon cassette carrier 7 Lift up the flap shown below and remove any paper passbooks jammed under the flap Release the flap 8 Push down the print head and ribbon cassette carrier until it clicks into position The printer will be reset when the carrier is pushed down ...

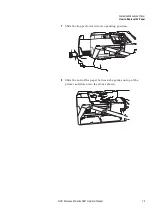
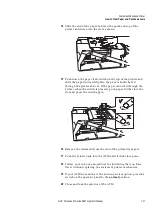
Page 167: ...nder the flap proceed to Step 16 If there was nothing jammed under the flap proceed to Step 10 to locate the jam 10 Push down the paper feed switch on the top of the printer as shown below When paper stops moving pull the end of the paper out of the printer 11 Push down the paper hopper lever and slide the hopper backwards as indicated 2 1 ...

Page 168: ...lear Paper and Passbook Jams 7 16 NCR Personas M Series 5887 Operator Manual 12 Lift up the flap located below the printer paper guides and remove any paper passbooks Release the flap 13 Slide the hopper forward to its operating position ...

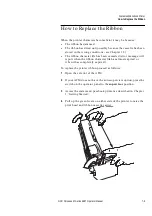
Page 169: ...nter and cut If the paper is not fed through the printer when the switch is pressed push paper further into the slot and press the switch again 16 Remove the statement from the end of the printer transport 17 Push the printer back into the ATM until it clicks into place 18 Follow your in house procedures for indicating that you have fixed without replacing the statement printer mechanism 19 If you...

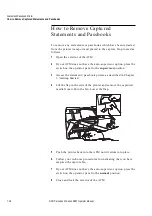
Page 170: ...supervisor option press the switch on the operator panel to the supervisor position 3 Access the statement passbook printer as described in Chapter 1 Getting Started 4 Lift the flap in the side of the printer and remove the captured media from within the bin Lower the flap 5 Push the printer back into the ATM until it clicks into place 6 Follow your in house procedures for indicating that you have...

Page 171: ...of Contents Page Turn Passbook Printer NCR Personas M Series 5887 Operator Manual Chapter 8 Page Turn Passbook Printer How to Replace the Ribbon 8 1 How to Clear Jams 8 5 How to Remove Captured Passbooks 8 8 ...

Page 172: ...Table of Contents Page Turn Passbook Printer NCR Personas M Series 5887 Operator Manual ...

Page 173: ...ection The ribbon character life has been exceeded error message will report when the ribbon character life has almost expired or has completely expired To replace the printer ribbon proceed as follows 1 Open the exterior of the ATM 2 If your ATM does not have the auto supervisor option press the switch on the operator panel to the supervisor position 3 Access the passbook printer as described in ...

Page 174: ...ersonas M Series 5887 Operator Manual 5 Gently squeeze on each side of the ribbon carriage mount and pull the mount off the print head as shown 6 Press down the green clip on the top of the ribbon cassette carrier and lift the ribbon off the carrier as shown 1 1 2 ...

Page 175: ...pull down the metal ribbon guide over the face of the print head and clip the ribbon carriage mount over the print head Make sure that the ribbon is not twisted and that it lies between the ribbon guide and the print head 9 Tighten the ribbon by turning the black knob on the top of the cassette one or two turns in the direction of the arrow marked on the cassette 10 Close the ribbon carrier by lif...

Page 176: ...printer back into the ATM until it clicks into place 12 Follow your in house procedures for indicating that you have replaced the passbook printer ribbon 13 If your ATM does not have the auto supervisor option press the switch on the operator panel to the normal position 14 Close and lock the exterior of the ATM ...

Page 177: ... that a jam is present To clear a jam proceed as follows 1 Open the exterior of the ATM 2 If your ATM does not have the auto supervisor option press the switch on the operator panel to the supervisor position 3 Access the statement passbook printer as described in Chapter 1 Getting Started 4 If the passbook is jammed in the rear section of the transport turn the green knob clockwise to move the bo...

Page 178: ...ft up the clear plastic transport cover using the green edge 7 Remove the book from the transport Lower the clear plastic transport cover and press down until it clicks into place 8 Close the ribbon carrier by lifting it up slightly and then lowering it to its closed position Press down the ribbon carrier until it clicks into place 9 Push the printer back into the ATM until it clicks into place 10...

Page 179: ...r How to Clear Jams NCR Personas M Series 5887 Operator Manual 8 7 11 If your ATM does not have the auto supervisor option press the switch on the operator panel to the normal position 12 Close and lock the exterior of the ATM ...

Page 180: ... of the ATM 2 If your ATM does not have the auto supervisor option press the switch on the operator panel to the supervisor position 3 Access the passbook printer as described in Chapter 1 Getting Started 4 Remove the captured passbooks from the rear of the printer 5 Push the printer back into the ATM until it clicks into place 6 If your ATM does not have the auto supervisor option press the switc...

Page 181: ...Series 5887 Operator Manual Chapter 9 Enhanced Page Turn Passbook Printer Overview 9 1 How to Replace the Ribbon 9 2 How to Clear Jams 9 5 How to Clear a Jam in the Printer Transport 9 6 How to Clear a Jam in the Page Turning Unit 9 7 How to Remove Captured Passbooks 9 9 ...

Page 182: ...Table of Contents Enhanced Page Turn Passbook Printer NCR Personas M Series 5887 Operator Manual ...

Page 183: ...n the passbook is read by the printer and any transaction recorded by printing on the correct page Additionally if the card holder enters the passbook at the wrong page the integral page turning functionality can turn the pages forward or backward to the correct page The following illustration shows the main components of the printer Page Turning Unit Capture Bin Front Transport Cover Ribbon Feed ...

Page 184: ...t when the ribbon character life has almost expired or has already expired Note Please refer to NCR publication Consumable Items for Self Service B006 4992 for ordering details and specification of the printer cartridge To replace the printer ribbon proceed as follows 1 Open the exterior of the ATM 2 If your terminal does not have auto supervisor press the switch on the operator panel to the super...

Page 185: ... upward position 6 Remove the ribbon cartridge by holding both ends and slowly lifting upwards ensuring the ribbon also comes out of the ribbon guides 7 Attach the new ribbon cartridge by threading the ribbon through the ribbon guide of the print head carrier then push the cartridge down to its home position Ribbon Cartridge Ribbon Guide Print Head Ink Ribbon ...

Page 186: ...d on the cartridge 10 Firmly push the print head carrier left and right several times to make sure the ribbon does not come out of the ribbon guide 11 Push the printer back into the terminal until it clicks into place 12 Follow your in house procedures for indicating that you have replaced the printer ribbon 13 If you terminal does not have auto supervisor press the switch on the operator panel to...

Page 187: ... passbook jam has occurred To clear a jam proceed as follows 1 Open the exterior of the ATM 2 If your terminal does not have auto supervisor press the switch on the operator panel to the supervisor option 3 Access the printer as described in Chapter 1 Getting Started 4 Lift the print head carrier until it locks in the upward position 5 Remove the ribbon cartridge by holding both ends and slowly li...

Page 188: ...locks in the upward position as shown 2 Open the front transport cover by lifting up the centre green handle as shown above If possible carefully remove the passbook 3 If the passbook is still jammed turn the transport knob backwards or forwards until the passbook becomes accessible The transport knob can move the passbook between the entry slot at the front of the printer and the capture bin at t...

Page 189: ...mmed passbook supporting both of the shutters with your other fingers When possible remove the passbook 3 Once the jam has been removed proceed to Step 7 to close the transport covers and place the terminal in service 7 Close the front transport cover by pushing down until it clicks into its home position 8 Close the rear transport cover by firmly pushing down Make sure the green levers at each si...

Page 190: ...rtridge in the direction of the arrow marked on the cartridge 12 Firmly push the print head carrier left and right several times to make sure the ribbon does not come out of the ribbon guide 13 Push the printer back into the terminal until it clicks into place 14 Follow your in house procedures for indicating that you have fixed without replacing the passbook printer mechanism 15 If you terminal d...

Page 191: ...does not have auto supervisor press the switch on the operator panel to the supervisor option 3 Access the printer as described in Chapter 1 Getting Started 4 Remove the passbook from the capture bin 5 Push the printer back into the terminal until it clicks into place 6 Follow your in house procedures for indicating that you have removed the captured passbook s 7 If you terminal does not have auto...

Page 192: ...ed as follows 1 Apply the correct size of cleaning sheet to the printer entry slot and allow the printer to perform the read operation The magnetic print head will be cleaned automatically when the printer tries to read a magnetic stripe 2 Depending on your application the cleaning sheet will be rejected or captured If the sheet is rejected remove it from the entry slot The cleaning activity is no...

Page 193: ...ed Card Reader How to Clear Motorised Card Reader Jams 10 1 How to Remove Captured Cards from a Motorised Card Reader 10 5 Standard Card Capture Container 10 5 Latch Fast Card Capture 10 6 Cleaning 10 8 For ATMs with APTRA Self Service Support system software 10 8 For ATMs with S4I system software 10 8 ...

Page 194: ...Table of Contents Motorised Card Reader NCR Personas M Series 5887 Operator Manual ...

Page 195: ...er jam will be indicated by one or both of the following A card holder complaint that a card has jammed An error message that a card has jammed The card may be jammed anywhere along the card transport from just inside the facia with too little of the card left outside to grip and pull it out to beyond the last roller on the way to the card capture bin The jam clearance procedures are identical for...

Page 196: ...out where the card has jammed 5 If the card is jammed under the shutter raise the shutter by pushing the small button shown below to the side and push the card back out the front of the card reader When the card has been freed proceed to step 9 Note If it is not possible to access the shutter button on some rear access machines for example turn the large pulley see the following diagram to move th...

Page 197: ...e transport and into the card capture bin When the card has been freed proceed to step 9 7 If the ATM is configured with a smart card enabled MCRW the card may be jammed in the smart block at the rear of the card reader Check that the stopper pin has not jammed by moving the pin backwards and forwards as shown below 8 Use your fingers to turn the belt pulleys and move the card through the transpor...

Page 198: ... card has been freed slide the card reader back into the ATM 10 Follow your in house procedures for indicating that you have fixed without replacing the card reader 11 If your ATM does not have the auto supervisor option press the switch on the operator panel to the normal position 12 Close and lock the ATM door or facia ...

Page 199: ...and the Integrated Motorised Card Reader Standard Card Capture Container 10 To remove captured cards proceed as follows 1 Open the exterior of the ATM 2 If your ATM does not have the auto supervisor option press the switch on the operator panel to the supervisor position 3 Access the card reader as described in Getting Started 4 Remove the cards from the card capture container which is positioned ...

Page 200: ...k the exterior of the ATM Latch Fast Card Capture 10 To remove captured cards proceed as follows 1 Open the exterior of the ATM 2 If your ATM does not have the auto supervisor option press the switch on the operator panel to the supervisor option 3 Access the card reader as described in Getting Started 4 Push down the latch on the side of the card capture cradle which is positioned behind the card...

Page 201: ...ards 6 Inspect the interior of the card capture container and remove any cards jammed inside 7 Refit the back panel on the card capture container Make sure that the top edge of the panel locates under the edge on the container Fit the lock or seal to the container 8 Fit the card capture container back into the card reader cradle 9 Slide the card reader back into the ATM 10 Follow your in house pro...

Page 202: ...pplication Main Menu 5 To run the MCRW Maintenance option select the MCRW option from the Maintenance Menu 6 Select the Cleaning Cycle Test option 7 A prompt is displayed asking you to enter a cleaning card Insert the card to start the cleaning cycle 8 When the cycle is finished a prompt is displayed requesting you to remove the cleaning card If you do not remove the card it is captured 9 From the...

Page 203: ...layed 9 Prepare the cleaning card according to the instructions provided with it 10 Press the key on the keyboard which corresponds to the CLEANING CYCLE option When instructed to do so insert the cleaning card into the card reader 11 When instructed to do so remove the cleaning card A screen will be displayed giving the results of the cleaning cycle 12 Select the FDK to return to the TEST menu If...

Page 204: ...ard Reader Cleaning 10 10 NCR Personas M Series 5887 Operator Manual 17 If your ATM does not have the auto supervisor option press the switch on the operator panel to the Normal position 18 Close and lock the ATM ...

Page 205: ...ertical Feed Transport 11 12 Recognition Unit 11 13 Escrow Unit 11 14 Between Escrow Unit and Main Transport Unit 11 14 Main Transport Unit 11 14 Between the Main Transport and the Garage Unit or Cash Cassettes 11 16 Completing the Jam Clearance Procedures 11 20 Cleaning Sensors 11 21 Cleaning Materials 11 21 Identifying the Sensors 11 21 Locating the Sensors 11 22 Main Transport Unit Area One 11 ...

Page 206: ...Table of Contents Cash Acceptor NCR Personas M Series 5887 Operator Manual ...

Page 207: ...hort infeed transports depending on the terminal in which it is installed Long and mid infeed transports which are very similar are for rear access terminals The short infeed transport is designed for use in front access terminals only This chapter contains the following sections Removing cash from the cassettes and the capture bin Clearing jams Long Infeed Transport Escrow Unit Recognition Unit M...

Page 208: ...essaging need to be emptied as shown below Note Bin Full Note Bin Full Soon Capture Bin Full Capture Bin Full Soon To remove cash from the cassettes or capture bin proceed as follows 1 Open the exterior of the terminal 2 If your terminal does not have the auto supervisor function press the switch on the operator panel to the supervisor position 3 Open the garage unit door by pulling the top of the...

Page 209: ...tes as they can be heavy 5 The cassettes should be removed by using the handle to slide outwards and lift up Caution Do not apply excessive force to the parts inside the cassette Damage to or deformation of these parts can cause problems with the operation of the module Do not place any items on top of the cassettes Additionally to avoid damage to the electronic parts circuits the cassettes should...

Page 210: ... 6 If the cassette is to be emptied in a secure area refer to your in house procedures 7 Tilt the cassette backwards slightly to prevent the cash falling out Unlock the cassette with the key provided 8 Release the lever for locking the stage and then lower the stage as shown below 9 Remove all of the cash Take care not to damage the stage or internal mechanical parts Inlet Unit Stage Stage Lock Le...

Page 211: ...s normal 10 Close and lock the cassette using the key provided Remove the key from the lock to avoid causing any damage when replacing the garage inner unit Caution Take special care when replacing the cassettes If they are not replaced correctly or if the front or rear cassettes are in the wrong positions the cassettes can become damaged 11 To replace a cassette carefully lower it onto the correc...

Page 212: ...transport area Make sure the handle drops down after replacing the cassettes Note The cassette should push in easily without excessive force If it does not remove re align and try again If a cassette is not replaced or incorrectly replaced an error message Note Bin Removed will be displayed 13 If cash has been sent to the capture bin open the capture bin door remove the cash and close the door Cap...

Page 213: ... operating the lock release lever and when pushing in the cassettes or garage inner unit 15 Close the garage unit door until the latch clicks If the door is not closed properly an error message Note Bin Removed will be displayed 16 Follow your in house procedures for indicating that the capture bin or cassettes have been emptied 17 If your terminal does not have the auto supervisor option press th...

Page 214: ...id or short Reject unit Feed unit Vertical feed transport Recognition unit Escrow unit Main transport unit Between reject unit and main transport unit Between escrow unit and main transport unit Garage Unit Cash cassettes Between main transport unit and cassettes Between the cassettes To clear jams within the cash acceptor proceed as follows 1 Open the exterior of the terminal 2 If your terminal d...

Page 215: ...ng Or Mid Feed Unit Jam Infeed Transport Short Reject Unit Jam Feed Unit Jam Reject Unit Feed Unit Jam Feed Unit Transport Jam Vertical Feed Transport Validator Jam Recognition Unit Transport Jam Main Transport Unit Escrow Jam Escrow Unit Note Bin Jam Between the Main Transport Unit and the Garage Unit or Cash Cassettes Includes the following areas cassettes capture bin central transport area gara...

Page 216: ...minder This is a good time to clean the reject unit sensor For details refer to the section Cleaning Sensors later in this chapter Infeed Transport Short 11 1 If the jam is located at the front section in the short infeed transport pull forward the pin latch and then pull and hold down the transport 2 Remove the cash from the front entry slot and close the transport by pushing it up until it locks...

Page 217: ... door 2 Turn the green knob to move the jammed cash backwards or forwards Remove the cash and close the metal door Between the Reject Unit and the Feed Unit or Main Transport Unit 11 If the jam is located at the connection between the reject unit and the feed unit or main transport unit the reject unit must be moved forward to gain access to this area 1 Push down on the latch and then push forward...

Page 218: ...e green knob to move the jammed cash backwards or forwards 3 Remove the cash and close the door The cash may move down into the vertical feed transport See next section Vertical Feed Transport 11 1 If the jam is located in the vertical feed transport lift up the green pin latch and pull down the transport Note The illustration above shows where the pin latch is located on the module In some termin...

Page 219: ...s For details refer to the section Cleaning Sensors later in this chapter Recognition Unit 11 1 If the jam is located in the recognition unit release the locking latch on the recognition unit and pull up the cover slightly 2 Remove the jammed cash using the tweezers supplied if required and then close and lock the cover 3 if the jammed cash is further inside open the recognition unit further by re...

Page 220: ... the cash cassette or refunded to the infeed transport If the cash remains in the escrow unit call your service representative Do not try to remove cash from the escrow unit Between Escrow Unit and Main Transport Unit 11 If the jam is located between the escrow unit and the main transport unit pull out the escrow unit as described in the previous section Follow the steps in the main transport sect...

Page 221: ...rs For details refer to the section Cleaning Sensors later in this chapter 3 If the jammed cash cannot be moved to the straight path try to move it further towards the connection between the main transport unit and the garage unit or cassettes using the same green knob Note If the cash cannot be moved or the belts become misaligned call your service representative 4 Close the main transport door a...

Page 222: ...e Do not try to rack out the garage unit when the main cash acceptor module is racked out The main module must be pushed in first 1 If a jam is located between the cassettes in the garage unit open the garage unit door by pulling the top of the green metal latch 2 Using the handle at the end of the garage inner unit fully pull out the cassette tray until the lock release lever clicks and locks it ...

Page 223: ...ssettes away from the central transport area by lifting each cassette handle and pushing outwards There is no need to remove the cassettes at this stage 4 Remove the jammed cash from the central transport area 5 Turn the green knob to manually drive the cash out of the transport Central transport area Exit Slot ...

Page 224: ...t remove the cassette nearest the terminal by lifting out 8 Reach in approximately 50 cm 20 in to the ceiling of the garage unit and remove any jammed cash from the small transport exit slot Be sure to remove all crumpled or torn pieces of paper that may have fallen down Caution Take special care when replacing the cassettes If they are not replaced correctly or if the front or rear cassettes are ...

Page 225: ...s 5887 Operator Manual 11 19 10 Slide the cassettes inwards until they stop in their correct home positions Make sure the handle drops down after replacing the cassettes Note The cassette should push in easily without excessive force If not remove re align and try again ...

Page 226: ... take care when operating the lock release lever and when pushing in the cassettes or garage unit Completing the Jam Clearance Procedures 11 1 Close the garage inner unit door and make sure the cash acceptor is fully racked in 2 Follow your in house procedures for indicating that a jam has been cleared 3 If your terminal does not have the auto supervisor option press the switch on the operator pan...

Page 227: ...fer to NCR publication Consumable Items for Self Service B006 4992 for ordering details and specification of canned compressed air Caution Do not use abrasive material or cleaning fluid as these may damage the sensors Identifying the Sensors 11 There are two types of sensor in the cash acceptor Both types comprise an emitter and lens at one end and a receiver and lens at the other end The lenses a...

Page 228: ...sors for cleaning To clean the sensors in the cash acceptor proceed as follows 1 Open the exterior of the terminal 2 If your terminal does not have the auto supervisor function press the switch on the operator panel to the supervisor position 3 Access the cash acceptor as described in Chapter 1 Getting Started Area 1 Area 2 Area 3 Area 4 Reject Unit Cleaning Lever ...

Page 229: ...the main transport unit door 2 Using the compressed air and tube attachment insert the tube approximately 10 cm 4 in into the areas shown below 3 Apply compressed air to the four sensor lenses under the top bracket 4 Apply compressed air to the four sensor lenses along the top surface of the lower bracket There are eight lenses to clean in total Clean four lenses under the top bracket Clean four l...

Page 230: ...ir and tube attachment insert the tube approximately 10 cm 4 in into the areas shown below 2 Apply compressed air to the four prism ends under the top bracket 3 Apply compressed air to the four sensor lenses along the top surface of the lower bracket There are eight lenses prism ends to clean in total 4 Close the main transport unit door Clean four lenses on lower bracket Clean four prism ends und...

Page 231: ...eed as follows 1 Open the vertical feed transport Lift up the green pin latch and pull down the transport 2 Using the compressed air and tube attachment insert the tube approximately 10 cm 4 in into the areas shown below 3 Apply compressed air to the four sensor lenses under the top bracket 1 2 Clean four lenses under the top bracket Clean four prism ends on lower bracket ...

Page 232: ...ition unit proceed as follows 1 Using the compressed air and tube attachment insert the tube approximately 10 cm 4 in into the area shown below 2 Apply compressed air to the four prism ends under the top bracket 3 Apply compressed air to the four sensor lenses along the top surface of the lower bracket There are eight lenses prism ends to clean in total 4 Close the vertical feed transport ensuring...

Page 233: ...To complete the process after cleaning the sensors proceed as follows 1 Ensure all units and doors are pushed back into their home positions 2 Push the cash acceptor back into the terminal until it clicks into place 3 Follow your in house procedures for indicating that the sensors have been cleaned 4 If your terminal does not have the auto supervisor option press the switch on the operator panel t...

Page 234: ...Cash Acceptor Cleaning Sensors 11 28 NCR Personas M Series 5887 Operator Manual ...

Page 235: ...que Acceptor 12 7 Infeed Transport long or mid 12 8 Infeed Transport short 12 9 Main Transport 12 9 Corner Belt Assembly 12 10 Endorser Track Guide 12 10 Capture Bin Track Guide 12 11 Cheque Bins 12 12 Transport Jam at Outfeed 12 14 Completing Jam Clearance Procedures 12 15 Removing and Replacing the Ribbon Cassette 12 16 Single Line Endorser 12 16 Multiple Line Endorser 12 18 Cleaning and Mainten...

Page 236: ...Table of Contents Cheque Acceptor NCR Personas M Series 5887 Operator Manual ...

Page 237: ...long infeed variant Your cheque acceptor may look slightly different from that shown however the following instructions apply to all variants except where stated otherwise This guide contains the following sections Emptying the cheque bin capture bin cheque receiving bins or open bin Clearing jams Removing and replacing the ribbon cassette Capture Bin Track Guide Main Transport Endorser Single Lin...

Page 238: ...tion s specification and business rules The cheques are driven to the correct pocket by powered track guides If a cheque has been captured and cannot be returned to the cardholder it will be stored in the open bin or in the capture bin of the power pocket variant Following a successful transaction cheques are stored in the open bin or in the cheque receiving bins of the power pocket variant Sensor...

Page 239: ...l up the side access door until the magnetic catch holds the door closed Rear access Push up the open bin until the lock plunger holds the bin in its home position or close the side access door as above 7 Rack in the module ensuring the latch clicks into the home position 8 Follow your in house procedures for indicating that the open bin has been emptied 9 If your terminal does not have the auto s...

Page 240: ...oes not have the auto supervisor option press the switch on the operator panel to the supervisor position 3 Access the module as described in Getting Started Proceed to Step 5 If you have a cheque acceptor with a racking bin module proceed to Step 4 4 Racking Bin Module front access view shown To access the areas in the bin module only push down the bin module latch as shown below and pull out the...

Page 241: ... capture bin or cheque receiving bins Take care not to damage the actuator wires and plastic plates in each bin 7 To close push up the access door ensuring the latch clicks into the home position 8 Rack in the module and or power pocket bin module ensuring the latch clicks into the home position Latch Bin Access Door Cheque Receiving Bins Capture Bin Actuator Wires Plastic Plate ...

Page 242: ...ator Manual 9 Follow your in house procedures for indicating that the capture bin or cheque receiving bins have been emptied 10 If your terminal does not have the auto supervisor option press the switch on the operator panel to the normal position 11 Close and lock your terminal ...

Page 243: ...ollowing areas Infeed transport long mid or short Main transport Corner belt assembly Endorser track guide Capture bin track guide Open cheque receiving bin Power pockets cheque bins To clear a jam in the cheque acceptor proceed as follows 1 Open the exterior of the terminal 2 If your terminal does not have the auto supervisor option press the switch on the operator panel to the supervisor positio...

Page 244: ... Transport long or mid 12 1 If a cheque is jammed in the infeed transport long infeed shown pull up the green latches on the top of the transport 2 Fully pull up and hold the infeed transport Error Message Go to this section Transport jam at in feed Infeed transport long or mid Infeed transport short Transport jam at de skew Main transport Transport jam at MICR Main transport Transport jam at endo...

Page 245: ...ammed in the short infeed transport pull up and hold the green handles on the top of the transport 2 Remove any jammed cheque s 3 To close lower the transport and then firmly push down into the home position Main Transport 12 1 If a cheque is jammed in the main transport push in the latch and pull up the transport 2 While holding up the transport remove any jammed cheque s 3 To close push down the...

Page 246: ...the corner belt assembly and cannot be accessed or removed call your local NCR Customer Engineer Endorser Track Guide 12 1 If a cheque is jammed in the endorser track guide push in the latch and open the guide 2 Remove any jammed cheque s 3 Close the guide ensuring the latch clicks into the home position Corner Belt Assembly Latch Endorser Track Guide ...

Page 247: ...perator Manual 12 11 Capture Bin Track Guide 12 1 If a cheque is jammed in the capture bin track guide push in the latch and open the guide 2 Remove any jammed cheque s 3 To close push in the track guide ensuring the latch clicks into the home position Latch Capture Bin Track Guide ...

Page 248: ...ower the open bin or open the side access door as above 2 Remove any jammed cheque s Note It may be necessary to open the endorser track guide if a cheque is jammed between the guide and the bin 3 Front access To close pull up the side access door until the magnetic catch holds the door closed Rear access Push up the open bin until the lock plunger holds the bin in its home position or close the s...

Page 249: ...eques Take care not to damage the actuator wires and plastic plates in each bin Note It may be necessary to open the capture bin track guide if a cheque is jammed between the guide and the bin 3 To close lift up access door ensuring the latch clicks into the home position 4 Close the capture bin track guide if required Latch Bin Access Door Cheque Receiving Bins Capture Bin Actuator Wires Plastic ...

Page 250: ...Between the endorser track guide and the open bin At the entry to the open bin If a cheque is jammed in these areas proceed as follows 1 Depending on configuration open the endorser track guide the capture bin track guide and the cheque bin as described in previous steps 2 Remove any jammed cheques 3 Close the endorser track guide the capture bin track guide and the cheque bin as described in prev...

Page 251: ...ures 12 1 Rack in the module and or power pocket bin module ensuring the latch clicks into the home position 2 Follow your in house procedures to indicate that a jam has been cleared 3 If your terminal does not have the auto supervisor option press the switch on the operator panel to the normal position 4 Close and lock your terminal ...

Page 252: ...que acceptor The two types are a single line endorser or a multiple line endorser as shown below Single Line Endorser 12 To replace the ribbon cassette in the single line endorser proceed as follows 1 Open the exterior of the terminal 2 If your terminal does not have the auto supervisor option press the switch on the operator panel to the supervisor position 3 Access the module as described in Get...

Page 253: ...atch clicks and holds the cassette in position Ensure ribbon is around the print head 8 Check that the new cassette has been replaced correctly by turning the ribbon feed knob on the left side of the cassette This action will also tighten the ribbon 9 To close firmly push in the module until the latch clicks and locks into position 10 Follow your in house procedures to indicate that the ribbon cas...

Page 254: ...atch and pull out the endorser unit 5 Pull out the green plastic latch to release the ribbon cassette 6 Remove and discard the used ribbon cassette 7 Remove the packaging from the new ribbon cassette including a red tab or clip if there is one 8 Insert the new ribbon cassette by pushing in to the endorser unit until the green plastic latch clicks and holds the cassette in position Ensure ribbon is...

Page 255: ...ill also tighten the ribbon 11 Push in the multiple line endorser unit until the latch clicks and locks into position 12 To close firmly push in the module until the latch clicks and locks into position 13 Follow your in house procedures to indicate that the ribbon cassette has been replaced 14 If your terminal does not have the auto supervisor option press the switch on the operator panel to the ...

Page 256: ...ptor Cleaning and Maintenance 12 20 NCR Personas M Series 5887 Operator Manual Cleaning and Maintenance 12 The cheque acceptor sensors are self cleaning No other cleaning or maintenance is required by the operator ...

Page 257: ...Table of Contents Coin Dispenser NCR Personas M Series 5887 Operator Manual Chapter 13 Coin Dispenser Replenishing Coin Cassettes 13 1 Clearing Jams 13 3 ...

Page 258: ...Table of Contents Coin Dispenser NCR Personas M Series 5887 Operator Manual ...

Page 259: ...ssettes 13 To replenish the coin dispenser proceed as follows 1 Open the coin dispenser door 2 If your ATM does not have the auto supervisor option press the switch on the operator panel to the supervisor option 3 Access the coin dispenser as described in Chapter 1 Getting Started 4 Remove the empty coin cassette ...

Page 260: ...nual 5 Insert a new coin cassette Care should be taken when handling a full coin cassette as it is quite heavy 6 Push the coin dispenser back into the ATM 7 Follow your in house procedure for indicating that you have replenished the coin dispenser 8 Close and lock the coin dispenser door ...

Page 261: ...r 2 If your terminal does not have the auto supervisor option press the switch on the operator panel to the supervisor option 3 Access the coin dispenser as described in Chapter 1 Getting Started 4 Remove the coin cassette Note Take care when removing the coin cassette not to damage any of the facia wiring 5 Check for and remove any bent or mis aligned coins in the cassette 6 Check for any spills ...

Page 262: ...ed coins in the exit slot Use a probe such as an unsharpened pencil to dislodge and remove any blockage 8 Replace the coin cassette 9 Push the coin dispenser back into the ATM 10 Follow your in house procedure for indicating that you have cleared a jam in the coin dispenser 11 Close and lock the coin dispenser door ...

Page 263: ...nter 14 2 Enhanced page turn passbook printer 14 2 Statement passbook printer 14 3 Programmable printing depository PPD 14 3 Document processing module DPM 14 3 Envelope depository 14 3 Envelope dispenser 14 3 Cheque acceptor Type 1 14 3 Cheque acceptor Type 2 14 3 Cheque acceptor Type 3 14 3 Coin dispenser 14 4 Cash dispenser 14 4 Printer Media Storage 14 4 Cleaning 14 5 Cleaning Materials 14 5 F...

Page 264: ...Table of Contents Cleaning and Maintenance NCR Personas M Series 5887 Operator Manual ...

Page 265: ...nding on configuration Check that there are sufficient supplies in the ATM and perform replenishment activities as indicated in the section Replenishment overleaf The following weekly activities are required depending on configuration Clean the facia and exterior panels Clean the magnetic heads on the motorised card reader Clean the magnetic heads on the dip card reader Clean the head on the enhan...

Page 266: ...how to replenish your ATM Refer to the NCR publication Consumable Items for Self Service B006 4992 for details of consumables specifications and ordering information Modules and Consumables 14 Receipt printer 14 Graphics or dot matrix paper roll Print head Dot matrix ribbon cassette Paper knife Journal printer 14 Graphics or dot matrix paper roll Ribbon cassette Print head Statement printer 14 Gra...

Page 267: ...ad Envelope dispenser 14 Envelopes Cheque acceptor Type 1 14 Ink jet print head cartridge Black ink roller for endorser stamp Customised front rubber stamp Cheque acceptor Type 2 14 Ribbon cassette for single line endorser Ribbon cassette for multiple line endorser Cheque acceptor Type 3 14 Ribbon cassette for single line endorser Ribbon cassette for multiple line endorser Note These consumable it...

Page 268: ...d replenished if required Coin dispenser 14 Coins Cash dispenser 14 Cash Paper media e g coupons Printer Media Storage 14 To get the best results from your printer store spare paper supplies and ribbon cassettes in a cool dry dust free place away from air vents or fans Leave the articles in their original packing material until required for use ...

Page 269: ...nels 14 Clean the surfaces of the facia and exterior panels using either a general surface cleaner or a dilute detergent solution washing up liquid and warm water as follows Using a damp lint free cloth clean the surface of the facia and exterior panels Using a dry lint free cloth wipe down the surface of the facia and exterior panels Paint grease or dirt can be removed by a light application of c...

Page 270: ...ication or Supervisor Mode depending on the System Software used 4 Prepare the cleaning card according to the instructions enclosed with it 5 Insert the cleaning card into the card reader with the cleaning face downwards Remove the card from the reader Repeat this action five times 6 If your ATM does not have the auto supervisor option press the switch on the operator panel to the Normal position ...

Page 271: ...passbook printer 7 18 Card reader 10 1 captured cards 10 5 latch fast card capture container 10 6 standard container 10 5 cleaning 10 8 jam clearance 10 1 Cash acceptor module cleaning completing the sensor cleaning procedures 11 27 identifying the sensors 11 21 locating the sensors 11 22 main transport area one 11 23 main transport unit area two 11 24 recognition unit area four 11 26 recognition ...

Page 272: ...rocedures 12 15 corner belt assembly 12 10 endorser track guide 12 10 error messages 12 8 infeed transport long or mid 12 8 infeed transport short 12 9 main transport 12 9 outfeed 12 14 removing and replacing the ribbon cassette 12 16 multiple line endorser 12 18 single line endorser 12 16 Cheque acceptor Type 3 12 1 Cleaning 14 5 dip card reader 14 6 exterior of the ATM 14 5 materials 14 5 motori...

Page 273: ...ing 1 14 H Hardware reset 1 33 I IMCRW see card reader 10 1 Inserting disks 1 34 In service replenishment 1 9 J Jam clearance card reader 10 1 cash acceptor module 11 8 cheque acceptor 12 7 capture bin track guide 12 11 cheque bins 12 12 completing jam clearance procedures 12 15 corner belt assembly 12 10 endorser track guide 12 10 error messages 12 8 infeed transport long or mid 12 8 infeed trans...

Page 274: ... Page turn passbook printer jam clearance 8 5 removing captured passbooks 8 8 replenishment printer ribbon 8 1 PC module errors 2 3 Personal cash deposit refer to cash acceptor module 11 1 Power 1 6 Print head journal printer 5 21 statement passbook printer 7 8 Printer ribbon journal printer 5 18 page turn passbook printer 8 1 statement passbook printer 7 5 R Receipt printer clearing jams 4 6 Remo...

Page 275: ... 1 21 with electronic lock 1 18 Sensor cleaning cash acceptor module cleaning materials 11 21 cleaning the recognition unit area four 11 26 cleaning the recognition unit area three 11 25 cleaning the reject unit cleaning lever 11 27 cleaning the transport unit area one 11 23 cleaning the transport unit area two 11 24 completing the sensor cleaning procedures 11 27 identifying the sensors 11 21 loc...

Page 276: ...sonas M Series 5887 Operator Manual Index 6 Switching the power on and off 1 6 System Application 2 1 U Unlocking locking controlled access electronic lock 1 21 electronic lock 1 18 standard security enclosure 1 12 ...

Page 277: ...nization 5 4 3 2 1 0 Appearance 5 4 3 2 1 0 Examples 5 4 3 2 1 0 Illustrations 5 4 3 2 1 0 Job performance 5 4 3 2 1 0 Question resolution 5 4 3 2 1 0 Overall satisfaction 5 4 3 2 1 0 Indicate the ways you feel we could improve this publication Improve the table of contents Add more better quick reference aids Improve the overview introduction Add more examples Improve the organization Add more il...

Page 278: ...y e mail userfeedback exchange scotland ncr com If we may contact you concerning your comments please fill in the information below Thank you for your evaluation of this publication Fold the form where indicated tape please do not staple and drop in the mail F 8763 0695 Name Organization Company Address Phone Fax NCR Financial Solutions Group Ltd Information Solutions Feedback Discovery Centre 3 F...

Reviews: