background image

16

Chapter 2:  Troubleshooting

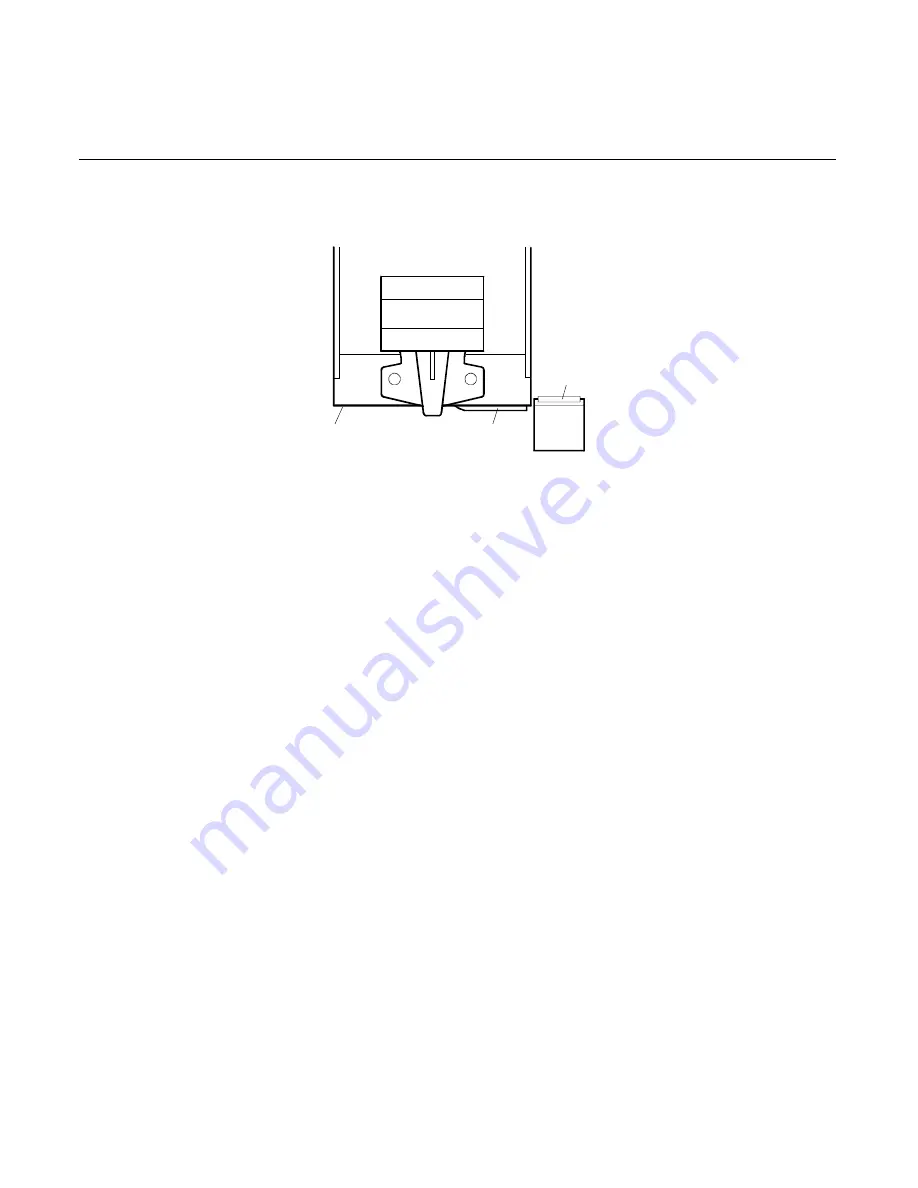
Suppressed Read head Motion

MICR 

Readhead

Foam

Pad

Printhead

Carriage

While actuating the Paper Feed button, verify that the read head rises
higher than the surface of the pad on the bottom of the print head
carriage as shown in the illustration above. Move the print head
carriage closer to the read head if necessary to make this
determination.

If the read head does not rise properly, tear down the printer to
remove the interference. For more information, see the 7156 Service
Guide
. Reassemble the printer, then perform the MICR adjustment and
repeat the MICR read test. For more information on adjusting the
MICR, see “In-Place MICR Adjustment” on page 20.


Harness dress will affect the read head movement.  See the
illustration on page 13 for the optimum shape and dress of the
ground and the pair of line leads below the read head.


Ensure that there is no interference with the freedom of travel of
the MICR solenoid plunger, and that the three springs of the
bracket assembly are in place.

If the read head rises properly, continue checking the following.

Damaged or Missing Foam Pad

The read head presses the document against a foam pad to ensure that
there is no separation between the document and the read head during
the MICR read phase.

Summary of Contents for 7156

Page 1: ...NCR 7156 Multifunction Printer MICR Operation and Trouble Shooting Guide B005 0000 1057 Issue A...

Page 2: ...y not be marketed by NCR in all parts of the world In some instances photographs are of equipment prototypes Therefore before using this document consult with your NCR representative or NCR office for...

Page 3: ...representative to service the 7156 printer Where to Get Additional Information The following publications contain more information about the 7156 printer Contact your sales representative to obtain a...

Page 4: ...ii MICR Operation and Trouble Shooting Guide...

Page 5: ...ncorrectly 8 Missing Platen Magnet 8 Incorrect Printer Installation Electrical Grounding or Bonding or MICR Adjustment 8 CRT Monitor Interference 8 Improper System Ground Bonding 9 Faulty Read head 10...

Page 6: ...iv MICR Operation and Trouble Shooting Guide Platen Gap Tightness 19 Chapter 3 In Place MICR Adjustment Setup for In Place MICR Adjustment 21 MICR Adjustment 22...

Page 7: ...MICR Operation and Trouble Shooting Guide v Revision Record Issue Date Remarks A Dec 97 First printing...

Page 8: ...any radio or television interference caused by unauthorized modification of this equipment or the substitution or attachment of connecting cables and equipment other than those specified by NCR The c...

Page 9: ...roblems due to electromagnetic interference or changes in the printer mechanism If you do encounter a problem use this guide to help you identify the cause and the solution Note A document read error...

Page 10: ...iated on command by the host system For test purposes MICR may also be enabled at the printer using a diagnostics routine To enable MICR reading by way of self diagnostics do the following Set the DIP...

Page 11: ...down and to the right Slide the document to the right until it lines up against the slip guide wall Slide the document toward the back of the printer until the printer begins running 7 Confirm correc...

Page 12: ...MICR is not adjusted properly the magnetic pulses from the motor may interfere with the weak magnetic signals from the MICR characters This electrical interference can cause misreads During the adjus...

Page 13: ...separate MICR amplifier and its interface harness use the harness extensions for the read head and the buck coil to facilitate connection to the new control board if you wish to leave the original re...

Page 14: ...scured or Faulty Slip In Sensor If the printer is in diagnostic mode reconfigure the DIP switches for normal operation remember to reset the printer to enable the new switch settings To test the slip...

Page 15: ...cator LED does not respond correctly remove the slip table and open the front cover Locate and clean the two slip in sensors Blow air use a soft damp cloth or cotton swab to remove all accumulated dus...

Page 16: ...CR read rate a failure rate greater than 1 or a catastrophic read problem such as NO MICR CHARACTERS or mostly garbage may indicate electrically induced problems This type of problem may be caused by...

Page 17: ...bonding remove the top cover of the printer and disconnect all cables including the power supply except the communication interface which is to be connected as normally required between the printer an...

Page 18: ...head as shown in the illustration above Disconnect one lead and repeat the MICR read test If the test result is now NO MICR CHARACTERS the read head is faulty Replace the read head assembly and perfor...

Page 19: ...er read head assemblies If the locating hole is not present in the cantilever as was the case for early models of the 7156 cut off and completely remove all remnants of the boss protrusion on the lowe...

Page 20: ...eadings without touching the MICR adjustment pots If the results differ from the previous readings by more than two letters replace the buck coil and its harness Cleaning the contacts in addition to t...

Page 21: ...eassemble the printer and perform the MICR adjustment Then repeat the MICR read test For more information on adjusting the MICR see In Place MICR Adjustment on page 20 Base Print Mechanism Motor Harne...

Page 22: ...ards in the dual board system check to confirm that the harness is properly plugged in Replace the board containing the MICR amplifier For more information see the 7156 Service Guide Reassemble the pr...

Page 23: ...d button while watching the MICR read head As you actuate the feed button the read head should snap up and down If the read head doesn t move it indicates that either the read head mechanism is jammed...

Page 24: ...er then perform the MICR adjustment and repeat the MICR read test For more information on adjusting the MICR see In Place MICR Adjustment on page 20 Harness dress will affect the read head movement Se...

Page 25: ...ck foam pad on the bottom right rear of the print head carriage If the pad is missing damaged or partially dislodged remove the carriage and repair the pad or replace the print head carriage For more...

Page 26: ...ng screw twist the bracket assembly to remove the tilt and tighten the mounting screw Reassemble the printer and perform the MICR adjustment Then repeat the MICR read test For more information on adju...

Page 27: ...t bumps such as those caused by paper debris buildup Check both rolls If bumps have been found and removed repeat the MICR read test Platen Gap Tightness If the platen gap is too tight it may create a...

Page 28: ...20 Chapter 2 Troubleshooting...

Page 29: ...rinter adjustment capability that suppresses interference from the stepping motor to allow for accurate MICR reading The printer should be in the position and orientation that the customer will be usi...

Page 30: ...the print head carriage from the position it was moved to by the printer upon reset If you should move the print head carriage before or during the adjustment reset the printer to accurately position...

Page 31: ...el frame Unlatch the restraining tab on the right inside edge of the cover Separate the plastic cover trim from the metal frame and set the trim aside Close the metal frame For dual board printers rem...

Page 32: ...pter 3 In Place MICR Adjustment Paper Top of Printer Paper Feed Button Potentiometers Led Front of Printer Paper MICR Read Head Front Cover Potentiometer R8 Potentiometer R9 Single Board Printer DIP S...

Page 33: ...rs See the illustration above that matches your printer This simulates the presence of a MICR document over the read head 2 Press and release the Paper Feed button The MICR solenoid actuates to raise...

Page 34: ...interactive changing the setting of one pot affects the other The pots are not coarse fine adjustments 5 Adjust the first pot about 10 degrees or less in either direction Make very small adjustments a...

Page 35: ......

Page 36: ...B005 0000 1057 Dec 1998 Printed on recycled paper...

Reviews: