background image

BIM 1009/2007/09 


Page 4 of 8 

www.nord.com 

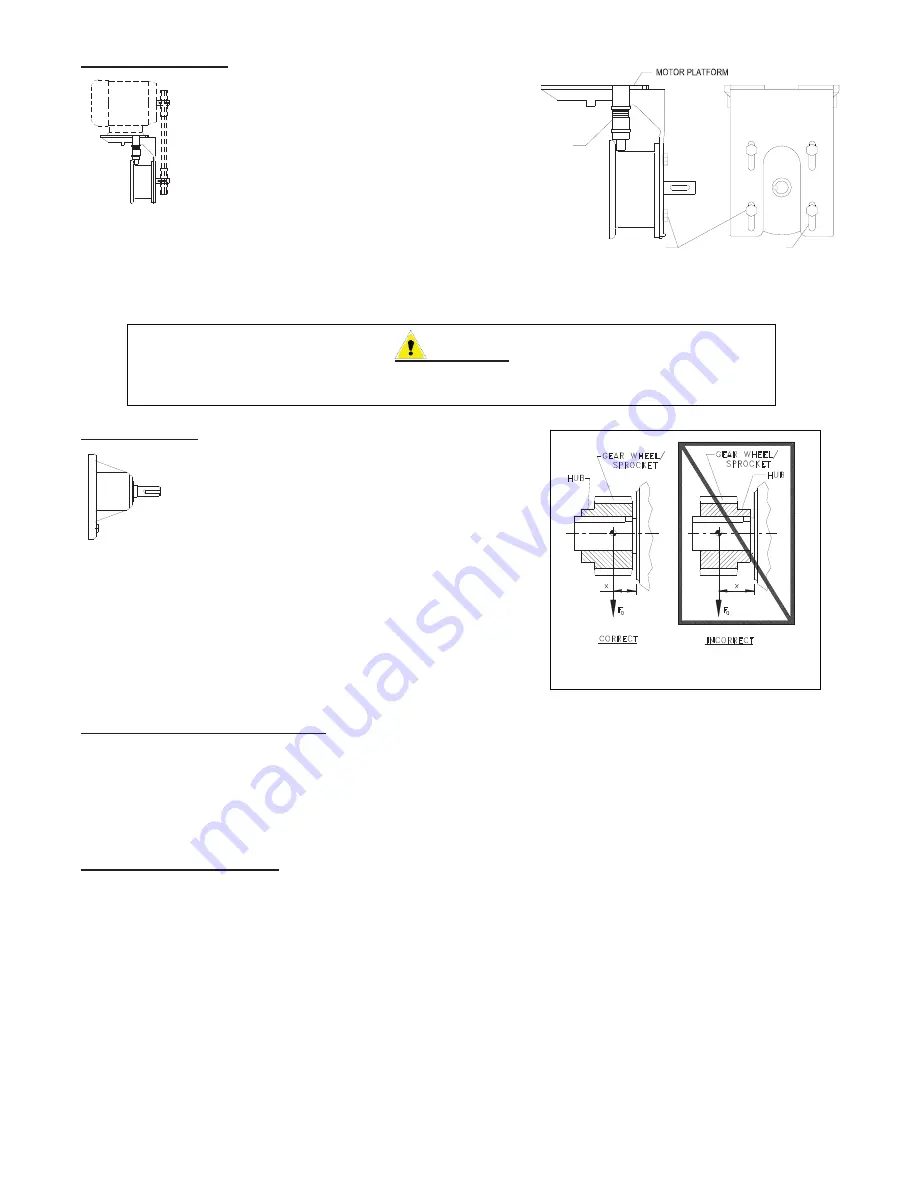
Figure 1.

  Mounting a coupling or a sprocket 

on a shaft. 

MK Motor Mount Platform

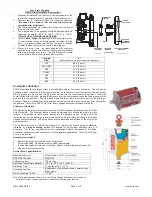
For proper installation of the belt drive, consult the V-belts 
manufacturer.  NORD MK motor mounts are adjustable in 
two ways.  Slotted holes are provided at the input cylinder 
for the initial height adjustment.  There are two fine 
adjustments at the Yolk to increase/decrease tension.  
Two Spanner head wrenches will be needed to 
tighten/loosen the fine adjustments.  The four bolts 
holding the motor platform to the input cylinder must be 
loosened in order to use the fine adjustments. 

The motor mounting platform has tapped holes to accept the foot pattern of the 
standard footed NEMA or IEC motor.  All MK mounting input shaft diameters 
are metric.

Align the sheaves or sprockets square and paraIIeI by placing a straight edge across their faces.  Alignment of bushed sheaves and sprockets 
should be checked after bushings have been tightened.  Check horizontal shaft alignment by placing a IeveI vertically against the face of the 
sheave or sprocket.  Adjust beIt or chain tension per the manufacturer’s specified procedure.  After a period of operation, recheck alignment 
and adjust as required. 

Solid Shaft (W-Type)

The shaft will be inch or metric, depending on how the unit was 
ordered.  Measure and verify the shaft before mounting anything 
on the shaft.   Below are the tolerances used for the solid shafts.   

All solid input shafts have a tapped hole on the end for customer 
use.  The chart below indicated the tap size for each shaft.  Keys 
are also supplied with solid shaft. 

Outboard pinion and sprocket fits should be as recommended by the manufacturer.   
The components should be heated according to the manufacturer’s 
recommendations, generaIIy 250

q

F to 300

q

F, (120

q

C to 150

q

C) before assembling to 

the shaft.  The coupling hub or sprocket should be mounted per Figure 1.   

On larger gearboxes, there is grease fitting on the W-Type inputs to grease the 
outboard bearing.  About 0.75 ounce (20 - 25g) of synthetic grease should be added 
every 1,000 service hours.  There is a sticker adjacent to the grease fitting detailing 
which grease should be used. 

The standard bearing grease is Kluber Petamo 

GHY 133N synthetic grease.  Bearings should be re-greased with a compatible 
product. 

Output and Input Shaft Diameter Tolerance 

Metric (mm) 

d ‡

  18 = +0.012/+0.001 

! ‡

   18 

d ‡

  30 = +0.015/+0.002 

! ‡

   30 

d ‡

  50 = +0.018/+0.002 

! ‡

   50 

d ‡

  80 = +0.030/+0.011 

! ‡

   80 

d ‡

 120 = +0.035/+0.013 

! ‡

 120 

d ‡

 180 = +0.040/+0.015 

Inch

d ‡

 1.750 = +0.0000/-0.0005 

! ‡

 1.750 = +0.0000/-0.0010

Solid Shaft DriII and Tap Shaft End

Metric (mm) 


d ‡

 16 = M5 


! ‡

 16 

d ‡

  21 = M6 


! ‡

 21 

d ‡

  24 = M8 


! ‡

 24 

d ‡

  30 = M10 


! ‡

 30 

d ‡

  38 = M12 


! ‡

 38 

d ‡

  50 = M16 


! ‡

 50 

d ‡

  85 = M20 


! ‡

 85 

d ‡

 130 = M24 


Inch

d ‡

 0.500 = #10-24 x 0.4 deep 

! ‡

 0.500 

d ‡

 0.875 = ¼-20 x 0.6 deep 

! ‡

 0.875 

d ‡

 0.938 = 5/16-18 x 0.7 deep 

! ‡

 0.938 

d ‡

 1.100 = 3/8-16 x 0.9 deep 

! ‡

 1.100 

d ‡

 1.300 = 1/2-13 x 1.1 deep 

! ‡

 1.300 

d ‡

 1.875 = 5/8-11 x 1.4 deep 

! ‡

 1.875 

d ‡

 3.500 = 3/4-10 x 1.7 deep 

! ‡

 3.500                  = 1-8 x 2.2 deep

 WARNING:

NORD Gear does not furnish the safety guards for the traction mechanism.  It is the 

responsibility of the customer to install a safety guard to conform to OSHA standards. 

YOKE

(FINE ADJUSTMENT)

BOLTS (4)

SLOTTED HOLES (4)

Summary of Contents for BTR Series

Page 1: ...OPERATION AND MAINTENANCE MANUAL SERIAL NUMBER ___________________ CUSTOMER ____________________________ SALES REP ____________________________ BTR SERIES 150644...

Page 2: ...THIS PAGE IS INTENTIONALLY LEFT BLANK...

Page 3: ...ER J MINIMUM HARDWARE CLEARANCE REQUIRED IN MOUNTING STRUCTURE NOTES BASIC WEIGHT DOES NOT 1 INCLUDE SHAFT IMPELLERS OR MOTOR ALL DIMENSIONS ARE IN INCHES 2 2018 DATE DIMENSION AND ASSEMBLY DRAWING AP...

Page 4: ......

Page 5: ...ALUE IN THE O M MANUAL 3 ATTACH THE GUARD ITEM 2 ON THE TOP OF THE GEARDRIVE ALTERNATE SHAFT CONSTRUCTION ATTACH THE SHAFT COLLAR ITEM 7 TO THE MIXER SHAFT ITEM 4 BEFORE STEP 1 QUANTITY VARIES DEPENDI...

Page 6: ...operate this equipment unless all safety devices are installed and working properly Check all devices prior to starting the equipment Disconnect and lock out electrical power before installing or ser...

Page 7: ...fferent phases The resistance should not be less than 100 megohms If the resistance is less please consult the factory If mixer is stored for more than a year the condition of the gear lubricant shoul...

Page 8: ...lubricant level should be checked with the unit mounted in its correct operating position Lubricant should be added or removed to bring it to the correct level The catalog for the gear unit shows the...

Page 9: ...accumulated moisture Drain regularly if storage atmosphere results in formation of condensation INSTALLATION Installation must be handled by qualified service or maintenance personal OPERATION CAUTIO...

Page 10: ...necessary to ensure safe operation of the equipment Particular applications may require further procedures Dangerous voltages are present in the equipment which can cause severe personal injury and p...

Page 11: ...e motor frame or housing permits removal of accumulated moisture Drain regularly MAINTENANCE LUBRICATION Gear units should have the oil changed every 10 000 hours or 2 years If synthetic lubricant is...

Page 12: ...st a machined orifice until pressure exceeds 2 psi Above 2 psi the air is allowed to escape depressurizing the gearcase When internal pressure drops below 2 psi the autovent re seals closing the unit...

Page 13: ...ak EP2 20 to 140 Mineral Shell Cypernia RA C3 Ambient Temperature F Formulation Grease Manufacturer Grease Brand Name 58 to 230 Synthetic Texaco Starfak 2202 58 to 230 Synthetic Shell Aero Shell 5 to...

Page 14: ...ich were conducted without their prior written authorization BRAWN Mixer shall not be held liable for any further cost expense or labor to replace equipment or replaceable parts or indirect or consequ...

Page 15: ...be performed only by qualified personnel Do not operate this equipment unless all safety devices are installed and working properly Check all devices prior to starting the equipment Disconnect and loc...

Page 16: ...of lubricant that was applied during assembly it is important to completely fill the voids in the seven ring box with lubricant No further lubricant is required for the two ring box 1 Remove the lubr...

Page 17: ...inspect the shaft for damage If the shaft is significantly worn it should be repaired or replaced 5 Select the correct size and type of packing refer to the mixer specification sheet Using a bar that...

Page 18: ...engagement zone and record the measurement as B in the equation below 3 Add A B and subtract 0 08 2mm from the distance This needs to be done so that the coupling will not be preloaded after installa...

Page 19: ...IEC 132 NEMA 180TC 210TC J28 28mm 1 1 8 in 45 90 Nm 399 797 lb in IEC 100 112 NEMA 180TC M42 42 mm 1 5 8 in 100 200 Nm 885 1 770 lb in IEC 160 NEMA 250TC M48 48 mm 1 7 8 in 140 280 Nm 1240 2 478 lb i...

Page 20: ...Automatic Lubricator Principle of Operation After tightening the plastic activating screw the Zinc Molybdenum pellet drops into the Citric Acid electrolyte The chemical reaction builds up pressure tha...

Page 21: ...apped hole on the end for customer use The chart below indicated the tap size for each shaft Keys are also supplied with solid shaft Outboard pinion and sprocket fits should be as recommended by the m...

Page 22: ...ew into the motor shaft to lock coupling in place 3 Let the coupling cool down before mounting the spider into the jaws The spider should not be under axial compression when installed 4 Place the moto...

Page 23: ...esume its normal function The lubricator contains approximately 120 cm3 or 120 ml 4 8 oz of grease For reference a single stroke of a typical grease gun delivers approximately 1 0 1 2 cm3 0 03 0 04 oz...

Page 24: ...extreme highs and lows Lower ambient temperatures will lead to slower dis pensing rates and higher ambient temperatures will lead to faster dispensing rates Average Ambient Temperature Discharge Perio...

Page 25: ...ice the grease cup 1 Unscrew the grease drain cup 1299 from either the outlet port of the NEMA or IEC input cylinder or from the extension 1243 that is secured to the NEMA or IEC input cylinder 2 To e...

Page 26: ...TORQUE DRY AS SPECIFIED IN O M MANUAL BSB ALL DIMENSIONS AND WEIGHTS ARE FOR REFERENCE ONLY UNLESS THE DRAWING IS CERTIFIED ALL EQUIPMENT DESIGN AND APPLICATION DATA SHOWN HEREIN IS CONFIDENTIAL AND T...

Page 27: ...THIS PAGE IS INTENTIONALLY LEFT BLANK...

Page 28: ......

Reviews: