background image

5

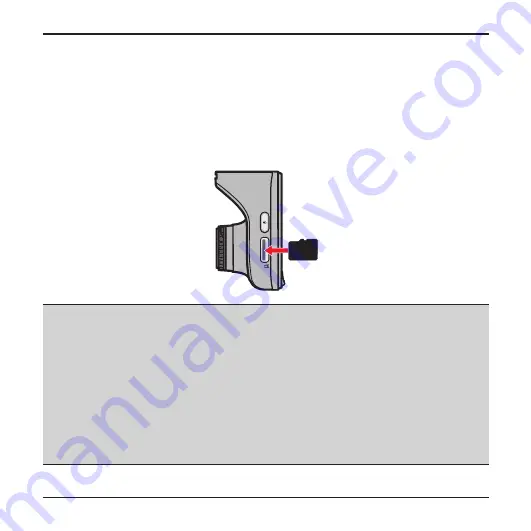
Inserting a memory card

You must insert a memory card (not included) before you can start recording.

1.  Hold the card by the edges and gently insert it into the slot with the label facing the 

rear side of the recorder.

2.  To remove card, gently push the top edge of the card inwards to release it, and pull it 

out of the slot.

CAUTION:


ƒ

DO NOT apply pressure to the centre of the memory card.


ƒ

You are advised to use a Class 6 memory card with at least 8GB capacity. The 
recorder supports memory cards with up to 32GB capacity.


ƒ

Navman does not guarantee the product’s compatibility with memory cards from all 
manufacturers.


ƒ

Before you start recording, please format the memory card to avoid malfunction 
caused by files not created by the recorder. You can format the card on your 
computer or on the recorder (by selecting 

Settings Menu > Format

).


ƒ

You are recommended to turn the device off before removing the memory card.

Summary of Contents for MIVue 5 Series

Page 1: ......

Page 2: ...on HD device 8 Operating basics 9 Turning the recorder ON and OFF 9 Setting the date and time 9 Recording in driving mode 10 Recording in Parking mode 11 Camera mode 11 Playback mode 12 System setting...

Page 3: ...onnects to an external device 4 LCD screen 5 Function keys 6 LED indicator 1 Indicates the system status of the recorder 7 Power key 8 Memory card slot Data is recorded to a MicroSD card 9 Speaker Out...

Page 4: ...urned on press the Power key to switch the LCD screen on off Function keys The device provides four function keys to control the corresponding icons displayed at the bottom of the LCD screen The key s...

Page 5: ...The GPS signal icon indicates the GPS status The Battery icon indicates the remaining battery power LED indicators Status LED 1 LED 2 The power cable is connected and the recorder is on The battery i...

Page 6: ...to the centre of the memory card You are advised to use a Class 6 memory card with at least 8GB capacity The recorder supports memory cards with up to 32GB capacity Navman does not guarantee the produ...

Page 7: ...ction below to mount your recorder in a vehicle securely 3 Connect the car charger to the cigarette lighter Route the cables through the top ceiling and the A pillar so that it does not interfere with...

Page 8: ...rder near the rear view mirror Select an appropriate location for mounting the device in a vehicle Never place the device where the driver s field of vision is blocked If the car s windscreen is tinte...

Page 9: ...uction below to connect the rcorder to the computer via the USB cable not supplied Connecting to a High Definition HD device For a better viewing experience you can connect the recorder to an external...

Page 10: ...To manually turn the recorder on and off press and hold the Power key for 2 seconds Setting the date and time To make sure of the correct date and time for your recordings please check the date and t...

Page 11: ...ng will not stop between video clips When continuous recording is in progress you can manually stop recording by pressing to access the Settings Menu Press to return to the recording screen and the sy...

Page 12: ...When Parking mode is enabled and the device is power off e g the vehicle engine is stopped or the power cable is disconnected or the car stops moving for 5 minutes the system starts parking recording...

Page 13: ...recordings Emergency event recordings Parking parking recordings and Photo 4 Use to select the desired file from the list and then press to start playback 5 During playback you can Press to return to...

Page 14: ...detects movements or if an event happens in Parking mode Auto Entry Select Easy Medium or Difficult Motion Detection Select the level Low Medium or High to trigger video recording automatically when m...

Page 15: ...ystem GPS Status Displays the status of GPS signal reception Date Time Sets the system date and time For more information see the Setting the date and time section Beep Alert Enables or disables syste...

Page 16: ...anager Download the Setup file from www navman com au or www navman co nz Double click Setup exe and follow the on screen prompts to install MiVue Manager Playing the recording files 1 Remove the memo...

Page 17: ...he right When a recording file exists you will see the date marked with Click that date to display the files that were recorded on that date You can choose the file type to display Event emergency eve...

Page 18: ...ng the track bar to move directly to a different location for the playback 6 The tool bar allows you to do the following Click to select the folder that stores the recording files Click to preview and...

Page 19: ...ge Sets the display language of MiVue Manager Change Skin Sets the color scheme of MiVue Manager Check for Update Checks if there is any new version of MiVue Manager Internet access is required for th...

Page 20: ...en surface can easily be scratched Avoid touching it with sharp objects Non adhesive generic screen protectors designed specifically for use on portable devices with LCD panels may be used to help pro...

Page 21: ...anger This product is intended to be supplied by a LISTED Power Unit marked with LPS Limited Power Source and output rated 5 V dc 1 0 A Use a specified battery in the equipment About the charger Do no...

Page 22: ...th the same or equivalent type recommended by the manufacturer The battery must be recycled or disposed of properly Use the battery only in the specified equipment About GPS GPS is operated by the Uni...

Page 23: ...ents in this section Some notices apply to specific models only The user needs to switch off the device when exposed to areas with potentially explosive atmospheres such as petrol stations chemical st...

Page 24: ...thout notice Navman does not warrant this document is error free Navman assumes no liability for damage incurred directly or indirectly from errors omissions or discrepancies between the device and th...

Reviews: