


Page 20
English
Stopping the Engine
1. Turn off and remove entire electrical loads.
Never start or stop the generator with
electrical devices plugged in or turned on.
Let the generator run at no-load for two
minutes to stabilize internal temperatures
of the engine and generator.
2. Flip the engine switch to“
OFF
”(
O
) position.
3. Turn the fuel valve to the “
OFF
” (
O
)position.
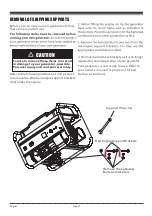
WARNING
If a cover is used, do not install until unit has cooled.
Fuel and its vapors are extremely flammable and
explosive which could cause burns, fire or
explosion resulting in death, serious injury
and/or property damage.
Low Oil Shutdown
If the engine oil drops below a preset level, an
oil switch will stop the engine. Check oil level
with dipstick.
If oil level is between LOW and HIGH mark on
dipstick:
1.DO NOT try to restart the engine.
2.Contact an Authorized Service Dealer.
3.DO NOT operate engine until oil level is
corrected.
If oil level is below LOW mark on dipstick:
1.Add oil to bring level to HIGH mark.
2.Restart engine and if the engine stops again
a low oil condition may still exist. DO NOT try
to restart the engine.
3.Contact an Authorized Service Dealer.
4.DO NOT operate engine until oil level is
corrected.
Do Not Overload Generator
Overloading a generator in excess of its rated
wattage capacity can result in damage to the
generator and to connected electrical devices.
To prolong the life of your generator and
attached devices, follow these steps to add
electrical load:
1. Start the generator with no electrical load
attached.
2. Allow the engine to run for several minutes
to stabilize.
3. Plug in and turn on the first item. It is best to
attach the item with the largest load first.
4. Allow the engine to stabilize.
5. Plug in and turn on the next item.
6. Allow the engine to stabilize.
7. Repeat steps 5-6 for each additional item.
Summary of Contents for NG2500
Page 2: ......
Page 30: ...P N 323745451 Rev 01...