


NAVCAM
‐
PRO
USER
MANUAL
12
Crashcam
‐
PRO
(Navcam
‐
PRO)
Manual
Ver
3.0
09/2013
When
approaching
a
self
‐
input
location
the
device
will
beep
300
meters
from
the
pre
‐
set
location
When
speed
is
in
excess
of
a
self
‐
inputted
speed
limit,
the
unit
will
beep.
Note:
In
order
to
work
correctly,
the
GPS
icon
needs
to
be
“on”
(satellite
location
fix
required)
Note:
a
maximum
of
1000
user
saved
speed
cameras
or
speed
traps
can
be
stored.
Note:
The
camera
data
on
this
device
can
be
updated
as
newer
versions
are
released.
USB CONNECTION
Connect
the
Crashcam
‐
Pro
to
a
Windows
PC
with
a
Mini
USB
to
USB
cable
(not
included).
The
welcome
screen
will
appear.
The
screen
will
turn
black
and
the
LED
indicator
will
turn
green.
The
unit
is
now
connected.
Find
the
device
Under
“My
computer”
or
“Windows
Explorer”
where
you
should
see
a
drive
which
will
resemble
a
“Removable
Disk
(?:)”
(like
a
USB
Flash
drive
or
Hard
drive).
Recorded
files
are
stored
in
the
EmgRec
or
REC
folders.
These
files
can
be
played
back
using
Windows
Media
player,
VLC
or
a
compatible
.MOV
media
player
or
an
image
viewer
(for
images)
PLAYBACK ON TV (WITH HDMI)
Connect
the
Crashcam
‐
Pro
to
a
HDMI
equipped
TV
or
AV
monitor
with
a
mini
‐
HMDI
to
HDMI
cable
(not
included).
Turn
on
the
Crashcam
‐
Pro
and
select
PLAY.
SD CARD REQUIREMENTS
The
CRASHCAM
‐
Pro
requires
an
SD
card
(not
included)
to
record
video/image
content.
For
optimal
performance,
we
recommend
using
a
Class
6
or
10
SD
card
(preferably
UHS
class
1)
to
ensure
fast
data
transfer
rates
(Class
4
cards
will
still
work
however
may
result
in
slower
transfer
rates).
Note,
some
“Extreme
Speed”
class
10
UHS
2
cards
will
not
work
correctly
with
the
Crashcam
Pro
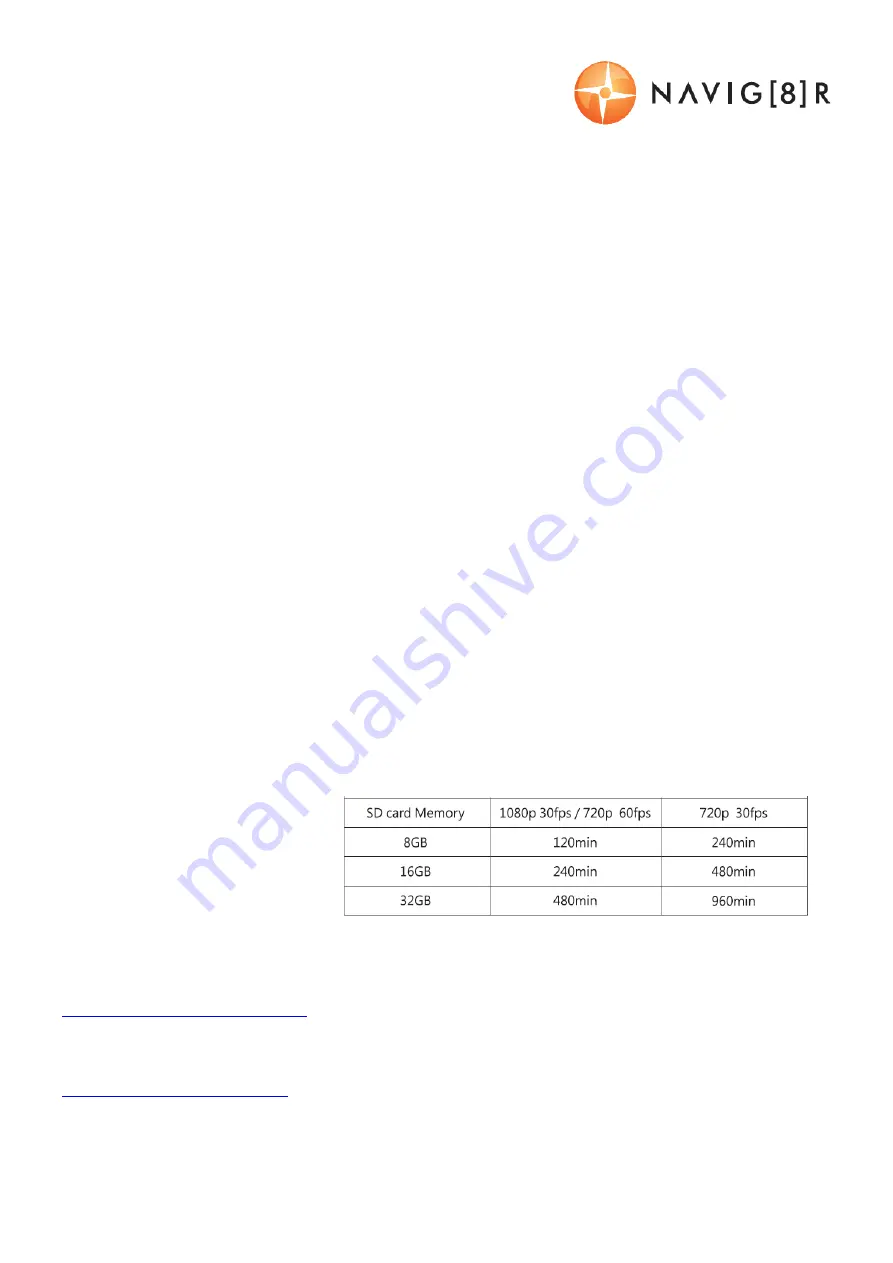
The
recording
time
table
(right)
is
an
estimate
to
recording
time
/
car
capacity
and
resolution.
FIRMWARE AND SPEED CAMERA UPDATES
To
update
speed
camera,
red
light
camera
and
average
speed
camera
locations,
please
go
to
www.navig8r.com.au/crashcam
.
Instructions
will
be
posted
on
how
to
obtain
the
latest
camera
updates.
Firmware
updates
need
to
be
completed
by
an
Authorised
Navig8r
service
centre.
Please
see
www.navig8r.com.au/service
for
details
on
service
and
firmware
updating.
Note:
Speed
Camera
updates
will
be
posted
as
they
become
available.
(normally
2
x
per
year)


