background image

Assembly Instructions 

There are two ways to assemble the solar panel. Make sure to install the solar panel close enough to 

the light so that the wire can reach from the solar panel to its plug in on the lamp. 

Post or Pole Mounted 

1. Carefully remove all the fittings from the box.

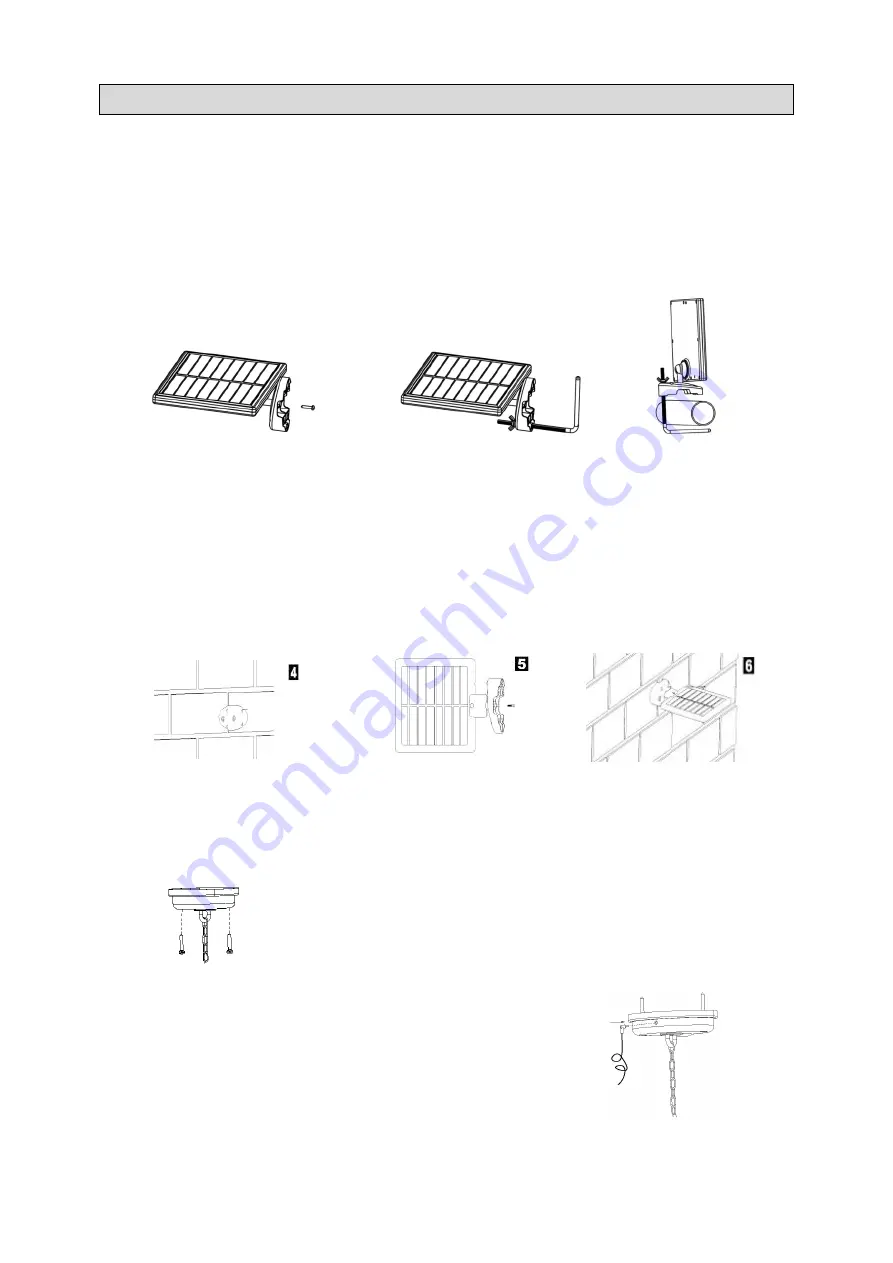
2. Setting the bracket screw to solar panel with Screw.(figure 1)

3. Connect  “L” shape screw and Bracket for solar panel and “U” Shape Screw.(figure 2) 

4. Tumble in the “L” Shape Screw to Pillar and twist the “U” Shape Screw tightly.(figure3)

Wall or Deck Mounted 

1. Choose the desired location for mounting the solar panel. Use the bracket to mark the four

screw holes. You may need to drill into the surface depending on the material the wall or deck is

made (figure 4).

2. Attach the bracket to the solar panel with the provided screw (figure 5).

3. Attach the bracket to the wall or deck with the provided screws (figure 6).

4. Adjust the angle of the solar panel to make sure it receives optimal sunlight during the day.

Lamp Installation 

Use the two pre-drilled holes on the ceiling bracket and mark the location. Install the two screws into 

the holes and attach the ceiling bracket with the two screws. 

Connection of the Solar Panel and Lamp 

Insert the plug of the wires into the socket at the side of the ceiling bracket 

Page 4 of  8 

gure 1 

gure 2 

Figure 3 

Summary of Contents for 21030

Page 1: ...ight User Manual WARNING Read carefully and understand all ASSEMBLY AND OPERATION INSTRUCTIONS before operating Failure to follow the safety rules and other basic safety precautions may result in serious personal injury Item 21030 V1 1 M 1Jun2018 ...

Page 2: ...ch it was not intended x Industrial or commercial applications must follow OSHA requirements Important Safety Information Thank you for choosing a Nature Power Product Save the receipt and these instructions It is important that you read the entire manual to become familiar with this product before you begin using it This product is designed for certain applications only the distributor cannot be ...

Page 3: ...tricity is unavailable or difficult to access The included remote control allows you to activate the light at the touch of a button Technical Specifications Property Specification Lumen 250 on bright setting 60 on low setting Hanging Length Adjustable to maximum of 32 inches Number of LEDs 4 Parts List Reference Part Description Quantity 1 Light 1 2 Solar Panel 1 3 Remote Control 1 4 Mounting Scre...

Page 4: ...on for mounting the solar panel Use the bracket to mark the four screw holes You may need to drill into the surface depending on the material the wall or deck is made figure 4 2 Attach the bracket to the solar panel with the provided screw figure 5 3 Attach the bracket to the wall or deck with the provided screws figure 6 4 Adjust the angle of the solar panel to make sure it receives optimal sunli...

Page 5: ...ons OFF AUTO ON Switch to the OFF position and the light will stay off Switch to the AUTO position and the light fixture will be off during the day and turn on at night The light brightness can be controlled from low light or high light mode with the remote control Switch to the ON position and the light fixture will stay on day and night The brightness can be controlled from low light or high lig...

Page 6: ...ition in the sky This will maximize the amount of sunlight received and help allow any water or snow that accumulates on the panel to slide off Troubleshooting Use the table below to troubleshoot problems before contacting service personnel or your local dealer If the problem continues after troubleshooting call your local dealer for assistance Failure Possible Cause Corrective Action Light does n...

Page 7: ... the hand held remote The rechargeable batteries are at the end of life Replace the batteries with new rechargeable batteries of the same type and size Battery Replacement For best results batteries should be replaced every 12 months 1 Remove the glass cover the plastic battery compartment and unscrew the screws with a screwdriver Make sure the new batteries are rechargeable batteries of the same ...

Page 8: ...ation Number must be issued by Nature Power and the defective part or unit should be returned to the authorized location at the purchasers expense A dated proof of purchase is required to receive warranty service Once received at authorized location and defect proves to be the result of defective material and workmanship the defective part or unit will be replaced at warrantors option and returned...

Reviews: