


©
National Instruments Corporation
9
NI Switches Getting Started Guide
5.
Remove the filler panel of an unused PXI/PXIe slot.
6.
Touch any metal part of the chassis to discharge static electricity.
7.
Ensure that the ejector handle of the device is in the unlatched (down) position and swings freely.
8.
Holding the device by the injector/ejector handle, slide it into the empty slot, ensuring that the card
engages with the card guides in the chassis, as shown in Figure 4.
9.
When you begin to feel resistance, pull up on the injector/ejector handle to latch the device.
10. Tighten the screws at the top and bottom of the device front panel.
11. Cover all empty PXI/PXIe slots using blank PXI/PXIe filler panels.
12. Plug in and power on the NI PXI/PXIe chassis.
13. Proceed to the
Configuring and Testing an NI PXI/PXIe Switch Module
section of this document.
6. Configuring and Testing in MAX
To configure and test your NI switch product, follow the instructions in the section that describes your
hardware platform.
Configuring and Testing the NI SwitchBlock
Configure the NI SwitchBlock under
Devices and Interfaces
in MAX.
Note
Each NI SwitchBlock card is initially configured as a single-card device in software. Use
MAX to group multiple cards to operate as a multicard device in software.
1.
If you are using an embedded PXI controller, power on the chassis. If you are using an MXI
controller, power on the chassis before you power on the computer.
2.
Launch MAX (
Start»All Programs»National Instruments»Measurement & Automation
).
3.
Expand
Devices and Interfaces
. If you are using a remote real-time (RT) target, expand
Remote
Systems
, find and expand the target, and then expand
Devices and Interfaces
.
4.
Check that the NI SwitchBlock carrier appears under the appropriate chassis. MAX assigns the slot
number of the carrier as the second-to-left chassis slot occupied by the carrier. If your chassis does
not appear under
Devices and Interfaces
, refer to the chassis documentation to identify the
chassis.
Note
If the carrier does not appear, press <F5> to refresh the view in MAX. If the carrier still does
not appear, repeat the steps in the
5. Installing the Hardware
section. Refer to NI Technical Support
at
ni.com/support
for troubleshooting information if the carrier is still not recognized. For more
information about using MAX, refer to the available help files within MAX.
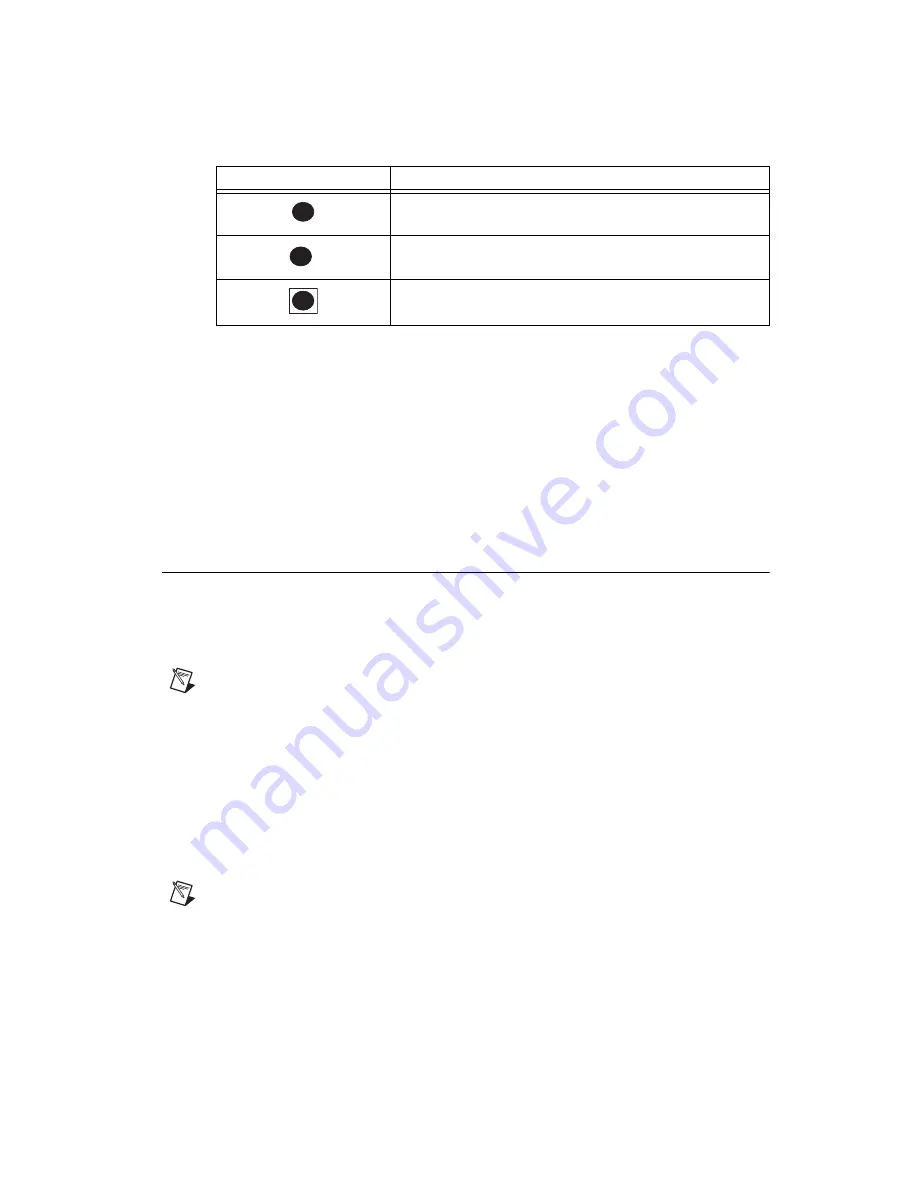
PXI Express Peripheral Slot
PXI Express Hybrid Peripheral Slot (Refer to
Appendix A: PXI
Express Compatible NI Switch Products
for more information.)
PXI Express System Timing Slot
Table 1.
Slot Identification Symbols in an NI PXIe Chassis (Continued)
Slot Symbol
Slot Use
3
4
H
5
Artisan Technology Group - Quality Instrumentation ... Guaranteed | (888) 88-SOURCE | www.artisantg.com


