background image

Chapter 2

Installation and Configuration

NI PXIe-1071 User Manual

2-8

ni.com

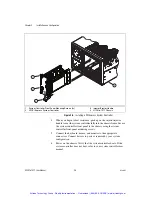
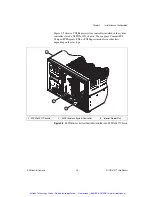
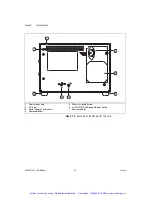
Figure 2-4.  

Installing a PXI Express System Controller

4.

When you begin to feel resistance, push up on the injector/ejector 
handle to seat the system controller fully into the chassis frame. Secure 
the system controller front panel to the chassis using the system 
controller front-panel mounting screws.

5.

Connect the keyboard, mouse, and monitor to the appropriate 
connectors. Connect devices to ports as required by your system 
configuration.

6.

Power on the chassis. Verify that the system controller boots. If the 
system controller does not boot, refer to your system controller user 
manual.

1

System Controller Front Panel Mounting Screws (4×)

2

NI PXI Express System Controller

3

Injector/Ejector Handle

4

NI PXIe-1071 Chassis

1

2

3

4

NI

 PX

Ie-1

071

Artisan Technology Group - Quality Instrumentation ... Guaranteed | (888) 88-SOURCE | www.artisantg.com

Summary of Contents for NI PXIe-1071

Page 1: ...service in house repair center WE BUY USED EQUIPMENT Sell your excess underutilized and idle used equipment We also offer credit for buy backs and trade ins www artisantg com WeBuyEquipment REMOTE IN...

Page 2: ...PXI Express TM NI PXIe 1071 User Manual NI PXIe 1071 User Manual February 2013 373011D 01 Artisan Technology Group Quality Instrumentation Guaranteed 888 88 SOURCE www artisantg com...

Page 3: ...rate Headquarters 11500 North Mopac Expressway Austin Texas 78759 3504 USA Tel 512 683 0100 For further support information refer to the Technical Support and Professional Services appendix To comment...

Page 4: ...or negligent acts and power failure or surges fire flood accident actions of third parties or other events outside reasonable control Copyright Under the copyright laws this publication may not be re...

Page 5: ...TEM SOFTWARE FITNESS FITNESS OF COMPILERS AND DEVELOPMENT SOFTWARE USED TO DEVELOP AN APPLICATION INSTALLATION ERRORS SOFTWARE AND HARDWARE COMPATIBILITY PROBLEMS MALFUNCTIONS OR FAILURES OF ELECTRONI...

Page 6: ...e by one or more of the following measures Reorient the antenna of the receiver the device suffering interference Relocate the transmitter the device generating interference with respect to the receiv...

Page 7: ...lots 1 8 PXI Local Bus 1 8 PXI Trigger Bus 1 9 System Reference Clock 1 9 Chapter 2 Installation and Configuration Safety Information 2 1 Chassis Cooling Considerations 2 2 Providing Adequate Clearanc...

Page 8: ...and Initialization Files 2 15 Chapter 3 Maintenance Service Interval 3 1 Preparation 3 1 Cleaning 3 2 Interior Cleaning 3 2 Exterior Cleaning 3 2 Appendix A Specifications Appendix B Pinouts Appendix...

Page 9: ...IEEE 1101 1 1991 IEEE Standard for Mechanical Core Specifications for Microcomputers Using IEC 603 2 Connectors IEEE 1101 10 IEEE Standard for Additional Mechanical Specifications for Microcomputers...

Page 10: ...sis for any possible damage debris or detached components If damage appears to have been caused during shipment file a claim with the carrier Retain the packing material for possible inspection and or...

Page 11: ...rectly connected to the system slot from each hybrid slot 32 bit 33 MHz PCI connected to each hybrid slot Accepts 4 slot wide PXI Express embedded controller Rugged compact chassis with universal AC i...

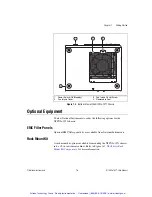
Page 12: ...ear view of the NI PXIe 1071 Figure 1 1 Front View of the NI PXIe 1071 Chassis 1 Backplane Connectors 2 Removable Feet 3 PXI Express Hybrid Peripheral Slots 4 PXI Express System Controller Slot 5 Syst...

Page 13: ...he NI PXIe 1071 Chassis 1 Rear Intake Vents 2 AC Input 3 Power Supply Fan Exhaust 4 Removable Feet 5 Chassis Ground Screw 6 AUTO HIGH Fan Speed Selector Switch 7 Kensington Slot 4 5 6 7 6 4 3 2 1 Arti...

Page 14: ...tional EMC filler panel kits are available from National Instruments Rack Mount Kit A rack mount kit option is available for mounting the NI PXIe 1071 chassis into a 19 in instrument cabinet Refer to...

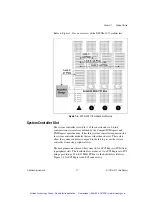
Page 15: ...lane Overview This section provides an overview of the backplane features for the NI PXIe 1071 chassis Interoperability with CompactPCI The design of the NI PXIe 1071 provides you the flexibility to u...

Page 16: ...three system controller expansion slots for system controller modules that are wider than one slot These slots allow the system controller to expand to the left to prevent the system controller from u...

Page 17: ...onnector with an XJ4 connector installed in the upper eight rows of J2 Refer to the PXI Express Specification for details The PXI Peripheral communicates through the backplane s 32 bit PCI bus A Compa...

Page 18: ...can pass triggers to one another allowing precisely timed responses to asynchronous external events the system is monitoring or controlling System Reference Clock The NI PXIe 1071 chassis supplies PXI...

Page 19: ...nt buffer drives PXIe_SYNC100 to each peripheral slot The differential pair must be terminated on the peripheral with LVPECL termination for the buffer to drive PXIe_SYNC100 so that when there is no p...

Page 20: ...hassis ground The earth safety ground must be connected during use of this equipment to minimize shock hazards Refer to the Connecting Safety Ground section for instructions on connecting safety groun...

Page 21: ...ion Failure to provide adequate clearances may result in thermal related failures in the chassis or modules Apertures in the top bottom front rear and along the sides of the chassis facilitate power s...

Page 22: ...ation National Instruments 2 3 NI PXIe 1071 User Manual Figure 2 1 NI PXIe 1071 Module Cooling Airflow Side View 1 Air Outlets 2 Air Intake 2 1 Artisan Technology Group Quality Instrumentation Guarant...

Page 23: ...Ie 1071 Vents 1 Power Supply Cooling Intake Vent 2 Module Cooling Exhaust Vent 3 Module Cooling Intake Vent 4 Backplane Cooling Intake Vent 5 Power Supply Cooling Exhaust Vent 4 2 3 5 1 1 NI PXIe 1071...

Page 24: ...1 User Manual Figure 2 3 NI PXIe 1071 Cooling Clearances 1 75 in 44 45 mm 1 75 in 44 45 mm 1 75 in 44 45 mm 1 75 in 44 45 mm In Electronics Rack 0 50 in 12 70 mm On Desktop NI PXIe 1071 Artisan Techno...

Page 25: ...speed selector switch Select HIGH for maximum cooling performance recommended or AUTO for quieter operation When set to AUTO the chassis intake air temperature determines the fan speed Installing Fill...

Page 26: ...neral installation instructions for installing a PXI Express system controller in a NI PXIe 1071 chassis Refer to your PXI Express system controller user manual for specific instructions and warnings...

Page 27: ...t panel mounting screws 5 Connect the keyboard mouse and monitor to the appropriate connectors Connect devices to ports as required by your system configuration 6 Power on the chassis Verify that the...

Page 28: ...1 chassis You can place CompactPCI CompactPCI Express PXI or PXI Express modules in other slots depending on the slot type Figure 2 5 NI PXI Express System Controller Installed in an NI PXIe 1071 Chas...

Page 29: ...he chassis backplane for any bending or damage prior to installation 2 Connect the AC power source to the PXI Express chassis before installing the module The AC power cord grounds the chassis and pro...

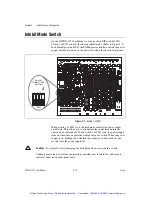
Page 30: ...steady green not flashing the chassis is powered on and operating normally If the inhibit switch LED is red the system fan has failed and the chassis has shut down to protect modules from damage due...

Page 31: ...s allows you to circumvent the controller and turn the chassis on or off manually When switch 1 of SW1 is on the power supply turns on when the you press the front panel power switch When the power su...

Page 32: ...th your system controller MAX creates the pxiesys ini and pxisys ini file which define your PXI system parameters MAX also provides an interface to route and reserve triggers so dynamic routing throug...

Page 33: ...integrators the manufacturers of PXI chassis and system modules must document the capabilities of their products PXI Express devices must provide a driver and ini file for identification These files a...

Page 34: ...create a single system initialization file called pxisys ini PXI System Initialization The system controller manufacturer either provides a pxisys ini file for the particular chassis model that conta...

Page 35: ...rating environment Periodic cleaning increases reliability and cooling performance Preparation The information in this section is designed for use by qualified service personnel Read the Read Me First...

Page 36: ...f the chassis with a dry lint free cloth or a soft bristle brush If any dirt remains wipe with a cloth moistened in a mild soap solution Remove any soap residue by wiping with a cloth moistened with c...

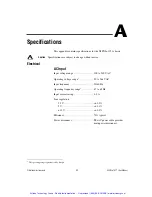
Page 37: ...age range 100 to 240 VAC Operating voltage range1 90 to 264 VAC Input frequency 50 60 Hz Operating frequency range1 47 to 63 Hz Input current rating 4 2 A Line regulation 3 3 V 0 2 5 V 0 1 12 V 0 1 Ef...

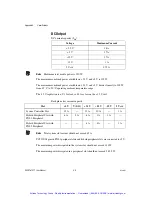
Page 38: ...tem slot current should not exceed 45 A PCI V I O pins in PXI 1 peripheral slots and hybrid peripheral slots are connected to 5 V The maximum power dissipated in the system slot should not exceed 140...

Page 39: ...through integrated fan Power supply cooling intake Front and left side of chassis Power supply cooling exhaust Rear of chassis Environmental Maximum altitude 2 000 m 800 mbar at 25 C ambient Measurem...

Page 40: ...28800F Class 2 limits Random Vibration Operating 5 to 500 Hz 0 3 grms Nonoperating 5 to 500 Hz 2 4 grms Tested in accordance with IEC 60068 2 64 Nonoperating test profile exceeds the requirements of...

Page 41: ...PR 11 Group 1 Class A emissions FCC 47 CFR Part 15B Class A emissions ICES 001 Class A emissions Note For the standards applied to assess the EMC of this product refer to the Online Product Certificat...

Page 42: ...products must be sent to a WEEE recycling center For more information about WEEE recycling centers National Instruments WEEE initiatives and compliance with WEEE Directive 2002 96 EC on Waste and Ele...

Page 43: ...e SYNC100 Maximum slot to slot skew 100 ps Accuracy 25 ppm max guaranteed over the operating temperature range Maximum jitter 3 ps RMS phase jitter 10 Hz 12 kHz range 2 ps RMS phase jitter 12 kHz 20 M...

Page 44: ...truded Aluminum Cold Rolled Steel and PC ABS Finish Conductive Clear Iridite on Aluminum Clear Chromate Zinc Plating on Cold Rolled Steel Polyurethane Enamel and Polyester Urethane Powder Paint Figure...

Page 45: ...7 mm 8 43 in 214 2 mm 6 97 in 177 mm 0 5 in 12 7 mm 6 46 in 164 08 mm M4 x 0 7 0 25 in 6 35 mm Max 10x 0 96 in 24 38 mm 1 72 in 43 69 mm 0 72 in 18 3 mm 1 83 in 46 58 mm 4 47 in 113 56 mm 3 02 in 76 7...

Page 46: ...A 10 ni com Figure A 2 NI PXIe 1071 Chassis Dimensions Bottom 8 74 in 222 mm 0 69 in 17 5 mm 6 49 in 164 85 mm M4 x 0 7 0 25 in 6 35 mm Max 4x 0 96 in 24 38 mm Artisan Technology Group Quality Instrum...

Page 47: ...71 User Manual Figure A 3 shows the chassis rack mount kit components Figure A 3 NI Chassis Rack Mount Kit Components 1 Front Rack Mount Kit 2 NI Chassis 1 2 NI PXIe 1071 Artisan Technology Group Qual...

Page 48: ...ler slot Table B 4 shows the XP4 Connector Pinout for the System Controller slot Table B 5 shows the P1 connector pinout for the Hybrid peripheral slots Table B 6 shows the XP3 Connector Pinout for th...

Page 49: ...GND 3PETp2 3PETn2 GND 2 3PETp3 3PETn3 GND 3PERp3 3PERn3 GND 3PERp2 3PERn2 GND 3 4PETp0 4PETn0 GND 4PERp0 4PERn0 GND 4PETp1 4PETn1 GND 4 4PETp2 4PETn2 GND 4PERp2 4PERn2 GND 4PERp1 4PERn1 GND 5 4PETp3...

Page 50: ...D 1PERp3 1PERn3 GND 2PETp0 2PETn0 GND 8 2PETp1 2PETn1 GND 2PERp1 2PERn1 GND 2PERp0 2PERn0 GND 9 2PETp2 2PETn2 GND 2PERp2 2PERn2 GND 2PETp3 2PETn3 GND 10 3PETp0 3PETn0 GND 3PERp0 3PERn0 GND 2PERp3 2PER...

Page 51: ...ND 17 GND 3 3V IPMB_SCL IPMB_SDA GND PERR GND 16 GND DEVSEL GND V I O STOP LOCK GND 15 GND 3 3V FRAME IRDY BD_SEL TRDY GND 12 14 Key Area 11 GND AD 18 AD 17 AD 16 GND C BE 2 GND 10 GND AD 21 GND 3 3V...

Page 52: ...Rn1 GND 7 1PETp3 1PETn3 GND 1PERp3 1PERn3 GND 1PETp4 1PETn4 GND 8 1PETp5 1PETn5 GND 1PERp5 1PERn5 GND 1PERp4 1PERn4 GND 9 1PETp6 1PETn6 GND 1PERp6 1PERn6 GND 1PETp7 1PETn7 GND 10 RSV RSV GND RSV RSV G...

Page 53: ...rvice Program Membership This program entitles members to direct access to NI Applications Engineers via phone and email for one to one technical support as well as exclusive access to self paced onli...

Page 54: ...cturer s declaration of conformity This system affords the user protection for electromagnetic compatibility EMC and product safety You can obtain the DoC for your product by visiting ni com certifica...

Page 55: ...lo 103 M mega 106 G giga 109 T tera 1012 Symbols Degrees Equal or greater than Equal or less than Percent A A Amperes AC Alternating current ANSI American National Standards Institute Auto Automatic f...

Page 56: ...an desktop PCI It uses industry standard mechanical components and high performance connector technologies to provide an optimized system intended for rugged applications It is electrically compatible...

Page 57: ...sis G g 1 grams 2 a measure of acceleration equal to 9 8 m s2 GPIB General Purpose Interface Bus IEEE 488 gRMS A measure of random vibration The root mean square of acceleration levels in a random vib...

Page 58: ...ge output will change as a result of a specified change in input AC voltage step change from 90 to 132 VAC or 180 to 264 VAC load regulation The maximum steady state percentage that a DC voltage outpu...

Page 59: ...An assembly installed into an empty slot to improve the airflow in adjacent slots standby The backplane is unpowered off but the chassis is still connected to AC power mains System controller A module...

Page 60: ...em The 10 MHz REF IN and OUT BNC connectors on the rear of the chassis can be used to synchronize multiple chassis to one reference clock The PXI backplane specification defines implementation guideli...

Page 61: ...learances for chassis cooling 2 2 figure 2 5 CompactPCI interoperability with NI PXIe 1071 backplane 1 6 configuration in MAX figure 2 13 configuration See installation configuration and operation coo...

Page 62: ...power up 2 7 unpacking the NI PXIe 1071 1 1 installing a PXI Express system controller figure 2 8 instrument drivers NI resources C 1 interoperability with CompactPCI 1 6 K key features 1 2 kit conte...

Page 63: ...5 service interval 3 1 setting fan speed 2 6 slot blocker installation 2 6 kit 1 6 software NI resources C 1 specifications acoustic emissions sound power A 4 sound pressure level at operator position...

Page 64: ...7 T technical support C 1 testing power up 2 7 training and certification NI resources C 1 trigger bus 1 9 troubleshooting NI resources C 1 U unpacking the NI PXIe 1071 chassis 1 1 W Web resources C...

Page 65: ...service in house repair center WE BUY USED EQUIPMENT Sell your excess underutilized and idle used equipment We also offer credit for buy backs and trade ins www artisantg com WeBuyEquipment REMOTE IN...

Reviews: