background image

35

W415-0098 / E / 06.28.10

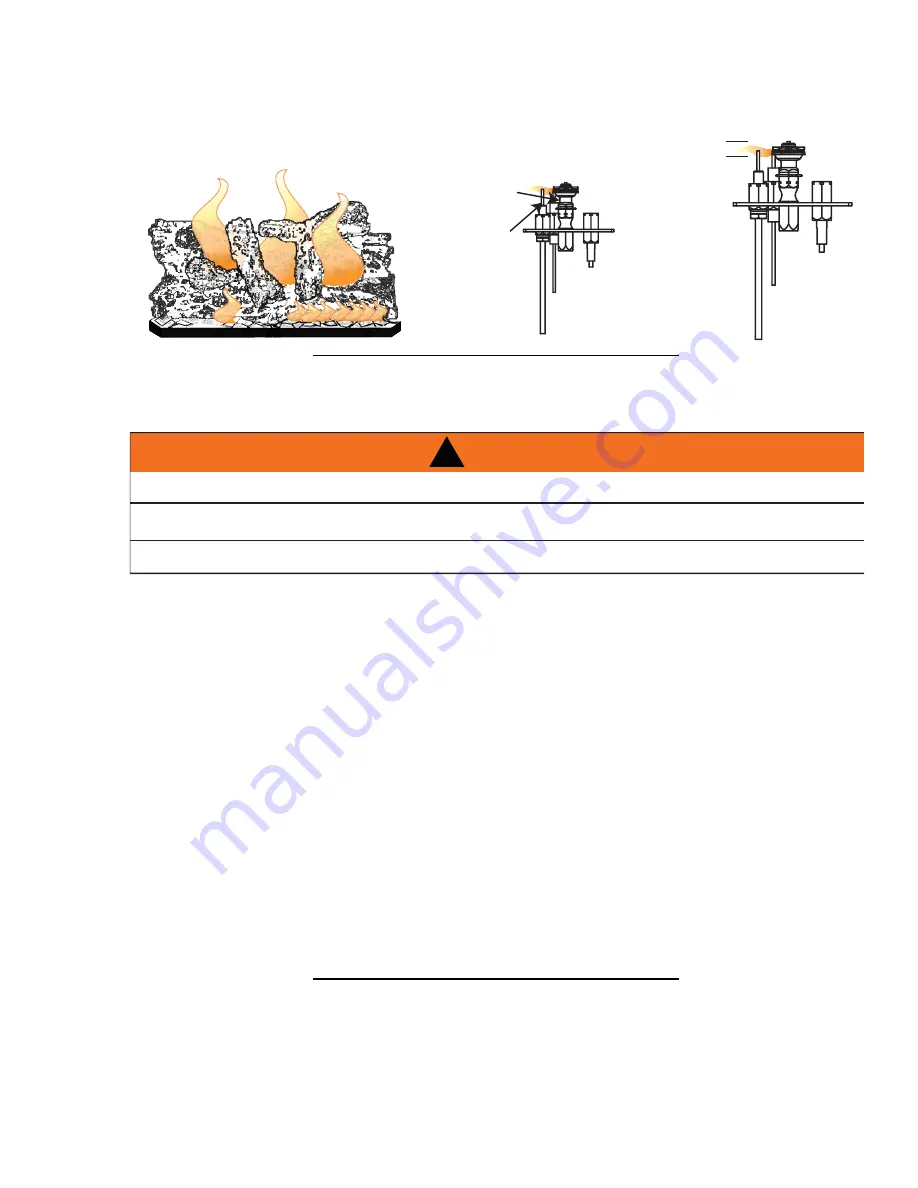
7.3 FLAME 

CHARACTERISTICS

It’s important to periodically perform a visual check of the pilot and burner 

fl

 ames. Compare them to the illustra-

tions provided. If any 

fl

 ames appear abnormal call a service person.

3/8” - 1/2”

PILOT 

BURNER

FLAME MUST ENVELOP 
UPPER 3/8” TO 1/2” OF 
FLAME SENSOR

FLAME

SENSOR

ELECTRODE

54.1

8.0 MAINTENANCE

CAUTION:

 Label all wires prior to disconnection when servicing controls. Wiring errors can cause improper 

and dangerous operation. Verify proper operation after servicing. This appliance and its venting system 
should be inspected before use and at least annually by a quali

fi

 ed service person. The appliance area must 

be kept clear and free of combustible materials, gasoline or other 

fl

 ammable vapors and liquids. The 

fl

 ow of 

combustion and ventilation air must not be obstructed.

1.


In order to properly clean the burner and pilot assembly, remove the logs, rocks and/or glass to 
expose both assemblies.

2.


Keep the control compartment, media, burner, air shutter opening and the area surrounding the logs 
clean by vacuuming or brushing, at least once a year.

3.


Check to see that all burner ports are burning. Clean out any of the ports which may not be burning or 
are not burning properly. 

4.


Check to see that the pilot 

fl

 ame is large enough to engulf the 

fl

 ame sensor and/or thermocouple / 

thermopile as well as reaches the burner.

5.


Replace the cleaned logs, rocks or glass. Failure to properly position the media may cause carboning 
which can be distributed in the surrounding living area.

6.


Check to see that the main burner ignites completely on all openings when turned on. A 5 to 10 
second total light-up period is satisfactory. If ignition takes longer, consult your local authorized dealer / 
distributor.

7.


Check that the gasketing on the sides, top and bottom of the door is not broken or missing. Replace if 
necessary.

8.


If for any reason the vent air intake system is disassembled, re-install and re-seal per the instructions 
provided for the initial installation.

40.1

MAINTENANCE

MAINTENANCE

MAINTENANCE

TURN OFF THE GAS AND ELECTRICAL POWER BEFORE SERVICING THE APPLIANCE.

APPLIANCE MAY BE HOT, DO NOT SERVICE UNTIL APPLIANCE HAS COOLED.

DO NOT USE ABRASIVE CLEANERS.

!

WARNING

Due to the high temperature that the hinges experience, wet lubricants such as oil and WD40 will cause the 
hinges to seize and are therefore not suitable.  Lubricate with a high temperature dry graphite, only.

Summary of Contents for GDS 50-N

Page 1: ...ions are not followed exactly a fire or explosion may result causing property damage personal injury or loss of life Do not store or use gasoline or other flammable vapors and liquids in the vicinity...

Page 2: ...LLATION 22 4 2 5 APPLIANCE VENT CONNECTION 23 4 2 6 VERTICAL THROUGH EXISTING CHIMNEY 24 4 3 B VENT INSTALLATION GS50 25 4 3 1 CHIMNEY INSTALLATION 25 4 3 2 INSTALLING FLASHING AND STORM COLLAR 25 4 3...

Page 3: ...10 1 0 INSTALLATION OVERVIEW Venting see VENTING section Door see DOOR OPENING AND CLOSING section Trivet see TRIVET INSTALLATION section Logs see LOG PLACEMENT section Rating plate see RATING PLATE...

Page 4: ...in the appliance and venting system are kept clean The appliance and its venting system should be inspected before use and at least annually by a qualified service person More frequent cleaning may be...

Page 5: ...5 W415 0098 E 06 28 10 2 1 DIMENSIONS 28 1 4 14 1 8 30 3 4 21 13 3 4 21 5 8 8 GAS LINE LOCATED IN PEDESTAL REAR 7 AIR INTAKE 4 FLUE...

Page 6: ...cial location for an appliance is in the center of a building thereby allowing the most efficient use of the heat created The location of windows doors and the traffic flow in the room where the appli...

Page 7: ...ance is approved for bedroom and bed sitting room installations 4 1 If the appliance is installed directly on carpeting vinyl tile or other combustible material other than wood flooring the appliance...

Page 8: ...I EST FOURNI AVEC CET APPAREIL PAR LE FABRICANT MINIMUM CLEARANCETO COMBUSTIBLE MATERIAL DEGAGEMENTSMINIMAUXDESMATERIAUXCOMBUSTIBLES A 7 D 17 B 2 E 6 C 1 F 9 20 TO CEILING FROM STOVE TOP 20 ENTRE LE D...

Page 9: ...IDDLE AND END OF EACH ELBOW TO ENSURE THIS GAP IS MAINTAINED THESE SPACERS MUST NOT BE REMOVED 3 1 VENTING LENGTHS AND COMPONENTS Use only Wolf Steel Simpson Dura Vent Selkirk Direct Temp American Met...

Page 10: ...and undamaged Rigid and flexible venting systems must not be combined Different venting manufacturers components must not be combined These vent kits allow for either horizontal or vertical venting o...

Page 11: ...o that when final grading is completed the bottom air slot is located a minimum 12 above grade The maximum allowable vent length is 10 9 7 3 3 SPECIAL VENT INSTALLATIONS 3 3 1 PERISCOPE TERMINATION 12...

Page 12: ...ng neighbouring buildings P 8 8 Roof must be non combustible without openings Q 3 3 See chart for wider wall dimensions R 6 6 See chart for deeper wall dimensions The terminal shall not be installed o...

Page 13: ...aximum of 40 feet 4 2 times the vertical rise equal to or greater than the horizontal run 3 times the vertical rise equal to or greater than the horizontal run 3 6 DEFINITIONS 14 1 For the following s...

Page 14: ...4 5 FT HO 03 three 90 elbows 90 03 270 90 5 4 FT HT HR HO 4 5 5 4 9 9 FT HT VT 9 9 11 20 9 FT Formula 1 HT VT 9 9 11 Formula 2 HT VT 40 FT 20 9 40 Since both formulas are met this vent configuration i...

Page 15: ...T VT 10 7 6 16 7 FT Formula 1 HT 4 2 VT 4 2 VT 4 2 x 6 25 2 FT 10 7 25 2 Formula 2 HT VT 24 75 FT 16 7 24 75 Since both formulas are met this vent configuration is acceptable 0 5 15 20 100 50 150 29 2...

Page 16: ...following formulas apply Formula 1 HT VT Formula 2 HT VT 40 feet Example 6 V1 5 FT V2 6 FT V3 10 FT VT V1 V2 V3 5 6 10 21 FT H1 8 FT H2 2 5 FT HR H1 H2 8 2 5 10 5 FT HO 03 four 90 elbows 90 03 360 90...

Page 17: ...3 2 1 1 5 4 5 FT H1 6 FT H2 2 FT HR H1 H2 6 2 8 FT HO 03 four 90 elbows 90 03 360 90 8 1 FT HT HR HO 8 8 1 16 1 FT HT VT 16 1 4 5 20 6 FT Formula 1 HT 3VT 3VT 3 x 4 5 13 5 FT 16 1 13 5 Since this form...

Page 18: ...LOOSE MATERIALS OR INSULATION TO TOUCH THE VENT PIPE REMOVE INSULATION TO ALLOW FOR THE INSTALLATION OF THE ATTIC SHIELD AND TO MAINTAIN CLEARANCES TO COMBUSTIBLES 68 2A 4 1 MINIMUM CLEARANCE TO COMB...

Page 19: ...orrect height for the air terminal location cut and frame a hole in the exterior wall as illustrated to accommodate the firestop assembly Dry fit the firestop assembly before proceeding to ensure the...

Page 20: ...ply a bead of caulking not supplied to the framework or to the Wolf Steel vent pipe shield plate or equivalent in the case of a finished ceiling and secure over the opening in the ceiling A firestop m...

Page 21: ...ter combustion air sleeve of the air terminal and secure with 3 8 screws Seal using high temperature sealant W573 0002 not supplied C Insert the vent pipes through the firestop maintaining the require...

Page 22: ...tor leaving a min 3 4 of the air terminal connector showing above the top of the flashing Slide the flashing underneath the sides and upper edge of the shingles Ensure that the air terminal connector...

Page 23: ...73 0007 not supplied C Run a bead of high temperature sealant not supplied around the inside of the air intake collar Pull the adjustable pipe a minimum 2 into the air intake collar NOTE Ensure that t...

Page 24: ...ollar of the termination cap must be connected to the air intake pipe Use Simpson Duravent Chimney Liner Termination Kit 923GK Base plate and Co Linear to Co Axial Adaptor Follow manufacturers Simpson...

Page 25: ...e sides and top edges of the flashing with roofing material Apply waterproof caulking around the vent 1 above the top of the flashing and push the storm collar down into the caulking Attach a rain cap...

Page 26: ...e adapter Gently pull the two wire terminals located inside the 7 flue collar at the top of the appliance out approximately 8 Bring the wires through the lower hole in the adapter and out the spill sw...

Page 27: ...to the terminal block 4 3 5 6 Attach the black on off switch wire with the 3 16 tab to the other side of the terminal block Connect the remaining wires 1 black 1 white with 1 4 connectors to TP TH and...

Page 28: ...TION SOURCES SUCH AS SPARKS OR OPEN FLAMES SUPPORT GAS CONTROL WHEN ATTACHING GAS SUPPLY PIPE TO PREVENT DAMAGING GAS LINE ALWAYS LIGHT THE PILOT WHETHER FOR THE FIRST TIME OR IF THE GAS SUPPLY HAS RU...

Page 29: ...not damage the door First open the valve control door Next open both side doors fully Pull the latch handles towards you and release each catch The door may now be safely opened To close the door rep...

Page 30: ...Y NOT FUNCTION PROPERLY AND DELAYED IGNITION MAY OCCUR THE LOGS ARE FRAGILE AND SHOULD BE HANDLED WITH CARE 76 1A 5 2 1 Place the 2 piece charcoal ember strip along the edge of the firebox 5 2 2 Place...

Page 31: ...e the backing of the logo supplied and centre over the logo installation holes as indicated 5 4 TRIVET INSTALLATION Insert the trivet into the space on the appliance top Line up the holes in the brack...

Page 32: ...ot burner to be lit until the thermo couple has cooled Allow approximately 60 seconds for the thermocouple to cool When lighting and re lighting the gas knob cannot be turned from pilot to off unless...

Page 33: ...in temperature and shuts down the gas valve in the event of a severe downdraft of air or a blocked or disconnected vent It acts as a safety shut off to prevent a build up of carbon monoxide or an expl...

Page 34: ...KING PRESSURE READINGS TIGHTEN SCREWS FIRMLY TO SEAL DO NOT OVER TORQUE LEAK TEST 39 3 P I P I L O T N O L O T HI L O F F O A B PILOT SCREW PILOT BURNER THERMOCOUPLE THERMOPILE 7 2 VENTURI ADJUSTMENT...

Page 35: ...see that all burner ports are burning Clean out any of the ports which may not be burning or are not burning properly 4 Check to see that the pilot flame is large enough to engulf the flame sensor and...

Page 36: ...ment blower tighten the screws without distorting the rubber grommets Replace the bracket blower assembly in the appliance 8 1 6 Reconnect the two wires Hold the replacement gasket in place and reatta...

Page 37: ...quipped with plated parts you must clean fingerprints or other marks from the plated surfaces before operating the appliance for the first time Use a glass cleaner or vinegar and towel to clean If not...

Page 38: ...EPLACE ONLY WITH A FAST ACTING THERMOCOUPLE SUPPLIED BY WOLF STEEL LTD WARNING COMMON COMPONENTS REF NO APPLIANCE DESCRIPTION 1 W725 0042 SIT VALVE NG 1 W725 0043 SIT VALVE LP 2 W100 0046 TURBO REAR B...

Page 39: ...ION 39 W500 0111 COMBUSTION AIR COVER PLATE 40 W290 0033 COMBUSTION AIR GASKET 41 W380 0002 VARIABLE SPEED SWITCH KNOB 42 KB 35 VARIABLE SPEED SWITCH GS50 COMPONENTS REF NO APPLIANCE DESCRIPTION 43 GS...

Page 40: ...7 INNER OUTER SLEEVE 59 W010 0567 ROOF SUPPORT 60 W263 0054 ROOF FLASHING 61 W170 0063 STORM COLLAR GD111 8 12 TO 12 12 PITCH 57 W670 0006 AIR TERMINAL 58 W490 0073 4 7 INNER OUTER SLEEVE 59 W010 056...

Page 41: ...41 W415 0098 E 06 28 10 60 57 58 61 59 14 42 9 8 7 6 48 20 17 16 49 53 55 50 52 47 43 5 4 13 34 26 23 25 27 30 39 11 1 2 3 15 28 56 52 52 29 1 45 46 66 18 19 21 35...

Page 42: ...y Loosen and tighten thermocouple Clean thermocouple and valve connection Replace thermocouple Replace valve Faulty valve Replace Pilot burning no gas to main burner gas knob is on HI wall switch ther...

Page 43: ...ames are very aggressive Door is ajar Ensure the mechanical means of securing the door is providing a tight seal Carbon is being deposited on glass logs or combustion chamber surfaces Air shutter has...

Page 44: ...and front burner to low When blower turns on re adjust burners Door sticking Dirt dust adheres to the hinges is heated and burns causing sticking Lift door from its hinges Lubricate with high temp dr...

Page 45: ...of NAPOLEON with respect to the NAPOLEON gas heater and any other warranties expressed or implied with respect to this product its components or accessories are excluded NAPOLEON neither assumes nor a...

Page 46: ...46 W415 0098 E 06 28 10 12 0 SERVICE HISTORY 43 1...

Page 47: ...47 W415 0098 E 06 28 10 44 1 13 0 NOTES...

Page 48: ...48 W415 0098 E 06 28 10 44 1...

Reviews: