background image

6

2.  Getting Started


2.1 Inserting Memory Card


   With the Car DVR turned off and the screen facing towards you insert the memory card with the text on the Micro SD card facing away 

from you. Push the memory card in until a click is heard.

Note:


1.  

Do not remove or insert the memory card while the Car DVR is turned on as this may 
damage the memory card or corrupt the memory cards stored data.


2. 

Please use a Class 6 or higher rated micro SD card with a maximum capacity of 32GB.


3. 

Please format the Micro SD card before the initial use.


4.  

When removing the memory card, be careful as the card may eject quickly. 


To remove the memory card


  Ensure that the Car DVR is powered off, push the memory card until a click is heard and release the card to eject.


  2.2  Installing the Car DVR

 1.

  Remove the protective stickers from the Car DVR and the Suction Mount.


2.

  Slot the mount bracket into the socket on the top of the Car DVR and with the screen facing you, slide the bracket from front to 

back until the bracket locks in place.


3.

  With the suction mount tab in the up position attach the suction cup to the windscreen.

 4.

  Press the mount base firmly against the windscreen and switch the suction mount tab to the down position.

2.2.1 Adjust the angle of the Car DVR


1.  

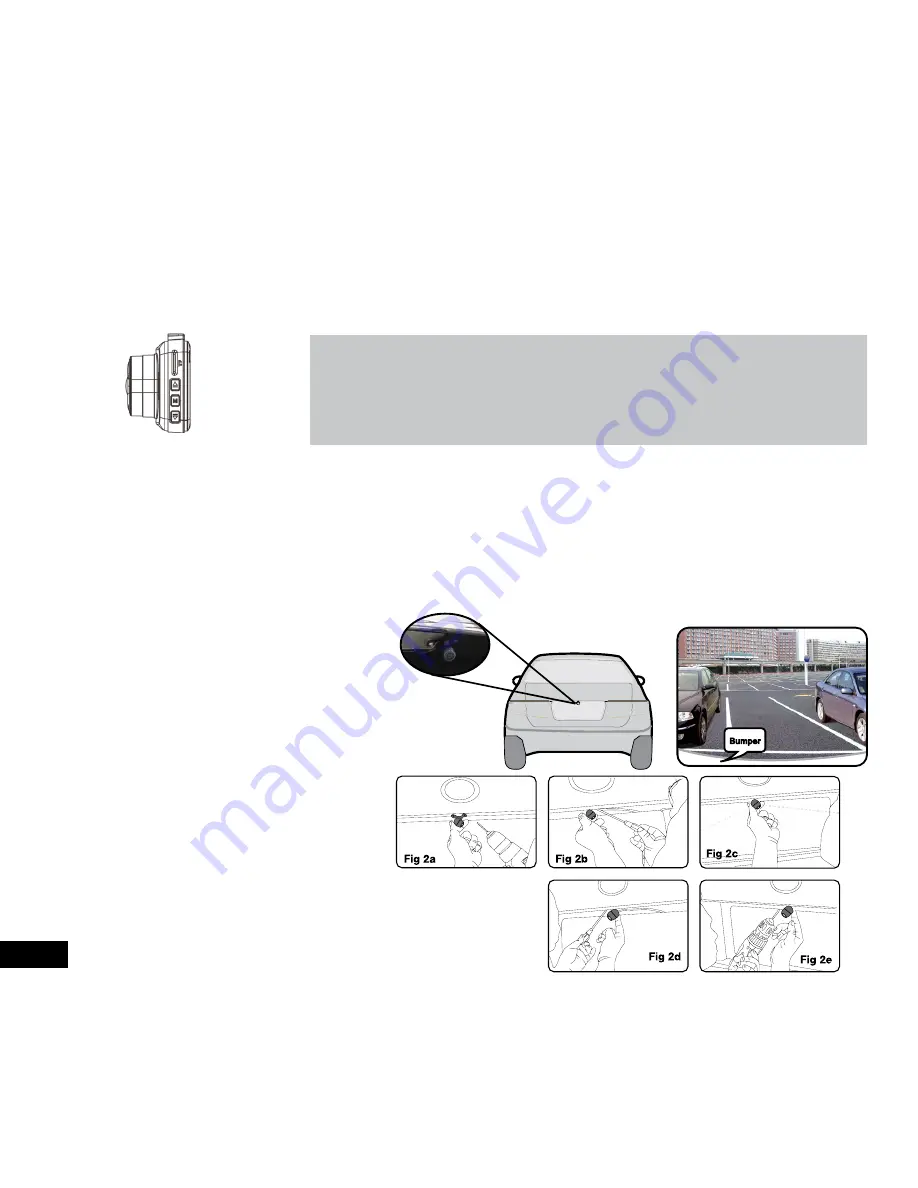
Select a flat and centred location near the 
number plate lamp at the rear of the vehicle to 
mount camera.

   IMPORTANT: 

When selecting this location, it is 

highly recommended that the image transmitted 
by the camera show the rear bumper and area 
behind the vehicle.

2.

  Attach tape to the bracket of the camera, and 

drill a small hole for the first screw. 

(Refer to 

Fig 2a)

3.

  Use a screw driver to fix the first screw, but 

don’t tighten it yet. 

(Refer to Fig 2b)

4.

  Insert camera wire through newly drilled hole 

and mount securely in place. 

(Refer to Fig 2c)

5.

  Mark the position suitable for the second screw and drill a small hole for 

it. 

(Refer to Fig 2d)

6.

 Fix the second screw and tighten both screws. 

(Refer to Fig 2e)

Suggested location 

to mount camera

Summary of Contents for NCP-DVRT1

Page 1: ...USER MANUAL FULL HD DUAL DASH CAM DVR WITH REVERSE CAMERA REVERSE MONITOR NCP DVRT1...

Page 2: ...he Car DVR On Off 7 2 3 1 Auto Power On Off 7 2 3 2 Manual Power On Off and Reset 7 2 3 2 1 Manual Power On 7 2 3 2 2 Power Off 7 2 3 2 3 Reset the device 7 2 4 Playing back Video on PC 7 2 5 Initial...

Page 3: ...ite Balance 11 2 7 6 Auto Record 11 2 7 7 Record Audio 11 2 7 8 Park Mode 12 2 7 9 Set Date Time 12 2 8 0 Language 12 2 8 1 Date Stamp 13 2 8 2 Format 13 2 8 3 Default Setting 13 3 Settings Menu 14 Wa...

Page 4: ...ded charger Improper charging of the Car DVR may result in failure of the internal battery Never dismantle the Car DVR or expose the internal battery Do not dispose of the Car DVR in fire Dispose of t...

Page 5: ...t www nanocamplus com au or www nanocamplus co nz 1 1 Features Front Camera recording full high definition 1080P footage Rear camera recording high definition VGA footage Rear View monitor engages whe...

Page 6: ...top of the Car DVR and with the screen facing you slide the bracket from front to back until the bracket locks in place 3 With the suction mount tab in the up position attach the suction cup to the wi...

Page 7: ...atically power up and start recording when the vehicle accessories are activated 2 3 2 Manual Power On Off and Reset 2 3 2 1 Manual Power On Hold the Power button on the top of the camera until the Na...

Page 8: ...Date allows you to stamp your footage with the date and time as a reference 1 Press the OK Button to stop the Car DVR from recording 2 Hold the Menu Button for 2 seconds to enter the Settings Menu 3...

Page 9: ...e automatically deleted when a new emergency recording file is created 2 6 3 Reverse Monitor The reverse monitor will display what is behind your vehicle in your blind spot when the reverse gear is se...

Page 10: ...the OK Button to stop the Car DVR from recording 2 Press the Menu Button to enter the Settings Menu 3 Use the and Buttons to navigate the Settings Menu and highlight the Motion Detection setting and...

Page 11: ...the Car DVR from recording 2 Press the Menu Button to enter the Settings Menu 3 Use the and Buttons to navigate the Settings Menu and highlight the Auto Record setting and press OK to select 4 Use the...

Page 12: ...ns to cycle the highlighted field then press the Mode button to confirm and highlight the next field 5 Once you have entered the current time and date press the Menu button to save and exit the Date s...

Page 13: ...r DVR from recording 2 Press the Menu Button to enter the Settings Menu 3 Use the and Buttons to navigate the Settings Menu and highlight the Format setting and press OK to select 4 Select Confirm and...

Page 14: ...aylight Fluorescent Cloudy Exposure 3 1 2 2 1 3 0 Auto Record On Off Screen Time out 10 Seconds 30 Seconds 20 Seconds Off Recording Audio On Off Park Mode On Off G Sensor High Mid Low Off Date Set Dat...

Page 15: ...y is only valid where you have used the product in accordance with any recommendations or instructions provided by NanoCam Plus This warranty excludes defects resulting from alterations of the product...

Page 16: ...www nanocamplus com au www nanocamplus co nz NanoCam Plus 2017 v2...

Reviews: