background image

13

Connections

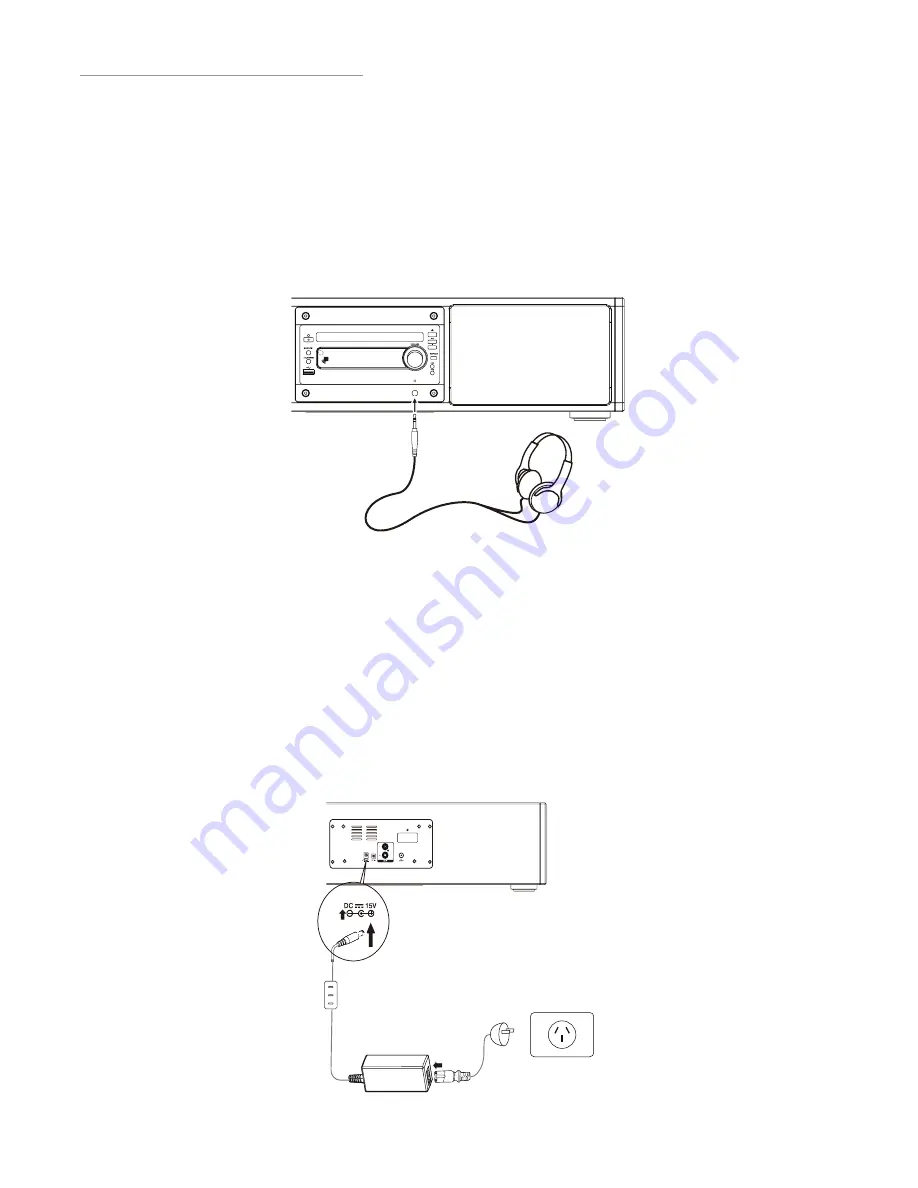
Connecting your Headphones to the unit

Connect a pair of headphones to the phone jack on the front of the unit.

No sound will come out of the unit speakers.

Connecting the AC Power Cable

Insert the AC adapter’s DC plug into the unit, then insert one side of the AC power cord into a 

wall outlet, and your unit is ready to operate.

Caution:

• Be sure to unplug the power plug from the outlet when going out or when the 

unit is not in use for an extended period of time.

Please Note:

Be sure to turn down the volume before connecting or putting on headphones.

Excessive sound pressure from earphones and headphones can cause hearing 

loss.

AC/DC Adapter

Power Cord

DC Plug

Wall Unit

Summary of Contents for ARIES 36

Page 1: ...ARIES 36 Thank you for purchasing this Nakamichi product Please take the time to register your product at www nakamichi com au register Quality Audio Since 1948 Owner s Manual CD MICRO SYSTEM...

Page 2: ...has been designed and manufactured to meet international standards but like any electrical equipment care must be taken if you are to obtain the best results and safety is to be assured Please take t...

Page 3: ...ct use of batteries may cause corrosion or battery leakage which could cause fire personal injury or damage to property Use only the type of batteries which are indicated in this manual Small batterie...

Page 4: ...part by an authorized service centre Protect the power cord from physical or mechanical abuse such as being twisted kinked pinched closed in a door or walked upon Pay particular attention to plugs wa...

Page 5: ...hey could damage the surface of the unit CAUTION Danger of explosion if battery is incorrectly replaced Replace only with the same or equivalent type To prevent possible hearing damage do not listen a...

Page 6: ...tting can cause leakage or in extreme cases fire or even an explosion Remove dead batteries from equipment and all batteries from equipment you know you are not going to use for a long time Otherwise...

Page 7: ...e Connecting the OPTICAL jack ECO Power Standby Features Powering ON OFF Switching the system to ECO Power Standby mode Setting the Clock Setting the Clock Manually Setting the Clock Automatically Dis...

Page 8: ...Playing NFC Near Field Communication enabled devices Playing an external device on Auxiliary Connection Setting the Daily on Timer Disc handling Troubleshooting Specifications Nakamichi Service Contac...

Page 9: ...7 What s Included Make sure all of the following contents are included Remote Control Battery Included AC Adaptor The Unit Owner s Manual FM Antenna Audio L R Cable x 1...

Page 10: ...ton Stop Button Tuning Down Button Loudness Button LOUDNESS USB Jack Remote Sensor LCD Display Lens Volume Control Knob Headphone Jack Next Button Preset Up Button Previous button Preset Down Button R...

Page 11: ...use Button Pairing PAIRING Album Up Button ALB Album Down Button ALB Mute Button MUTE Number Button 0 9 10 Open Close CD Tray Button USB Optical Button Bluetooth Function Button AUX Function Button AU...

Page 12: ...ect sunlight or near sources of excessive heat Do not use caustic cleaners e g porcelain stainless steel toilet or oven cleaner etc on the remote as it may cause damage 10 Batteries 1 Remove the insul...

Page 13: ...erating distance may vary according to the brightness of the room Please Note Make sure that there is no obstacle between the infrared remote sensor of the unit and remote control If you install the u...

Page 14: ...f reception is poor you can connect to an outside antenna Caution To avoid noise keep antenna away from the system the connecting cord and the AC power cord Connect the AUX input terminals on the rear...

Page 15: ...e unit then insert one side of the AC power cord into a wall outlet and your unit is ready to operate Caution Be sure to unplug the power plug from the outlet when going out or when the unit is not in...

Page 16: ...ble not supplied to the OPTICAL IN jack on the unit and the OPTICAL output jack on the other device e g Flat Panel TV Please Note In receiving OPTICAL signals the setting menu of TV or other connected...

Page 17: ...to ECO Power Standby mode Press and hold the standby button for 2 seconds or more to switch to ECO Power Standby or normal Standby The clock will not be displayed Red LED on Press the CLOCK button to...

Page 18: ...e mode the built in clock shows the time on the display by pressing the CLOCK button on your remote control Please Note To exit clock setting mode without storing press the stop button If no button is...

Page 19: ...e the bass sound effect at low volume It can also increase the bass sound effect at high volume but it will be relatively less when it is at high volume Press the loudness button LOUDNESS on your remo...

Page 20: ...ly after the stations are preset Repeatedly press the Preset buttons on the remote control or press the buttons on unit panel to select the desired preset number The band and frequency are displayed o...

Page 21: ...on is received the name of that station Programme Type Programme type identification signal E g News Rock Classical music Radio Text This displays a station description Frequency This shows the freque...

Page 22: ...umber Press the PROGRAM button to confirm the track number to be stored Repeat steps 3 4 to select and store all desired tracks Press the button to start programme play Press the button once to stop p...

Page 23: ...tions appear on the LCD display To repeat the same track the words TRK and REP will blink To repeat playing all tracks on a disc the words REP ALL will blink To play tracks randomly the word SHUF will...

Page 24: ...st MP3 WMA playback Press the DISPLAY button on the remote control ID3 information song title and artist will be displayed or NO ID3 if there is no ID3 information Press this button again Album track...

Page 25: ...Note USB connection is not compatible with all hard drive devices Insert one plug of the USB cable not supplied to the socket on the unit Insert the other plug of the USB cable to the USB output term...

Page 26: ...nt device e g Smartphone Press and hold the stop button for more than 2 seconds to clear pairing history Please Note The operational range between this unit and a Bluetooth device is approximately 10...

Page 27: ...e that your device is connected to this unit refer to page 12 for connection details 1 2 Press AUX button on your remote control to select the audio input your device has been connected to You can now...

Page 28: ...tton the volume indicator will blink Adjust volume with the VOL button Press the TIMER button the timer is set and activated and is displayed This unit can switch to standby mode automatically after a...

Page 29: ...ease place it back in its original case To avoid warping or damage do not stack discs Don t play discs which have scratches are warped or damaged in any way It may damage the unit Clean your discs usi...

Page 30: ...Unable to operate the remote control The path between the remote control and the sensor on the player is blocked The battery has lost it s charge Remove the obstruction Replace the battery Operations...

Page 31: ...devices pairing Supported codecs Receive Transmit Bluetooth Standard version 4 0 and EDR specification Bluetooth Standard Power Class 2 Approximately 10m 2 4 Ghz Band 2 4000 Ghz 2 4835 Ghz Advanced A...

Page 32: ...urs of Operation Monday Friday 9am to 5 00pm excluding Public Holidays Or visit the Nakamichi website anytime 24 7 and use the e warranty service to make a claim Australia Telephone 1300 565 197 Fax 0...

Page 33: ......

Page 34: ......

Page 35: ......

Page 36: ......

Reviews: