background image

7

DAC-V1 Installation and Connection

3 DAC-V1 Installation and Connection

Your DAC-V1 should be installed on a desk or equipment stand intended for the purpose. 
Ensure it is well ventilated, and do not stand it directly on top of another item of electronic 
equipment. It should be installed in its final location before connecting cables or switching 
on. The DAC-V1 has no standby mode and is intended to be left switched on.

Connecting the DAC-V1 to mains power and to a variety of audio peripherals and sources 
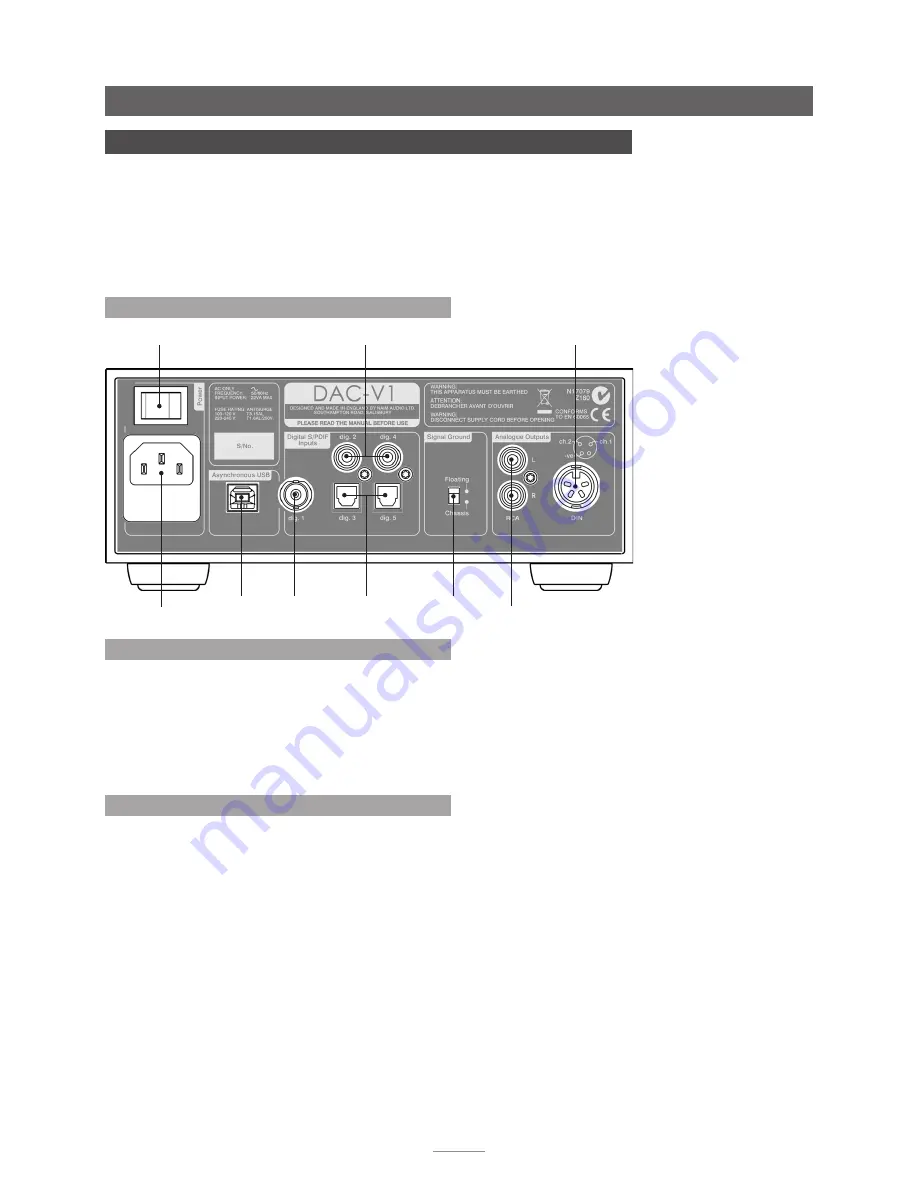
is described in the following paragraphs. Diagram 3.1 illustrates the DAC-V1 rear panel 
connection sockets.

3.1 DAC-V1 Rear Panel Connections

mains input 

and fuse

power 

switch 

analogue 

output (RCA)

analogue 

output (DIN)

input 1 

(BNC)

USB 

input

inputs 2 & 4 

(coaxial)

inputs 3 & 5 

(optical)

signal 

ground 

switch

3.2 Mains Power Connection

Check that the 

mains

 supply specified on the DAC-V1 

rear panel is appropriate for your territory. Connect the 
DAC-V1 to the mains using the supplied cable (or a 
Naim PowerLine) but do not switch it on until all other 
connections have been made and, if appropriate, the 
DAC-V1 Windows OS driver application has been installed 
on the USB connected computer (see Section 2).

3.3 Audio Inputs and Outputs

3.3.1 Audio Signal Inputs

The DAC-V1 provides one asynchronous USB digital input 
and five S/PDIF digital stereo inputs. Connection to the 
inputs is made via a variety of socket types:

Input Type


Socket


USB 

Asynchronous USB 

USB Type B 

dig. 1 

S/PDIF Digital  

Coaxial (BNC) 

dig. 2 

S/PDIF Digital  

Coaxial (RCA phono) 

dig. 3 

S/PDIF Digital 

Optical (TosLink) 

dig. 4 

S/PDIF Digital  

Coaxial (RCA phono)

dig. 5 

S/PDIF Digital 

Optical (TosLink)

Always use high quality interconnect cables to connect 
sources to DAC-V1 inputs.

For optimum audio performance the USB connection from 
the computer to the DAC-V1 should be direct rather than 
via any “hub” device. The USB cable used should be no 
longer than 3m. 

3.3.2 Audio Signal Outputs

The DAC-V1 provides both DIN and RCA phono analogue 
outputs for connection to a “downstream” amplifier. If 
the option is available on the pre or power amplifier, DIN 
socket connections should be used in preference to RCA 
phono sockets. The DIN and RCA phono socket options 
should not be connected or used simultaneously.

Always use high quality interconnect cables to connect to 
DAC-V1 outputs.

3.3.3 Headphone Output

The DAC-V1 incorporates a front panel 6.3mm stereo 
headphone socket. Inserting a headphone plug will mute 
the DAC-V1 signal outputs. Removing the headphone plug 
will restore the signal outputs.

Summary of Contents for DAC-V1

Page 1: ...R E F E R E N C E M A N U A L D A C V 1 D I G I T A L T O A N A L O G U E C O N V E R T E R P R E A M P L I F I E R E N G L I S H...

Page 2: ...tion and Connection 7 3 1 DAC V1 Rear Panel Connections 7 3 2 Mains Power Connection 7 3 3 Audio Inputs and Outputs 7 3 4 Signal Ground Switch 8 4 DAC V1 Operation 9 4 1 DAC V1 Front Panel 9 4 2 DAC V...

Page 3: ...eam power amplifier or preamplifier Section 2 of this manual covers the configuration of Windows and OSX audio playback applications to ensure that audio quality via the DAC V1 USB input is optimised...

Page 4: ...ut setup menu see Section 5 2 2 If headphones are used with the DAC V1 while Fixed Output is selected volume control will be restored while the headphones are plugged in 1 5 DAC V1 BitPerfect Analysis...

Page 5: ...ality and superior audio performance This section of the manual covers selection of a DAC V1 as the default USB connected sound output device on Windows and OS X computers It then continues to describ...

Page 6: ...les to be played Select 24 bit 44100Hz as the default Also ensure that Allow application to take control of this device is selected Click on OK to confirm the selected options Note The Windows 8 Sound...

Page 7: ...base Note The BitPerfect audio playback application is available from the Apple App Store Note To configure Audio MIDI Setup to have computer alert audio played through the DAC V1 ctrl click or left...

Page 8: ...vide enhanced functionality and superior audio performance Configuration of many of these for use with the DAC V1 is covered in the DAC V1 section of the Naim Knowledge Base at www naimaudio com knowl...

Page 9: ...onnected computer see Section 2 3 3 Audio Inputs and Outputs 3 3 1 Audio Signal Inputs The DAC V1 provides one asynchronous USB digital input and five S PDIF digital stereo inputs Connection to the in...

Page 10: ...rs Contact your retailer distributor or Naim for advice if necessary Note Connected in the context above means an analogue audio signal cable that includes an earth connection The DAC V1 digital input...

Page 11: ...andset More advanced DAC V1 operation and configuration requires navigation through a menu based user interface using the remote handset setup and navigation keys 4 1 DAC V1 Front Panel 4 2 DAC V1 Rem...

Page 12: ...e of the input signal Volume control adjustments are also temporarily displayed In setup mode accessed by pressing the handset setup key the DAC V1 front panel display shows the four top level setup m...

Page 13: ...use the handset navigation 3456 keys To select menu items use the handset play pause key To leave setup mode press the handset setup key DAC V1 volume and input selection controls will continue to op...

Page 14: ...ed to a DAC V1 it may ask for specific key stokes to be sent to identify the keyboard layout The DAC V1 keyboard setup menu enables the appropriate key strokes to be sent Use the handset 5 and 6 and p...

Page 15: ...rol Panel or OS X Audio MIDI Setup application matches the sample rate and bit depth of the BitPerfect test file to be used See Sections 2 1 2 2 1 3 or 2 2 2 Note If iTunes or Window Media Player are...

Page 16: ...The DAC V1 will automatically identify the WAV file as a firmware update and enter its firmware update mode Note The DAC V1 will automatically mute its outputs while a firmware update is underway Do...

Page 17: ...et 5 x S PDIF 1 x BNC 2 x RCA Phono 2 x TosLink optical Input Format Support USB 44 1kHz to 384kHz 16 to 24 bit S PDIF 32kHz to 192kHz up to 24 bit Mains Power 100V 115V or 230V 50 60Hz Power Consumpt...

Reviews: