


E12
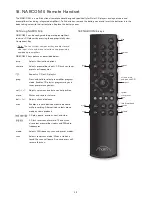
17. R-com Remote Handset
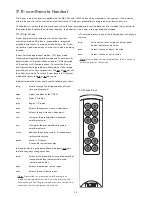
The R-com remote handset is supplied with the NAC 552 and CD555 and can be purchased as an accessory. It offers quick
and intuitive control of the most often used functions of CD players, preamplifiers, integrated amplifiers and tuners.
To fit batteries, remove the bottom end cover using the tool provided and insert the batteries into the body taking care with
their orientation. Replace the end cover. Remove the batteries if the R-com is to be packed and shipped.
17.2 R-com Keys
play
stop
prev
next
vol +
pause
vol -
mute
open
tun
disp
pre
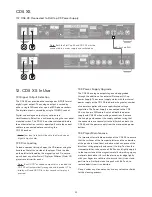
17.1 Using R-com
R-com keys primarily provide control of the functions
most often used on CD players, preamplifiers, integrated
amplifiers and tuners. In order to extend battery life, R-com
will enter a ‘sleep’ mode when unused. It will ‘wake’ on being
touched.
R-com has three operational modes - CD Player mode,
Preamplifier/Integrated amplifier mode and Tuner mode. Its
default mode is CD player. When awake in CD Player mode,
all R-com keys will illuminate green. To switch the R-com
into Preamplifier/Integrated amplifier mode or Tuner mode
press the pre or tun keys respectively. The pre or tun key will
then illuminate white. To switch R-com back into CD player
mode either press the pre or tun key again.
In default mode the R-com keys have the following functions:
disp:
Scrolls through the display options of track,
time and display off.
open:
Opens the door on the CD555.
stop:
Stops CD replay.
play:
Begins CD replay.
prev:
Selects the previous track or index point.
next:
Selects the next track or index point.
vol +:
Increases the preamplifier/integrated
amplifier volume.
vol –:
Decreases the preamplifier/integrated
amplifier volume.
mute:
Reduces the volume to zero. A second press
restores the volume.
pause:
Pauses CD replay.
A second press restores play.
In Preamplifier/Integrated amplifier mode (press pre key),
the following keys change function:
disp:
Switches the preamplifier/integrated amplifier
front panel button indicators amd knob
indicators off and on.
prev:
Selects the previous source input.
next:
Selects the next source input.
Note: Preamplifier or integrated amplifier program
mode can be selected from the R-com by pressing and
holding the pre key. Program mode functions can then be
accessed from the equipment front panel.
In Tuner mode (press tun key) the following keys will change
function:
disp:
Switches the tuner display and front panel
button indicators off and on.
prev:
Selects the tuner “down” function.
next:
Selects the tuner “up” function.
Note: Tuner modes can be selected from the R-com by an
extended press of the tun key.


